Girl with a Pearl Earring Crochet Keychain

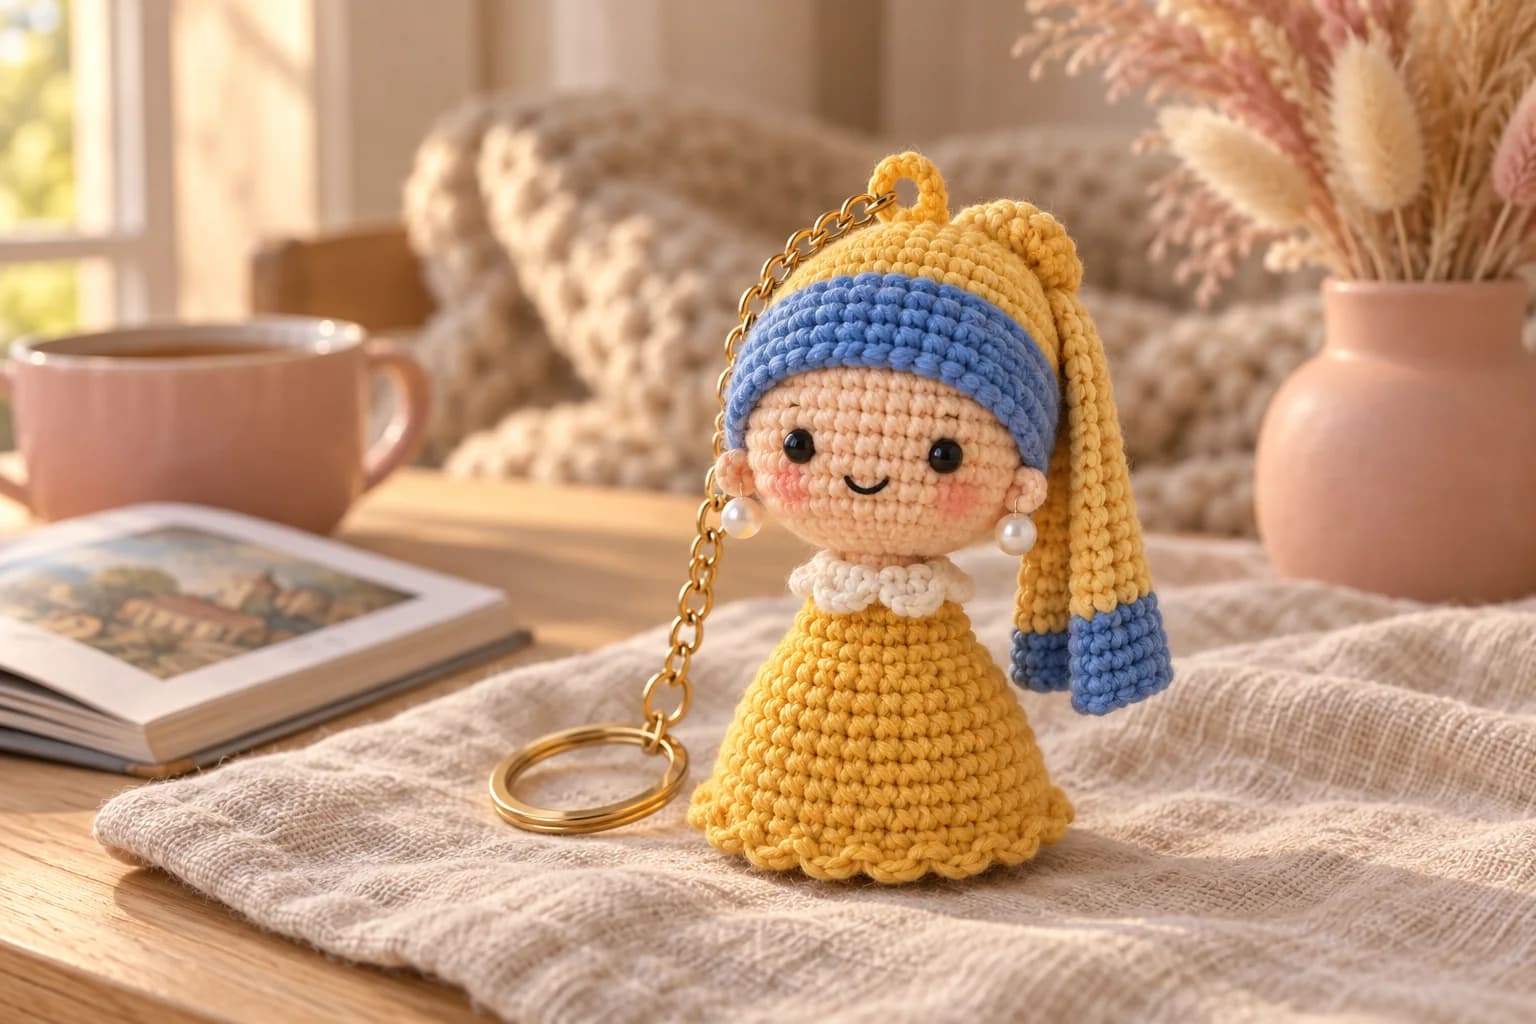
This free crochet doll keychain is a tiny tribute to Vermeer's Girl with a Pearl Earring. She wears the famous blue and yellow turban, two pearl earrings and a sunny yellow dress with a white collar. The head, neck and dress are one piece, worked from the top of the head down. You'll need DK cotton scraps in five colors, about 90 yards in all, a 2.5 mm hook and 5 to 6 hours.
Key Takeaways
- Head, neck and dress are one piece, so there's no head to sew on.
- The turban is four small pieces: a cap, a ribbed band, a bun and a hanging tail.
- The collar and the hem ruffle are worked into the front loops that you leave free on purpose.
- About 90 yd (82 m) of DK cotton, a pair of 8 mm pearl beads and a gold key ring.
Why I love this pearl earring doll
I've always loved that painting: the turn of the head, the blue turban, the single pearl. This keychain turns it into something you can carry every day, and it's the cutest thing hanging from a bag. It makes a lovely gift for art lovers, teachers and museum fans.
The construction keeps it simple. You crochet the head, close it down to a neck, and keep going straight into the dress. The dress grows into a little bell, and a flat base lets her stand on a shelf too.
The turban is where she becomes herself. The blue band has soft ridges, and the yellow tail falls behind her ear, just like in the painting. Doesn't she look like she's about to turn and smile?
Skill level. Easy-intermediate. You need a magic ring, sc, inc and dec in the round, working in back and front loops, a few rows, and some sewing and embroidery.
What you'll need
Yarn: DK #3 cotton, such as Paintbox Yarns Cotton DK. Cotton gives crisp, tight stitches that keep their shape on a keychain.
| Color | Used for | Amount |
|---|---|---|
| Sunflower yellow | Dress, cap, bun, tail, loop | about 50 yd |
| Light peach | Head, neck, ears | about 25 yd |
| Cornflower blue | Turban band, end of the tail | about 12 yd |
| White | Collar | about 3 yd |
| Black and soft pink | Smile and cheeks (embroidery) | a few yards |
I worked those amounts out from the stitch counts: the head and dress take about 1,030 single crochet, at about 1.6 in of yarn each, plus the small pieces and tails.
Hook and notions
- 2.5 mm (US B/1 or C/2) hook.
- Two 5 mm black safety eyes, or black yarn to embroider them.
- Two 8 mm white pearl beads, and white sewing thread with a fine needle.
- Polyester fiberfill.
- A gold key ring (25 mm split ring) with a short chain, or a lobster clasp.
- A tapestry needle, a long doll needle (about 4 in), stitch markers and scissors.
- Optional: a little pink blush or pink yarn for the cheeks. Skip it if you don't have any.
Gauge and finished size
Gauge: tight enough that the stuffing doesn't show between the stitches. With DK cotton on a 2.5 mm hook, that's about 6 sc per inch.
Finished doll: about 4½ in (11.5 cm) tall and 2¼ in (5.5 cm) wide at the hem. The loop and key ring add about 2 in.
Abbreviations (US crochet terms)
- MR = magic ring
- ch = chain
- sl st = slip stitch
- sc = single crochet
- hdc = half double crochet
- dc = double crochet
- inc = 2 sc in the same st
- dec = single crochet two together (I use the invisible decrease through the front loops)
- BLO / FLO = back loop only / front loop only
- st(s) = stitch(es)
- rnd(s) = round(s)
Work in continuous rounds, without joining, unless the pattern says otherwise. Move a stitch marker up at the start of every round.
The pattern — step by step
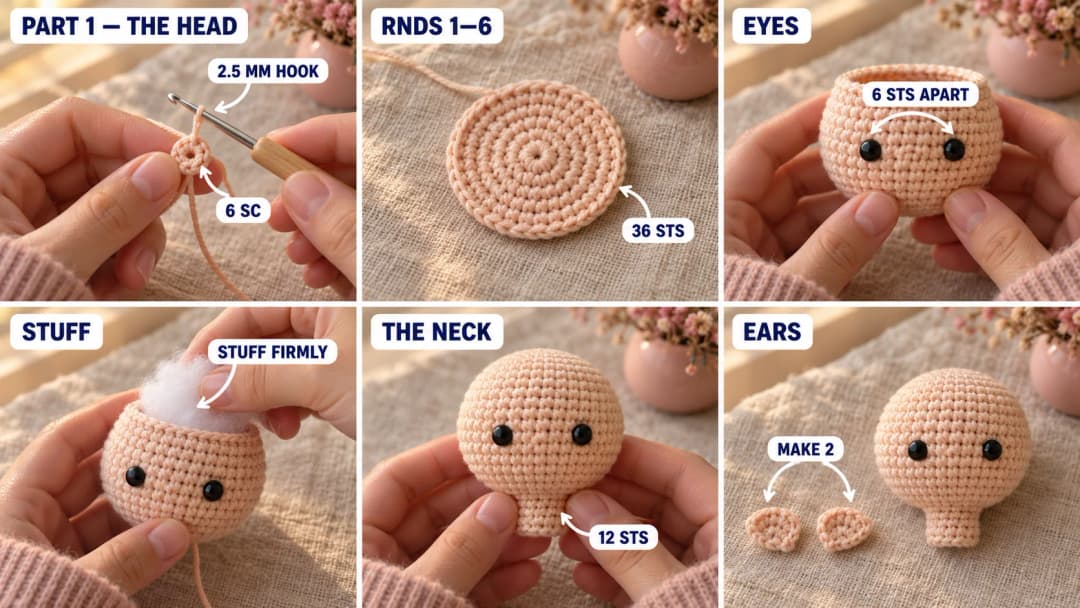
Part 1 — The head and neck
The magic ring is the top of the head. The head closes down to a narrow neck at the bottom, and the dress grows from there.
With light peach:
- Rnd 1: MR, 6 sc in the ring. (6)
- Rnd 2: Inc × 6. (12)
- Rnd 3: (Sc, inc) × 6. (18)
- Rnd 4: (2 sc, inc) × 6. (24)
- Rnd 5: (3 sc, inc) × 6. (30)
- Rnd 6: (4 sc, inc) × 6. (36)
- Rnds 7–13: Sc in each st around. (36)
Eyes. Insert the safety eyes between Rnds 10 and 11, with 6 sts between them. The end of the round should be at the back. Fix the backs on now.
- Rnd 14: (4 sc, dec) × 6. (30)
- Rnd 15: (3 sc, dec) × 6. (24)
- Rnd 16: (2 sc, dec) × 6. (18)
Stuff the head firmly, shaping it into a round ball.
- Rnd 17: (Sc, dec) × 6. (12)
- Rnd 18 (neck): Sc in each st around. (12)
Push a little more stuffing into the neck. Don't fasten off: you'll change color in the next round.
Ears (light peach, make 2). MR, 5 sc in the ring. Pull the ring closed but don't join, so the ear stays a little half-circle. Fasten off, leaving a 6-in tail.
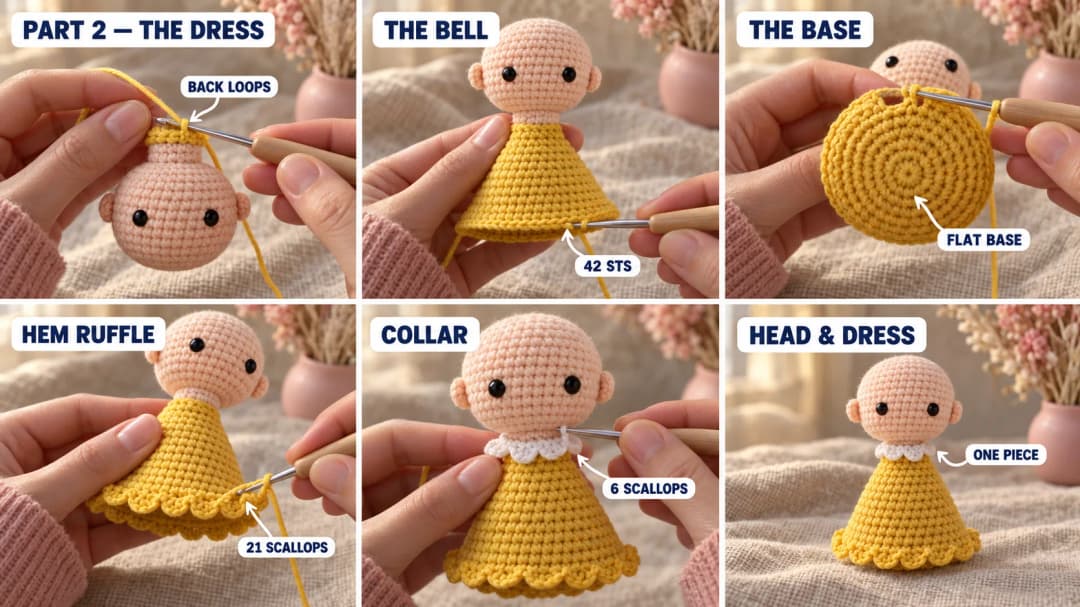
Part 2 — The dress, collar and hem
Change to yellow on the last yarn-over of Rnd 18. The dress grows down from the neck like a bell.
- Rnd 19 (BLO): Working in the back loops only: (sc, inc) × 6. (18) The front loops of Rnd 18 stay free for the collar.
- Rnd 20: (2 sc, inc) × 6. (24)
- Rnd 21: Sc in each st around. (24)
- Rnd 22: (3 sc, inc) × 6. (30)
- Rnds 23–24: Sc in each st around. (30)
- Rnd 25: (4 sc, inc) × 6. (36)
- Rnds 26–27: Sc in each st around. (36)
- Rnd 28: (5 sc, inc) × 6. (42)
- Rnds 29–31: Sc in each st around. (42)
- Rnd 32 (BLO): Sc in the back loop only of each st. (42) This makes the bottom edge, and the front loops stay free for the hem ruffle.
Stuff the dress as you go, firmly at the top and a little softer at the bottom.
Base:
- Rnd 33: (5 sc, dec) × 6. (36)
- Rnd 34: (4 sc, dec) × 6. (30)
- Rnd 35: (3 sc, dec) × 6. (24)
- Rnd 36: (2 sc, dec) × 6. (18)
- Rnd 37: (Sc, dec) × 6. (12)
Top up the stuffing so the base stays flat.
- Rnd 38: Dec × 6. (6)
Fasten off, thread the tail through the front loops of the last 6 sts, pull it closed and weave it in.
Hem ruffle (yellow). Turn the doll upside down. Join yellow in any free front loop of Rnd 32. Sl st in the next front loop, (hdc, dc, hdc) in the next front loop. Repeat from * around. Join to the first sl st and fasten off. (21 little scallops)
Collar (white). Join white in any free front loop of Rnd 18, at the neck. Sl st in the next front loop, 3 hdc in the next front loop. Repeat from * around. Join to the first sl st and fasten off. (6 scallops) The collar sits like a little wavy ruff under the chin.
Part 3 — The turban
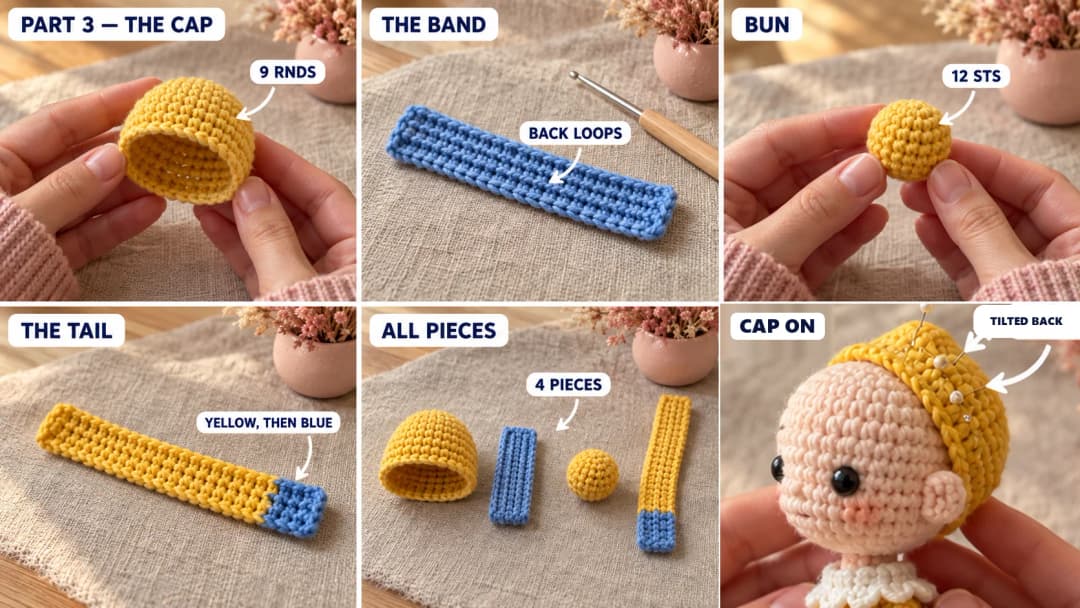
Cap (yellow).
- Rnds 1–6: Work as Rnds 1–6 of the head. (36)
- Rnds 7–9: Sc in each st around. (36)
Sl st in the next st and fasten off, leaving a 15-in tail. Don't stuff it: it's a little dome that fits over the back of the head.
Turban band (blue). Ch 41.
- Row 1: Sc in the 2nd ch from the hook and in each ch across. (40)
- Rows 2–4: Ch 1, turn. Sc in the back loop only of each st across. (40)
Fasten off, leaving a 15-in tail. The back loops make soft ridges along the band, like folds of fabric.
Bun (yellow).
- Rnd 1: MR, 6 sc in the ring. (6)
- Rnd 2: Inc × 6. (12)
- Rnds 3–4: Sc in each st around. (12)
- Rnd 5: Dec × 6. (6)
Stuff it lightly. Fasten off, leaving an 8-in tail, and pull the last round closed.
Hanging tail (yellow, then blue). With yellow, ch 7.
- Row 1: Sc in the 2nd ch from the hook and in each ch across. (6)
- Rows 2–12: Ch 1, turn. Sc in each st across. (6) Change to blue on the last yarn-over of Row 12.
- Rows 13–15 (blue): Ch 1, turn. Sc in each st across. (6)
Fasten off and weave in the blue end. Leave the yellow starting tail long (about 8 in) for sewing. The tail is about 2¾ in long.
Part 4 — Face, turban, pearls and loop
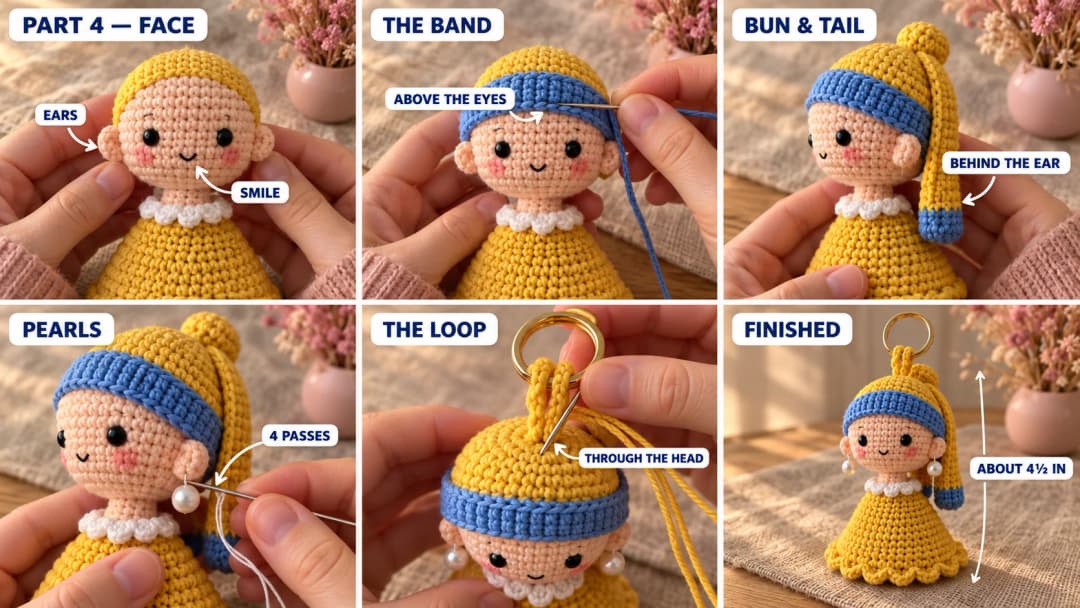
- Ears. Sew one ear on each side of the head, between Rnds 10 and 13, about 4 sts behind each eye. The flat side faces forward.
- Smile (black). Stitch a tiny curve, 2 sts wide, 2 rounds below the eyes, centered between them.
- Cheeks. Brush a little pink blush under each eye, or embroider 2 short pink stitches on each side.
- Cap. Set the cap on the head, tilted toward the back, so its front edge sits on about Rnd 6 over the forehead and its back edge reaches the nape of the neck. Sew all around its edge with the yellow tail.
- Band. Wrap the blue band around the head over the front edge of the cap, a little higher at the back. It covers the forehead down to about Rnd 7, just above the eyes. Overlap the ends at the back, a little to one side, and sew the band down along both long edges.
- Bun and tail. Sew the bun on the top back of the cap. Sew the top end of the hanging tail just under the bun, on the side where it will hang behind one ear. Let it fall down over the back of the shoulder. Tack it once, halfway down, so it stays in place.
- Pearls. Thread the sewing needle with doubled white thread. Go through the lower edge of one ear, through a pearl bead and back through the ear, at least 4 times. Knot it inside the head and hide the ends. Repeat on the other ear.
- Loop. Hold two strands of yellow together. Leave 8-in (20 cm) tails, ch 8, and fasten off, leaving another pair of 8-in tails. Slide the double chain onto the key ring's chain or jump ring and fold it in half: you have 4 tails together.
- Anchor the loop. Thread all 4 tails on the doll needle. Push it down through the top center of the cap (next to the bun), straight through the head, and out at the back of the neck, just under the collar. Pull until the loop sits snugly on top of the cap.
- Knot it. Tie the tails together in a tight double knot against the neck. Take each tail back into the dress, bring it out at the side and trim it. Add 3 or 4 stitches through the cap and the chain to lock the loop in place.
Give the loop a few firm tugs. It shouldn't move at all.
Safety and wear. This keychain has small pearl beads, safety eyes and a metal key ring, so it isn't a toy and isn't safe for children under 3. For a child, embroider the eyes, leave out the pearls or make tiny white crochet balls instead, and swap the key ring for a sewn-on loop. To clean it, spot wash with a damp cloth and mild soap, and let it air dry.
Make it yours — quick variations
| Variation | Change from base pattern |
|---|---|
| Bag charm | Swap the key ring for a lobster clasp so she clips onto a bag strap. |
| Shelf doll | Skip the loop and stand her on her flat base, next to your books. |
| Pearl-free | Make two tiny white balls (MR, 5 sc, pull closed) instead of the beads. |
| Hair under the turban | Embroider a few brown straight stitches along the forehead, under the band. |
| Art lover's set | Pair her with another doll in your favorite painting's colors. |
Troubleshooting the three things that go wrong
The head wobbles on the neck
The neck isn't stuffed firmly enough. Push extra stuffing into the neck before you start the dress, and stuff the top of the dress firmly too. The loop tails running through the neck also hold the head straight.
The doll won't stand
The base isn't flat. Stuff the bottom of the dress more softly, and press the base flat with your thumb before you close it. A small bag of plastic pellets in the bottom helps, but only for a decoration, never for a toy.
The turban looks lumpy
The band is sewn too tightly in places. Pin it all the way around first, then sew along both edges with even stitches. Don't pull the yarn tight.
Frequently asked questions
How long does this doll keychain take? About 5 to 6 hours. The head and dress take about 3 hours. The turban pieces take about an hour, and the face, pearls and sewing take another hour or so.
How much yarn do I need? About 90 yd (82 m) of DK cotton in all: about 50 yd of yellow, 25 yd of peach, 12 yd of blue and a few yards of white, black and pink. Scraps work well.
Can I use worsted yarn? Yes. With worsted yarn and a 3.5 mm hook, she grows to about 5½ in tall. Use 6 mm eyes and 10 mm pearls so she keeps the same proportions.
Is the painting okay to use? Yes. Vermeer painted Girl with a Pearl Earring around 1665, and the painting is in the public domain. This pattern is my own crochet design inspired by it.
Can I sell keychains made from this pattern? Yes, you're welcome to sell finished keychains made from this free pattern at markets, on Etsy or as gifts. Please credit "Pattern by Wavode" in your listing and link back to this page. What you can't do is republish this write-up or my photos as your own pattern.
Related patterns on Wavode
- Panda keychain: a round little panda on a key ring.
- Snowman keychain: a mini snowman with a top hat and scarf.
- Crochet owl keychain: a tiny owl to hang on your bag.
- Crochet mushroom keychain: a kawaii red-cap mushroom.
Made a pearl earring doll? Tag #wavodecrochet on Pinterest. I re-pin every finished make and credit the maker.
Pattern by Clara Hartwell for Wavode. Questions? Email me at support@wavode.com.