Soft Baby Dolphin Amigurumi

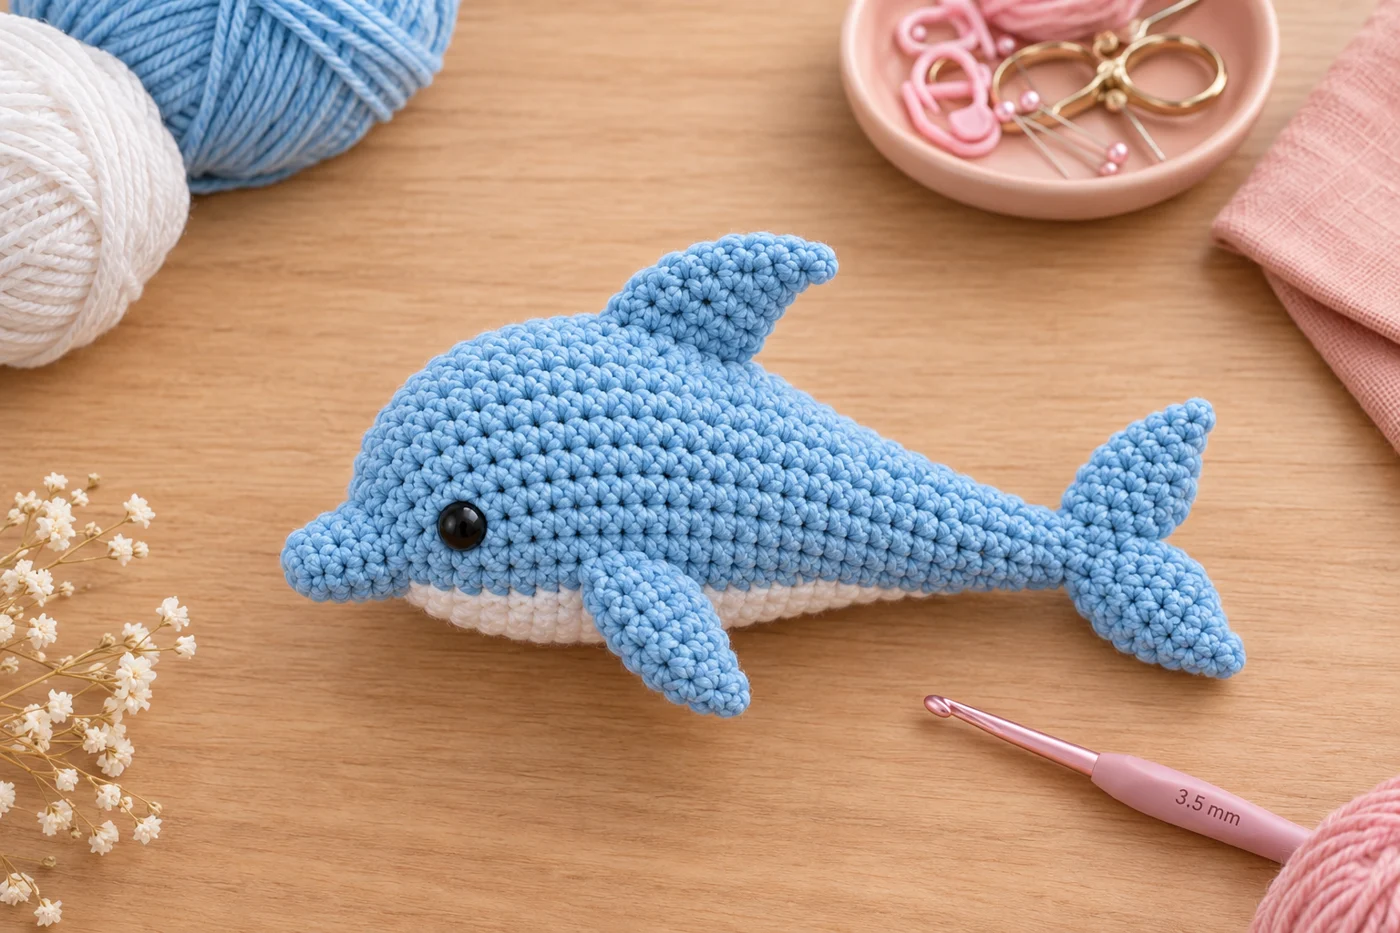
This free baby dolphin amigurumi pattern makes a soft, 10-inch sky-blue plush with a white belly, a swept-back dorsal fin and a wide V-shaped tail. The body is worked in one piece from the tip of the nose to the tail, in single crochet only. You'll need about 130 yards of blue and 20 yards of white worsted yarn and a 3.5 mm hook. It takes 5 to 6 hours.
Key Takeaways
- One-piece body, nose to tail. The beak, the round head and the tapered tail all come from simple increases and decreases.
- Only single crochet. The fins and tail are small shapes you sew on at the end.
- The white belly is a sewn-on oval. No color changes in the round, and it hides the round-start jog.
- About 150 yd (137 m) of worsted #4 in total.
Why I love this little dolphin
It's the plush I make when someone asks for "something ocean." It's big enough to hug, small enough to finish in a weekend, and it has that happy, round-headed baby dolphin look. I love giving them as baby-shower gifts with embroidered eyes, and one lives on my desk with shiny safety eyes.
It's also a friendly step up from your first amigurumi. The body is one long piece that grows from a tiny beak into a round head, then slowly narrows into the tail. There's no joining, no color changes in the round and no tricky stitches. What makes it look like a dolphin is the fins, and they're small and quick.
Why a separate belly? Working white into the rounds would mean carrying two colors, which is fiddly for a beginner. A sewn-on oval gives the same clean white underside, and it covers the little "step" every spiral makes.
Skill level. Beginner. You'll need a magic ring, single crochet, increases and decreases in the round, a foundation-chain oval and a whipstitch seam. I explain each one as it comes up.
If you like soft nursery animals, my Pippa the little elephant uses the same yarn and hook. And for another water friend, try Piko the pond turtle.
What you'll need
Yarn (worsted #4)
- Sky blue for the body, fins and tail: about 130 yd (119 m). Plan on 115–140 yd, depending on your tension.
- White for the belly: about 20 yd (18 m).
- A soft, smooth yarn shows the stitches best. Lion Brand 24/7 Cotton or Paintbox Yarns Cotton Aran (both worsted #4) give a crisp look like the photos. Red Heart Soft (also worsted #4) makes a squishier, washable acrylic dolphin.
Hook and notions
- 3.5 mm (US E-4) hook. That's small for worsted yarn, on purpose, so the fabric is tight.
- Two 8 mm black safety eyes (or black embroidery floss for a child-safe version, see below).
- About 1.5 oz (40 g) of fiberfill stuffing.
- 1 stitch marker.
- A tapestry needle, pins and scissors.
Gauge and finished size
Gauge isn't critical for a plush. What matters is tension tight enough that the stuffing doesn't show through. If you can see white fiberfill between the blue stitches, go down to a 3.25 mm or 3 mm hook.
Finished size: about 10 in (25 cm) from the nose to the tail tips, and 3 in (7.5 cm) tall at the head, plus about 1.5 in for the dorsal fin. A thicker yarn makes a slightly bigger dolphin, and that's fine.
Abbreviations (US crochet terms)
- MR = magic ring
- ch = chain
- sc = single crochet
- inc = 2 sc in the same st
- dec = invisible decrease (insert the hook into the front loops of the next 2 sts, yarn over and pull through both, yarn over and pull through 2)
- st(s) = stitch(es)
- Rnd = round
- ( ) x6 = repeat what's in the brackets 6 times
UK crocheters: this pattern uses US terms. US single crochet = UK double crochet.
How the dolphin is built
Here's the plan in plain words:
- Body (blue). The magic ring is the tip of the beak. Rnds 1–5 make the short beak. Rnds 6–11 increase quickly into the round head, and that fast increase is what gives the beak its crisp line. Rnds 12–24 are the widest part. From Rnd 25, the body slowly narrows. The last round is the narrow tail end, flattened and closed.
- Belly (white). An oval worked around a foundation chain, sewn onto the underside.
- Dorsal fin (blue). A small curved cone, sewn flat along the top of the back.
- Side fins (blue, make 2). Little paddles, sewn just behind the head.
- Tail (blue). Two pointed lobes joined into one piece, then slipped over the tail end and sewn.
Work in continuous rounds, without joining. Put the marker in the first stitch of each round and move it up as you go. The marker line will be the belly. Keep it underneath, and the white oval will cover it.
The pattern — step by step
Part 1 — The beak and the head
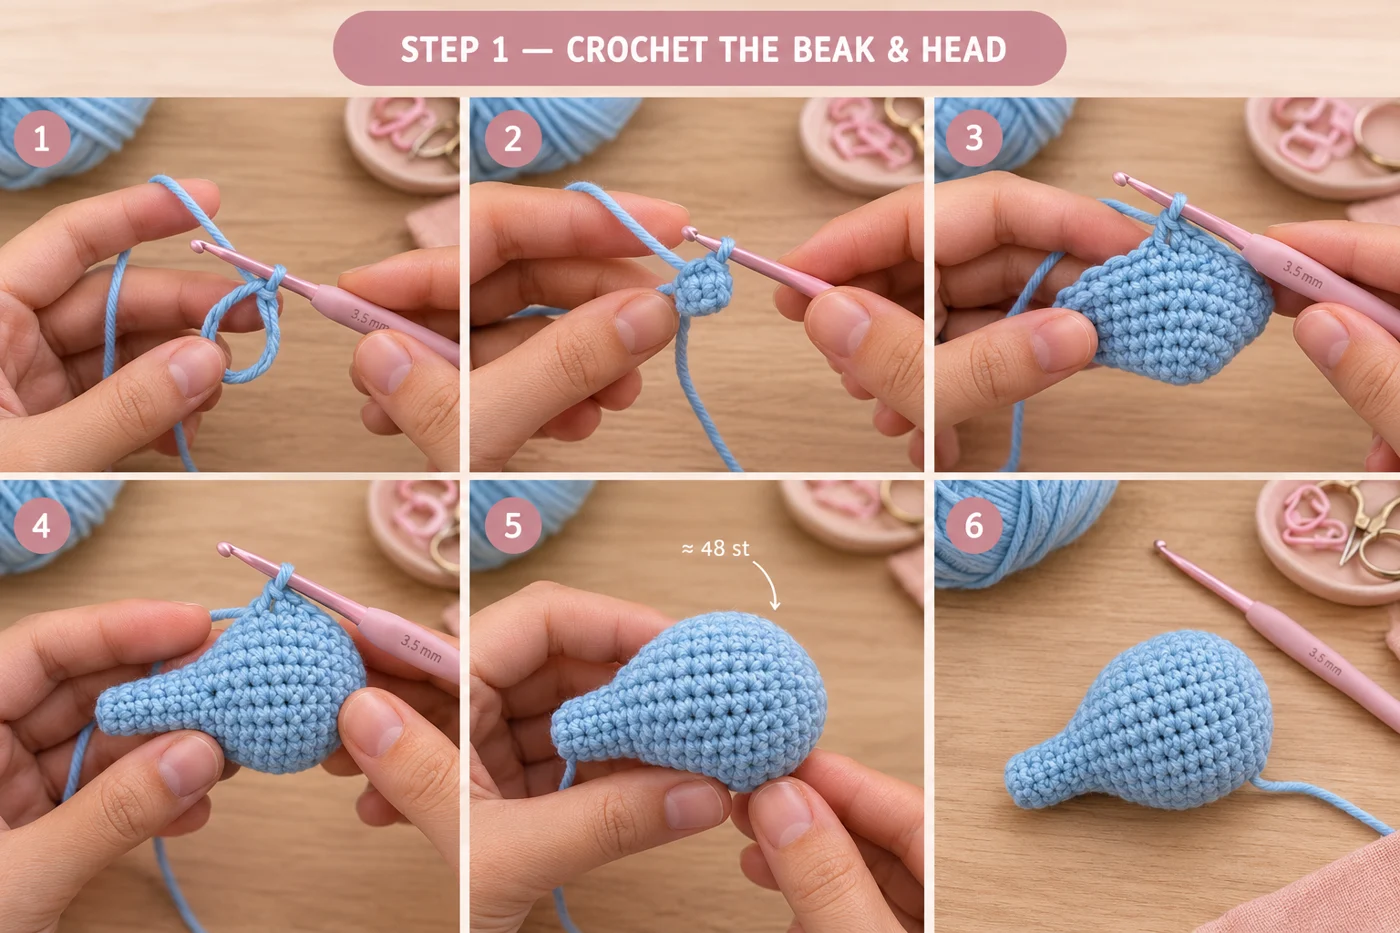
With blue, make a magic ring.
Rnd 1: 6 sc in the MR. (6)
Rnd 2: (sc, inc) x3. (9)
Rnd 3: (2 sc, inc) x3. (12)
Rnds 4–5: sc in each st around. (12) That's 2 rounds.
Pull the magic ring tail tight, knot it on the inside and leave it there. It'll be hidden by the stuffing.
Rnd 6: (sc, inc) x6. (18)
Rnd 7: (2 sc, inc) x6. (24)
Rnd 8: (3 sc, inc) x6. (30)
Rnd 9: (4 sc, inc) x6. (36)
Rnd 10: (5 sc, inc) x6. (42)
Rnd 11: (6 sc, inc) x6. (48)
Rnds 12–24: sc in each st around. (48) That's 13 rounds.
Part 2 — Set the eyes
Insert the safety eyes now, while the opening is still wide. Hold the piece with the marker line underneath, at the belly.
Put the eyes between Rnds 9 and 10, where the beak meets the head. Space them 6 to 7 sts apart, on the upper side of the head, away from the marker. Seen from the front, they sit on either side of the beak, just above it. That's what gives the sweet baby-dolphin face. Push the washers on firmly from the inside.
Child-safe version. Safety eyes are not safe for babies and children under 3, because they can come loose. For a baby gift, skip them. Embroider each eye with black floss instead: a small filled oval of 5 or 6 straight stitches, over about 2 sts, in the same spot.
Part 3 — Taper the body to the tail
Rnd 25: (6 sc, dec) x6. (42)
Rnds 26–29: sc in each st around. (42) That's 4 rounds.
Rnd 30: (5 sc, dec) x6. (36)
Rnds 31–33: sc in each st around. (36) That's 3 rounds.
Start stuffing now. Push small pieces firmly into the beak first. Tweezers or the end of a pencil help. Then fill the head until it's round and firm.
Rnd 34: (4 sc, dec) x6. (30)
Rnds 35–36: sc in each st around. (30) That's 2 rounds.
Rnd 37: (3 sc, dec) x6. (24)
Rnds 38–39: sc in each st around. (24) That's 2 rounds.
Keep stuffing as you go, a little less firmly than the head.
Rnd 40: (2 sc, dec) x6. (18)
Rnds 41–42: sc in each st around. (18) That's 2 rounds.
Rnd 43: (sc, dec) x6. (12)
Rnds 44–46: sc in each st around. (12) That's 3 rounds.
Close the tail end. Stuff the narrow part lightly, so it stays a little flexible. Flatten the opening so the fold runs from side to side, in the same direction as a line between the eyes. Now work 6 sc through both layers, going through one stitch from the front and one from the back each time. Fasten off and hide the tail inside the body.
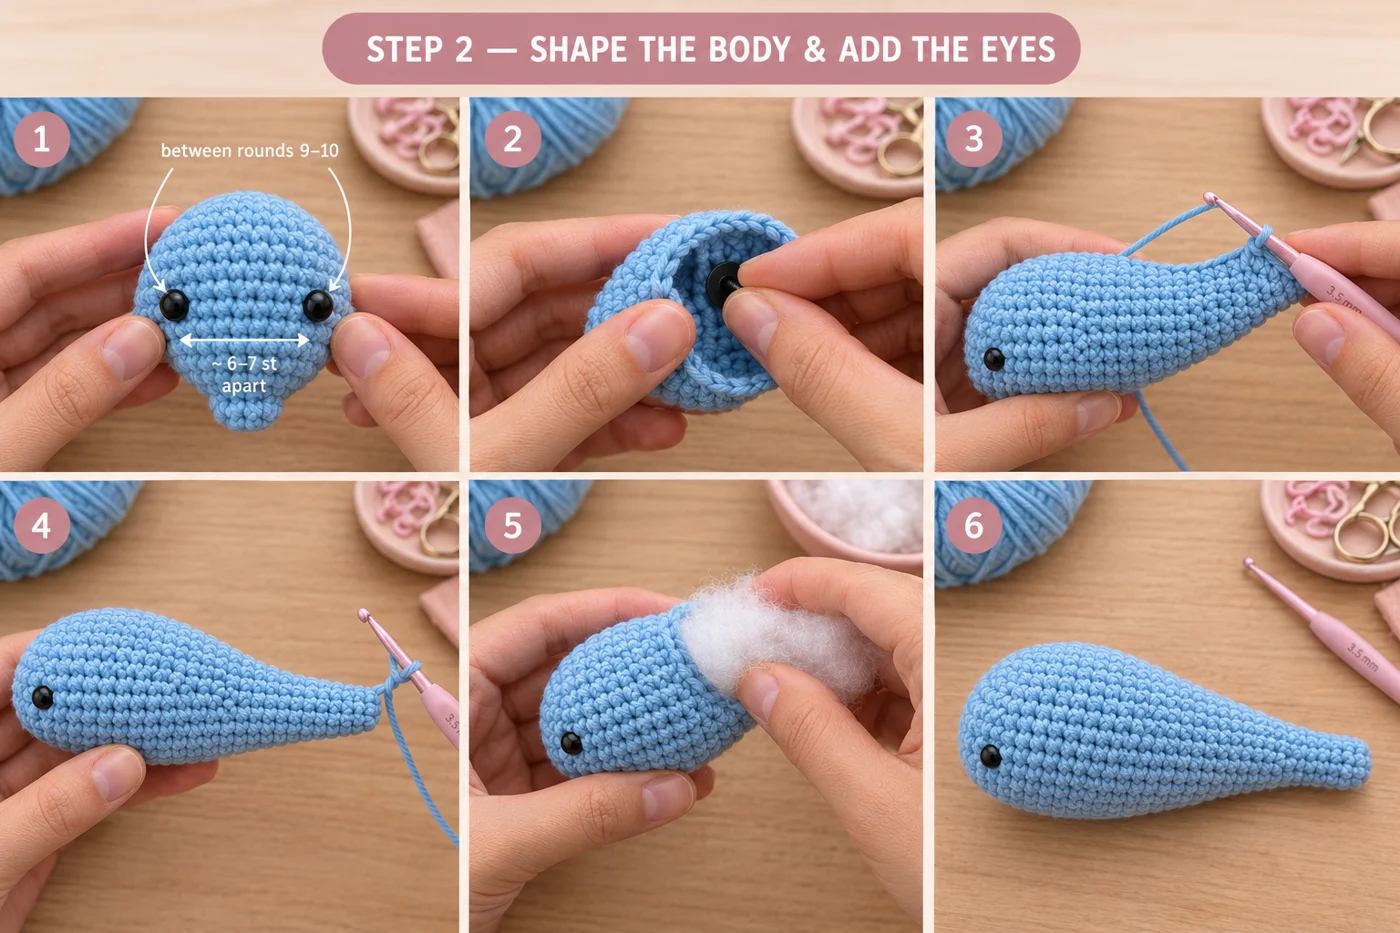
Keep the taper smooth. If the body suddenly narrows, you probably skipped one of the plain rounds. Count the rounds between decreases, as the gaps get shorter toward the tail on purpose.
Part 4 — The white belly
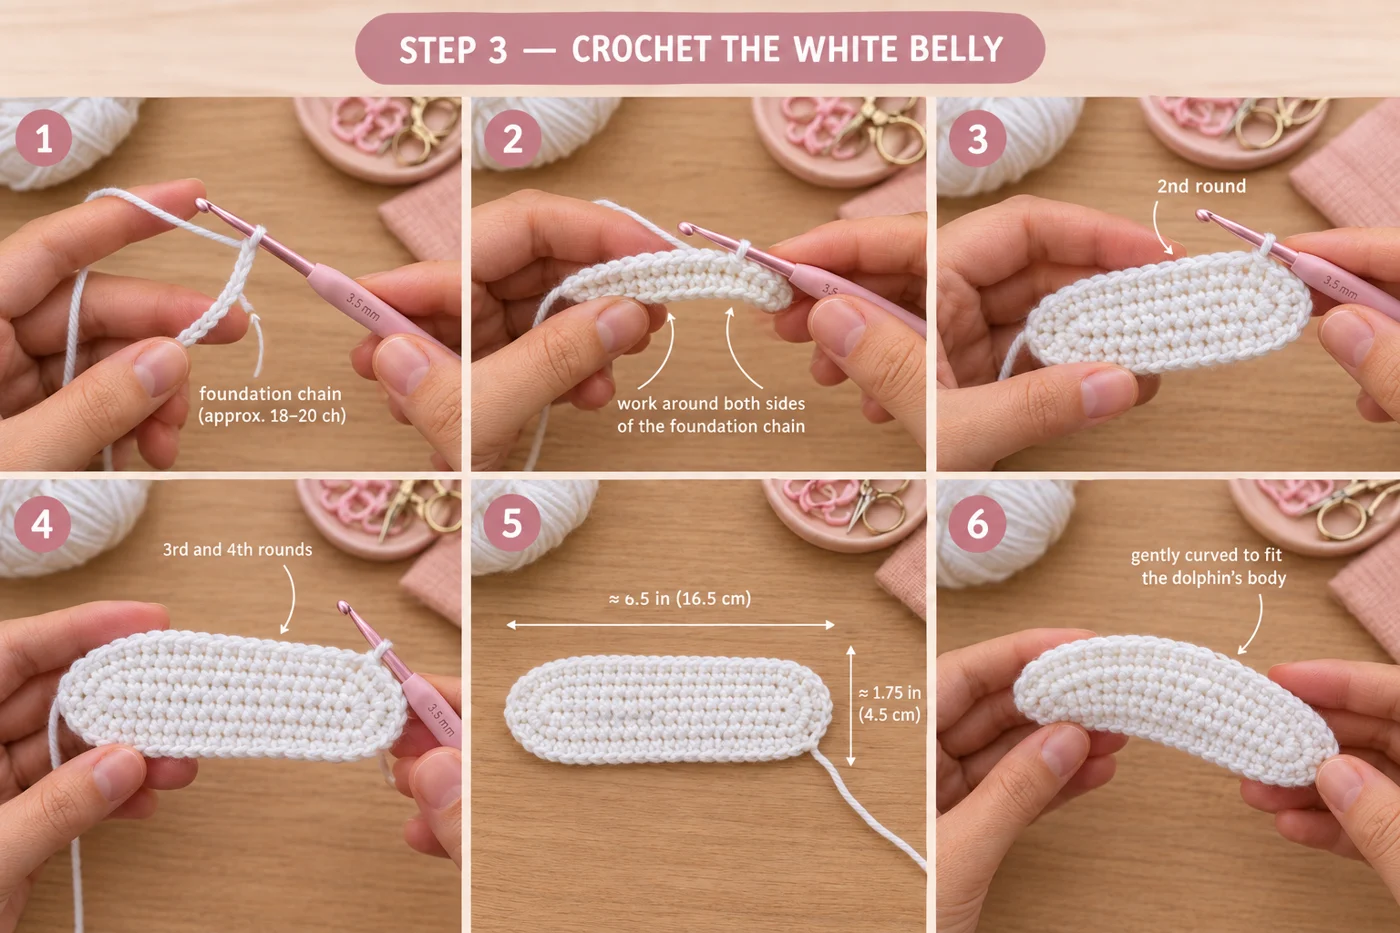
With white, ch 20.
Rnd 1: 2 sc in 2nd ch from hook, sc in next 17 ch, 4 sc in last ch. Now work along the other side of the chain: sc in next 17 ch, 2 sc in the last ch (the same ch you started in). (42)
Rnd 2: inc x2, 17 sc, inc x4, 17 sc, inc x2. (50)
Rnd 3: (sc, inc) x2, 17 sc, (sc, inc) x4, 17 sc, (sc, inc) x2. (58)
Rnd 4: (2 sc, inc) x2, 17 sc, (2 sc, inc) x4, 17 sc, (2 sc, inc) x2. (66)
Sl st into the next st. Fasten off, leaving a 30-in tail for sewing.
The oval is about 6.5 in long and 1.75 in wide. It'll cup very slightly. That's what you want, because it hugs the round body. If your oval comes out shorter, add 2 or 3 chains to the start and 2 or 3 sc to each straight side.
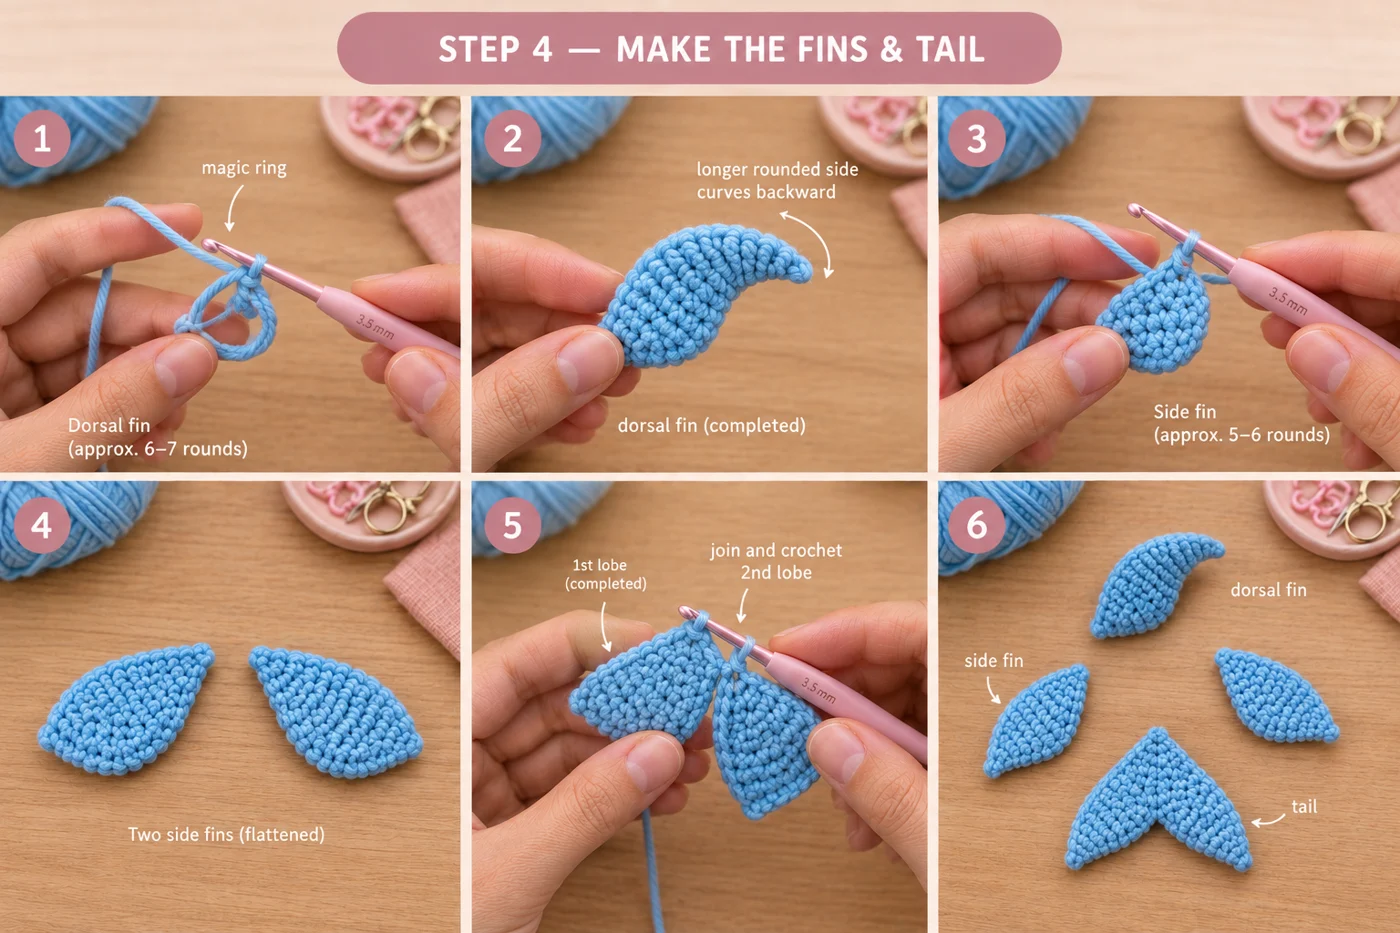
Part 5 — The dorsal fin
With blue, make a magic ring.
Rnd 1: 4 sc in the MR. (4)
Rnd 2: inc x2, 2 sc. (6)
Rnd 3: inc x2, 4 sc. (8)
Rnd 4: inc x2, 6 sc. (10)
Rnd 5: inc x2, 8 sc. (12)
Rnds 6–7: sc in each st around. (12) That's 2 rounds.
Fasten off, leaving a 15-in tail.
The increases stack up on one side, so that side grows longer and the fin curves back. That longer, rounded side is the front edge and faces the head. Add a small wisp of stuffing to the bottom half so the fin stands up.
Part 6 — The side fins (make 2)
With blue, make a magic ring.
Rnd 1: 6 sc in the MR. (6)
Rnd 2: (sc, inc) x3. (9)
Rnds 3–4: sc in each st around. (9) That's 2 rounds.
Rnd 5: (sc, dec) x3. (6)
Rnd 6: sc in each st around. (6)
Fasten off, leaving a 12-in tail. Don't stuff. Flatten each fin into a little paddle, wide at the tip and narrow at the base.
Part 7 — The tail (two lobes joined)
Lobe (make 2). With blue, make a magic ring.
Rnd 1: 4 sc in the MR. (4)
Rnd 2: (sc, inc) x2. (6)
Rnd 3: (2 sc, inc) x2. (8)
Rnd 4: (3 sc, inc) x2. (10)
Rnds 5–6: sc in each st around. (10) That's 2 rounds.
Fasten off the first lobe with a 6-in tail. On the second lobe, don't fasten off. Keep going with the joining round.
Rnd 7 (joining round): hold the lobes side by side. Sc in the next 5 sts of lobe 2. Insert the hook into any st of lobe 1 and sc, then sc in the next 9 sts of lobe 1, for 10 sts on lobe 1. Then sc in the remaining 5 sts of lobe 2. (20)
Rnd 8: (3 sc, dec) x4. (16)
Fasten off, leaving an 18-in tail. Don't stuff. Use the 6-in tail of lobe 1 to close the small gap between the lobes, then hide it inside.
Part 8 — Put your dolphin together
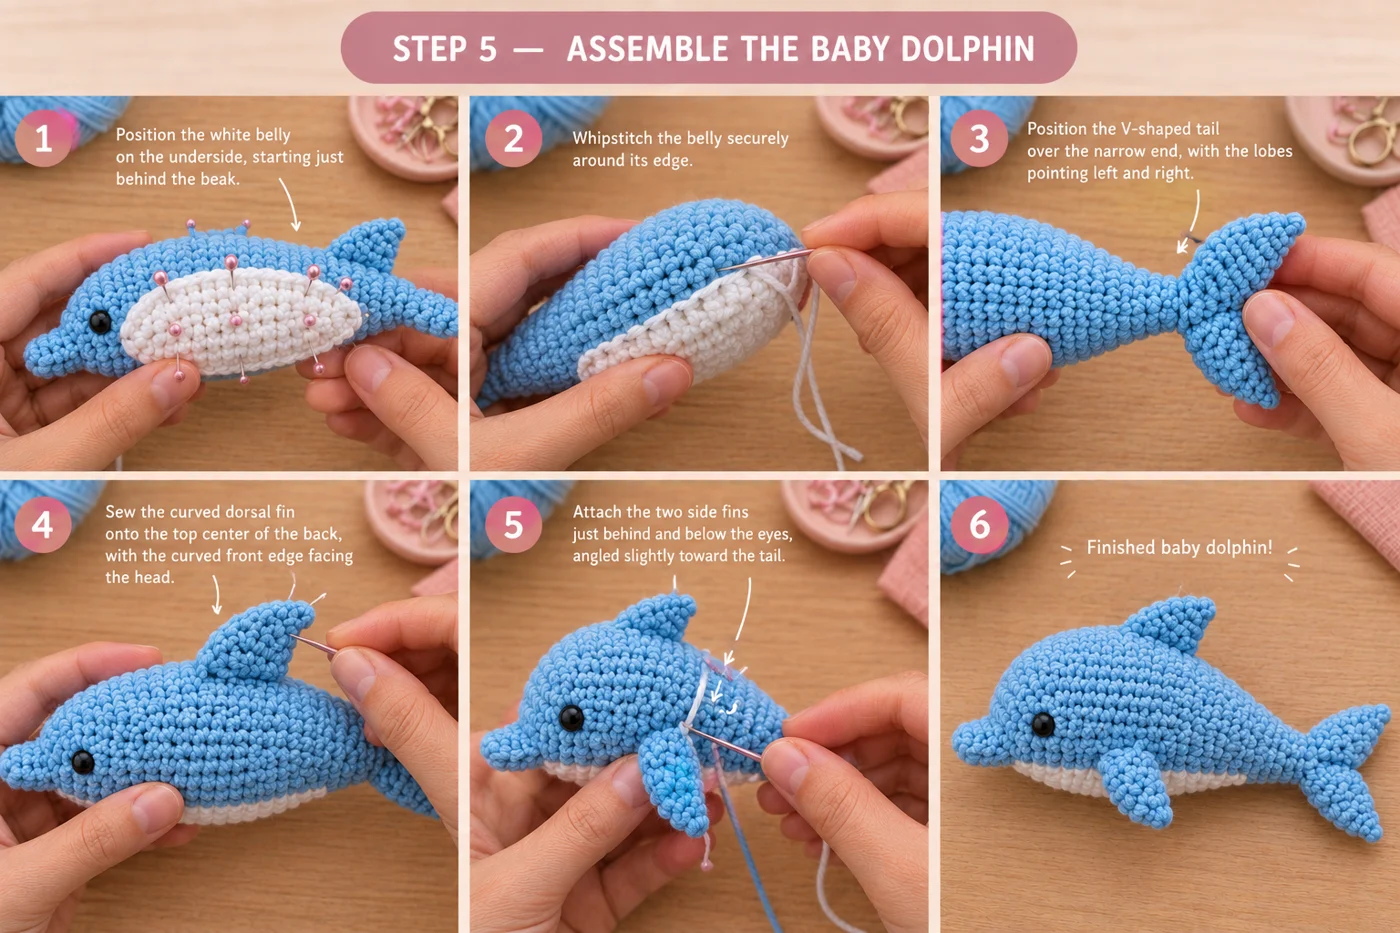
Pin every piece before you sew. It's much easier to move a pin than to unpick a seam.
- Belly. Put the white oval on the underside, over the marker line. The front tip starts just behind the beak, about at Rnd 7. Pin all around. Then whipstitch the edge to the body with the white tail, taking small stitches through the outer loops of the oval. Keep the stitches small, and the seam hardly shows.
- Tail. The tail sits flat, with the two lobes pointing out to the left and right, the same way as the flattened tail end. Slide the tail's 16-st opening over the flattened end of the body, by about one round. Whipstitch all around the opening with the 18-in tail. Then go around a second time, as this is the seam that gets pulled the most.
- Dorsal fin. Flatten the fin's opening so it runs lengthwise along the back, nose to tail. Put it on the top center, opposite the belly, about at Rnds 20–26, with the curved front edge toward the head. Whipstitch all around the base.
- Side fins. Place one fin on each side, just behind and below the eye, at about Rnds 14–17 and close to the edge of the belly. Flatten the base in line with the body, and angle the tip back toward the tail. Whipstitch all around each base.
- Hide the tails. For each tail, take the needle into the body and out the far side, pull gently, then trim it close. The stuffing holds it in place.
That's it! Give your dolphin a squeeze, and try not to start a whole pod.
Make it yours — quick variations
| Variation | Change from base pattern |
|---|---|
| Other ocean colors | Try dusty grey for a bottlenose, pale pink for a river dolphin, or navy with a white belly for a little orca look. Everything else stays the same. |
| Baby-safe dolphin | Embroider the eyes with black floss, sew every piece on with two rounds of stitches, and weave in every tail deeply. There are no hard parts left, but always supervise small children with toys. |
| A sweet smile | Embroider a short curved line in dark blue or black from the corner of the beak, 3 or 4 sts long, on each side. |
| Bigger, cuddlier dolphin | Use super bulky #6 blanket yarn and a 5 mm hook with the same rounds. It comes out about 20 in long. Use 12 mm safety eyes, or embroider them. You'll need about 180–220 yd of blue. |
| Mini dolphin | Use DK #3 cotton and a 2.5 mm hook. It comes out about 8 in long, a nice size for a baby's hands. Use 6 mm safety eyes, or embroider them. |
| A curved "jumping" pose | When you sew on the tail, pin it slightly upward, and add a few extra stitches under the tail end to pull it into a gentle curve. |
Troubleshooting the three things that go wrong
The beak is floppy
The beak is only 12 sts around, so it needs small bits of stuffing, pushed in firmly before you fill the head. If it still bends, take some stuffing out of the head, fill the beak again with tweezers, and put the head stuffing back.
The belly ripples or pulls
If it ripples, the oval is a little too big for your body. Pin it tighter, and ease the extra evenly all around. If it pulls the body flat, your oval is too tight. Go up half a hook size for the belly only, and make it again.
The tail droops
The tail is flat and unstuffed, so it relies on the seam. Go around the tail opening twice, taking deep stitches into the body. For a stiffer tail, slip a small piece of plastic canvas cut to shape into the tail before you sew it on. This isn't baby-safe, so skip it for gifts for little ones.
Frequently asked questions
How long does the dolphin amigurumi take? About 5 to 6 hours. The body takes about 3 hours, because it has 46 rounds, and many of them are plain. The belly, fins and tail take about 1.5 hours together. Assembly takes another hour, as long as you pin before you sew.
How much yarn do I need? About 150 yd (137 m) of worsted #4 in total. That's about 130 yd of blue for the body, fins and tail, and about 20 yd of white for the belly. One standard 100 g ball of blue is plenty, and any white scrap will do for the belly.
Is this dolphin plush safe for babies? Not as written. The 8 mm safety eyes can come loose, and they're a choking hazard for children under 3. For a baby, embroider the eyes with black floss, sew every piece on securely and weave each tail deeply into the body. Then it has no small hard parts.
Can I use a different yarn weight? Yes. The rounds stay the same, and only the size changes. DK #3 on a 2.5 mm hook makes a dolphin about 8 in long. Super bulky blanket yarn on a 5 mm hook makes one about 20 in long. Just keep the hook small enough that the stuffing doesn't show through.
Can I sell dolphins made from this pattern? Yes, you're welcome to sell finished dolphins made from this free pattern at markets, on Etsy or as gifts. Please credit "Pattern by Wavode" in your listing and link back to this page. What you can't do is republish this write-up or my photos as your own pattern.
Related patterns on Wavode
- Pippa the little elephant: a soft grey worsted plush with pink inner ears, on the same 3.5 mm hook.
- Piko the pond turtle: a no-sew turtle that's perfect for a little ocean shelf.
- Chunky lamb plush: a big, huggable chenille lamb for the nursery.
- Sleepy bear on the moon: a dreamy bedtime amigurumi in soft blues.
- Ocean wave coaster: a beach-house coaster in navy, sage and sand.
Made a dolphin? Tag #wavodecrochet on Pinterest. I re-pin every finished make and credit the maker.
Pattern by Clara Hartwell for Wavode. Questions? Email me at support@wavode.com.