Hot Air Balloon Bear Keychain

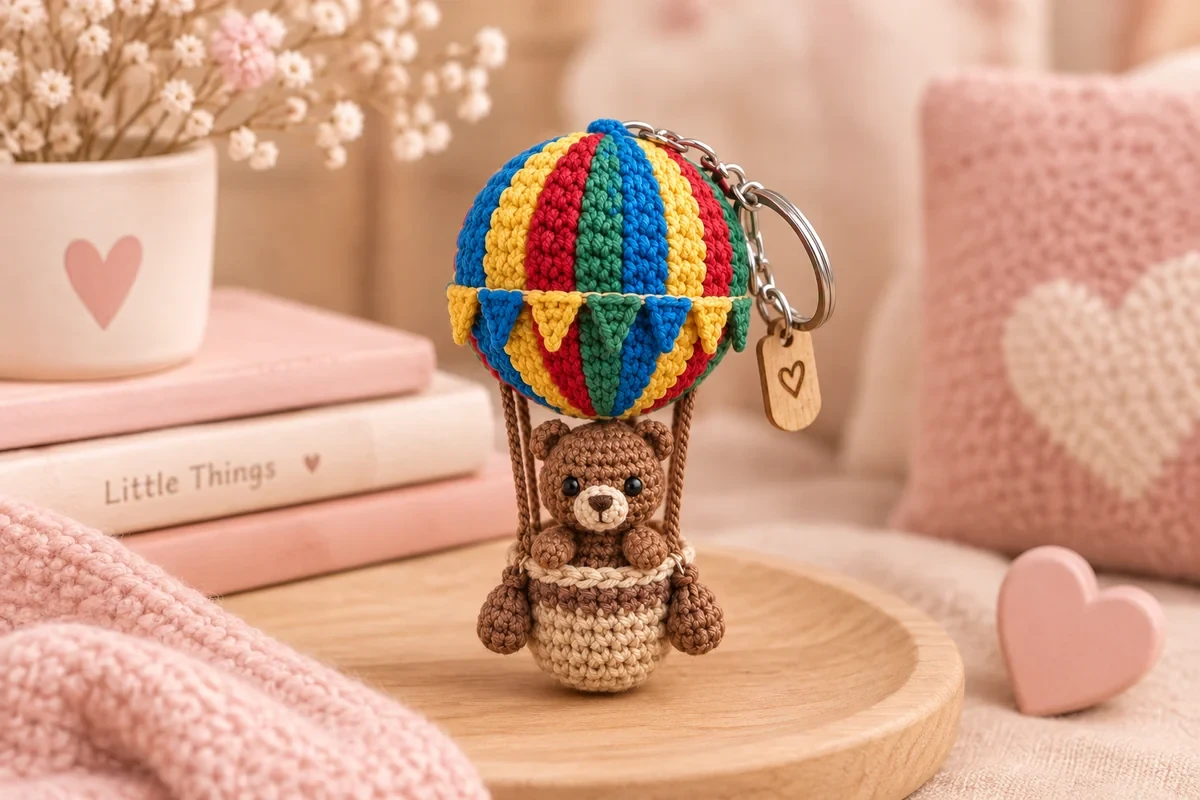
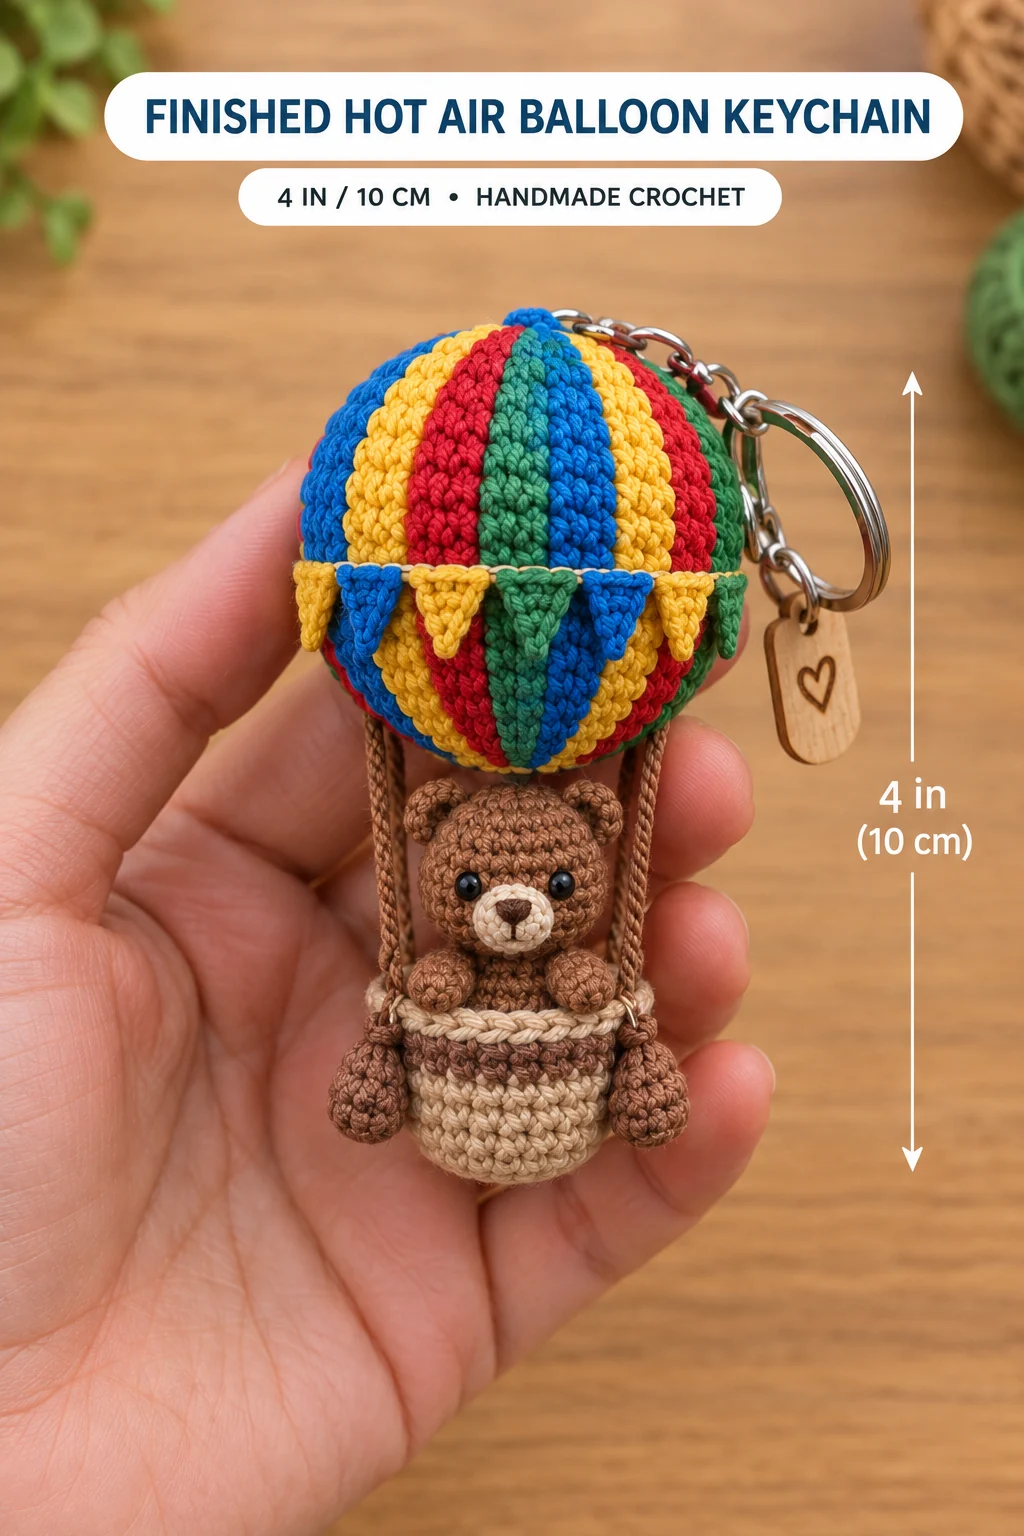
This hot air balloon amigurumi keychain is a 4-inch bag charm: a striped balloon in blue, yellow, red and green, a ring of tiny bunting flags, and a little brown bear riding in a tan basket with two sandbags. It's DK cotton on a 2.5 mm hook. You'll need about 80 to 95 yards in total across eight colors, and scraps are plenty for most of them. Plan on 4 to 5 hours, with the striped balloon taking the longest.
Key Takeaways
- Five small builds: a striped balloon, eight flags, a one-piece bear, a basket with sandbags, and four chain ropes.
- The stripes use 8 little bobbins, one per stripe, so every float stays short and hides inside the balloon.
- The bear's head is sewn to the balloon. That hidden seam carries the weight, so the ropes stay decorative and never stretch.
- About 80–95 yd of DK #3 cotton. Metal hardware and safety eyes mean it isn't for children under 3.
Why I love this little balloon
Most keychains are one shape. This one tells a tiny story: a bear off on an adventure, waving over the side of the basket. It's the charm I'd give a friend who's moving away, a new graduate or anyone with a trip coming up. It's also the one people at a market pick up first, just to look at the bear.
The part I'm proudest of is hidden. The top of the bear's head is sewn straight to the bottom of the balloon. The ropes look like they hold the basket, but a single chain in cotton stretches the moment it takes weight. Sewing the head to the balloon makes the whole charm one solid piece. Your keys can swing all day and the basket won't sag.
The stripes are the other trick. Rather than carry four colors all the way round, each stripe gets its own small bobbin. The yarn only ever travels back across its own stripe, on the inside. Don't you love a colorwork method with no tangled mess of balls?
Pattern at a glance
- Stitches: single crochet in continuous rounds, color changes in the round, plus a few rows for the flags and chain ropes.
- Yarn: DK #3 cotton, about 80–95 yd (73–87 m) total in eight colors.
- Hook: 2.5 mm (US B/1–C/2). That's smaller than a DK ball band suggests, on purpose, so no stuffing shows between the stitches.
- Construction: 5 steps: balloon → flags, string and keyring → bear → basket and sandbags → ropes and assembly.
- Finished size: about 4 in (10 cm) tall and 2⅓ in (6 cm) wide, without the keyring. Tension will shift this a little.
- Time: 4–5 hours. Allow about 2 hours for the balloon and flags, 1 hour for the bear, 45 minutes for the basket and sandbags, and 45 for assembly.
- Skill level: intermediate. You should be comfortable with a magic ring, color changes and sewing small pieces. If this is your first stripe in the round, it's a great one to learn on, because the balloon is small.
What you'll need
Yarn (DK #3 cotton, ~80–95 yd / 73–87 m total)
- Blue (crown and 2 stripes, 2 flags): 11–13 yd.
- Yellow (2 stripes, 4 flags, flag string): 12–14 yd.
- Red (2 stripes): 8–9 yd.
- Green (2 stripes, 2 flags, keyring loop): 10–12 yd.
- Brown (bear, 4 ropes): 20–23 yd. A warm teddy-bear brown.
- Light tan (basket, bear muzzle): 13–15 yd. A biscuit or oatmeal shade.
- Mocha (basket band, 2 sandbags): 5–6 yd. A soft rosy brown, a little lighter than the bear. The bear brown works too.
- Dark brown or black (nose): 1 yd.
These amounts come from the stitch counts in the pattern, plus floats and sewing tails, with a little margin. Keep every color a true DK #3 cotton, such as Paintbox Cotton DK or Scheepjes Catona. A worsted #4 cotton like Lily Sugar 'n Cream would make that piece noticeably bigger than the rest.
Hook and notions
- 2.5 mm crochet hook
- 2 black safety eyes, 4 mm (or black yarn to embroider them)
- A small handful of polyfil stuffing
- 1 keyring with a split ring and a short chain
- 1 small jump ring, about 6 mm
- Tapestry needle
- 3 stitch markers
- A few pins
- Small flat-nose pliers, for the jump ring
- 8 bobbins or small cards to wind yarn on (a folded scrap of cardboard is fine)
- Optional: a wooden or leather "handmade" tag for the keyring, a nice touch if you sell them
Tension
You don't need a strict gauge here. Aim for a firm fabric where the stuffing doesn't peek through. If it does, drop to a 2.25 mm hook. Work the stripe rounds at the same tension as the plain ones, so the balloon stays round.
Abbreviations (US terms)
- MR: magic ring
- ch: chain
- sl st: slip stitch
- sc: single crochet
- inc: 2 sc in the same stitch
- dec: invisible decrease (sc2tog through the front loops)
- sc2tog / sc3tog: single crochet 2 or 3 stitches together (used on the flat flags)
- BLO: back loop only
- R: round
- st(s): stitch(es)
Stuffed pieces are worked in a continuous spiral. Don't join at the end of rounds, and move your marker up each round.
Step 1 — Crochet the striped balloon
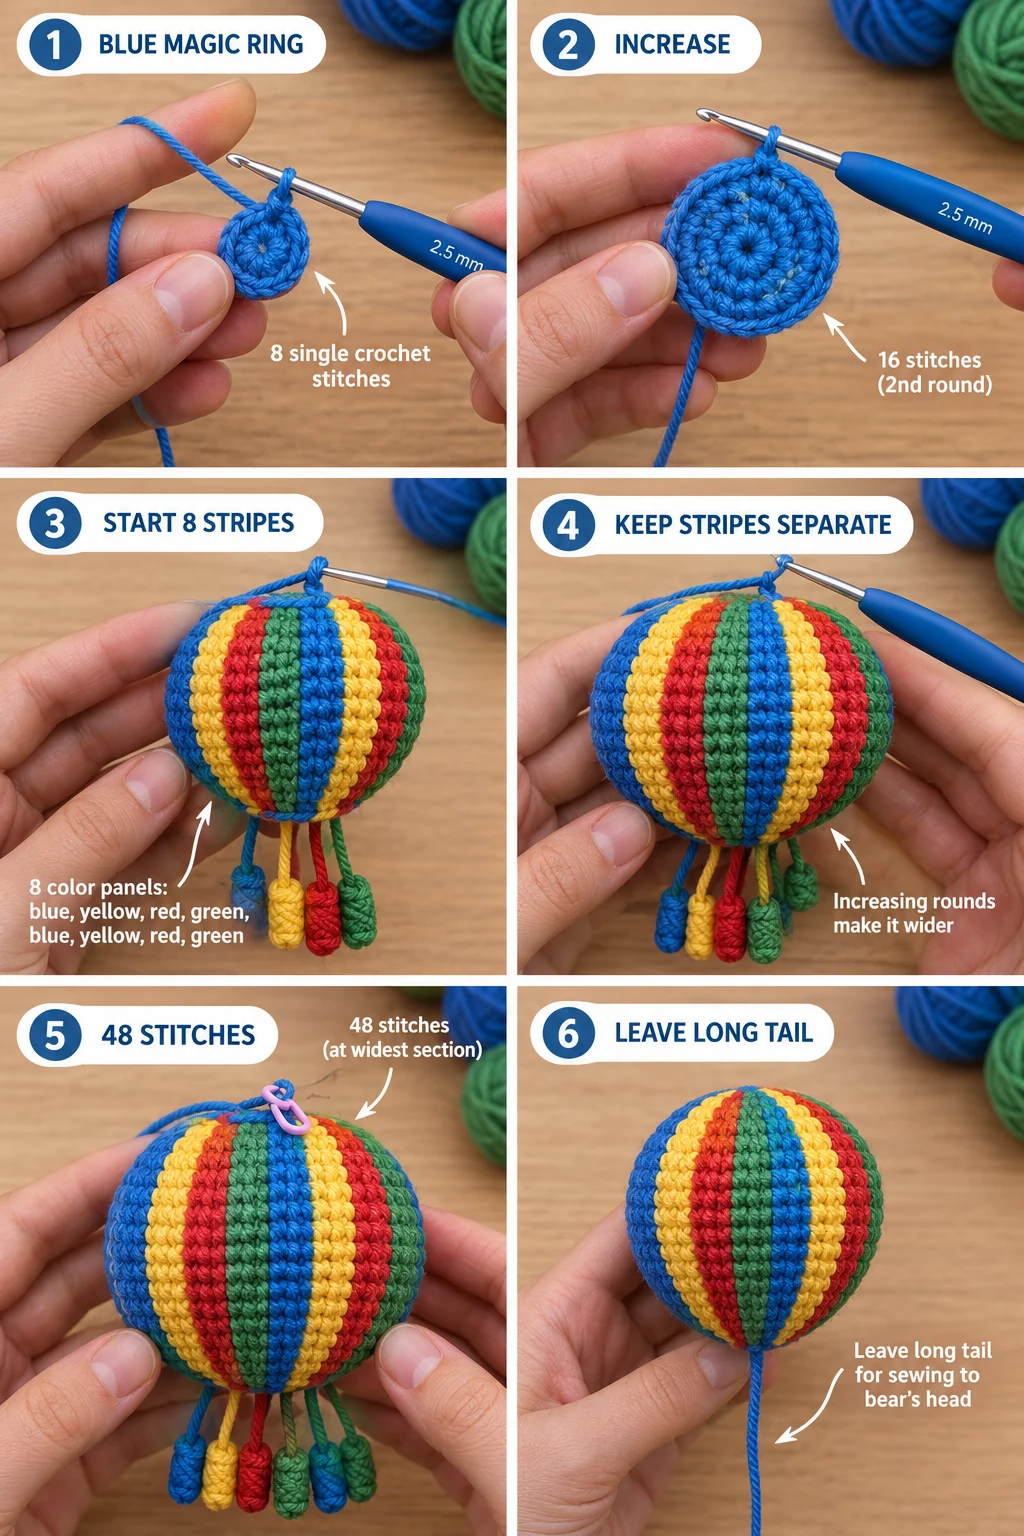
The magic ring is the crown, the top of the balloon. The last round closes the bottom, which sits on the bear's head.
Set up your bobbins. Wind about 5 yd of each color onto its own bobbin: 2 blue, 2 yellow, 2 red, 2 green. One of the blue bobbins is simply the yarn you start with.
How the stripes work. From R3 there are 8 stripes in this order: blue, yellow, red, green, blue, yellow, red, green. Each stripe always uses its own bobbin. At the end of a stripe, drop that color to the inside and pick up the next stripe's bobbin. Complete the last sc of each stripe with the new color, so the edge is clean. On the next round, bring each bobbin back across the inside of its own stripe, loosely, before you use it. Twist the old and new yarns once at every change so there's no hole.
The floats sit inside and the stuffing hides them. Keep them relaxed: a tight float will pucker the stripe. The bobbins simply dangle out of the opening below your work.
R1 (blue): 8 sc in MR. (8 sts) R2 (blue): Inc in each st around. (16)
R3: Now start the stripes. In each stripe, sc 1, inc. Work the 8 stripes in order. (3 sts per stripe, 24 total) R4: In each stripe, sc 2, inc. (4 per stripe, 32) R5: In each stripe, sc 3, inc. (5 per stripe, 40) R6: In each stripe, sc 4, inc. (6 per stripe, 48) R7–R11: Sc in each st around, keeping each color over its own stripe. (48) That's 5 rounds, the widest part of the balloon. R12: In each stripe, sc 4, dec. (5 per stripe, 40) R13: Sc in each st around. (40) R14: In each stripe, sc 3, dec. (4 per stripe, 32)
Stuff the balloon firmly now, shaping it into a round top and a slight taper.
R15: In each stripe, sc 2, dec. (3 per stripe, 24) R16: In each stripe, sc 1, dec. (2 per stripe, 16)
Cut all the bobbins except the blue one you're working with, leaving 4-inch tails, and push the tails inside. Top up the stuffing.
R17 (blue): Dec 8 times. (8)
Fasten off leaving a 12-inch tail at the bottom. Thread it through the front loops of the last 8 sts and pull tight. Don't weave this tail in. You'll use it to sew the balloon to the bear's head in Step 5.
A slight lean in the stripes is normal. Single crochet always spirals a little, and on a balloon it looks like the real fabric panels.
Step 2 — Add the flags, the string and the keyring
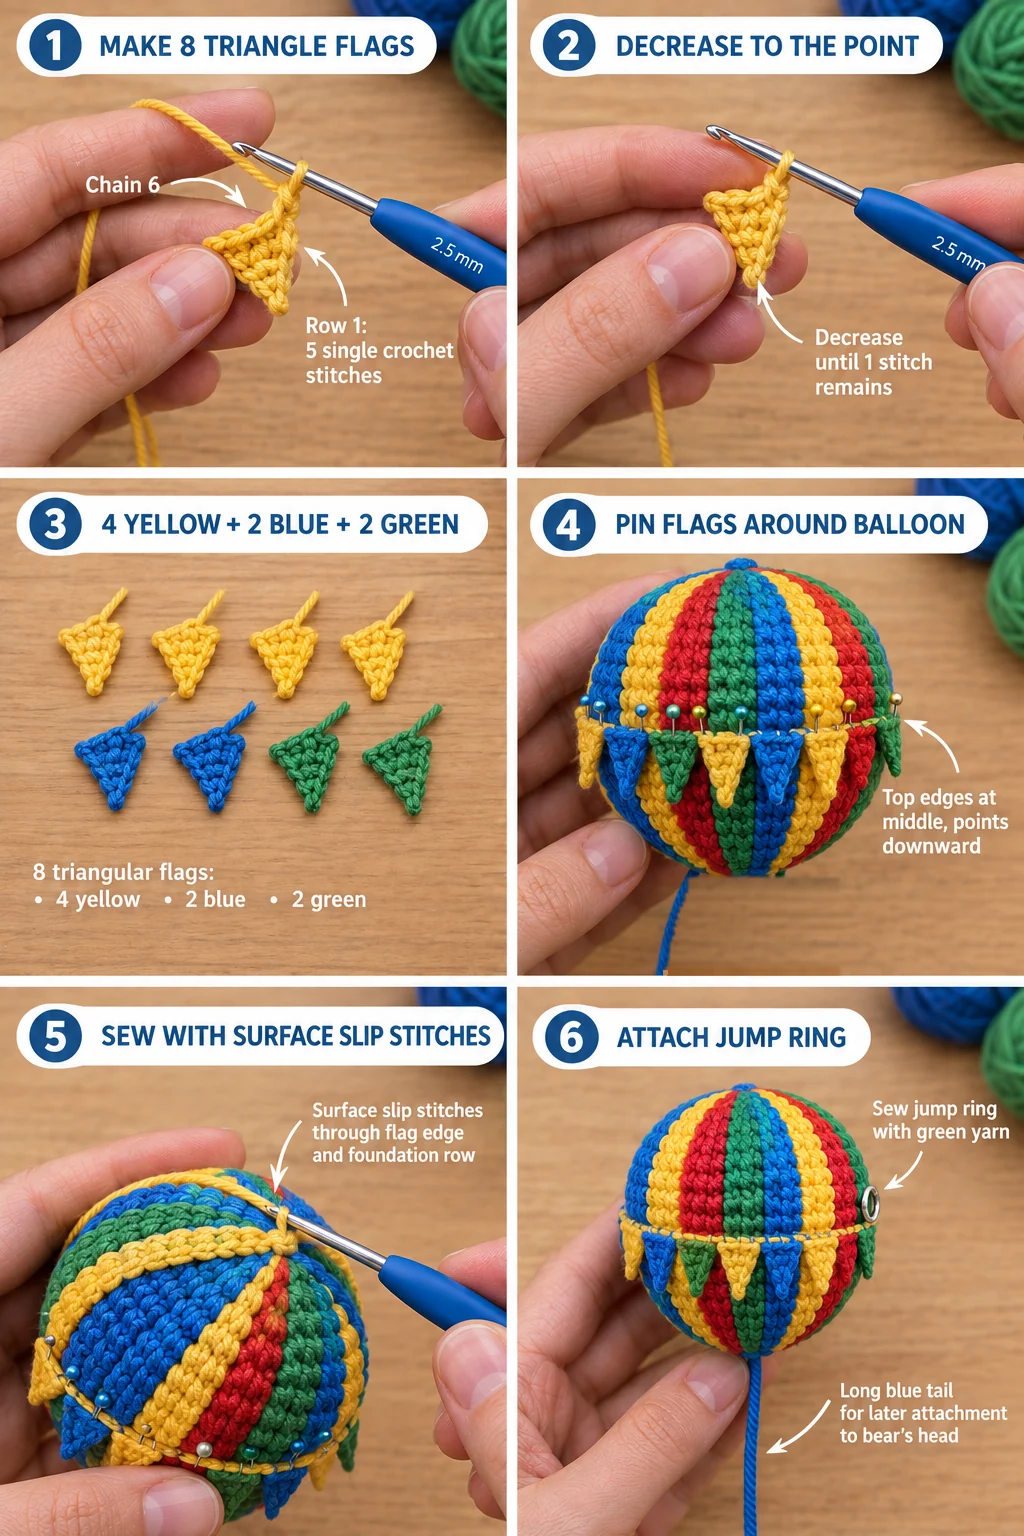
Flags (make 8: 4 yellow, 2 blue, 2 green)
Each flag is a tiny triangle worked in rows. The foundation chain is the top edge, and the point is the bottom.
Leave a 6-inch starting tail. Ch 6.
Row 1: Sc in the 2nd ch from the hook and in each ch across. (5 sts) Row 2: Ch 1, turn. Sc2tog, sc 1, sc2tog. (3) Row 3: Ch 1, turn. Sc3tog. (1)
Fasten off leaving a 6-inch tail at the point. Each flag is about ¾ in (2 cm) across the top.
Pin the flags
Pin the flags around the middle of the balloon, one per stripe, with their top edges along R9 and the points hanging down. Mix the colors so that no flag sits on a stripe of its own color, or it will disappear.
The flag string
The string sews the flags on as it goes. Because the balloon is already closed, you'll work the slip stitches on the surface, with the yarn held on the outside.
Thread the end of the yellow yarn onto a tapestry needle, bury 2 inches of it inside the balloon, and bring it out just above a flag, between R8 and R9. Put a slip knot on your hook. Then, all the way round the balloon:
- insert the hook under the top strands of the next stitch of R9, going through the flag's foundation chain as well wherever a flag sits;
- catch the yarn and pull it back through, then through the loop on your hook.
That's one surface slip stitch. The line of stitches looks like a little string holding the bunting. When you're back at the start, fasten off, thread the tail on the needle and bury it deep in the balloon.
Then use each flag's point tail to take one small stitch into the balloon, so the point doesn't flap. Bury the point tails and the starting tails in the balloon.
Keyring (sewn with green yarn)
Decide where the front of the balloon is. In my photos, the bear's face sits under the line between a yellow and a red stripe. The keyring goes on the right side of the balloon, just above the flag string.
Cut a 12-inch length of green. Thread it through the jump ring and fold it in half, with the ring at the fold. Sew both tails through the balloon across R7–R8, so the ring sits snug against the side. Go back and forth at least 10 times, deep through the fabric and the stuffing, then knot the two tails together tightly against the balloon. Bury each tail in a different direction. Everything on your keys hangs from this spot, so over-sew it.
Hanging it from the side makes the charm sit upright when you hold your keys, and a little lower on the side works too. If you'd rather it dangle straight down from a bag, sew the ring at the crown instead, centered on R1–R2.
Step 3 — Crochet the bear
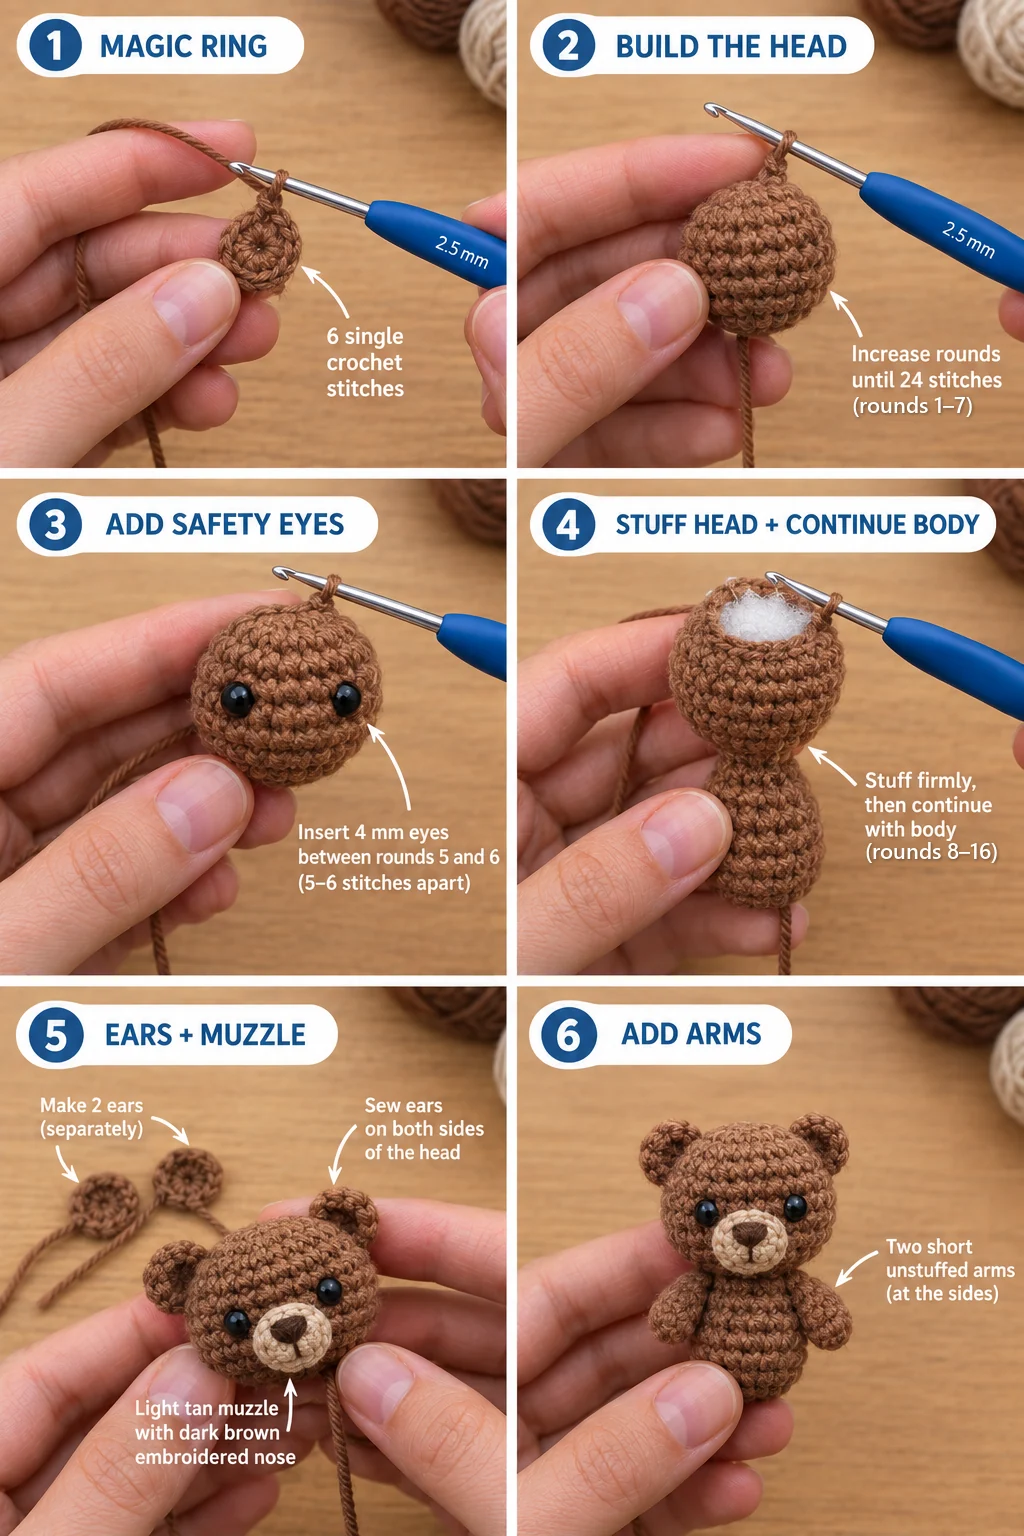
The head and body are one piece. The magic ring is the crown of the head. The closing round is the bottom of the body, which sits on the basket floor.
Head and body (in brown)
R1: 6 sc in MR. (6 sts) R2: Inc in each st around. (12) R3: Sc 1, inc; repeat 6 times. (18) R4: Sc 2, inc; repeat 6 times. (24) R5–R7: Sc in each st around. (24) That's 3 rounds.
Add the eyes. Insert the safety eyes between R5 and R6, with 5 sts between them. Check they're level before you snap the washers on. If you're embroidering the eyes, do it after stuffing, with 3 black French knots each.
R8: Sc 2, dec; repeat 6 times. (18)
Stuff the head firmly.
R9: Sc in each st around. (18) This is the neck. R10: Sc 2, inc; repeat 6 times. (24) The body starts here. R11–R13: Sc in each st around. (24) That's 3 rounds. R14: In BLO, sc 2, dec; repeat 6 times. (18) This makes a flat bottom.
Stuff the body a little more lightly than the head.
R15: Sc 1, dec; repeat 6 times. (12) R16: Dec 6 times. (6)
Fasten off leaving a 12-inch tail at the bottom of the body. Thread it through the front loops of the last 6 sts and pull tight. Keep the tail. It sews the bear into the basket.
Ears (make 2, in brown)
R1: 6 sc in MR. (6) R2: Sc 1, inc; repeat 3 times. (9) R3: Sc in each st around. (9)
Fasten off leaving an 8-inch tail at the open edge. Don't stuff them. Press each ear flat, so the open edge is a straight line, and sew it to the head over R3–R5, one on each side of the crown. Leave the top of the head between the ears clear. That's where the balloon goes.
Muzzle (in light tan)
R1: 6 sc in MR. (6) R2: Sc 1, inc; repeat 3 times. (9)
Sl st in the next st and fasten off leaving an 8-inch tail. With dark brown, embroider a small triangle nose near the top of the muzzle, then one short straight stitch down from it. Pin the muzzle between and just below the eyes, over R6–R8. Tuck in a tiny pinch of stuffing and sew it on around its edge.
Arms (make 2, in brown)
The magic ring is the paw. The open end is the shoulder, where the tail comes out.
R1: 6 sc in MR. (6) R2–R3: Sc in each st around. (6)
Fasten off leaving an 8-inch tail at the shoulder. Don't stuff them. Flatten each arm and sew it by its shoulder to the side of the body, across R10–R11, just below the neck. Let the paws hang forward. You'll tack them onto the basket rim during assembly.
Step 4 — Make the basket and sandbags
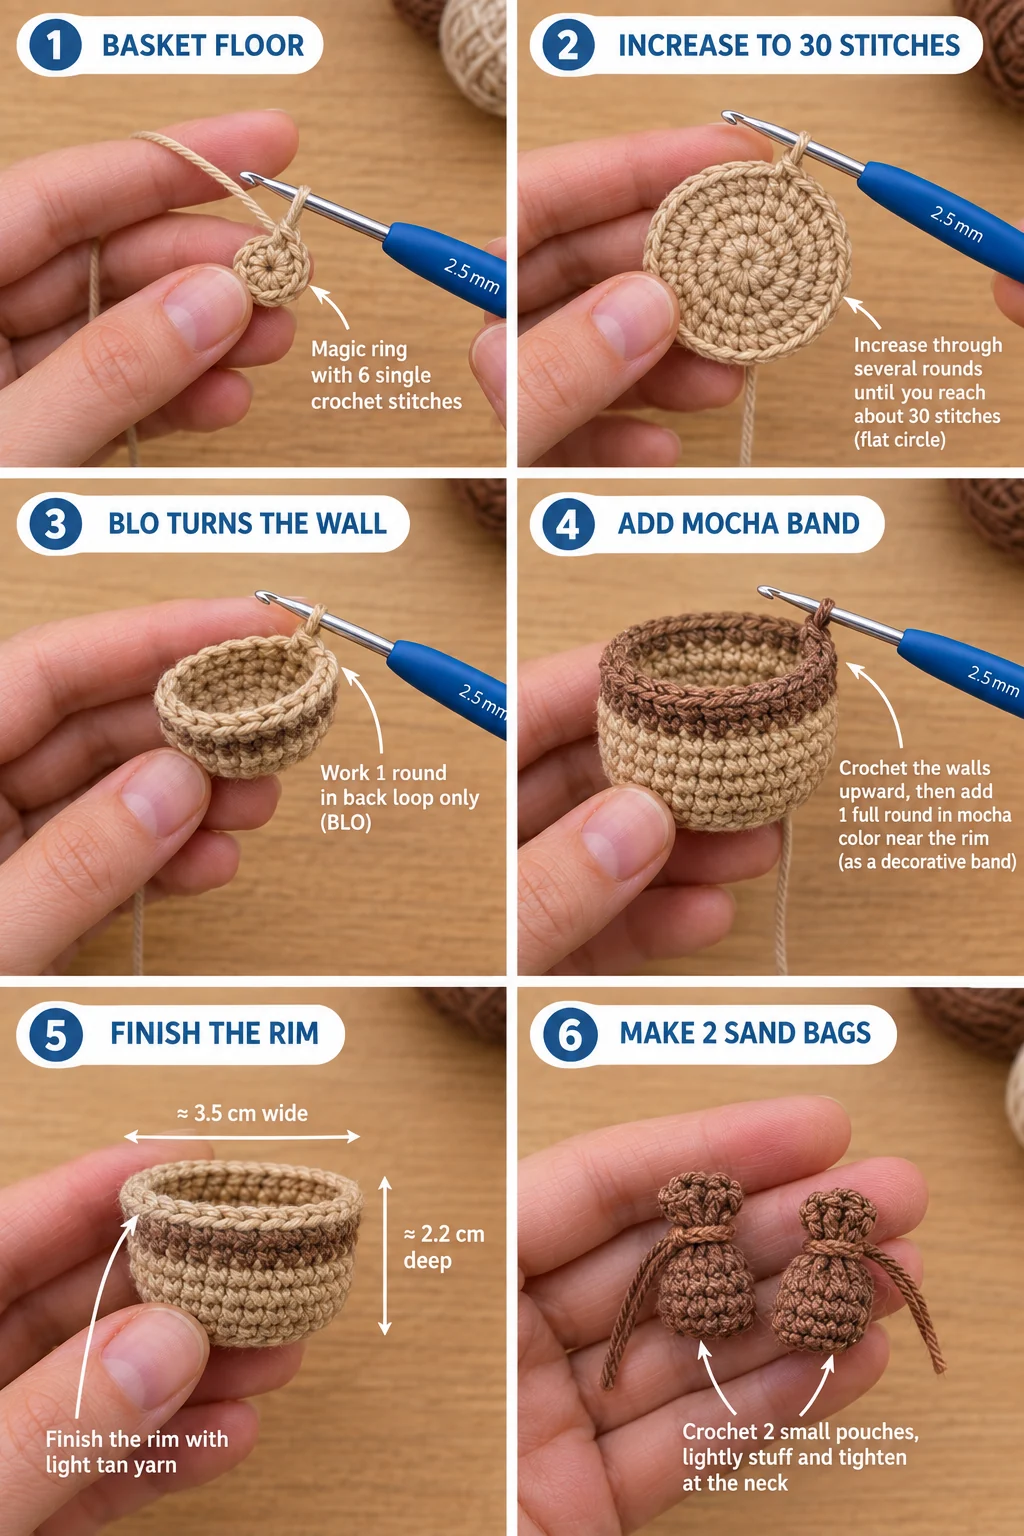
Basket (light tan, with a mocha band)
The magic ring is the center of the floor. The last round is the rim.
R1: 6 sc in MR. (6 sts) R2: Inc in each st around. (12) R3: Sc 1, inc; repeat 6 times. (18) R4: Sc 2, inc; repeat 6 times. (24) R5: Sc 3, inc; repeat 6 times. (30) R6: Sc in BLO in each st around. (30) This turns the wall up and gives the floor a crisp edge. R7–R8: Sc in each st around. (30) R9 (mocha): Sc in each st around. (30) This is the band. R10 (light tan): Sc in each st around. (30) R11: Sl st loosely in each st around.
Fasten off and weave in the ends. Don't stuff the basket. The basket is about 1⅓ in (3.5 cm) across and ⅞ in (2.2 cm) deep.
Sandbags (make 2, in mocha)
The magic ring is the bottom of the bag. The closing round is the tied neck.
R1: 6 sc in MR. (6) R2: Sc 1, inc; repeat 3 times. (9) R3–R4: Sc in each st around. (9) R5: Sc 1, dec; repeat 3 times. (6)
Tuck in a pinch of stuffing. Fasten off leaving an 8-inch tail at the neck, thread it through the last 6 sts and pull tight. Wrap the tail twice around the neck, a little below the top, and pull snug to make the tie. Keep the tail for sewing.
Step 5 — Add the ropes and put it all together
Ropes (make 4, in brown)
A slip-stitched ring would only give you one tail. Each rope needs a tail at each end, so work it as a plain chain.
Leave a 6-inch starting tail. Ch 12. Fasten off leaving a second 6-inch tail.
Each rope is about 1½ in (3.5 cm) long. You'll check the length during assembly.
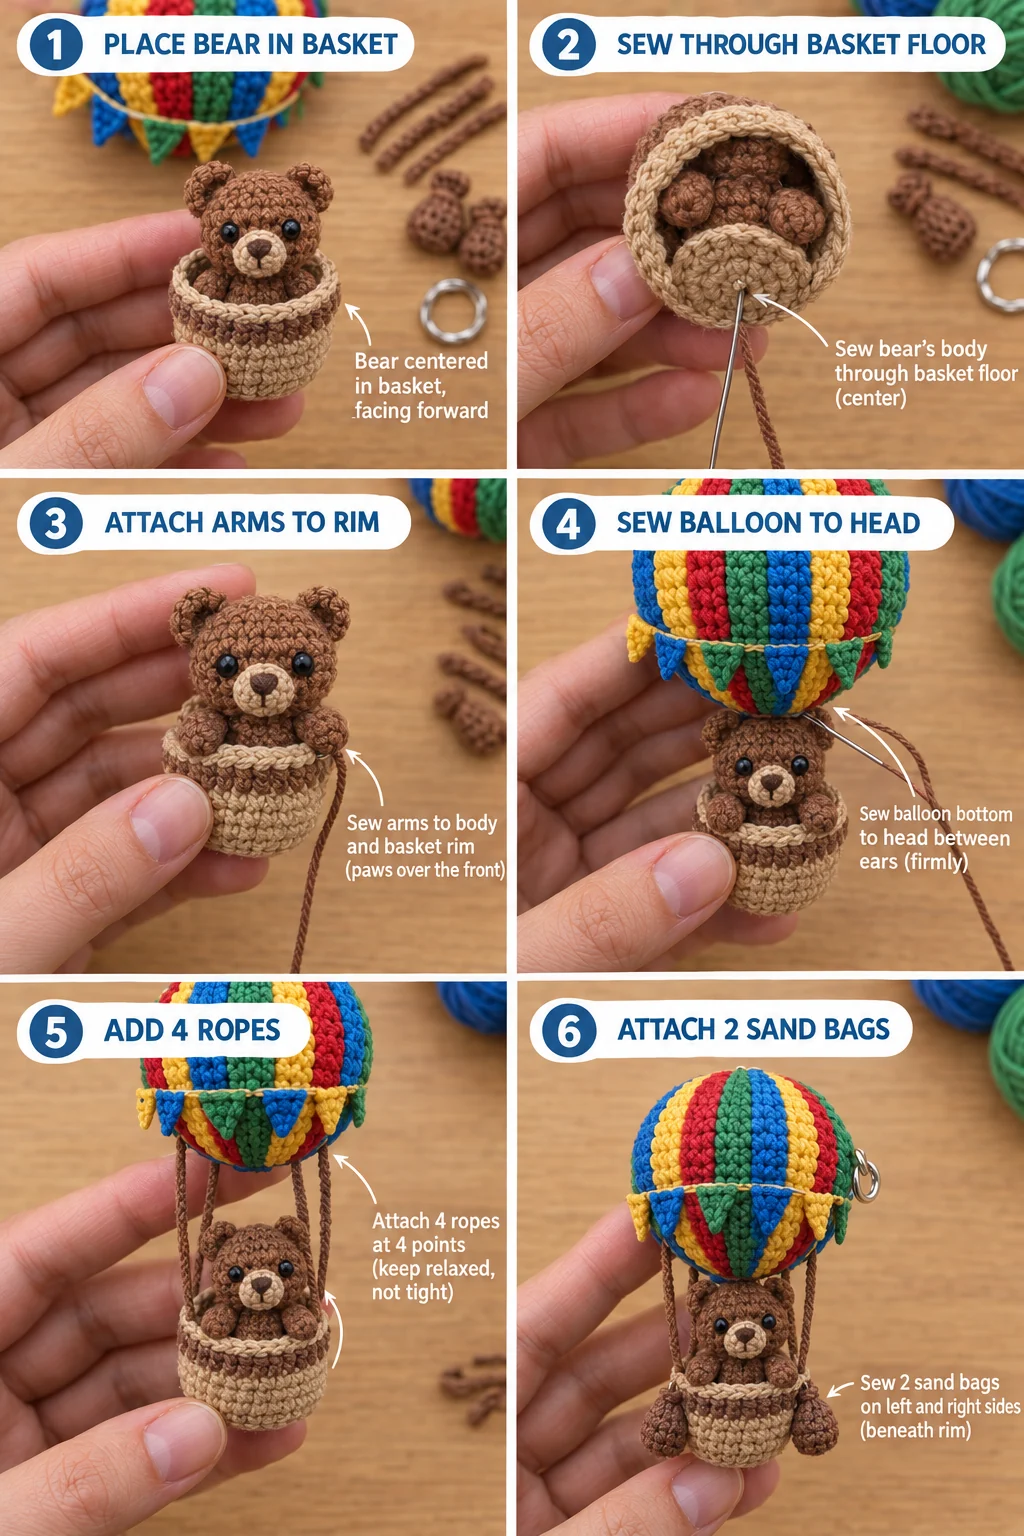
Assemble the charm
1. Bear into basket. Set the bear inside the basket, facing front. Thread the tail from the bottom of the body down through the center of the basket floor, then back up through the floor and into the body. Repeat 4 times, then bury the tail deep inside the bear. The neck should sit right at the rim.
2. Paws on the rim. Bring each paw forward over the rim, so the bear looks like it's leaning on the edge. Take 1 or 2 stitches through the paw and the rim with a scrap of brown so it stays there. Bury the tails in the body.
3. Balloon onto the head. Hold the balloon over the bear, with the keyring on the right and the bear's face under the yellow and red stripes. Using the long blue tail from the bottom of the balloon, sew the balloon's closed bottom to the bear's crown, in the space between the ears. This seam carries the basket, the bear and the sandbags, so go around the join twice and take at least 10 stitches, deep into both pieces. Bury the tail in the balloon.
4. Ropes. Think of the basket as a clock, with the bear's face at 6 o'clock. Sew one rope end inside the rim at 4, 8, 10 and 2 o'clock: two at the front corners, either side of the bear, and two at the back. Take the other end up to the balloon and sew it at R15, straight above. Keep each rope relaxed, not tight, so it never pulls on the balloon. Add or remove a chain if it's much too long or too short. Take 4 stitches at each end and bury the tails.
5. Sandbags. Sew one sandbag by its neck to each side of the basket, at 3 and 9 o'clock, just under the rim. Let the bag hang free below. Bury the tails inside the basket wall.
6. Keyring. Open the jump ring on the side of the balloon with pliers, twisting the ends sideways rather than pulling them apart. Slip on the end link of the keyring chain, then twist the jump ring firmly closed. Add a "handmade" tag on the split ring if you like.
Safety and care
Safety. This is a keychain with a metal split ring, a jump ring and plastic safety eyes, plus several small sewn-on pieces. It isn't a toy and isn't safe for children under 3, because the hardware and small parts are choking hazards. For a nursery decoration, embroider the eyes, leave off all the hardware and hang it out of reach.
Care. Spot clean with a damp cloth. If it needs a proper wash, hand-wash in cool water with a drop of mild soap, squeeze it in a towel and let it dry upright. Don't tumble-dry, because the flags can curl.
Wear. The green yarn loop on the side of the balloon takes all the pull. If it ever loosens, sew a second loop through the same spot, 10 stitches again, and move the jump ring over.
Easy variations
- Pastel balloon: swap the brights for baby blue, butter yellow, blush and mint. It makes a sweet baby-shower bag charm.
- Two-color balloon: use just two colors, alternating on all 8 stripes. You still wind 8 bobbins, 4 of each color, but there's less to keep track of.
- Different passenger: keep the head and body counts, and change the ears. Long ears in cream make a bunny, and pointy ears in orange make a fox.
- Shelf size: use worsted #4 cotton and a 3.5 mm hook with the same counts. It grows to about 5½ in (14 cm) tall, which suits a nursery shelf or a car mirror better than a keyring.
Troubleshooting
There are little holes at the color changes
Twist the two yarns once at every change, and keep the float a touch firmer on the round right after. If a hole still shows, close it from the inside with the tail of that color before you stuff.
The stripes pucker
The floats are too tight. Before you pick up a bobbin, spread the stitches of its stripe open on your finger, then let the yarn cross behind them. The float should be as long as the stripe is wide.
The bear tips forward
The body isn't sitting flat on the basket floor. Unpick the floor seam, press the bear's flat BLO bottom down onto the floor and sew it again, dead center. The balloon seam will also hold it upright once it's on.
The ropes sag
Each rope should hang gently, without drooping into a loop. Unpick one end, take out a chain and sew it back. Your tension may be looser than mine, so 10 or 11 chains is fine.
Frequently asked questions
How much yarn does the hot air balloon keychain use?
About 80–95 yd (73–87 m) of DK #3 cotton. That's roughly 11–13 yd of blue, 12–14 yd of yellow, 8–9 yd of red, 10–12 yd of green, 20–23 yd of brown, 13–15 yd of tan, 5–6 yd of mocha and a scrap of dark brown. Scraps cover most colors.
Do I have to use 8 bobbins?
No, but it's the tidiest way. You can carry all four colors round inside the balloon instead. Just leave every float loose. With 8 bobbins, each yarn only crosses its own 6-stitch stripe, so nothing tangles and the stripes lie flatter.
How long does this keychain take to crochet?
About 4 to 5 hours. Plan roughly 2 hours for the balloon and 8 flags, 1 hour for the bear, 45 minutes for the basket and sandbags, and 45 minutes for the ropes and assembly. It fits into two relaxed evenings.
Is it safe for kids?
Not for children under 3. The metal keyring, jump ring, safety eyes and small sewn pieces are choking hazards. For older kids, it's a fun backpack charm. For a baby's room, embroider the eyes and leave off all the hardware.
Can I sell the finished keychains?
Yes. You're welcome to sell finished balloons made from this free pattern at markets, on Etsy or as gifts. Please credit "Pattern by Wavode" and link back to this page. Please don't republish the written pattern or my photos as your own.
UK terms note
This pattern uses US terms. In UK terms, sc becomes double crochet (dc), so sc2tog and sc3tog become dc2tog and dc3tog. The other abbreviations don't change. DK is the same yarn weight on both sides of the Atlantic.
Related patterns on Wavode
- Crochet campfire keychain: a layered mini bonfire, another story-in-a-keychain charm on the same 2.5 mm hook.
- Crochet palm tree keychain: a mini palm on a sandy island, for the beach-trip version of this adventure.
- Panda keychain: a one-hour bag charm if you want a quicker bear-shaped make.
- Sleepy bear on the moon: a bigger nursery bear that pairs beautifully with this balloon.
Made a balloon? Tag #wavodecrochet on Pinterest. I re-pin every finished make and credit the maker.
Pattern by Clara Hartwell for Wavode. Questions? Email me at support@wavode.com.