Crochet Skull Keychain

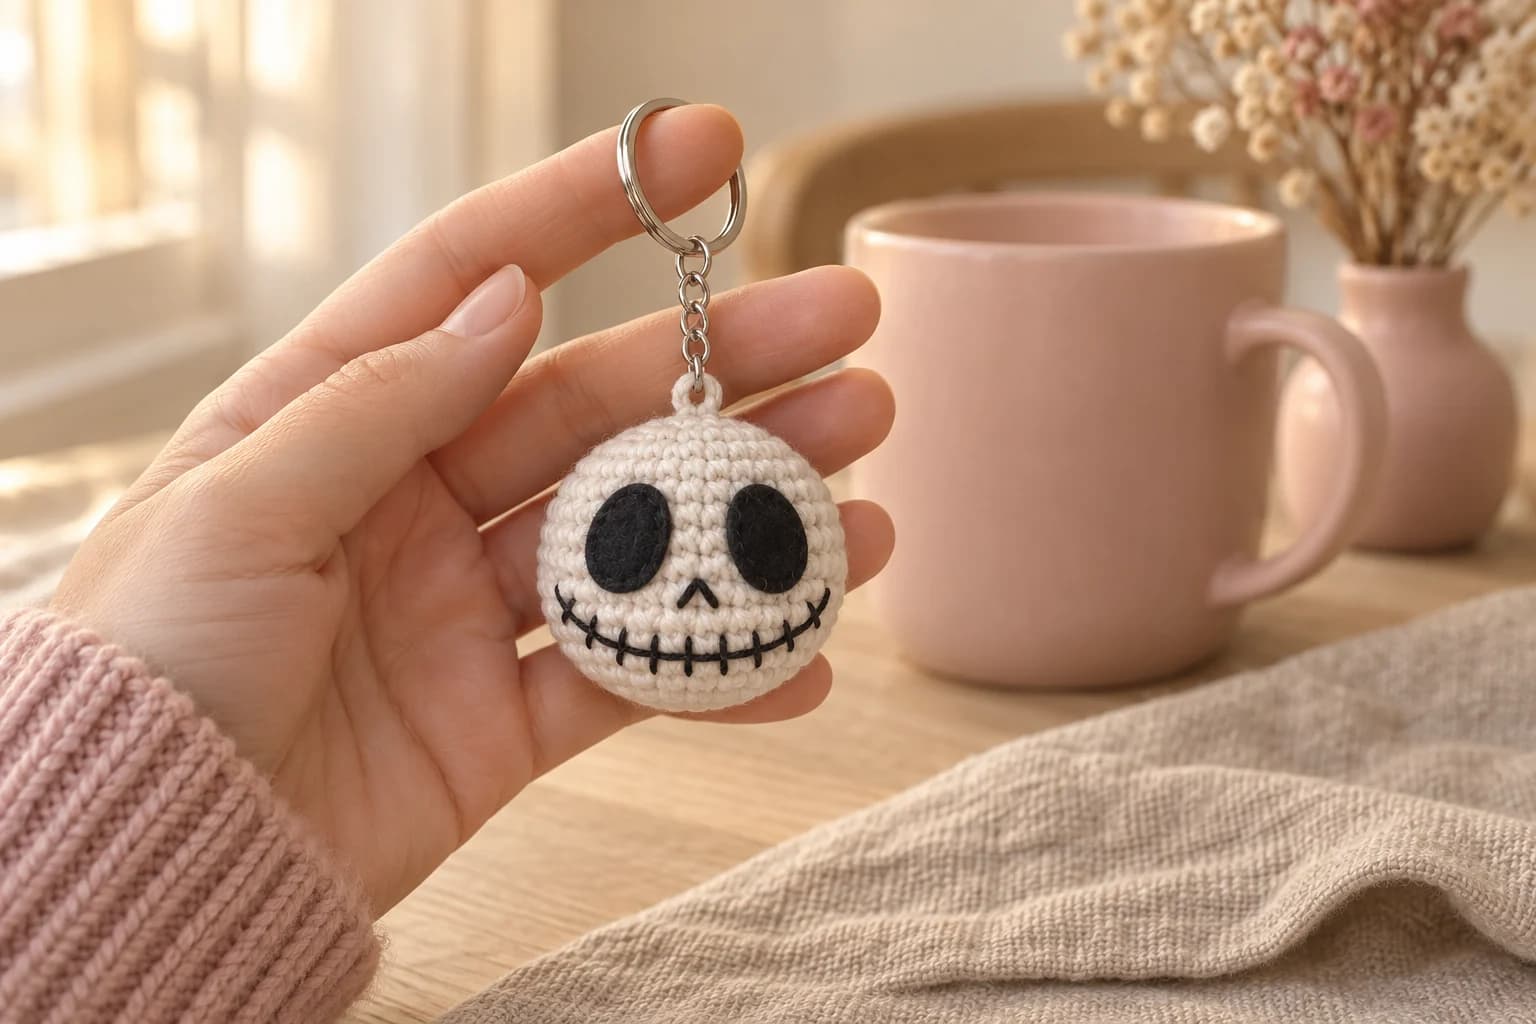
This crochet skull keychain is a round white head with two big black oval eyes, a tiny nose and a long stitched smile. The head is one simple amigurumi ball, worked from the top of the crown down to the bottom. The eyes are cut from black felt and sewn on, and the nose and the smile are embroidered in black yarn. You'll need DK cotton in white and black, a little black felt, a 2.5 mm hook and about 1¼ hours.
Key Takeaways
- Two crocheted pieces: the head and a chain loop, plus two felt eyes.
- One round ball: 36 sts at the widest, 18 rounds from the crown to the bottom.
- The loop is fixed from the inside while the crown is still wide open, so it hangs straight from the top and can't pull out.
- The smile is all backstitch and short stitches: one curved line from cheek to cheek and 11 little teeth across it.
Why I love this keychain
A white ball, two black eyes and a stitched grin. That's all a Halloween skull needs, and it's been the classic spooky face for as long as anyone has carved pumpkins. The long smile is what makes it. It curves from one side of the head to the other, and every tooth is one short stitch.
It's also the easiest amigurumi shape there is: increase, work straight, decrease. Make one for your keys, then a little batch for a market table, treat bags or a friend's backpack zip.
Skill level. Easy. You need a magic ring, sc, inc and dec, and two simple embroidery stitches (backstitch and straight stitch). Sewing the felt eyes on is a plain whipstitch. I explain each one where you need it.
More spooky minis? My ghost cat crochet keychain is a plush velvet ghost with cat ears.
What you'll need
Yarn (DK #3 cotton)
| Color | Used for | Amount |
|---|---|---|
| White | Head, chain loop | about 22 yd |
| Black | Nose, smile | about 2 yd |
- I like Paintbox Yarns Cotton DK. It's smooth, the white stays bright, and the stitches are crisp at this size. Any DK cotton works: check your size against the gauge below.
- I've worked these amounts out from the stitch count, with tails for sewing. They're estimates.
Hook
- 2.5 mm. It's small for DK on purpose: the fabric comes out firm, so the stuffing doesn't show through the white.
Notions
- Black felt, a scrap about 2 in (5 cm) square, and black sewing thread with a sewing needle.
- Fiberfill, 2 stitch markers, 3 sewing pins, a tapestry needle and sharp scissors.
- A split key ring (25 mm / 1 in) with a short chain.
Gauge
Gauge isn't critical. Crochet tightly enough that the stuffing doesn't show between the stitches. With DK cotton and a 2.5 mm hook, that's about 6 sc per inch (2.5 cm), with rounds about as tall as the stitches are wide. At that tension, the head should come out about 2 in (5 cm) across, as round as a ball. That size is an estimate, so measure yours: your tension and how firmly you stuff both change it. If yours is bigger or smaller, cut the felt eyes to match (each eye about a third as tall as the head).
Abbreviations (US crochet terms)
- MR: magic ring
- ch: chain
- sc: single crochet
- inc: 2 sc in the same st
- dec: single crochet 2 together (I use the invisible decrease: insert the hook in the front loop of the next 2 sts, yarn over and pull through both front loops, yarn over and pull through the 2 loops on the hook)
- sl st: slip stitch
- R: round
- st(s): stitch(es)
Work in continuous spiral rounds. Don't join, and move your marker up at the start of each round. The number in parentheses at the end of each round is the stitch count.
How the skull is built
Here's the whole thing in one sentence. The head starts with a magic ring at the top of the crown, grows into a ball and closes at the bottom. The little step where the rounds meet is the back of the head, so the face goes on the opposite side. The chain loop is fixed through the very top of the crown, from the inside, while the head is still an open cup. The eyes are sewn on and the face is embroidered before the last rounds, while the bottom is still open, so every knot hides inside. Then the head is closed.
The pattern, step by step
Part 1: The felt eyes and the loop
Cut 2 felt eyes, and make 1 loop in white.
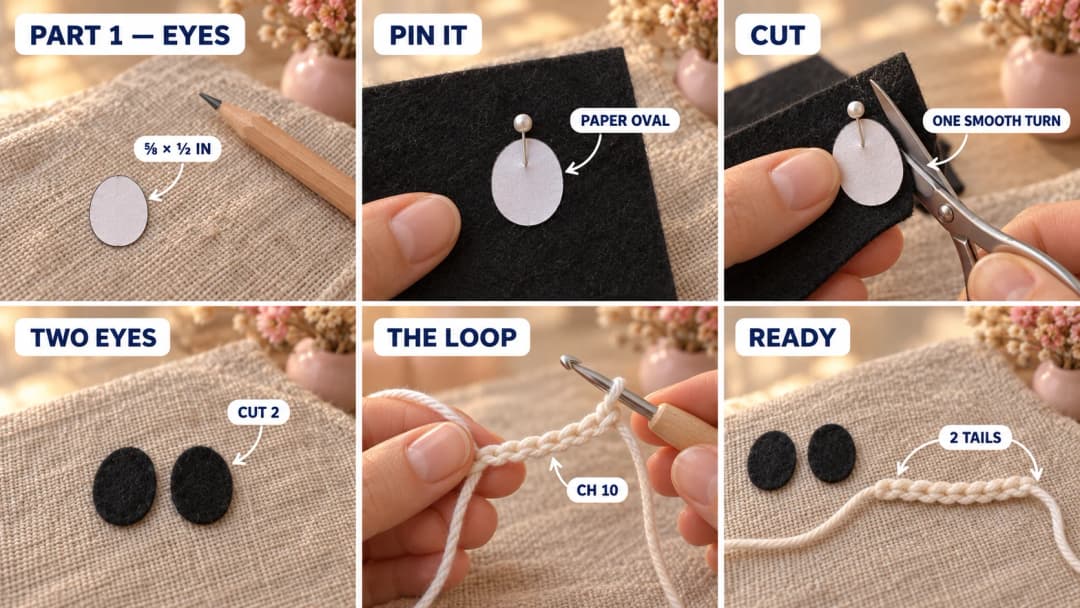
Felt eyes (black, cut 2). Two ovals, each about ⅝ in (1.6 cm) tall and ½ in (1.2 cm) wide. Draw one on paper first, cut it out and check it against your head later: each eye should be about a third as tall as the head. Pin the paper oval on the felt and cut around it with sharp scissors, in one smooth turn so the edge stays clean. Cut the second eye from the same paper oval so the two match.
Chain loop (white, make 1). Leave an 8 in (20 cm) starting tail, ch 10, fasten off leaving a second 8 in (20 cm) tail. Don't join it into a ring: the two tails go into the head in Part 2.
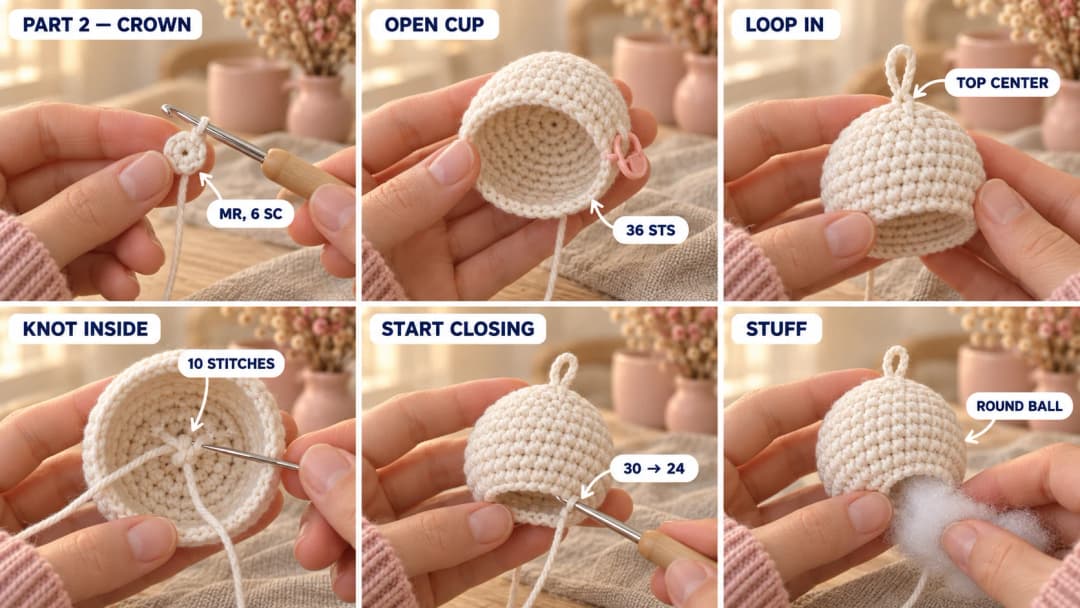
Part 2: The head, from the crown down
Make 1, in white.
- R1: MR, 6 sc in the ring. (6) Pull the ring closed tight. This is the very top of the crown, where the loop will hang.
- R2: inc × 6. (12)
- R3: (sc, inc) × 6. (18)
- R4: (sc 2, inc) × 6. (24)
- R5: (sc 3, inc) × 6. (30)
- R6: (sc 4, inc) × 6. (36)
- R7–R13: sc around. (36) 7 rounds. This is the widest part of the head, where the eyes will sit.
Fix the loop now, after R13. Keep your marker in the last st and leave the live loop on a second marker so it can't unravel. The head is an open cup, and you can reach the inside of the crown with your fingers.
- Hold the head with the marker (the back) facing away from you. Thread one tail of the chain onto the tapestry needle and push it from the outside to the inside of the crown, between R1 and R2, on the left of the magic ring. Do the same with the other tail between R1 and R2, on the right of the ring. The two ends go in about ⅓ in (8 mm) apart, and the chain stands up from the top of the crown as a little loop, lying flat from left to right, like the face.
- Inside the head, pull both tails until the loop is about ¾ in (2 cm) tall. Tie them together in a tight double knot against the inside of the crown.
- With each tail in turn, sew 5 small stitches through the inside of the crown around the knot, catching only the inner half of the white stitches so nothing shows on the outside. That's 10 small stitches in total. Trim the tails to about 1 in (2.5 cm).
Give the loop a few firm tugs from the outside. It shouldn't move, and the knot can't slip back through the crown.
Put the live loop back on your hook.
- R14: (sc 4, dec) × 6. (30)
- R15: (sc 3, dec) × 6. (24)
Don't fasten off. Slip the live loop onto a marker again.
Stuff the head now. Stuff it firmly through the opening, pushing the fiberfill up into the crown and out to the sides, and shape it into a smooth ball with your hands.
Part 3: The face
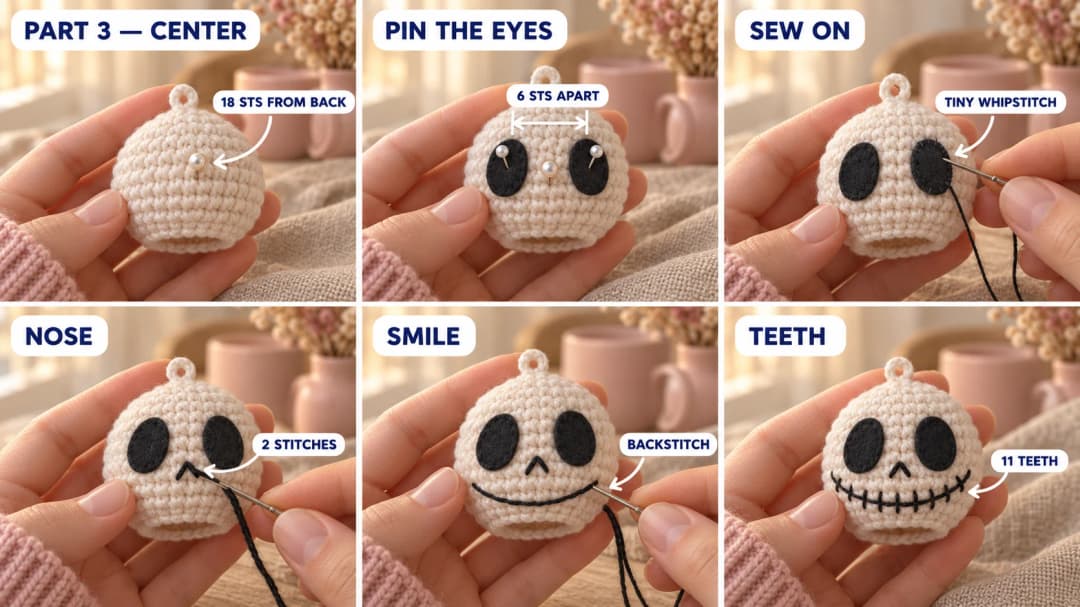
The bottom is still open, so you can start and end every thread inside the head, through the opening. For each feature, knot the thread inside, bring the needle out where the stitch starts, and take it back in through the opening when you're done.
Find center front first. Count 18 sts along R9 from the last st of the round (straight below your marker, the back of the head) and put a pin in the 18th st. That's center front, right between the eyes. Every placement below starts from this pin.
- Eyes. Pin the first felt oval upright, with its center in R9, 3 sts to the left of center front. Pin the second one with its center in R9, 3 sts to the right of center front. That's 6 sts between the two eye centers. Each eye covers about R7 to R11, on the widest part of the head. Look at the face from the front before sewing: both eyes at the same height, the same distance from the pin. With black sewing thread, sew each one on with tiny whipstitches all around the edge, about ⅛ in (3 mm) apart, catching the felt and the white stitches under it. Hide the knots inside.
- Nose. With black yarn, make a tiny upside-down V in R12, straight below the pin: two short straight stitches that meet at the top, in the middle, with their feet 2 sts apart.
- Smile. With black yarn, backstitch one long curved line, low on the face, from 7 sts to the left of center front in R12, down through R13 at 5 sts to the left, to R14 at 3 sts to the left, straight along R14 across center front to 3 sts to the right, then up through R13 at 5 sts to the right to R12 at 7 sts to the right. Keep the stitches short (1 st long each) so the line curves smoothly. Backstitch: bring the needle out one stitch ahead, go back in one stitch behind, come out one stitch ahead again.
- Teeth. Add 11 short vertical stitches across the smile, one in every st from 5 sts to the left of center front to 5 sts to the right, each one about half a round above and half a round below the line. Then add one tiny stitch at each end of the smile, going up and out, like the corners of a grin.
Pull every thread just snug: tight embroidery puckers the white. Pull the pin out when the face is done.
Part 4: Close the head and add the ring
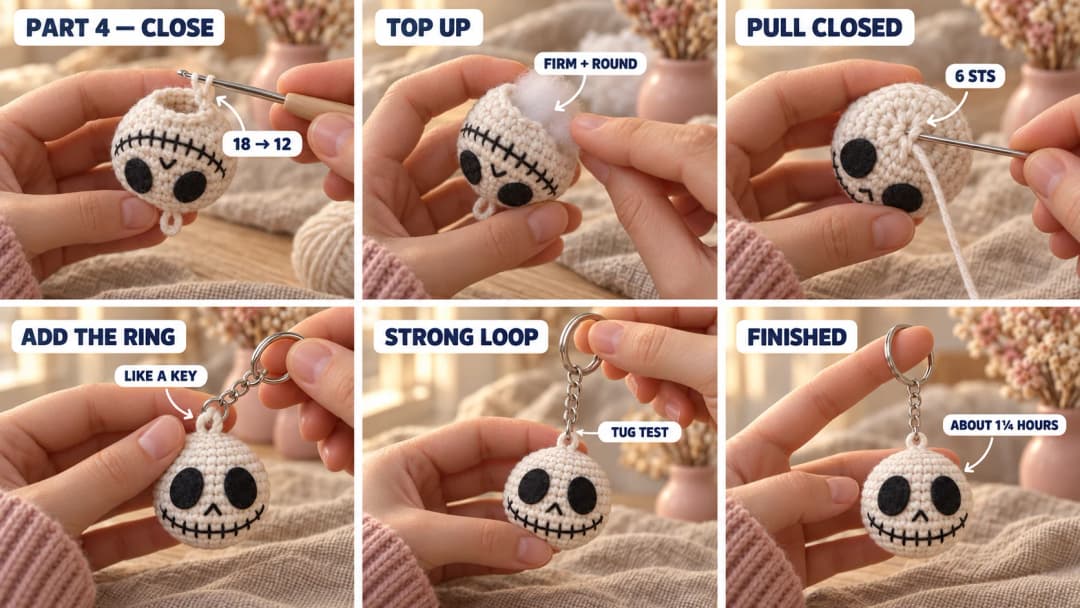
Put the live loop back on your hook.
- R16: (sc 2, dec) × 6. (18)
- R17: (sc, dec) × 6. (12) Top up the stuffing so the bottom of the ball is as firm and round as the top.
- R18: dec × 6. (6)
Fasten off, leaving a 6 in (15 cm) tail. Thread it onto the needle and pass it through the front loop of each of the 6 sts, then pull tight to close the hole. Push the needle into the center and out through the back of the head, pull a little so the end sinks inside, and trim.
Add the ring. A key ring with a chain usually ends in a small jump ring. Open it sideways (twist one end toward you and the other away, never pull it apart) with two pairs of flat pliers or your fingernails, slip it through the white loop, and twist it closed the same way, so the ends meet with no gap. If your chain has no jump ring at the end, open the split ring with a fingernail and wind it straight onto the loop, like putting a key on it.
Hold the skull up by its ring: it hangs straight from the top of the crown, face forward. Give it a few firm tugs. Cotton chain can stretch over time: if your loop gets longer, sew over the chain with a second strand of white, from the crown to the ring and back.
Safety. This keychain has a metal key ring and felt eyes, so it isn't a toy for children under 3. For a little one, leave off the ring and the loop, and embroider the eyes in black yarn with satin stitch instead of using felt. Check the seams from time to time.
Make it yours — quick variations
| Variation | Change from base pattern |
|---|---|
| Embroidered eyes | No felt: fill the two ovals with black satin stitch (short straight stitches side by side, all in the same direction). |
| Black skull | Work the head in black, cut the eyes from white felt, and embroider the nose and smile in white. |
| Pumpkin pair | Make a second head in orange with black felt eyes and hang the two from one ring. |
| Bag charm | Swap the split ring for a lobster clasp so it clips onto a bag handle or a zip. |
| Tree ornament | Skip the ring and thread a 6 in (15 cm) ribbon through the loop, tied in a knot, to hang it on a Halloween tree. |
Troubleshooting the three things that go wrong
The head isn't round
It's under-stuffed or stuffed unevenly. Add fiberfill in small tufts before you close it, and roll the head between your palms. The bottom rounds (R16 to R18) close quickly, so top up the stuffing at R17 as written.
The eyes look uneven
Each eye was pinned by eye, not by count. Go back to the pin at center front and count again: each eye center in R9, 3 sts from the pin, both upright. Felt eyes are easy to unpick and move, so check them before you close the head.
The smile looks wobbly
The backstitches are too long. Keep each one 1 st long and follow the rounds given in Part 3: R12 at the corners, R13, then R14 across the middle. If it still wobbles, unpick it and work it again: the white cotton doesn't mark.
Frequently asked questions
How long does this keychain take? About 1¼ hours if you're used to small amigurumi: about 10 minutes for the eyes and the loop, 40 for the head, and 25 for the face and finishing. Give yourself longer for your first one.
Can I use worsted yarn? Yes, with a 3.5 mm hook. The skull comes out about a third bigger, closer to 2¾ in (7 cm) across, which makes a nice bag charm. Cut the felt eyes a third bigger too.
Can I glue the felt eyes instead of sewing them? I sew them. Glue goes stiff, can show at the edges, and lets go on a keychain that gets handled every day. Tiny whipstitches in black thread disappear into the felt.
Can I sell keychains made from this pattern? Yes, you're welcome to sell finished keychains made from this free pattern at markets, on Etsy or as gifts. Please credit "Pattern by Wavode" in your listing and link back to this page. What you can't do is republish this write-up or my photos as your own pattern.
Related patterns on Wavode
- Ghost cat crochet keychain: a plush velvet ghost with cat ears.
- Pumpkin keychain: a ribbed mini pumpkin in about an hour.
- Mini vampire amigurumi: a tiny Dracula with a cape and a bow tie.
- Crochet hat keychain: a mini straw hat with a red band.
- Crochet coffee cup keychain: a takeaway cup with a lid and sleeve.
Made a skull keychain? Tag #wavodecrochet on Pinterest. I re-pin every finished make and credit the maker.
Pattern by Clara Hartwell for Wavode. Questions? Email me at support@wavode.com.