Chubby Cat Keychain Amigurumi

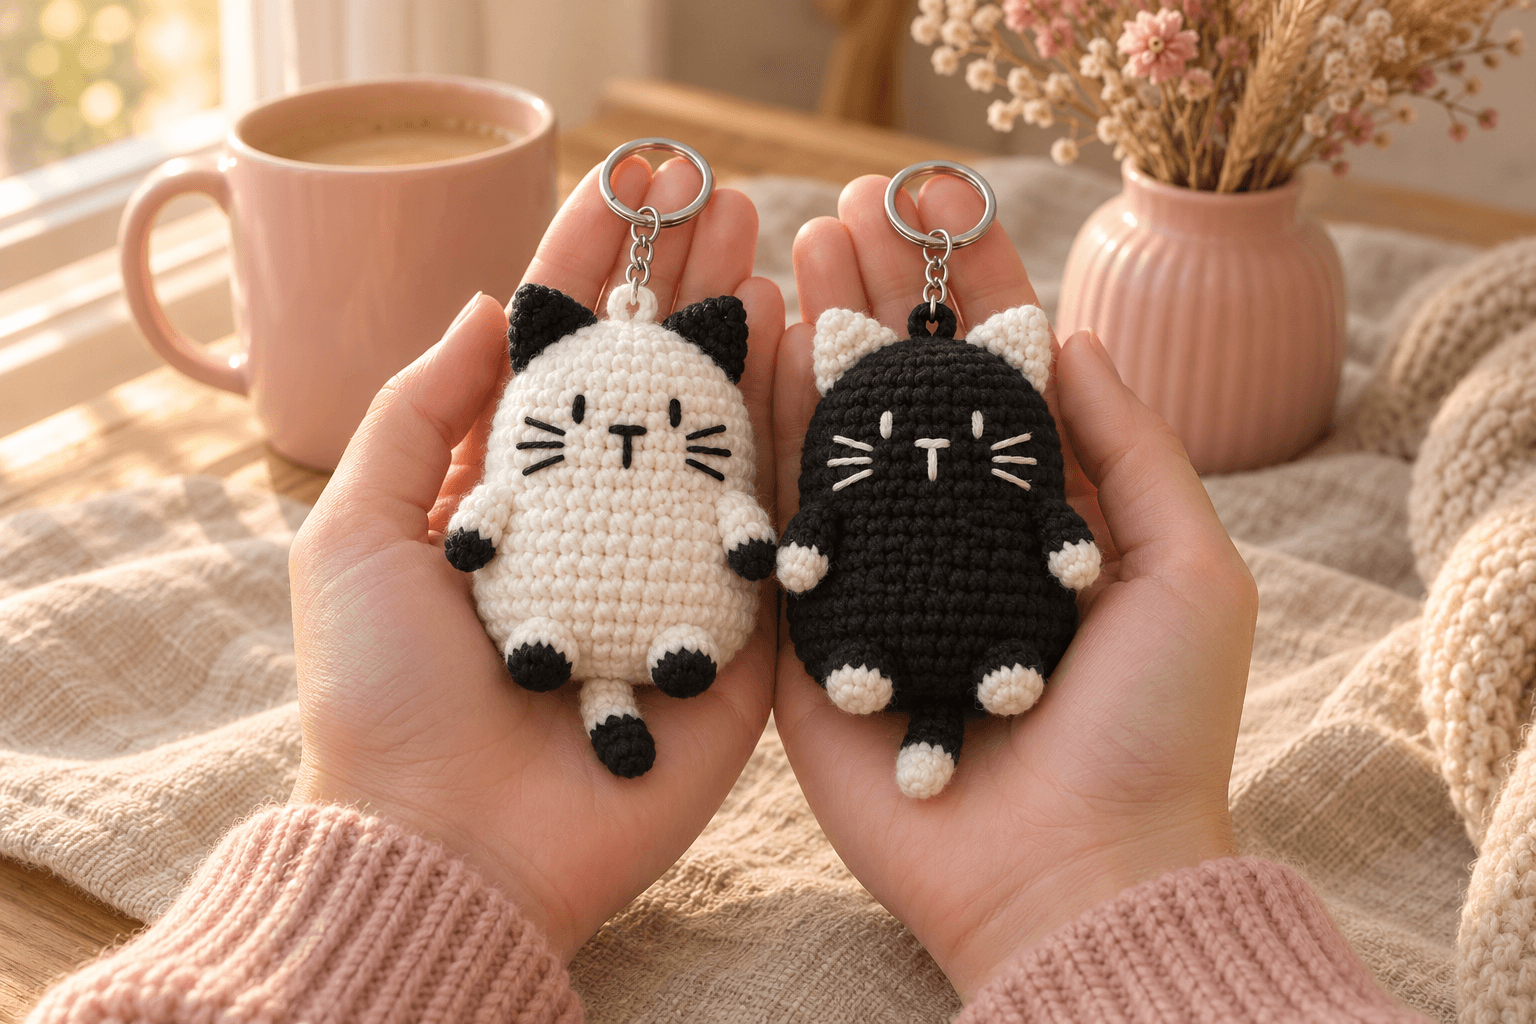
I have a soft spot for cats that look as though they've just finished lunch. A round tummy, tiny paws and a very serious little face. Mochi and Sesame are chubby cat keychain amigurumi, about 3¾ in (9.5 cm) tall, with pointed ears, three whiskers on each cheek and a little tail peeping out underneath.
Mochi is white with black details; Sesame wears the colors the other way around. The head and tummy grow together in one piece, which saves a little sewing. I embroider the face while I can still get my fingers inside. Then come the tiny paws. Make one, then swap the yarns for its companion.
| At a glance | |
|---|---|
| Finished size | about 3¾ in (9.5 cm) tall, 2¼ in (5.7 cm) wide, plus the chain and ring |
| Yarn | DK #3 cotton in white and black |
| Hook | 2.5 mm for every crocheted piece |
| Pieces | 8 crocheted pieces per cat, plus a sewn hanging loop and keychain hardware |
| Time | about 2–3 hours per cat |
| Skill | easy: magic ring, sc, inc, dec, small seams and embroidery |
Cotton and tiny findings for Mochi and Sesame
- Yarn: DK #3 cotton, about 137 yd (125 m) per 50 g ball, such as Paintbox Yarns Cotton DK in Paper White and Pure Black. For one cat, allow about 30 yd of the main color and 6 yd of the contrast color, including sewing, the face and the hanging loop. For the pair, set aside about 36 yd of white and 36 yd of black.
- Hook: 2.5 mm for the body, ears, arms, feet and tail.
- Keychain hardware: one silver split ring with a short, fine-link chain and a small open jump ring, about 5 mm, per cat. Two pairs of flat pliers help open and close the jump ring.
- Small things: polyester fiberfill, a tapestry needle, embroidery needle, scissors, sewing pins, one locking stitch marker and a length of bright scrap yarn to mark the front.
For Mochi, white is the main color and black is the contrast. For Sesame, black is the main color and white is the contrast. Use the contrast yarn for the whole face too. All the instructions below make one cat; work them again with the colors swapped for the pair.
Tension. I keep the stitches snug, about 6 sc per inch (2.5 cm), so the stuffing doesn't peek through. At that tension Mochi's body is about 3¼ in (8 cm) long, before the ears and tail. Let the hook slide through easily. Tight stitches are good; sore fingers aren't.
Stitches, in US terms: magic ring (MR), single crochet (sc), increase (inc: 2 sc in one stitch), decrease (dec: sc 2 together) and slip stitch (sl st). R means round; st means stitch. Work continuous spirals without joining. Keep the marker in the first stitch and move it up each round. Counts are in parentheses; the finishing slip stitch doesn't add to them.
Making the chubby cat body
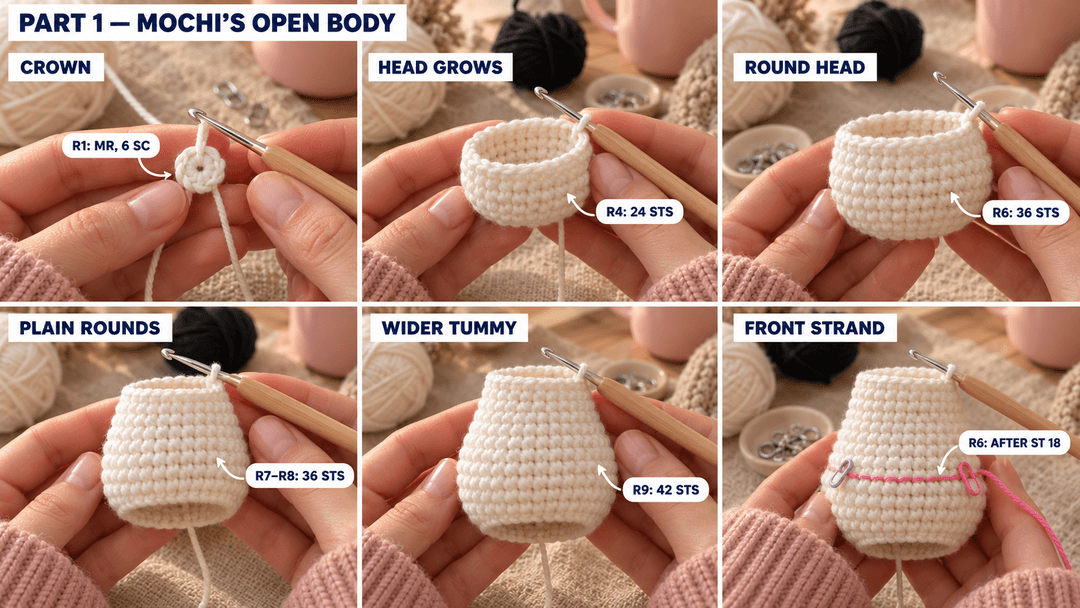
Head and body (main color, 2.5 mm hook, Make 1). Start at the crown between the ears. The last round closes the bottom of the tummy. Mochi's head flows straight into that round belly, like a little pear.
- R1: MR, 6 sc in the ring. (6)
- R2: inc × 6. (12)
- R3: (sc, inc) × 6. (18)
- R4: (sc 2, inc) × 6. (24)
- R5: (sc 3, inc) × 6. (30)
- R6: (sc 4, inc) × 6. (36)
- R7–R8: sc around. (36) 2 rounds.
- R9: (sc 5, inc) × 6. (42)
Leave the little body open and empty for a moment. Slip the working loop onto the locking marker. Finish the face and hanging loop in the next section before continuing with R10.
Mark the front now. Keep the first stitch of the round at the back. Count 18 stitches along R6 and tuck the bright scrap strand into the gap after stitch 18. Run it up toward the crown and down the tummy, like a little center seam (on R9, it passes after stitch 21). Leave it there until the ears and paws are sewn on.
Embroidering the cat’s eyes, nose and whiskers before closing
Lay Mochi with the marked face toward you and the crown at the top. The opening points down, so you can reach behind every stitch. I use a short length of contrast yarn for each feature; a long strand tangles inside this little body.
- Eyes. Make two little upright dashes, one on each side of the scrap strand. Count from the first stitch at the back: the eyes sit after stitch 15 and after stitch 21 on R6, three stitch widths either side of the strand. Sew two short vertical stitches over R6 for each eye, from the gap between R5 and R6 to the gap between R6 and R7. Keep them tiny.
- Nose. Sew a short horizontal bar below the eyes, centered on the scrap strand. Make two stitches between R6 and R7, from the gap after stitch 17 of R7 to the gap after stitch 19.
- Mouth. Bring the needle out at the middle of the nose and take one stitch straight down. There's Mochi's little T-shaped mouth (start after stitch 18 of R7 and finish between R7 and R8, after stitch 18 of R8).
- Whiskers. Mark a spot on each cheek, between R7 and R8, after stitches 14 and 22 of R8. From each spot, sew three whiskers about three stitches long, fanning out: one angled up, one straight out, one angled down. Keep the yarn resting on the fabric (on the first side, end after stitch 11 of R7, stitch 11 of R8 and stitch 13 of R9, at their upper edges; on the other side, end after stitch 25 of R7, stitch 25 of R8 and stitch 29 of R9, at their upper edges).
Knot the embroidery ends on the inside, then weave each end through a few stitch backs. Let the fabric stay soft under the face; tight whiskers pull little dents into the cheeks.
A small hanging loop, anchored inside the crown
Sew a little yarn loop between the ears, right over the crown, a bit like a tiny buttonhole. Cut 40 in (100 cm) of main-color cotton and leave a 6 in (15 cm) tail inside the body.
- Bring the needle out between R1 and R2 on one side of the magic ring. Lay the shaft of the 2.5 mm hook across the crown as a spacer.
- Pass the yarn over the shaft and back inside between R1 and R2 on the opposite side of the ring. Bring the needle out at the first spot again. Work six passes in total over the shaft, making one small bundle of loops.
- Slip the hook out. Keep the loop just large enough for the jump ring, about ¼ in (0.6 cm) high. Smooth the six strands side by side so the jump ring has room.
- On the inside, take 12 small backstitches around R2, one through the fabric behind each of its twelve stitches. Knot the working end to the starting tail, then weave both ends into the inside of the crown.
Tip. Tug the loop gently now. The crown should lift without the stitches opening up. If the cotton loop stretches with use, sew another strand through the same loop and repeat the twelve anchoring stitches before putting it back on your bag.
Finish Mochi’s round tummy
Put the working loop back on your hook and finish the tummy.
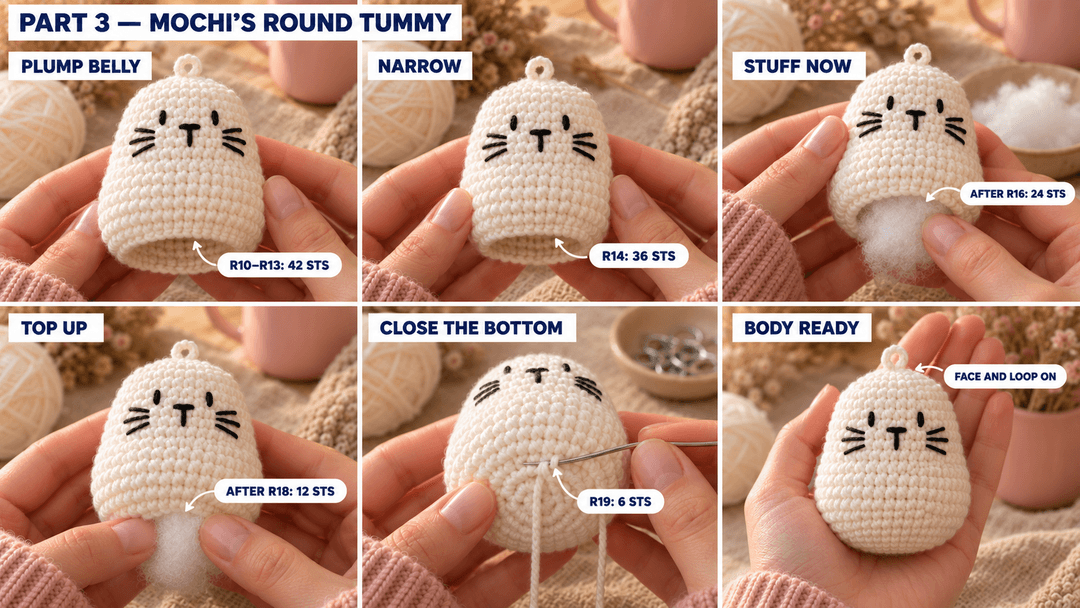
- R10–R13: sc 42. (42) 4 rounds: the belly.
- R14: (sc 5, dec) × 6. (36)
- R15: (sc 4, dec) × 6. (30)
- R16: (sc 3, dec) × 6. (24)
Stuff after R16. Push small tufts into the crown first, then fill the tummy until it feels plump. Keep the face smooth. I give Mochi a gentle squeeze between my palms to flatten him a little front to back.
- R17: (sc 2, dec) × 6. (18)
- R18: (sc, dec) × 6. (12)
Add a final small tuft through the opening. Keep the bottom rounded without packing it hard.
- R19: dec × 6. (6)
Sl st in the next stitch and fasten off, leaving a 6 in (15 cm) tail at the bottom. Thread it through the front loop of each of the six remaining stitches, pull the opening closed and hide the end inside.
Little cat ears, two-tone paws and a tiny tail
Mochi's black ears and paw tips are the fun part. For Sesame, pick up the white yarn instead.
Small pointed ears
Ears (contrast color, 2.5 mm hook, Make 2). Start at the pointed tip and work down to the open base.
- R1: MR, 3 sc in the ring. (3)
- R2: inc × 3. (6)
- R3–R5: sc around. (6) 3 rounds.
Don't stuff. Sl st in the next stitch and fasten off, leaving an 8 in (20 cm) tail at the open base. Flatten the opening into two layers of three stitches. Pinch the magic-ring end into a little point with your fingers. Keep the long tail for sewing the base.
Two little arms
Arms (contrast, then main color, 2.5 mm hook, Make 2). Start at the colored paw tip; the last round becomes the shoulder.
- R1: MR, 6 sc in the ring. (6)
- R2: sc around. (6)
In the last sc of R2, stop with two loops on the hook and finish the stitch with the main color. Cut the contrast yarn here, leaving a 4 in (10 cm) tail. Knot the two color-change ends inside and tuck them into the paw.
- R3–R4: sc around. (6) 2 rounds in the main color.
Leave the arms unstuffed. Sl st in the next stitch and fasten off with an 8 in (20 cm) main-color tail at the shoulder. Flatten the six-stitch opening into two layers of three stitches. The soft arms lie against the sides of the tummy.
Two round feet
Feet (contrast, then main color, 2.5 mm hook, Make 2). The magic ring is the toe; the last round is the open top that meets the body.
- R1: MR, 6 sc in the ring. (6)
- R2: sc around. (6)
Change to the main color on the final pull-through of the last sc of R2, exactly as for the arms. Cut and secure the contrast end inside. Push a tiny pinch of stuffing into each toe after R2.
- R3: sc around. (6)
Sl st in the next stitch and fasten off, leaving an 8 in (20 cm) main-color tail at the open top. Keep the top empty and flatten it into two layers of three stitches.
The tail with a contrasting tip
Tail (contrast, then main color, 2.5 mm hook, Make 1). Start at the colored tip and work toward the open base, where the tail joins Mochi's back.
- R1: MR, 4 sc in the ring. (4)
- R2: sc around. (4)
Change to the main color in the last stitch of R2, as for the arms. Cut the contrast yarn, leaving a 4 in (10 cm) end, and secure the ends inside.
- R3–R5: sc around. (4) 3 rounds in the main color.
Don't stuff the tail. Sl st in the next stitch and fasten off with an 8 in (20 cm) main-color tail at the open base. Flatten the opening into two pairs of stitches. Let the tail stay soft and straight, with just its colored tip showing below the tummy.

Putting Mochi together and securing the keychain
Sit Mochi facing you, with the scrap strand down his tummy and the beginning-of-round line at his back. Pin the ears and paws before sewing. I hold him by the crown loop for a moment to see how they hang.
- Ears. Pin them on either side of the crown, tips up and flat sides facing you (at R4, over stitches 5–7 and stitches 18–20, counted from the first stitch at the back). With each ear tail, sew through both layers of the flattened base and the three body stitches underneath. Then come back along the same seam: three stitches out and three back.
- Arms. Let the colored paws point down against the tummy, with the main-color shoulders at the top. Pin the flattened shoulders in place (on R10, across stitches 13–15 and stitches 28–30); the paws rest over R12–R13. Sew each shoulder through both layers with three stitches, then go back with three more. Leave the paw ends free to flop.
- Feet. Pin them low on the front, colored toes pointing down and a little out. Leave a small gap between them (attach the flattened tops at R17, across stitches 6–8 and stitches 11–13). Sew through both layers of each top, three stitches out and three back.
- Tail. Turn Mochi over and lay the tail down his back, colored tip toward his bottom. Pin the flattened base in place (on R16, across stitches 24 and 1). Sew through both layers, two stitches out and two back. Lift him up: the little colored tip should peep out between his feet.
Hide the sewing ends inside the body and take out the scrap strand. Turn him around: that's Mochi, ready for his key ring.
Add the metal chain. Open the jump ring sideways with two pairs of pliers, twisting one end toward you and the other away. Slide it through the sewn crown loop and the last link of the keychain, then twist it closed until the ends meet with no gap. Don't pull the ring ends straight apart. Hold the split ring: the cat should hang crown up, with the face looking forward.
Safety. Mochi and Sesame have metal keychain parts, so they aren't toys for children under three, even with embroidered eyes. Keep the finished keychains away from little hands. For a cat without hardware, leave off the hanging loop, chain and ring.
A black-and-white pair to share
Sesame uses the same instructions, stitch for stitch: black body, white ears, white paw tips, white tail tip and a white embroidered face. Leave Sesame's upper arms, tops of his feet and tail base black. Those little patches of white are enough to make the second cat look quite different.
I like them side by side, one for each bag, or tucked into a small box together as a gift. And if they'd like a little company on the same key ring, the crochet penguin keychain would fit right in.
UK terms: sc = UK dc; sl st = UK ss. The stitch counts stay the same.
Made your own Mochi or Sesame? Tag #wavodecrochet on Pinterest so I can see them.