Sleepy Bear on the Moon

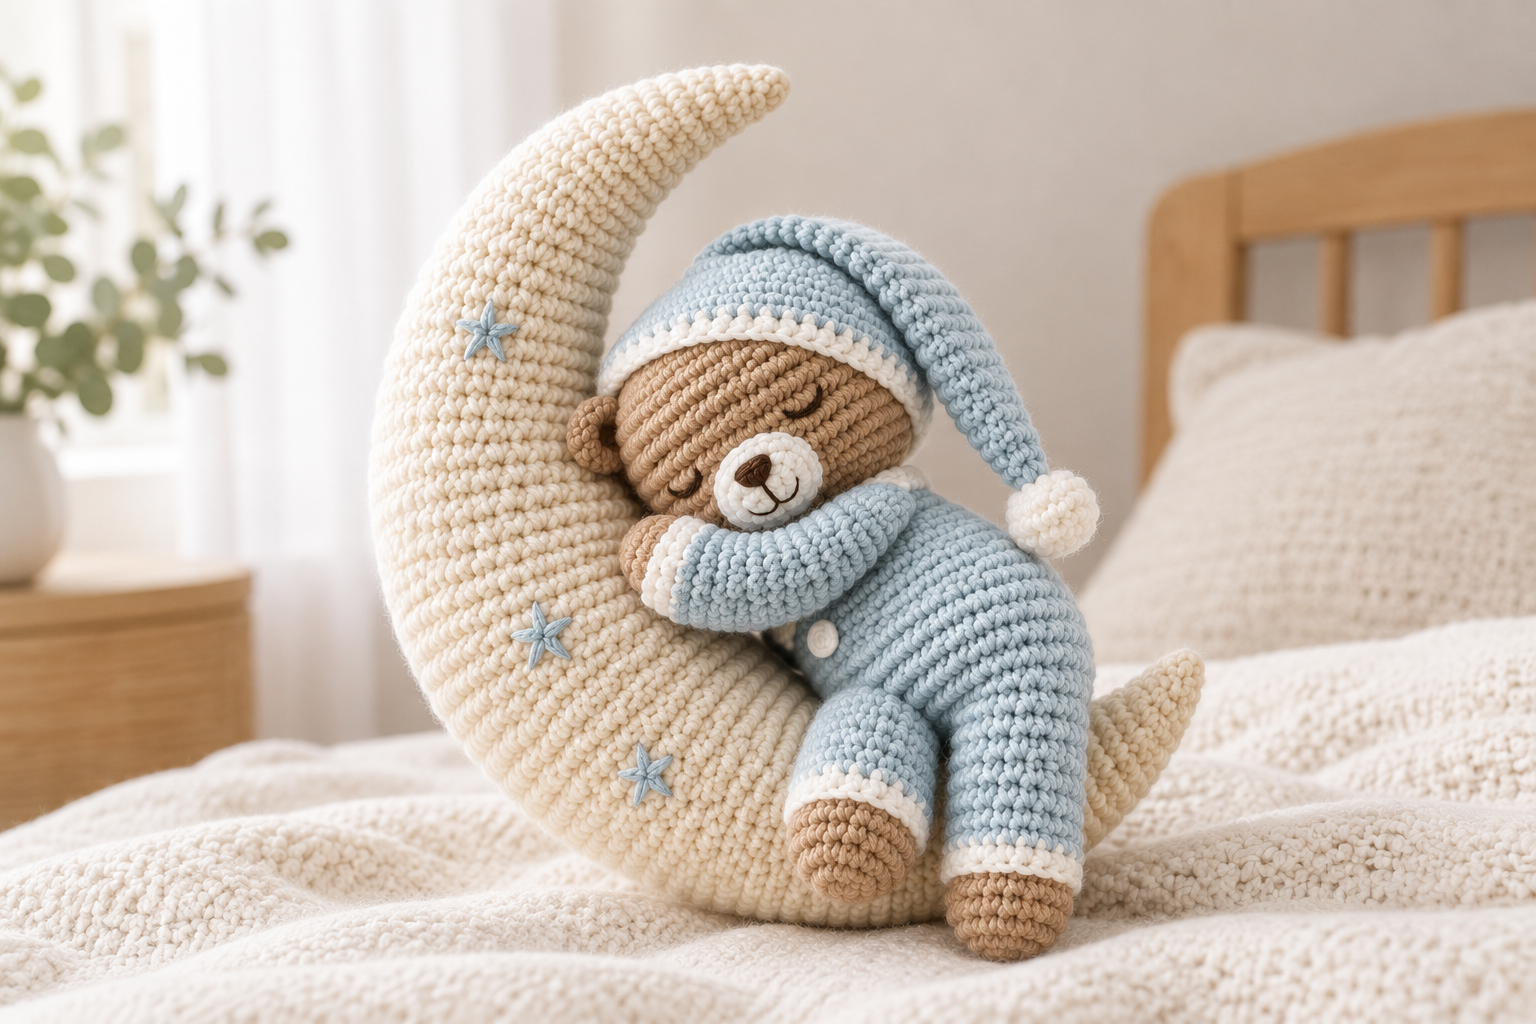
This sleepy bear on the moon crochet pattern makes a tan teddy in powder-blue pajamas and a floppy nightcap, curled up asleep on a cream crescent moon about 7 inches tall. Everything is single crochet in DK cotton on a 2.5 mm hook. The face is embroidered, so there are no safety eyes or plastic buttons. You'll need about 200 yards across four colors, and it takes 9 to 11 hours, which makes it a relaxed weekend project.
Key Takeaways
- Two builds, one keepsake: a stuffed crescent moon worked as one curved tube, and a bear made of 9 small pieces sewn together.
- Only beginner stitches: magic ring, single crochet, increase, invisible decrease and slip stitch, plus simple embroidery.
- About 200 yd of DK #3 cotton in cream, powder blue, caramel tan and white. One 50 g ball of each color is plenty.
- Embroidered face and buttons, so there's nothing hard to pull off. It's still a shelf or supervised-play toy, never a crib toy (see the safety note).
Why I love this sleepy bear
There's a reason the bear-on-a-moon shape keeps showing up in nurseries. It says "goodnight" without a single word. I wanted a version that a confident beginner could actually finish. So the moon is one tube with no flat panels to join, and the bear is small, simple pieces.
The trick that makes it work is on the moon. Increases stack on one side of the tube and plain stitches stay on the other, so the moon starts to bend as you go. At the end, one pulled running stitch along the inside curve turns a gentle banana into a proper crescent. I'd skipped that pull on an earlier moon and it looked more like a croissant. It's now my favorite ten-minute fix in amigurumi.
The bear gets its sleepy look from two small curved stitches. Embroidered closed eyes are easier than safety eyes, and they're kinder for a baby gift too.
Pattern at a glance
- Stitch: single crochet in continuous spirals, with invisible decreases.
- Yarn: DK #3 cotton, about 200 yd (183 m) in total across four colors.
- Hook: 2.5 mm (US B/C). That's smaller than a DK ball band suggests, on purpose, so the stuffing doesn't show.
- Construction: moon tube (tip to tip) → bear head → body → arms → legs → ears, muzzle, nightcap, pompom → embroidery → assembly.
- Finished size: the moon is about 7 in (18 cm) tip to tip. The bear is about 4.5 in (11 cm) from cap to toes. Tension shifts both a little.
- Time: 9–11 hours. Plan about 3 hours for the moon, 5 to 6 for the bear, and 1.5 for embroidery and assembly.
- Skill level: advanced beginner. You should be happy with a magic ring and with sewing small pieces onto a round shape.
What you'll need
Yarn (DK #3 cotton, ~200 yd / 183 m total)
- Cream (moon): 65–80 yd. I like Paintbox Yarns Cotton DK in Champagne White.
- Powder blue (pajamas and nightcap): 55–70 yd. Paintbox Cotton DK Duck Egg Blue or any soft baby blue.
- Caramel tan (bear): 35–45 yd. Pick a light camel or biscuit shade.
- White (muzzle, cuffs, collar, brim, pompom): 15–20 yd. Paintbox Cotton DK Paper White works.
These are all true DK #3 cottons. Please don't mix in a worsted #4 cotton like Lily Sugar 'n Cream for one color. That piece will come out noticeably bigger than the rest.
Hook and notions
- 2.5 mm crochet hook
- Polyfil stuffing, about 1.5 oz (40 g)
- Dark brown embroidery floss or DK yarn, for the eyes, nose and mouth
- A little powder-blue yarn or floss, for the stars on the moon
- Tapestry needle, plus a sharp embroidery needle if you're using floss
- 2 stitch markers
- Pins (long quilting pins are easiest)
Tension
You don't need a strict gauge here. Aim for a firm fabric where the white stuffing doesn't peek through between stitches. If you can see stuffing, go down to a 2.25 mm hook.
Abbreviations (US terms)
- MR: magic ring
- ch: chain
- sc: single crochet
- inc: 2 sc in the same stitch
- inv dec: invisible decrease (insert the hook into the front loops of the next 2 stitches, yarn over, pull through both, then finish like a sc)
- sl st: slip stitch
- (…) × N: repeat the part in brackets N times
- (N): the stitch count at the end of the round
Work every piece in a continuous spiral. Move your marker up at the start of each round.
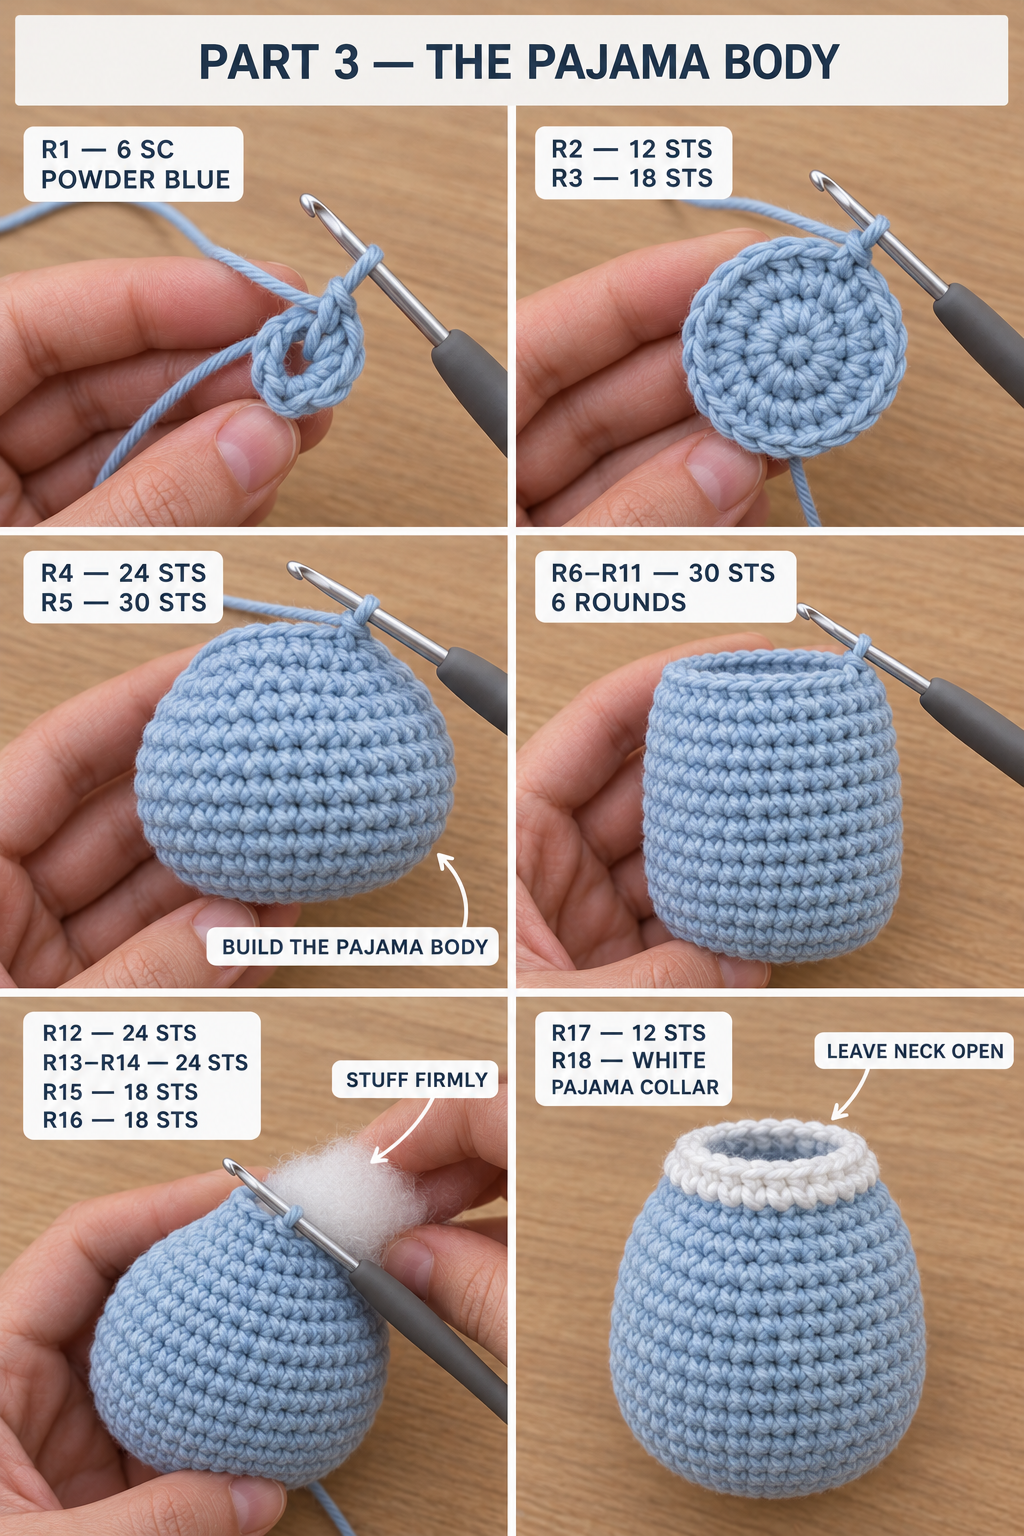
Crescent moon (make 1, in cream)
The moon is one stuffed tube, worked from one tip to the other. The magic ring is the top tip and the final round closes the bottom tip.
Every round in the middle section ends with 12 plain sc. Those 12 stitches are the inner curve of the crescent. All increases and decreases happen before them, on the outer curve. Put a second marker in the first of those 12 stitches when you reach Round 10. Check now and then that the block of 12 is still lining up, because spirals drift a little.
Top tip
- R1: 6 sc in MR. (6)
- R2: (sc, inc) × 3. (9)
- R3: sc in each st. (9)
- R4: (2 sc, inc) × 3. (12)
- R5: sc in each st. (12)
- R6: (3 sc, inc) × 3. (15)
- R7: sc in each st. (15)
- R8: (4 sc, inc) × 3. (18)
- R9: sc in each st. (18)
Stuff the tip firmly now with small tufts. It's hard to reach later.
Growing the outer curve
- R10: (sc, inc) × 3, 12 sc. (21)
- R11: sc in each st. (21)
- R12: (2 sc, inc) × 3, 12 sc. (24)
- R13: sc in each st. (24)
- R14: (3 sc, inc) × 3, 12 sc. (27)
- R15: sc in each st. (27)
- R16: (4 sc, inc) × 3, 12 sc. (30)
- R17: sc in each st. (30)
- R18: (5 sc, inc) × 3, 12 sc. (33)
- R19: sc in each st. (33)
- R20: (6 sc, inc) × 3, 12 sc. (36)
- R21: sc in each st. (36)
- R22: (7 sc, inc) × 3, 12 sc. (39)
- R23: sc in each st. (39)
- R24: (8 sc, inc) × 3, 12 sc. (42)
Keep stuffing as you go, every 5 rounds or so.
Middle of the moon
- R25–R30: sc in each st. (42, 6 rounds)
Shrinking the outer curve
- R31: (8 sc, inv dec) × 3, 12 sc. (39)
- R32: sc in each st. (39)
- R33: (7 sc, inv dec) × 3, 12 sc. (36)
- R34: sc in each st. (36)
- R35: (6 sc, inv dec) × 3, 12 sc. (33)
- R36: sc in each st. (33)
- R37: (5 sc, inv dec) × 3, 12 sc. (30)
- R38: sc in each st. (30)
- R39: (4 sc, inv dec) × 3, 12 sc. (27)
- R40: sc in each st. (27)
- R41: (3 sc, inv dec) × 3, 12 sc. (24)
- R42: sc in each st. (24)
- R43: (2 sc, inv dec) × 3, 12 sc. (21)
- R44: sc in each st. (21)
- R45: (sc, inv dec) × 3, 12 sc. (18)
Bottom tip
- R46: sc in each st. (18)
- R47: (4 sc, inv dec) × 3. (15)
- R48: sc in each st. (15)
- R49: (3 sc, inv dec) × 3. (12). Finish stuffing the whole moon firmly, right into this end.
- R50: sc in each st. (12)
- R51: (2 sc, inv dec) × 3. (9)
- R52: sc in each st. (9)
- R53: (sc, inv dec) × 3. (6)
- Fasten off. Thread the tail through the front loops of the last 6 stitches, pull the hole shut and hide the end inside the moon.
Deepen the crescent (don't skip this)
- Cut 30 in (75 cm) of cream yarn and thread it on the tapestry needle.
- Bring it out at the top tip, right in the middle of the 12-stitch inner band.
- Work a running stitch down the center of that band, one stitch every 2 rounds, all the way to the bottom tip.
- Pull the yarn gently. The inner curve gathers and the two tips swing toward each other. Stop when the moon looks like a crescent, not a banana.
- Knot the yarn at the bottom tip, then bury the end deep inside the moon.
Embroider the stars now, before the bear goes on. Decide which side of the moon is the front. Using powder-blue yarn or floss, stitch 4 or 5 small stars across it: four straight stitches crossing at the center, each about 3 rounds long. Scatter them unevenly on the outer half of the front, where the bear won't cover them. Knot on the inside by passing the needle through the moon and out the back.
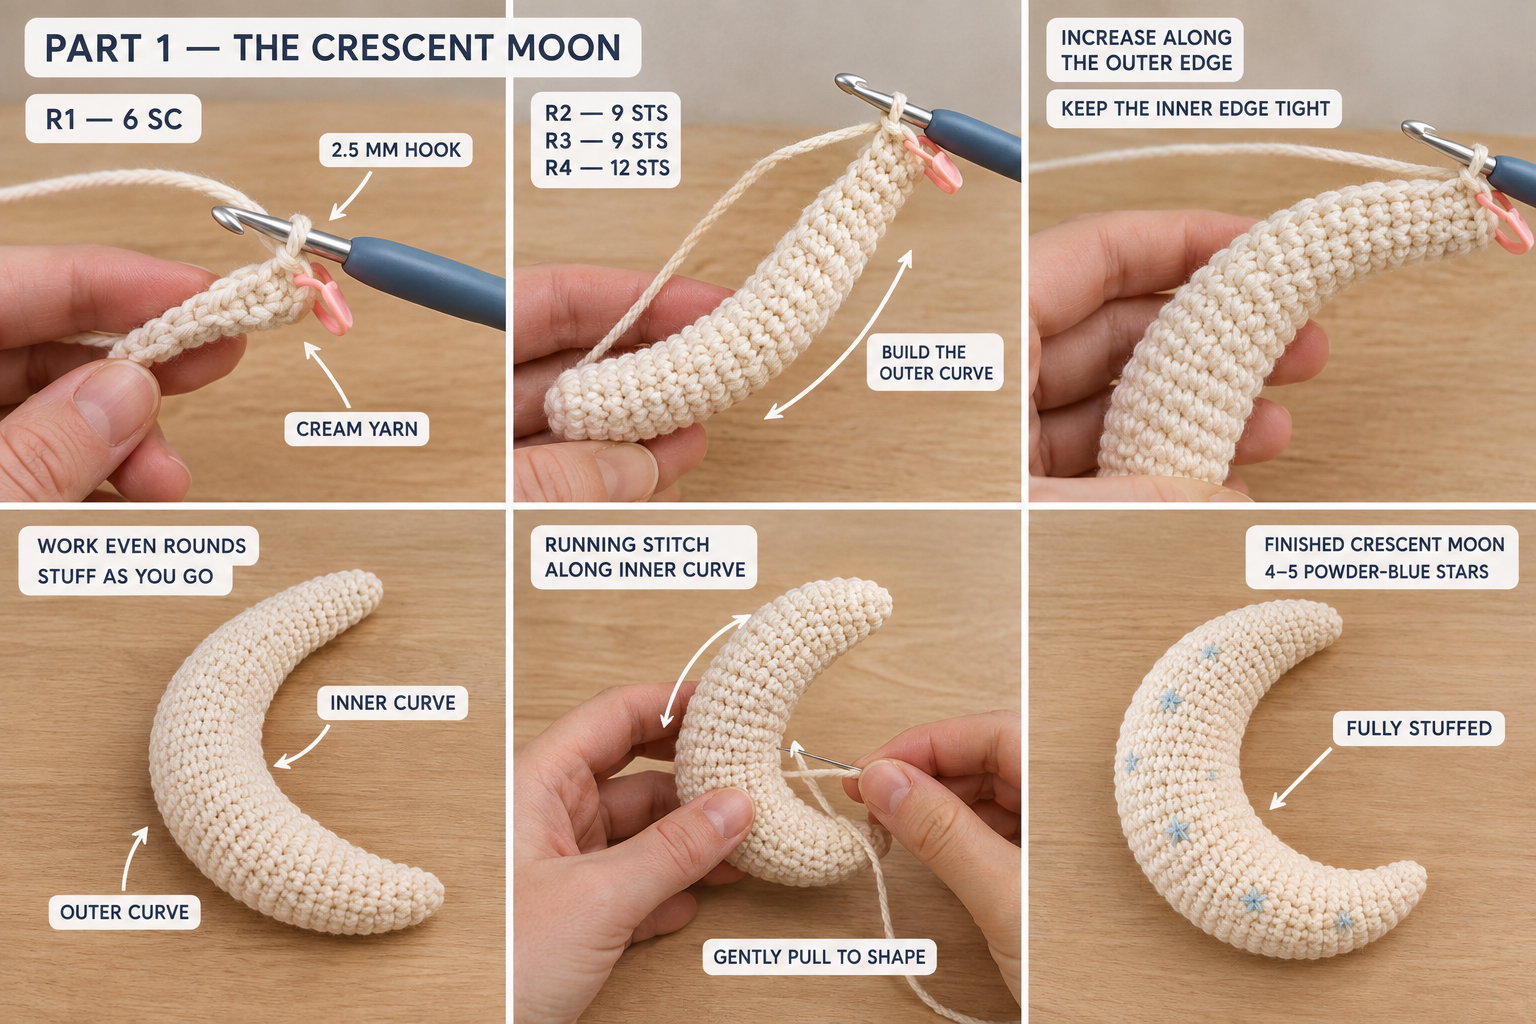
Bear head (make 1, in tan)
The magic ring is the crown of the head. The last round is an open 12-stitch neck opening that matches the body's neck stitch for stitch. Don't close it. You'll embroider the face before this opening is closed by the neck seam.
- R1: 6 sc in MR. (6)
- R2: inc × 6. (12)
- R3: (sc, inc) × 6. (18)
- R4: (2 sc, inc) × 6. (24)
- R5: (3 sc, inc) × 6. (30)
- R6: (4 sc, inc) × 6. (36)
- R7–R14: sc in each st. (36, 8 rounds)
- R15: (4 sc, inv dec) × 6. (30)
- R16: (3 sc, inv dec) × 6. (24). Start stuffing firmly.
- R17: (2 sc, inv dec) × 6. (18)
- R18: (sc, inv dec) × 6. (12). Top up the stuffing so the head is firm and round.
- Fasten off, leaving an 18-inch (45 cm) tail for the neck seam. Leave the 12-stitch neck open.
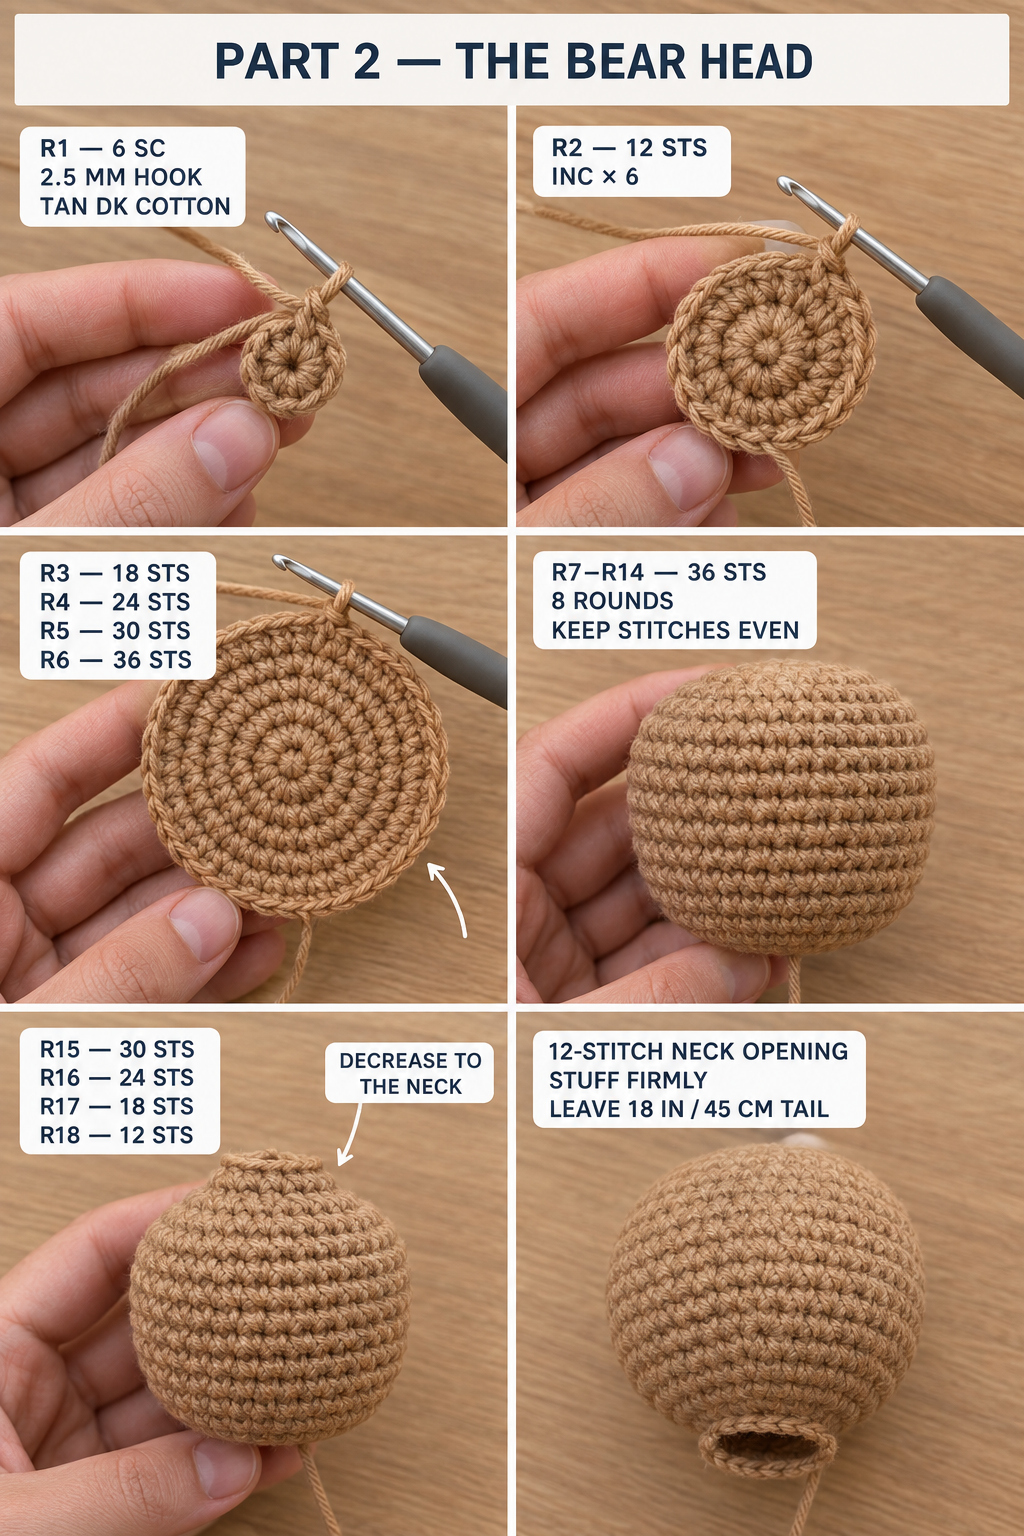
Bear body (make 1, in powder blue with a white collar)
The body is worked from the bottom up. The magic ring is the seat of the pajamas, and the last round is the neck opening.
- R1: 6 sc in MR. (6)
- R2: inc × 6. (12)
- R3: (sc, inc) × 6. (18)
- R4: (2 sc, inc) × 6. (24)
- R5: (3 sc, inc) × 6. (30)
- R6–R11: sc in each st. (30, 6 rounds)
- R12: (3 sc, inv dec) × 6. (24)
- R13–R14: sc in each st. (24, 2 rounds)
- R15: (2 sc, inv dec) × 6. (18)
- R16: sc in each st. (18). Stuff the body firmly.
- R17: (sc, inv dec) × 6. (12). Top up the stuffing.
- R18: change to white. Sc in each st. (12). This round is the pajama collar.
- Fasten off with a short 4-inch tail and weave it in. Leave the neck open. The head's long tail does the seam.
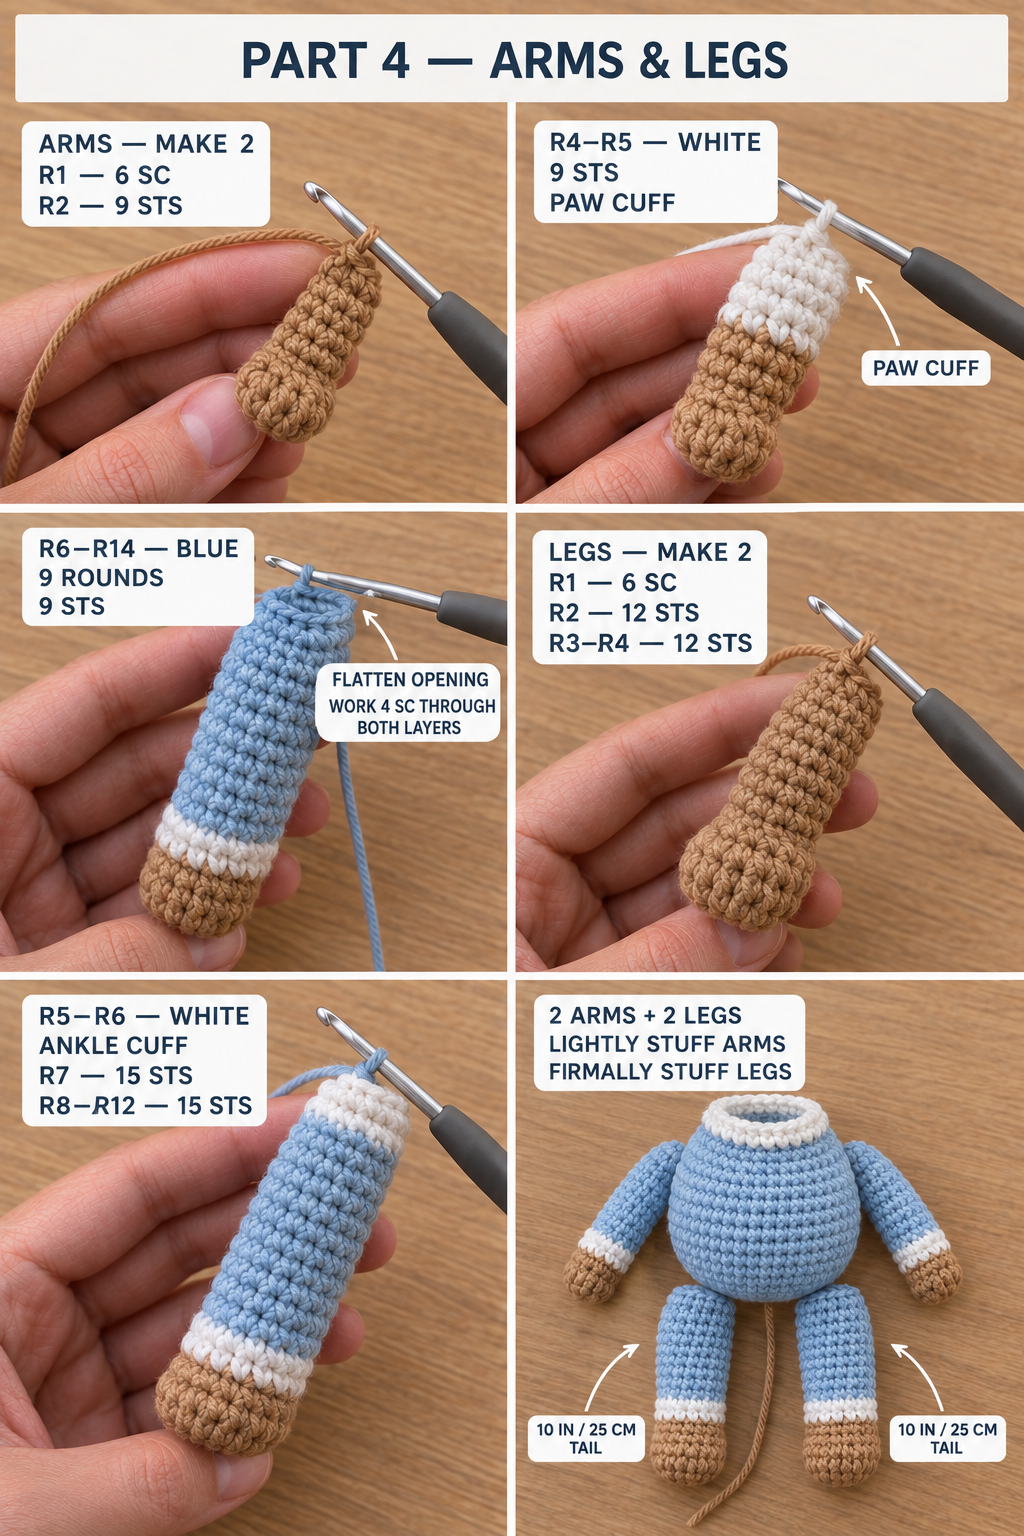
Arms (make 2: tan paw, white cuff, blue sleeve)
Each arm starts at the paw (the magic ring) and ends at the shoulder, which is the flat closing you'll sew on.
- R1: with tan, 6 sc in MR. (6)
- R2: (sc, inc) × 3. (9)
- R3: sc in each st. (9)
- R4–R5: change to white. Sc in each st. (9, 2 rounds). This is the cuff.
- R6–R14: change to blue. Sc in each st. (9, 9 rounds)
- Stuff only the paw and the lower half of the arm, lightly. Leave the top soft so the arm can bend around the moon.
- Flatten the opening and work 4 sc across, through both layers.
- Fasten off, leaving a 10-inch (25 cm) tail at the shoulder.
Legs (make 2: tan foot, white cuff, blue leg)
Each leg starts at the sole of the foot (the magic ring) and ends at the hip, which is the flat closing you'll sew on.
- R1: with tan, 6 sc in MR. (6)
- R2: inc × 6. (12)
- R3–R4: sc in each st. (12, 2 rounds)
- R5–R6: change to white. Sc in each st. (12, 2 rounds). Ankle cuff.
- R7: change to blue. (3 sc, inc) × 3. (15)
- R8–R12: sc in each st. (15, 5 rounds)
- Stuff the leg firmly, but leave the top quarter-inch a bit softer so it lies flat against the body.
- Flatten the opening and work 7 sc across, through both layers.
- Fasten off, leaving a 10-inch (25 cm) tail at the hip.
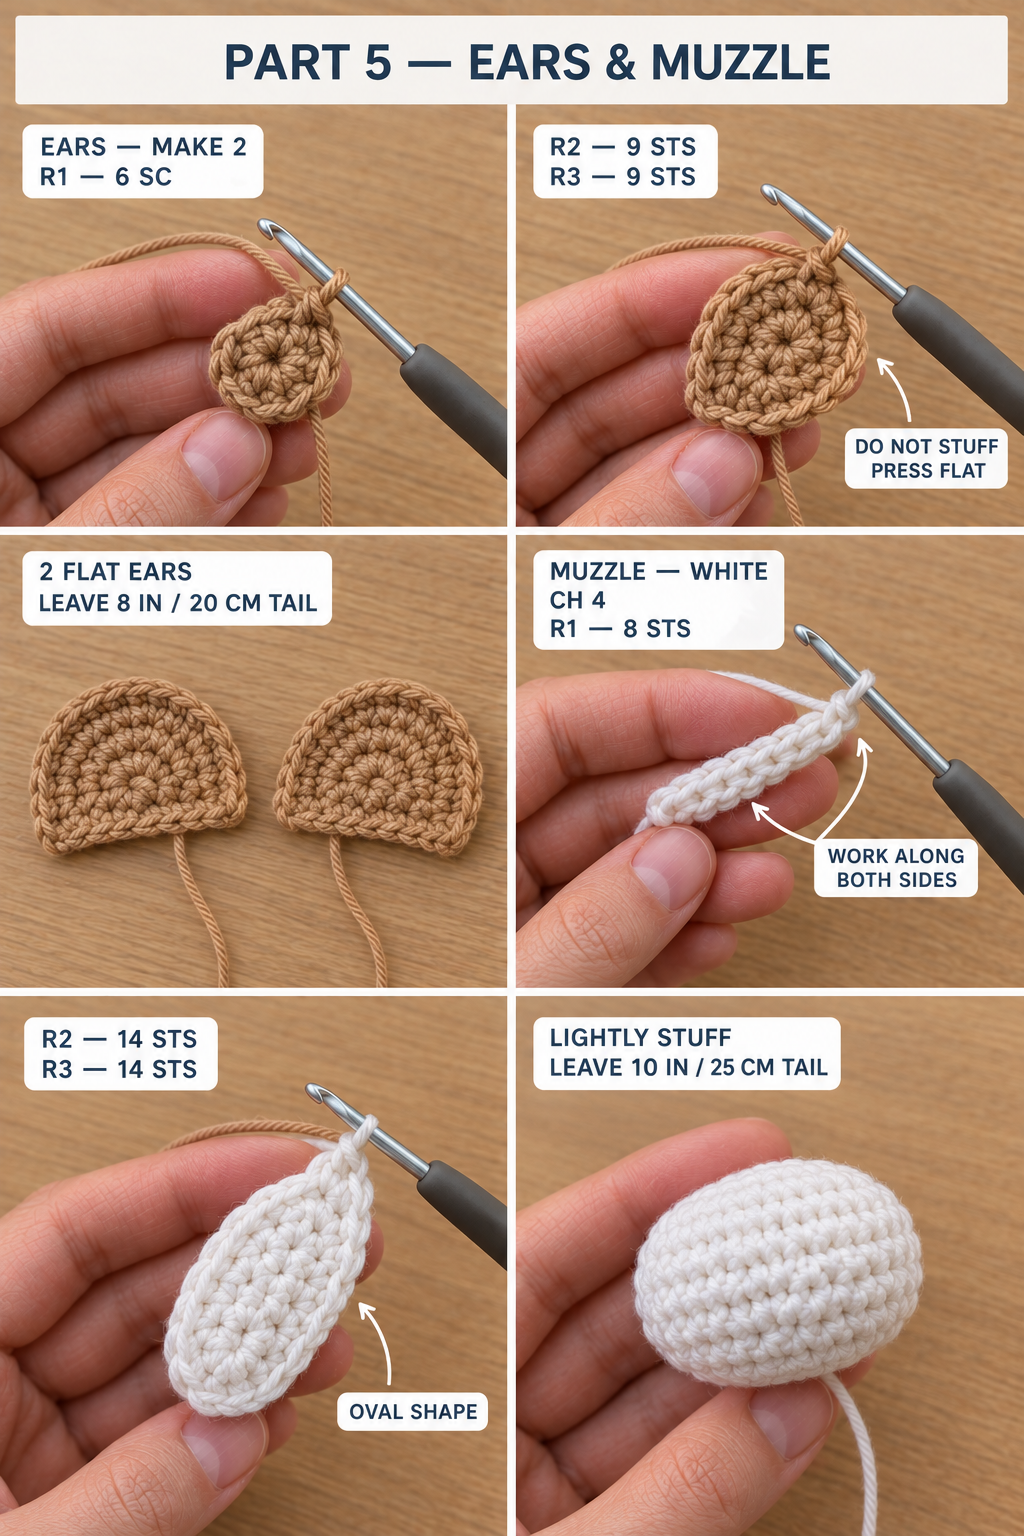
Ears (make 2, in tan)
- R1: 6 sc in MR. (6)
- R2: (sc, inc) × 3. (9)
- R3: sc in each st. (9)
- Sl st into the next st. Fasten off, leaving an 8-inch (20 cm) tail. Don't stuff. Press each ear flat into a little half-moon.
Muzzle (make 1, in white)
- R1: ch 4. Starting in the 2nd ch from the hook: sc, sc, 3 sc in the last ch. Turn to work along the other side of the chain: sc, 2 sc in the last ch. (8)
- R2: inc, sc, inc × 3, sc, inc × 2. (14)
- R3: sc in each st. (14)
- Sl st into the next st. Fasten off, leaving a 10-inch (25 cm) tail.
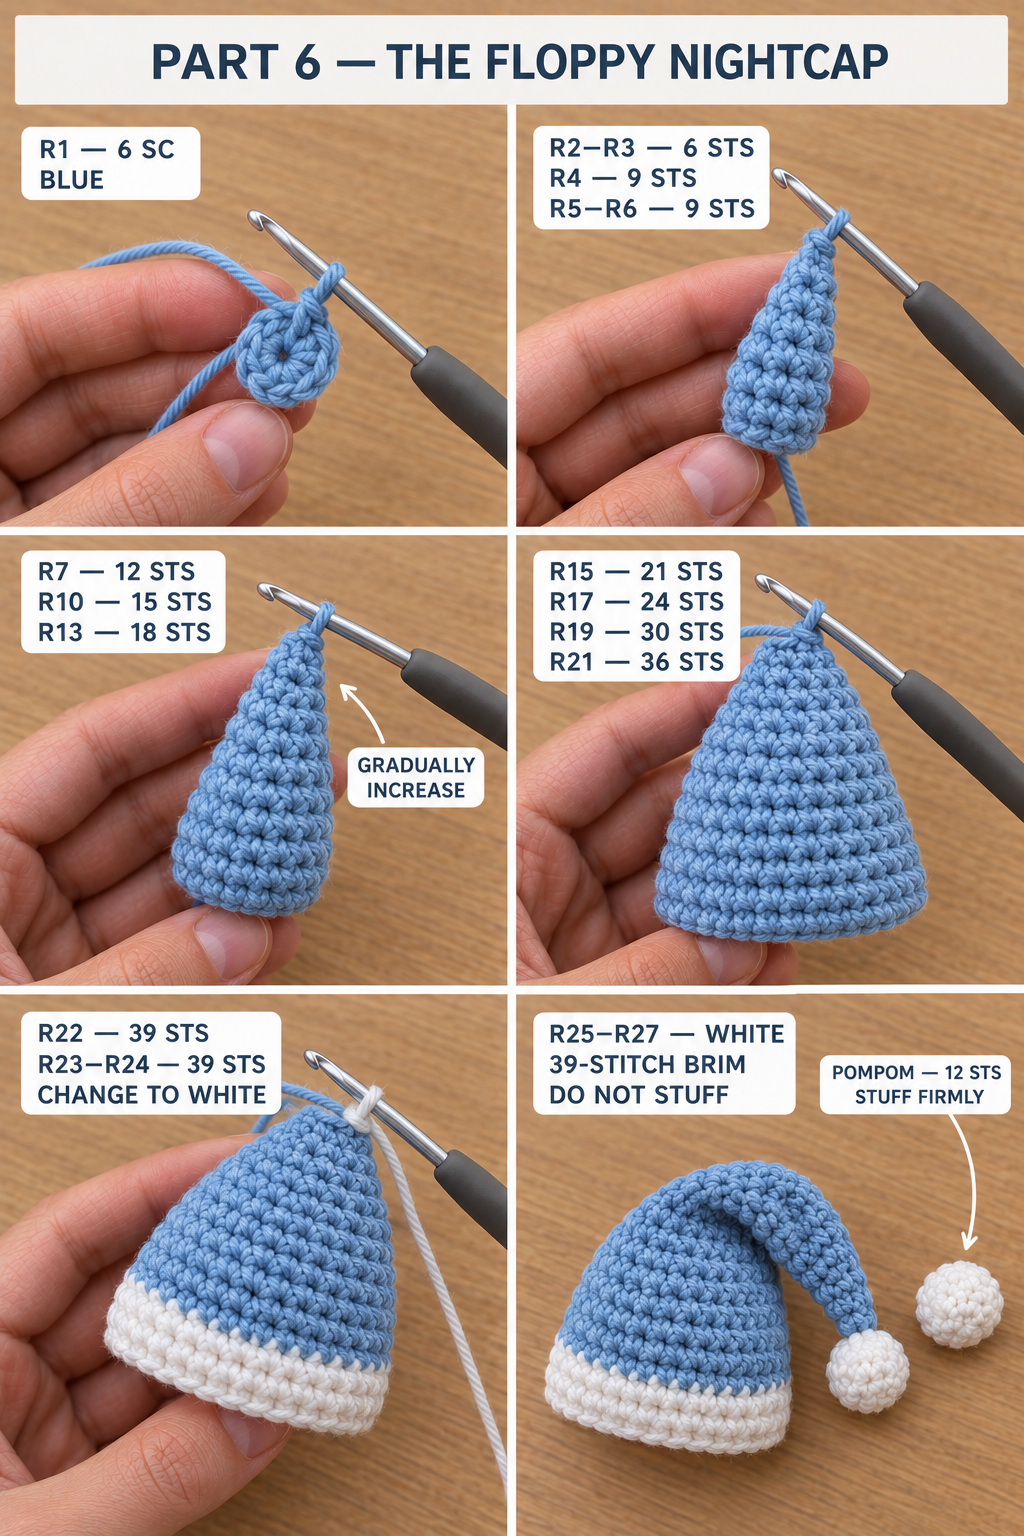
Nightcap (make 1: blue cone, white brim)
The cap is worked from the pointed tip down to the brim. The magic ring is the tip, where the pompom goes. The long, narrow start is what lets it flop over.
- R1: with blue, 6 sc in MR. (6)
- R2–R3: sc in each st. (6, 2 rounds)
- R4: (sc, inc) × 3. (9)
- R5–R6: sc in each st. (9, 2 rounds)
- R7: (2 sc, inc) × 3. (12)
- R8–R9: sc in each st. (12, 2 rounds)
- R10: (3 sc, inc) × 3. (15)
- R11–R12: sc in each st. (15, 2 rounds)
- R13: (4 sc, inc) × 3. (18)
- R14: sc in each st. (18)
- R15: (5 sc, inc) × 3. (21)
- R16: sc in each st. (21)
- R17: (6 sc, inc) × 3. (24)
- R18: sc in each st. (24)
- R19: (3 sc, inc) × 6. (30)
- R20: sc in each st. (30)
- R21: (4 sc, inc) × 6. (36)
- R22: (11 sc, inc) × 3. (39)
- R23–R24: sc in each st. (39, 2 rounds)
- R25–R27: change to white. Sc in each st. (39, 3 rounds). This is the brim.
- Sl st into the next st. Fasten off, leaving a 16-inch (40 cm) white tail to sew the brim to the head.
- Don't stuff the cap. The 39-stitch brim is 3 stitches wider than the head, so it slips on snugly.
Pompom (make 1, in white)
I crochet the pompom as a tiny ball instead of making a yarn pompom. It holds its shape and there are no loose strands to tug.
- R1: 6 sc in MR. (6)
- R2: inc × 6. (12)
- R3–R4: sc in each st. (12, 2 rounds)
- Stuff firmly.
- R5: inv dec × 6. (6)
- Fasten off, leaving an 8-inch (20 cm) tail. Close the hole through the front loops, but keep the tail for sewing.
Assembly
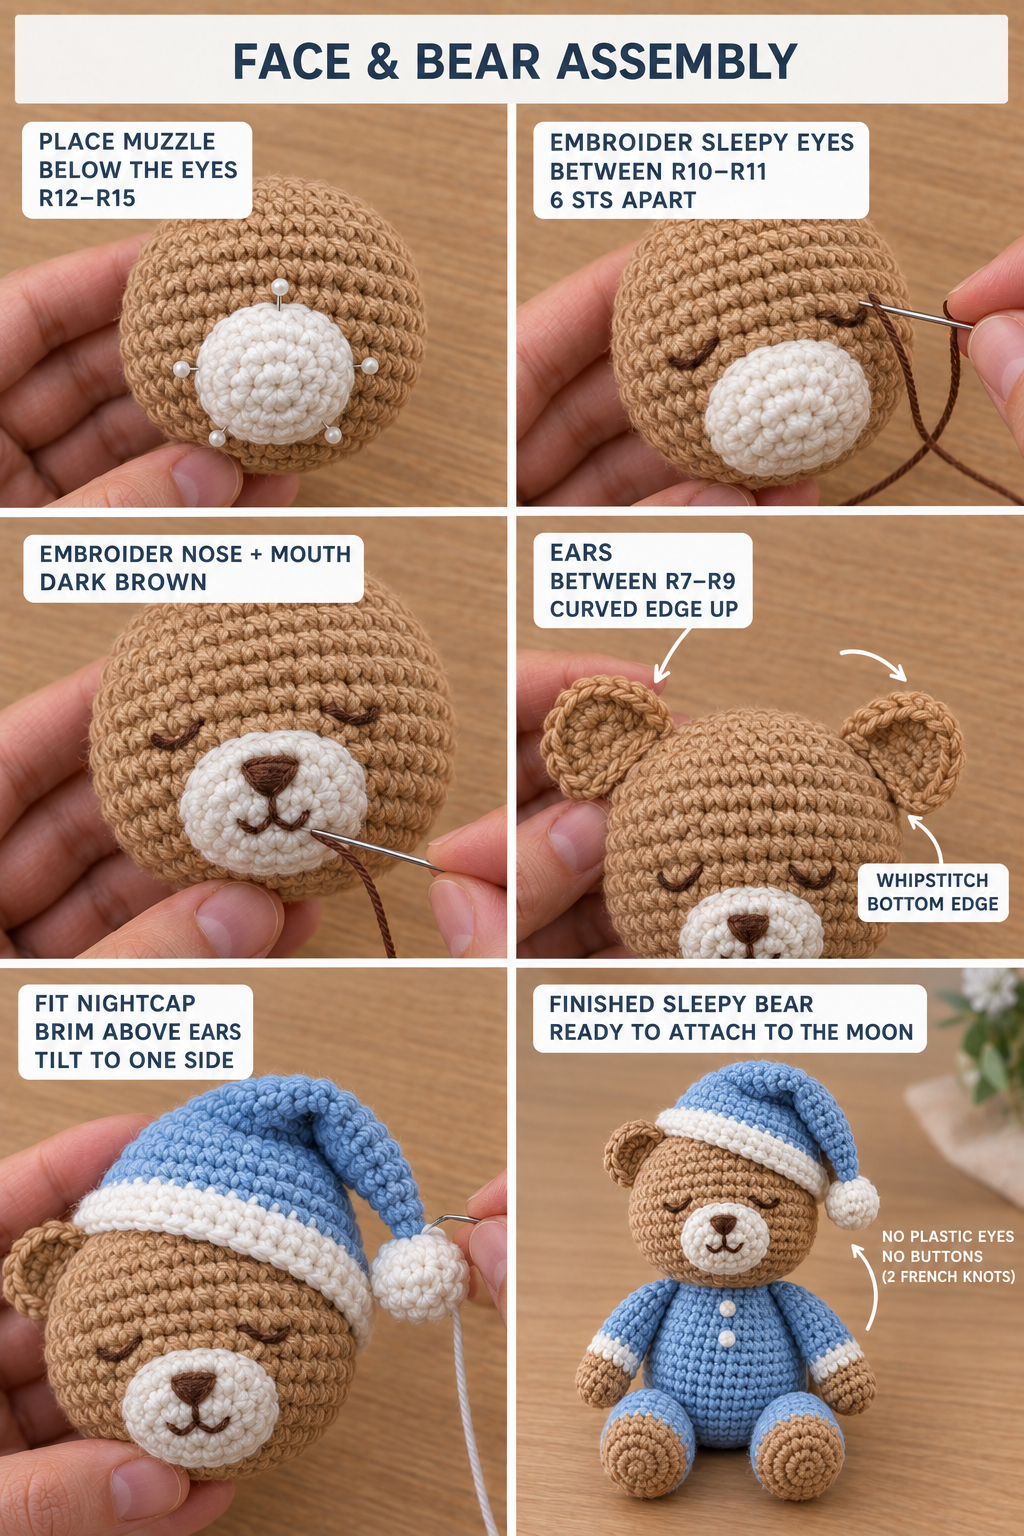
Pin everything before you sew, and look at the bear from the front after each step. Small shifts change the expression a lot. I finish the body first, then do all the face work on the loose head, where it's easy to hold, and join the two at the end.
The body
- Buttons. With white yarn, make two French knots down the center front of the pajamas, between R12 and R15.
- Arms. Pin each flat shoulder edge to the side of the body at R15–R16. Whipstitch them on with their tails, going deep into the body.
- Legs. Pin each flat hip edge to the lower front of the body, at about R4 to R7, feet pointing forward and slightly down. Whipstitch them on.
The head
- Muzzle. Stuff the muzzle very lightly. Pin it centered on the lower front of the head, covering about R12 to R15, long side horizontal. Whipstitch around the edge with its tail. Sewing it on first gives you a guide for placing the eyes.
- Sleepy eyes. Use dark brown, and work through the open neck so you can knot inside the head. Place each eye between R10 and R11, just above the muzzle, with 6 stitches between them. Make each eye a gentle downward curve, like a smile, about 3 stitches wide. Two or three short straight stitches following the curve look neat.
- Nose and mouth. With dark brown, fill a small triangle at the top of the muzzle with 5 or 6 horizontal stitches, getting shorter toward the point. Then work one short stitch down from the point and two small angled stitches for a soft "w" smile.
- Ears. Pin each ear on the side of the head, curved edge up, between R7 and R9. Set them slightly toward the back. Whipstitch along the bottom edge with the ear's tail.
- Nightcap. Sew the pompom to the tip of the cap first. Then slide the cap over the crown so the lower edge of the white brim sits just above the ears, around R6 to R7. Tilt it a little toward one side and whipstitch the brim to the head all the way around with the white tail.
- Flop the cap. Bend the cone so it falls toward the side you tilted to, with the pompom near where the shoulder will be. Tack the bend with 2 or 3 blue stitches so it stays down.
- Head to body. Line up the head's open 12-stitch neck with the white collar round of the body, stitch for stitch. Whipstitch all the way around with the head's 18-inch tail. Then go around a second time. This is a secure whipstitch seam, and it carries the weight of the head, so don't rush it.
Attaching the bear to the moon
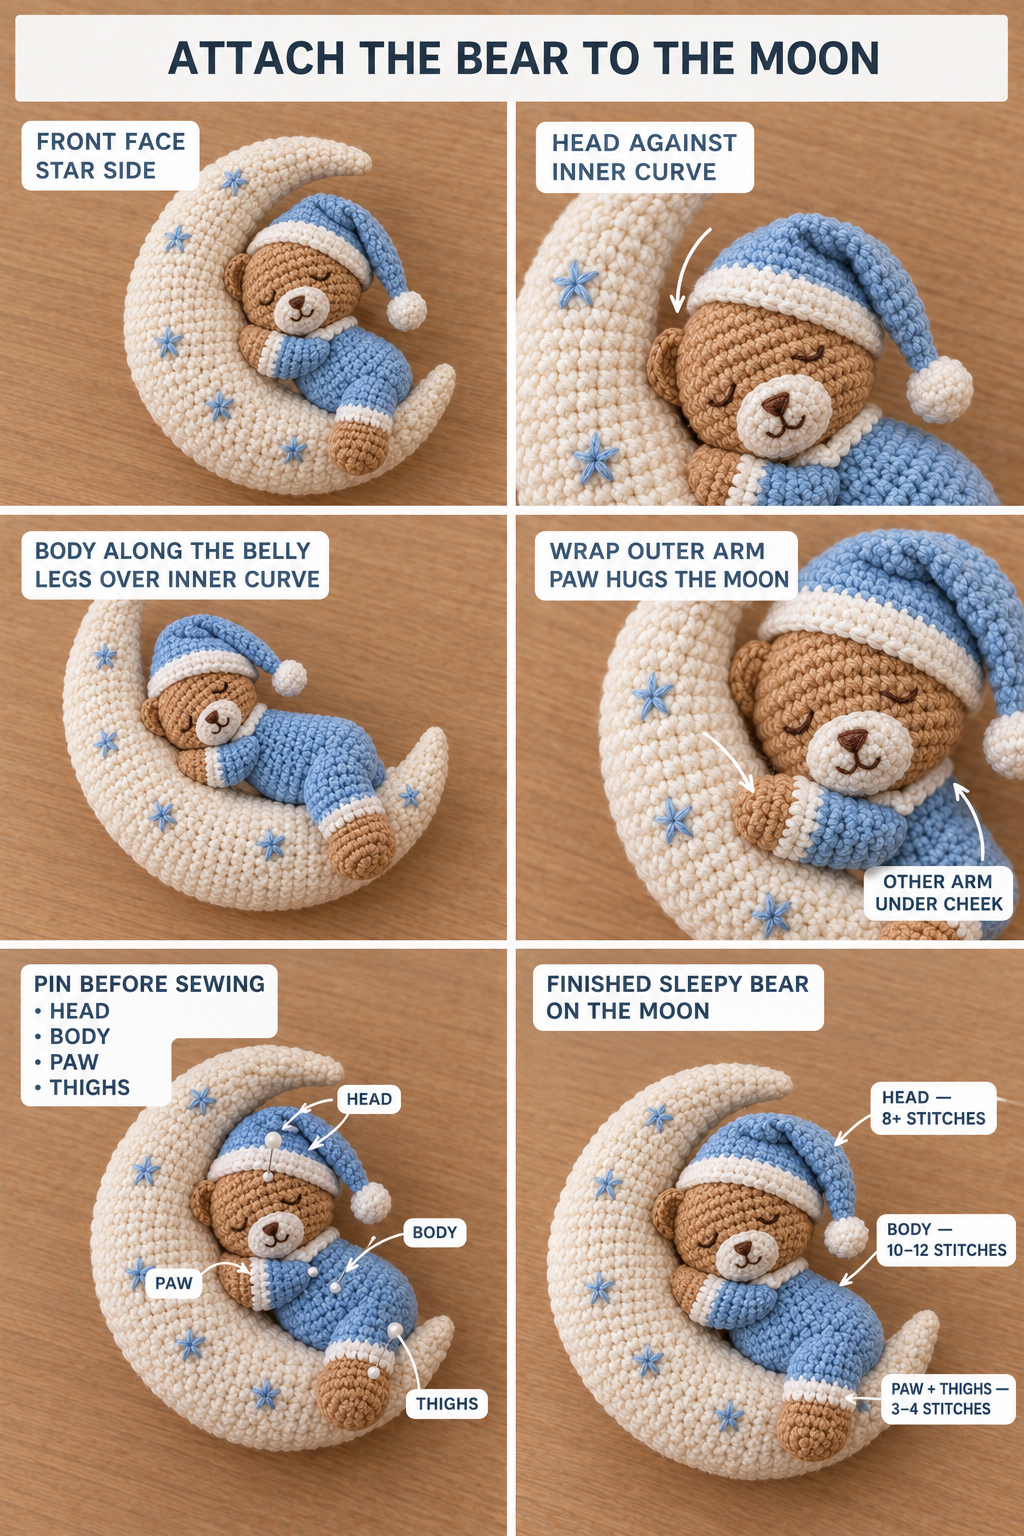
- Place the bear on the front face of the moon, the side with the stars. His head rests against the upper half of the inner curve. His body lies along the belly of the crescent, and his legs hang over the lower part of the inner curve.
- Wrap the outer arm across the moon so the paw rests on it, as if he's hugging it. Tuck the other arm under his cheek.
- Pin at four points: the back of the head, the back of the body, the hugging paw and each thigh.
- With a 24-inch (60 cm) length of tan yarn, sew the back of the head to the moon with at least 8 stitches, going deep into both pieces. The head is the heaviest part and it will slide down over time if this seam is shallow.
- With a length of blue yarn, sew along the line where the body touches the moon, 10 to 12 stitches. Then tack the hugging paw and each thigh with 3 or 4 stitches each.
- Weave in every remaining end and hide it inside the stuffing.
Optional hanging loop. If this is going on a wall hook or a high shelf bracket, leave a 6-inch starting tail, chain 20 in cream, then fasten off, leaving a second 6-inch tail. Thread both tails into the top tip of the moon, about 3 rounds apart, and knot them together inside. Over-sew each side with 10 or more stitches. Cotton chains stretch over time, so check the loop now and then. If it loosens, sew it back down.
The finished piece. Here's how it looks once every end is woven in: the bear curled up on the starry side of the moon, cap flopped over, ready for a nursery shelf.
Safety and care
- Keep it out of the crib. The American Academy of Pediatrics advises keeping soft objects and toys out of a baby's sleep area for the first 12 months. This bear is nursery decor for a shelf, or a toy for supervised play, not something to sleep with.
- No hard parts, but check small pieces. The face and buttons are embroidered and the pompom is crocheted, so there's nothing to pop off. Tug the ears, cap tail, pompom and paws hard before gifting. If anything moves, sew it again.
- The hanging loop never goes near a crib or changing table. Cords and loops are a strangling risk for babies and toddlers. Hang the moon on a wall well out of reach.
- Washing: spot clean with a damp cloth and mild soap. If you have to wash it, hand wash in cool water, squeeze gently in a towel and let it air dry. Stuffed shapes can go lumpy in a machine.
Easy variations
- Pink or sage bear. Swap the powder blue for dusty rose or soft sage. The cream moon goes with everything.
- Starry pajamas. With white floss, stitch tiny four-point stars across the pajamas and the nightcap.
- Bigger shelf version. Use worsted #4 cotton and a 3.5 mm hook, keeping every stitch count the same. The moon comes out at roughly 9 to 10 in tall. Budget about 280 yd in total.
- Moon only. The crescent on its own, with a hanging loop, makes a sweet wall decoration for a nursery. It takes one evening.
Why this is a great "next" amigurumi
If you've made a simple sitting bear, this is a lovely second step. It teaches two skills that come up again and again.
The first is bending a tube. Keeping your increases on one side is how you shape horns, tails, bananas and croissants. Adding a running stitch to pull the curve is a fix you'll use again for years.
The second is posing pieces onto a larger shape. Most amigurumi is sewn standing up, but this bear is sewn lying down, hugging something. Pinning in four places first is what gets the pose right. That habit helps with every scene-style piece you make afterward.
Frequently asked questions
How much yarn do I need for the sleepy bear on the moon?
About 200 yd (183 m) of DK #3 cotton in total. That's 65–80 yd of cream for the moon, 55–70 yd of powder blue, 35–45 yd of tan and 15–20 yd of white. A single 50 g ball of each color covers it with yarn to spare. Tension and yarn brand can shift these figures a little.
How do I make a crochet moon curve into a crescent?
Keep all the increases and decreases on one side of the tube and leave the last 12 stitches of each round plain. That makes the outer side grow while the inner side stays narrow. Then run a stitch along the inner curve and pull it gently. That turns the gentle bend into a crescent.
Can I use safety eyes instead of embroidered eyes?
You can, but the closed, embroidered eyes are what make the bear look asleep, and they're safer for a baby gift. If you want open eyes, use 6 mm safety eyes between R10 and R11, 6 stitches apart. Fit them before you stuff the head. The toy is then only suitable for children aged 3 and up.
How long does this pattern take?
About 9 to 11 hours in total. Plan around 3 hours for the moon, 2 for the head, 1.5 for the body, 1.5 for the arms and legs together, 1 for the small pieces and 1.5 for embroidery and assembly. That fits comfortably into one weekend.
Can I sell the finished bears?
Yes. You're welcome to sell finished pieces made from this free pattern at markets, on Etsy or as gifts. Please credit "Pattern by Wavode" and link back to this page. Please don't republish the written pattern or my photos as your own.
UK terms note
This pattern uses US terms. In UK terms, every "single crochet (sc)" is a double crochet (dc). The other abbreviations don't change. DK is the same weight on both sides of the Atlantic.
Related patterns on Wavode
- Barnaby the teddy bear lovey: a bear head on a granny-square blanket, another sweet baby-shower gift.
- Pippa the little elephant: a sitting elephant with pink-lined ears, the same head-to-body seam.
- Chunky lamb plush: a soft cream chenille lamb for the nursery shelf.
- Classic newborn bonnet: a quick baby bonnet to gift alongside the bear.
Made a sleepy bear? Tag #wavodecrochet on Pinterest. I re-pin every finished make and credit the maker.
Pattern by Clara Hartwell for Wavode. Questions? Email me at support@wavode.com.