Soft Pig Plush Crochet Pattern

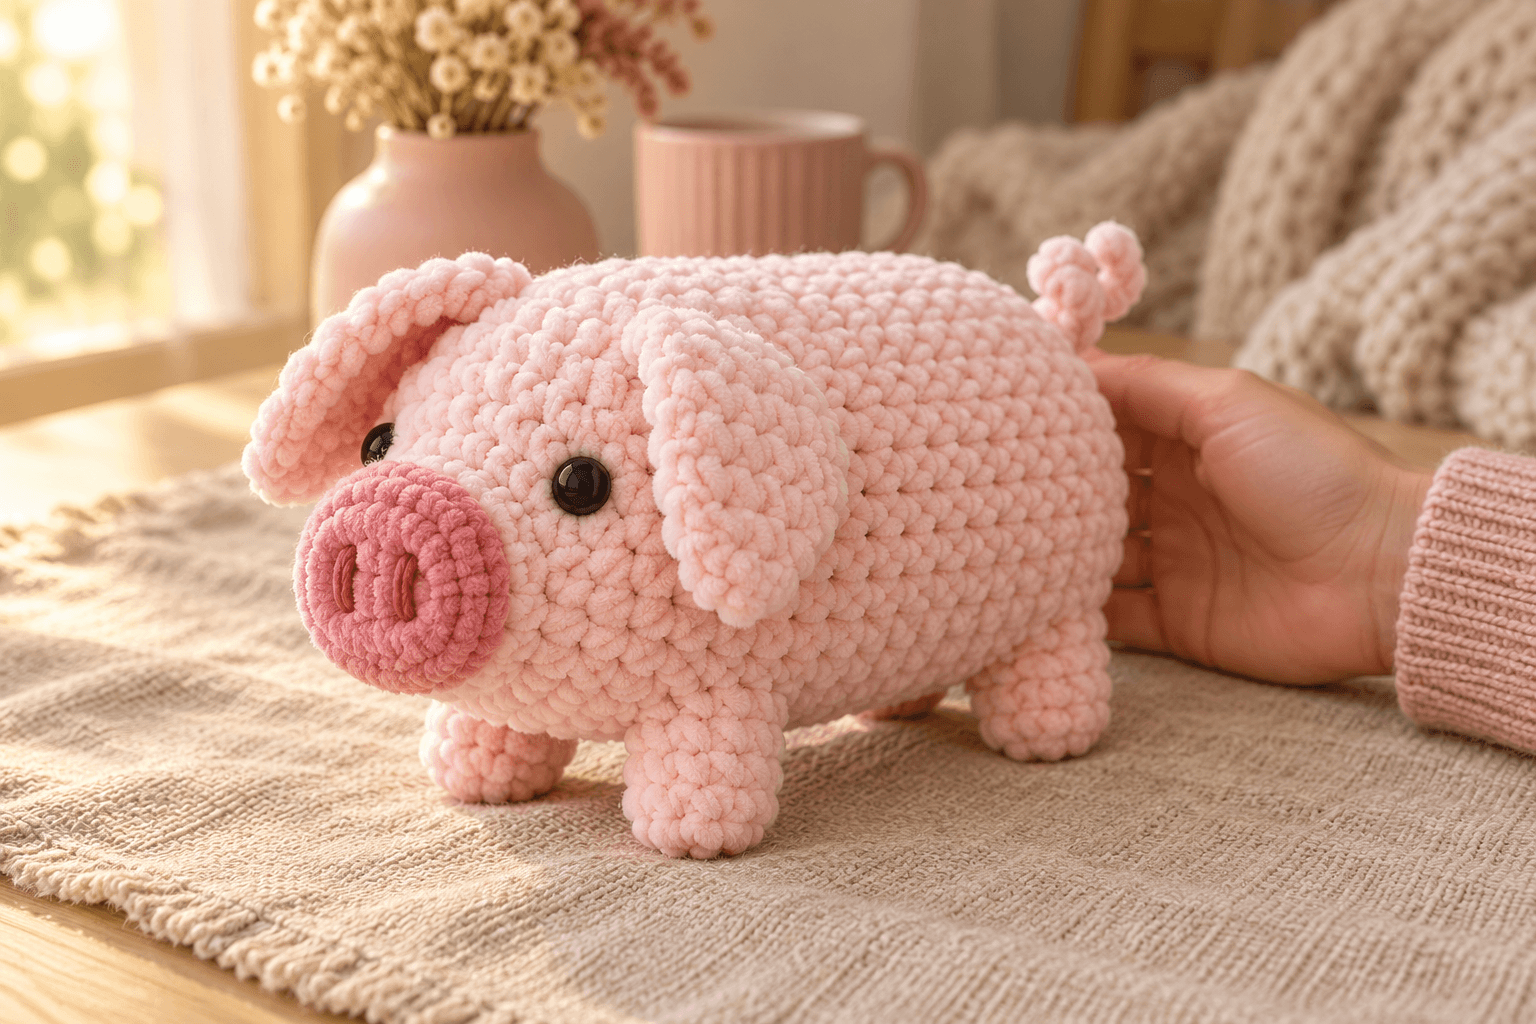
I like a little pig with ears that flop over as though he's listening for the feed bucket. Truffle is a soft pink crochet pig about 6½ in (16.5 cm) from snout to rump, with a darker pink nose and little feet tucked under a round tummy. His tail curls up at the back.
The body grows from the front toward the rump, so the face stays easy to reach while you set the eyes. I keep the ears empty and hold their folds with a small stitch. That soft flop is my favorite part of Truffle.
| At a glance | |
|---|---|
| Finished size | about 6½ in (16.5 cm) snout to rump, excluding tail; about 4½ in (11.5 cm) high |
| Yarn | bulky #5 pale pink and deeper pink chenille; smooth yarn for seams and nostrils |
| Hook | 4 mm (G/6) throughout |
| Pieces | 9 crocheted pieces |
| Time | about 3–4 hours |
| Skill | easy: sc, increases, decreases, back loops and sewing |
Pink chenille and supplies for a little pig
- Chenille: bulky #5, 100% polyester, about 131 yd (120 m) per 100 g, in the same yarn line for both colors. Allow about 72 yd pale pink and 6 yd deeper pink.
- Smooth sewing yarn: about 4 yd pale pink worsted #4 cotton or acrylic, and 1 yd dark rose worsted #4 for the nostrils. Allow 1 yd black smooth worsted yarn if you choose embroidered eyes.
- Hook: 4 mm (G/6) for every crocheted piece.
- Eyes: two 10 mm black safety eyes with matching washers.
- Small things: polyester fiberfill, a locking stitch marker, a contrasting scrap strand, pins, a blunt tapestry needle and scissors.
Tension. Work at about 3 sc per inch (2.5 cm), with about 3 rounds per inch. I keep the stitches snug so the stuffing stays tucked inside. Truffle's body is about 6 in (15 cm) long and 3¾ in (9.5 cm) across before adding the snout and feet. Chenille varies between brands, so these are approximate sizes.
Stitches, in US terms: magic ring (MR), chain (ch), single crochet (sc), slip stitch (sl st), increase (inc: 2 sc in one stitch), decrease (dec: sc two stitches together), back loop only (BLO). R means round; st means stitch. For a dec, pick up the front loops of the next two stitches, yarn over and draw through those loops, then yarn over and draw through both loops on the hook.
Work in continuous spirals, moving the marker into the first stitch of each round. The tail is worked once along a chain. Counts in parentheses exclude joining slip stitches.
Safety. With plastic safety eyes, Truffle isn't a toy for children under three. For a little one's version, embroider the eyes while the body is still open, using the instructions below.
Making the pig's rounded body, from snout end to rump
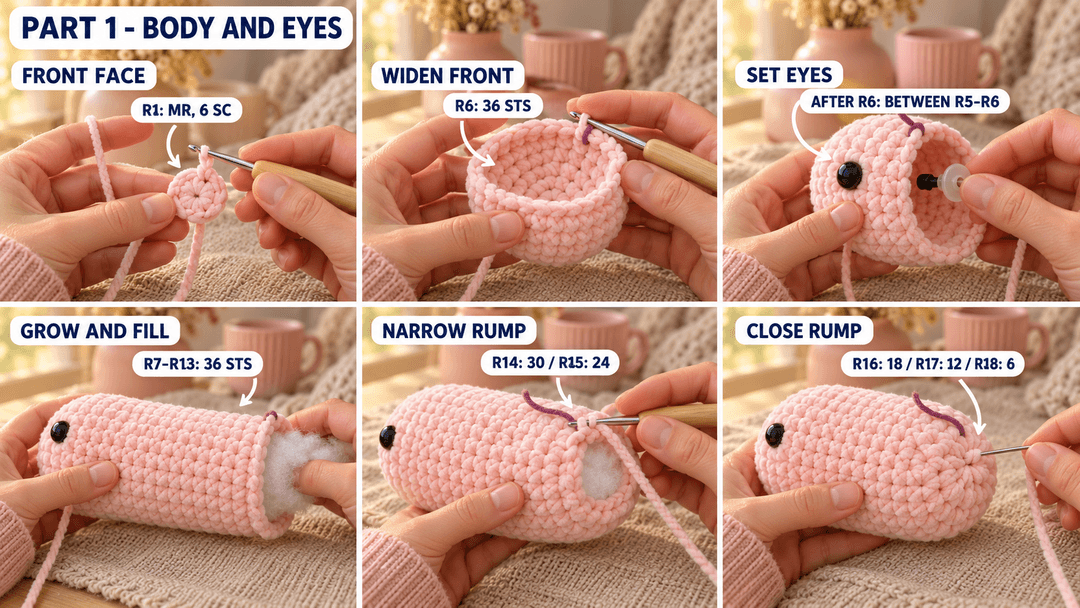
Body — pale pink, 4 mm hook, Make 1. Leave a 6 in (15 cm) starting tail. The magic ring is the middle of the face, underneath the snout. The closing rounds become the rump.
- R1: MR, 6 sc in the ring. (6)
- R2: inc × 6. (12)
- R3: (sc, inc) × 6. (18)
- R4: (sc 2, inc) × 6. (24)
- R5: (sc 3, inc) × 6. (30)
- R6: (sc 4, inc) × 6. (36)
Close the magic ring and weave its tail inside the face. Mark the top now: run a contrasting scrap strand along the gap just before the first stitch of each round, starting at R1. This is the top of Truffle's back. Continue that strand as you crochet. Stitch numbers on each round count forward from its first stitch.
Set Truffle's eyes while the front is open.
Put the live loop on the locking marker. With the scrap strand at the top, place one eye in the gap between R5 and R6, immediately after stitch 5 of R5, and the other immediately after stitch 25 of R5. They sit one on each side of the upper face. Look straight at the magic ring before pushing the washers on from inside.
Optional embroidered eyes. Replace each plastic eye with five short vertical black worsted stitches, side by side, spanning the height of R5 at the same positions. Secure both ends inside before continuing.
Put the live loop back on the hook.
- R7–R13: sc around. (36) 7 rounds.
Stuff after R13. Fill the front firmly enough to support the snout, then add small tufts along the body. Keep the back rounded and the underside a little flatter, like a loaf resting on the table.
- R14: (sc 4, dec) × 6. (30)
- R15: (sc 3, dec) × 6. (24)
Top up the filling after R15, pushing it gently into the rump.
- R16: (sc 2, dec) × 6. (18)
- R17: (sc, dec) × 6. (12)
Add a last small tuft after R17 if the rump dents under your thumb.
- R18: dec × 6. (6)
Cut the yarn, leaving a 10 in (25 cm) tail, and pull it through the live loop. Thread it through the front loops of all six remaining stitches, draw the rump opening closed and secure it through nearby stitch backs. Hide the end inside. Keep the top scrap strand in place for assembly.
Shaping the darker pink snout and stitching the nostrils
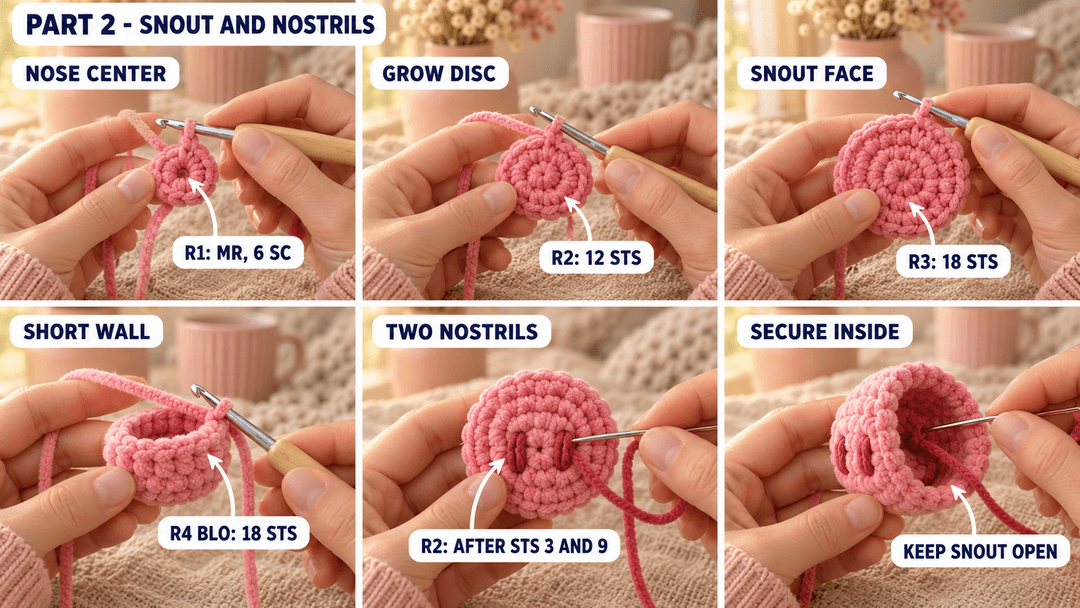
Snout — deeper pink, 4 mm hook, Make 1. Leave a 6 in (15 cm) starting tail. The magic ring is the front of the nose; the final round is its open back.
- R1: MR, 6 sc in the ring. (6)
- R2: inc × 6. (12)
- R3: (sc, inc) × 6. (18)
- R4: BLO sc around. (18)
Sl st in the next stitch and fasten off, leaving a 6 in (15 cm) tail. Close the magic ring and weave both chenille ends inside. Put a marker in the gap just before stitch 1 of R4: this is the top of the snout.
Nostrils. Keep the snout empty, front facing you and marker at the top. With dark rose smooth yarn, make three close vertical stitches over R2 immediately after stitch 3, then three more immediately after stitch 9. Each little bar runs from the gap between R1 and R2 to the gap between R2 and R3. Secure and weave the ends inside the open nose.
The nostrils sit side by side, with the magic ring between them. Keep the snout empty until you pin it to Truffle's face.
Tip. Smooth yarn makes clear little nostrils without pulling the chenille pile through the fabric. Let the stitches sit on top of the fluff.
Little folded ears and four stubby trotters
Ears that fold toward the nose
Pale pink, 4 mm hook, Make 2. Leave a 6 in (15 cm) starting tail. The magic ring is the rounded tip; the last round is the wider base.
- R1: MR, 4 sc in the ring. (4)
- R2: (sc, inc) × 2. (6)
- R3: (sc 2, inc) × 2. (8)
- R4: (sc 3, inc) × 2. (10)
- R5: sc around. (10)
Sl st in the next stitch and fasten off, leaving an 8 in (20 cm) tail. Close the magic ring and weave its end inside. Leave the ears unstuffed.
Flatten the ten-stitch opening into five pairs. Using pale pink smooth sewing yarn, take one whipstitch through both stitches of each pair to close the base. Weave the chenille finishing tail into the inside of the ear. The fold that makes it flop forward comes during assembly.
Short round trotters
Pale pink, 4 mm hook, Make 4. Leave a 6 in (15 cm) starting tail. The magic ring is the sole, and the open end gets sewn under the tummy.
- R1: MR, 6 sc in the ring. (6)
- R2: inc × 6. (12)
- R3–R4: sc around. (12) 2 rounds.
Sl st in the next stitch and fasten off, leaving a 10 in (25 cm) tail. Close the magic ring and weave the starting end inside. Stuff after R4, using a small firm pinch in the sole and less filling near the top. Leave the twelve-stitch opening open, and weave the finishing tail inside the upper wall.
Set each little foot on the table and press its sole flat with your thumb. They should feel softly padded, with flat little bottoms.
Crocheting the pig's curly tail
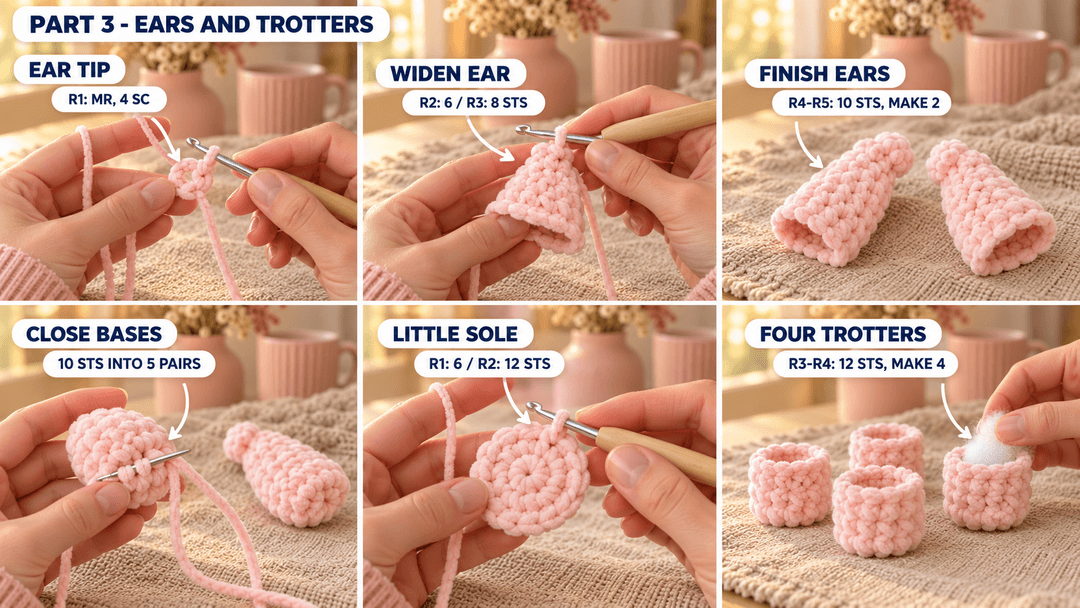
Pale pink, 4 mm hook, Make 1. Leave a 6 in (15 cm) starting tail, then ch 9.
- Row 1: 2 sc in the 2nd ch from the hook and in each remaining ch. (16)
Fasten off, leaving an 8 in (20 cm) tail. The last stitch ends beside the starting tail; this is the base that will sit against the rump. The far end, where the first two sc were worked, is the tip.
Coil the strip around your fingertip so it forms a little corkscrew. With pale pink smooth yarn, take two small tacking stitches along the inner edge where the coil overlaps, keeping the outer edge free. Weave the chenille ends into the base. Leave the tail unstuffed.
Putting the pig together, with the ears folded forward
Use pale pink smooth sewing yarn for every seam. Keep the scrap strand along the top of the body, with the magic-ring face at the front and the closed rump at the back. Secure each sewing end near its seam, pass the needle through the filling and trim so the end slips inside.
A round snout on Truffle's face
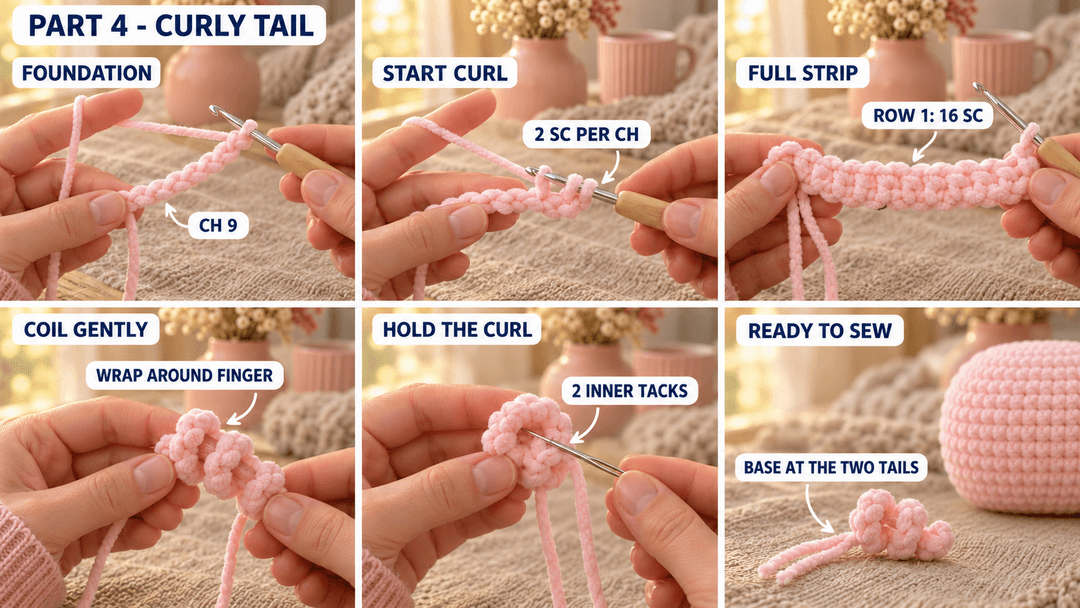
Place a small pinch of filling inside the snout, keeping its front face fairly flat. Center it over the body's magic ring, with the snout's top marker pointing toward the back's scrap strand.
Match the 18 stitches of snout R4 to the 18 positions of body R3, beginning at the marked top. Whipstitch around once, taking one stitch through each snout-edge stitch and its matching body position. Keep the nostrils level as you sew. Hide the end and remove the snout marker.
Fold the ears forward
Pin each ear's closed five-pair base along body R8: one over stitches 4–8, the other over stitches 29–33. The wide bases sit on the upper sides of the back; the rounded tips point toward the nose.
Sew through the five closed pairs and the five matching body stitches, then sew back through the same five positions. Bend each ear forward over its base. Tack the underside of one ear to R6, stitch 6, and the other to R6, stitch 31, with two small stitches per ear. Let the tip hang loose beside Truffle's cheek.
Set the trotters under the tummy
Turn Truffle belly-up, with the face pointing away from you. Mark the four attachment patches below. Each patch has four corners, and its edge contains twelve sewing positions.
| Trotter | Front and back limits on the body | Side-to-side limits |
|---|---|---|
| Front, first side | R6 to R9 | stitches 12 to 15 on those rounds |
| Front, other side | R6 to R9 | stitches 22 to 25 on those rounds |
| Rear, first side | R10 to R13 | stitches 12 to 15 on those rounds |
| Rear, other side | R10 to R13 | stitches 22 to 25 on those rounds |
For each patch, put a pin at each corner. Starting at the front corner nearest the body's top strand, trace the patch edge: three sewing positions along the front, three down the outer side, three across the back and three up the inner side. Count the starting corner of each side, then the two positions before the next corner. Keep the corners for the next side.
Set the trotter's open end over that outline, with its sole pointing out from the tummy. Match the 12 stitches of trotter R4 to the 12 positions around the patch, one to one, and whipstitch all the way around. Add a last small tuft of filling through the remaining gap before the final three stitches. Repeat for the other feet.
Turn Truffle onto his feet and check the pins before tightening each seam fully. Keep all four soles at the same level, then secure the sewing ends.
A curly tail at the rump
Pin the base of the coil just above the rump closure, over body R16, stitch 1, on the top scrap line. The curl points up and back. Sew through the first four stitch bases nearest the tail's starting end and four nearby body stitch backs, then sew back through those same four points. Keep the curled tip free.
Remove the pins and the top scrap strand. Give Truffle a gentle squeeze along the tummy and smooth his ears forward with your thumb.
A soft pink pig to tuck into a gift box
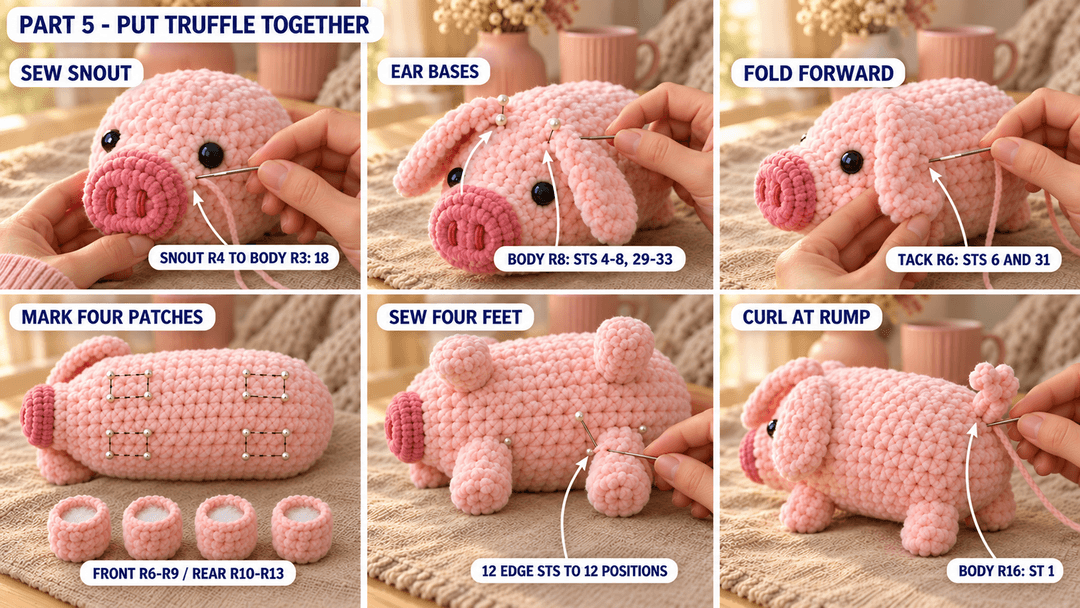
I like Truffle nestled in a shallow box with cream tissue around his feet, where the darker nose peeks over the edge. Put any gift ribbon around the box rather than around the pig. Those floppy ears deserve a little room.
Keep the two pinks close in tone for a gentle look, or make the snout a brighter rose with the same yarn weight. The little dark nostrils will still show clearly against it.
UK terms: US sc = UK dc; ch and sl st keep the same names.
Made your own Truffle? Tag #wavodecrochet on Pinterest so I can see your soft pink pig.