Orange Cat Keychain Crochet Pattern

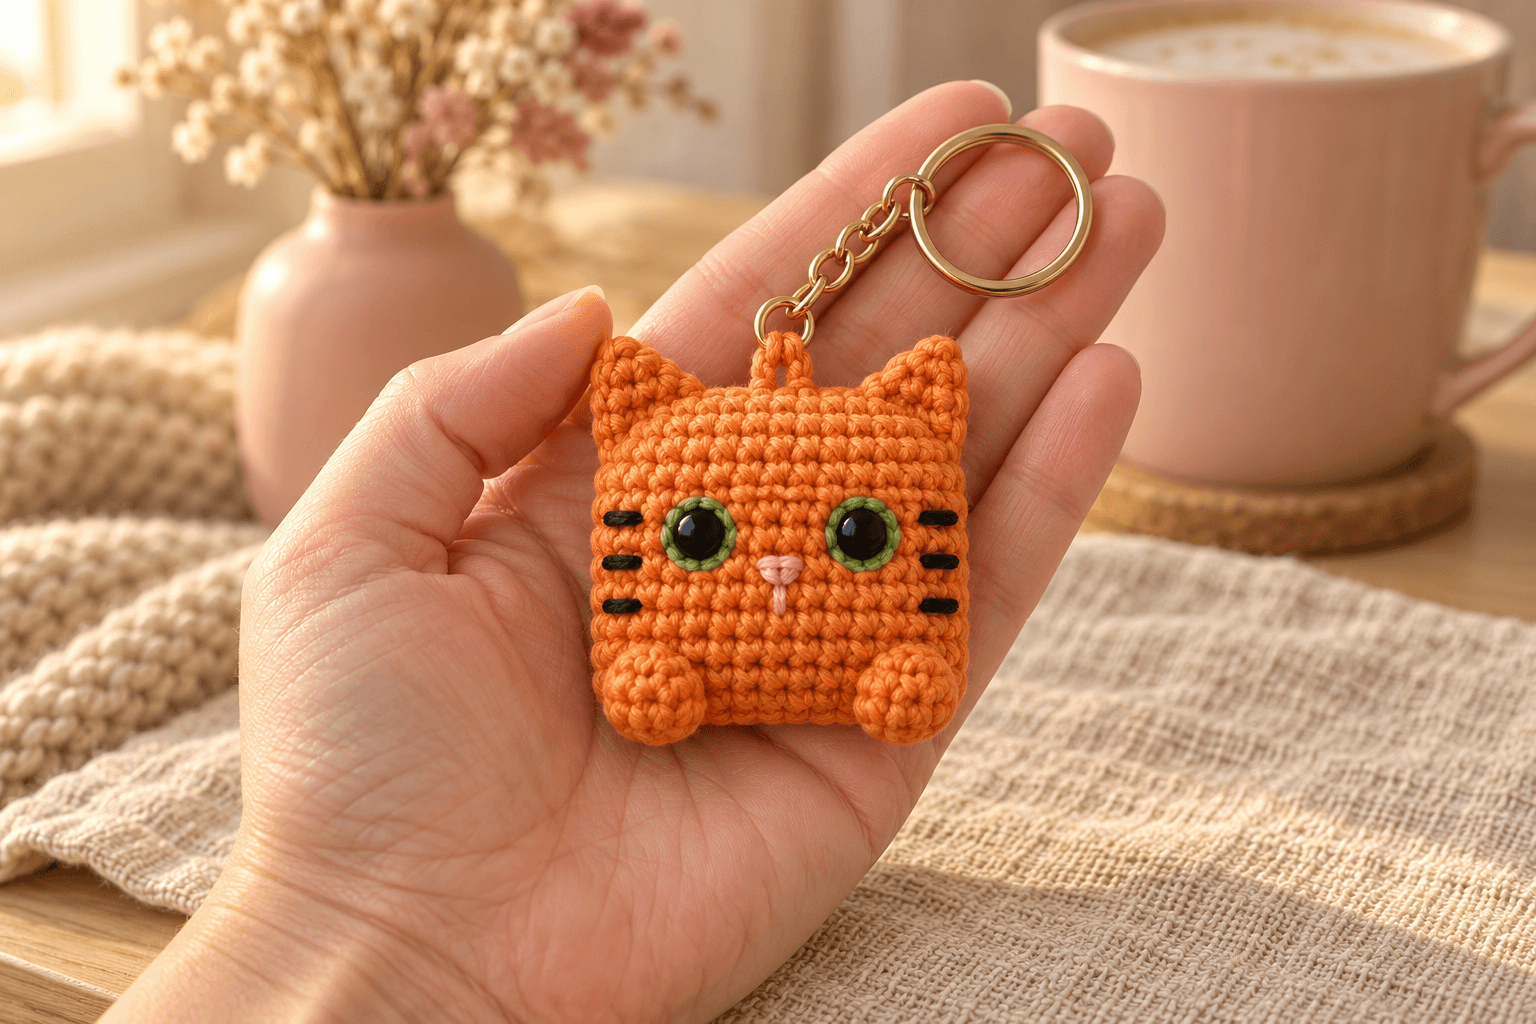
I have a soft spot for orange cats with a very serious stare. Marmalade is a little orange cat keychain about 2¾ in (7 cm) tall, with a square, softly padded face and bright green peeking around his black eyes. His little paws hang just below the bottom edge.
The face is worked flat, so placing those big eyes is easy. I keep the filling light, like a tiny cushion, and give the hanging loop a broad anchor inside. Marmalade can ride on a bag with his face pointing forward.
| At a glance | |
|---|---|
| Finished size | about 2¾ in (7 cm) tall including ears and paws; body about 2 in (5 cm) square; hardware adds length |
| Yarn | DK #3 cotton in orange, green, black and pink |
| Hook | 2.5 mm throughout |
| Pieces | 8 crocheted pieces |
| Time | about 2–3 hours |
| Skill | easy: sc, increases, flat rows, small rounds and embroidery |
Cotton yarn and little details for the orange kitty
- Yarn: smooth DK #3, 100% cotton, about 137 yd (125 m) per 50 g. Allow about 24 yd orange, 2 yd green, 1 yd black and 1 yd pink, including sewing and embroidery. Keep the same yarn weight for all four colors.
- Hook: 2.5 mm for every crocheted piece.
- Eyes: two 8 mm black safety eyes with matching washers.
- Hardware: a gold-tone split keyring with a short fine chain and a 6 mm open jump ring at its end; two pairs of flat pliers.
- Small things: a little polyester fiberfill, contrasting scrap yarn, a stitch marker, pins, a blunt tapestry needle and scissors.
Tension. Work at about 6 sc per inch (2.5 cm), with 6 rows or rounds per inch. I keep the stitches snug so the filling stays tucked inside. Each square panel measures about 2 in (5 cm) across and high, before sewing. A little filling rounds the corners; keep the middle gently padded.
Stitches, in US terms: chain (ch), single crochet (sc), slip stitch (sl st), increase (inc: 2 sc in the same stitch), magic ring (MR). St means stitch; R means round. The turning ch 1 never counts as a stitch. Work the paws in a continuous spiral, with a marker in the first stitch of each round. Counts appear in parentheses.
Safety. Marmalade has plastic eyes and metal keyring parts, so he's an accessory for adults and older children, not a toy for children under three. For a small sewn decoration, embroider the eyes as described below and leave off the metal hardware.
Making the square orange cat, from the bottom up
Marmalade's front and back panels
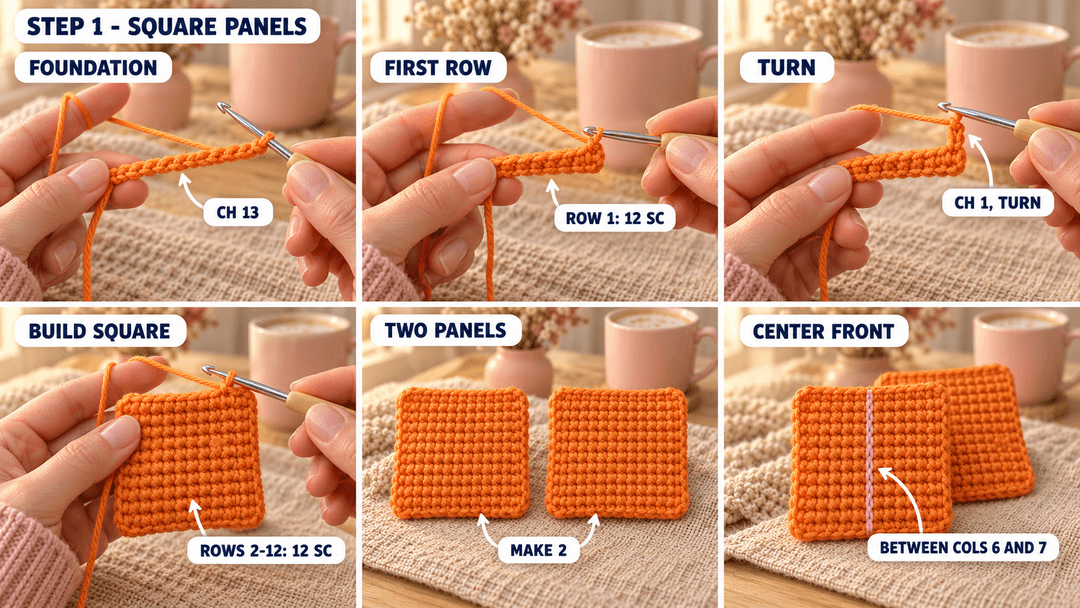
Orange, 2.5 mm hook, Make 2. Leave a 6 in (15 cm) starting tail, then ch 13. The foundation edge is the bottom of the kitty; the last row is the top, between his ears.
- Row 1: sc in the 2nd ch from the hook and in each ch across. (12)
- Rows 2–12: ch 1, turn, sc 12. (12) 11 rows.
Fasten off each panel, leaving a 6 in (15 cm) tail at the top. Weave the foundation and finishing ends through the back of the fabric, reversing direction once. Use a fresh strand for joining later.
Lay one panel with its right side facing you and the foundation edge at the bottom. This is the front. Put a short scrap strand through the middle of Row 1, between columns 6 and 7, and run it straight up through that gap to Row 12.
Use these positions throughout: rows count from bottom to top. Columns count from your left to your right as you look at the front, starting at 1, even though the crochet rows change direction. The scrap strand is center front. Keep the panels separate for the face and stripes.
Placing the green-rimmed eyes and pink nose
Green eye surrounds
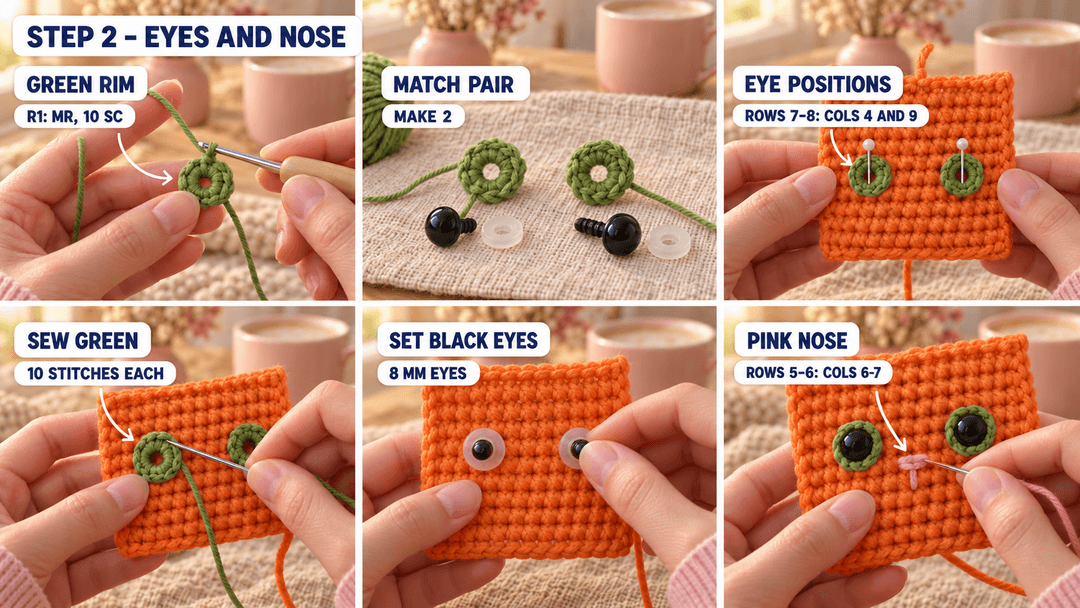
Green, 2.5 mm hook, Make 2. Leave a 6 in (15 cm) starting tail. The magic ring is the center of each eye surround.
- R1: MR, 10 sc in the ring. (10)
Sl st in the first sc and fasten off, leaving a 10 in (25 cm) tail at the outer edge. Snug the ring around an eye post to check the opening, then slide the post out. Keep that center hole open for the post. Weave the green starting end into the back of the surround.
Set the eyes while the panel is flat
- Mark the centers. Put a pin in the gap between Rows 7 and 8, above column 4, and another above column 9. The centers are five stitch widths apart.
- Green surrounds. Center one green circle over each pin, with its hole at the pin. Using the green tail, sew around the outside through each of its 10 stitches, catching only the orange front panel. Keep the circles flat. Secure the tails on the back.
- Black eyes. Push each 8 mm eye post through its green center and the marked gap in the orange panel. Look at Marmalade straight on, then push the matching washers onto the posts at the back. The black domes sit inside narrow green rims.
Tip. Pin both circles before sewing either one. If a circle tips toward the center, move the pin before you lock the eyes in place.
Pink nose. With pink yarn on the needle, make three horizontal stitches across columns 6 and 7, along the gap between Rows 5 and 6. Place them close together to make a small bar. From its middle, make one short straight stitch down to the gap between Rows 4 and 5, keeping it on the center-front strand. Secure both ends on the back of the panel.
Optional embroidered eyes. Leave off the plastic eyes and washers. After sewing down each green surround, fill its center with six short vertical black stitches, side by side, about ¼ in (0.6 cm) high. Cover the center opening and secure the ends on the back. This keeps the same green outline.
Adding the kitty's ears and little paws
Small pointed ears
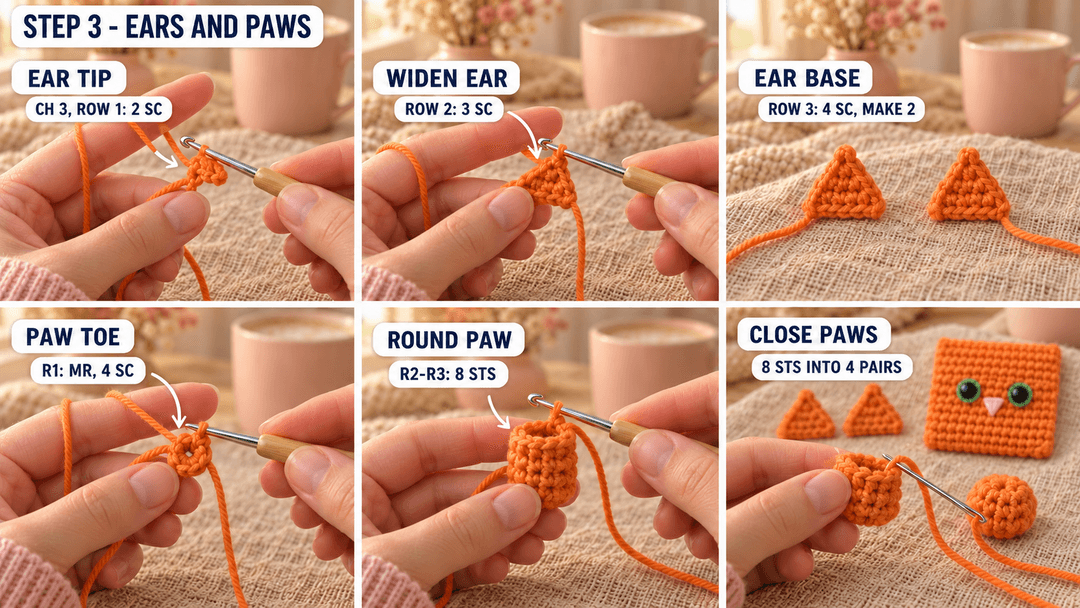
Orange, 2.5 mm hook, Make 2. Leave a 6 in (15 cm) starting tail, then ch 3. Start at the pointed tip; the last row is the wide base that gets sewn to the top of the body.
- Row 1: sc in the 2nd ch from the hook and in the next ch. (2)
- Row 2: ch 1, turn, inc, sc. (3)
- Row 3: ch 1, turn, sc, inc, sc. (4)
Fasten off, leaving an 8 in (20 cm) tail at the wide base. Weave the starting end into the back of the ear. Keep the triangles flat and unstuffed.
Little rounded paws
Orange, 2.5 mm hook, Make 2. Leave a 6 in (15 cm) starting tail. The magic ring is the rounded toe; the last round is the upper opening.
- R1: MR, 4 sc in the ring. (4)
- R2: inc × 4. (8)
- R3: sc around. (8)
Sl st in the next stitch and fasten off, leaving a 10 in (25 cm) tail at the opening. Pull the magic ring closed and weave its starting end inside. Leave the paw empty; the cotton keeps it softly rounded.
Flatten the eight-stitch opening into four matching pairs. With its tail, take one whipstitch through both stitches of each pair, closing all four pairs. Keep the tail for sewing the paw to the front.
Set the ears and paws aside. They'll go on after the square is filled and closed, with their positions given below.
Embroidering the black tabby stripes
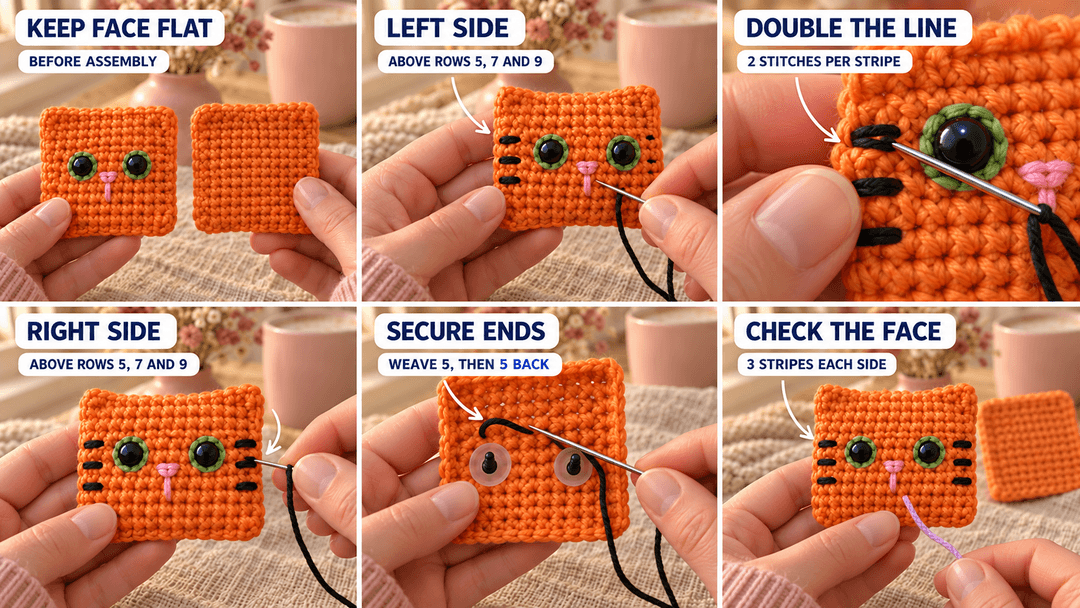
Keep the front panel flat, face toward you, with the scrap strand down its middle. The stripes sit outside the green eyes, close to the side edges.
Thread a 24 in (60 cm) length of black cotton onto the needle. On the left side, work along the gaps immediately above Rows 5, 7 and 9, from the left outer edge, just before column 1, to the gap after column 1. Make two parallel straight stitches at each position, close enough to read as one short thick stripe.
Mirror them on the right: along the same three row gaps, stitch from the gap after column 11 to the right outer edge, just after column 12, again two close stitches per stripe. Let the thread rest on the cotton; pulling it tight makes Marmalade squint. Secure the starting and finishing ends on the back, weaving through five stitch backs, then five more in the other direction. Trim the ends.
Turn Marmalade's face toward you. The green rims should sit above the pink nose, with three little dark bars at either side. Remove the center-front scrap strand after checking the placements.
Securing the keyring so the kitty hangs upright
Anchor the loop before joining the panels
The hanging loop belongs at the center top, between the ears. Make it now, while you can reach the backs of both panels.
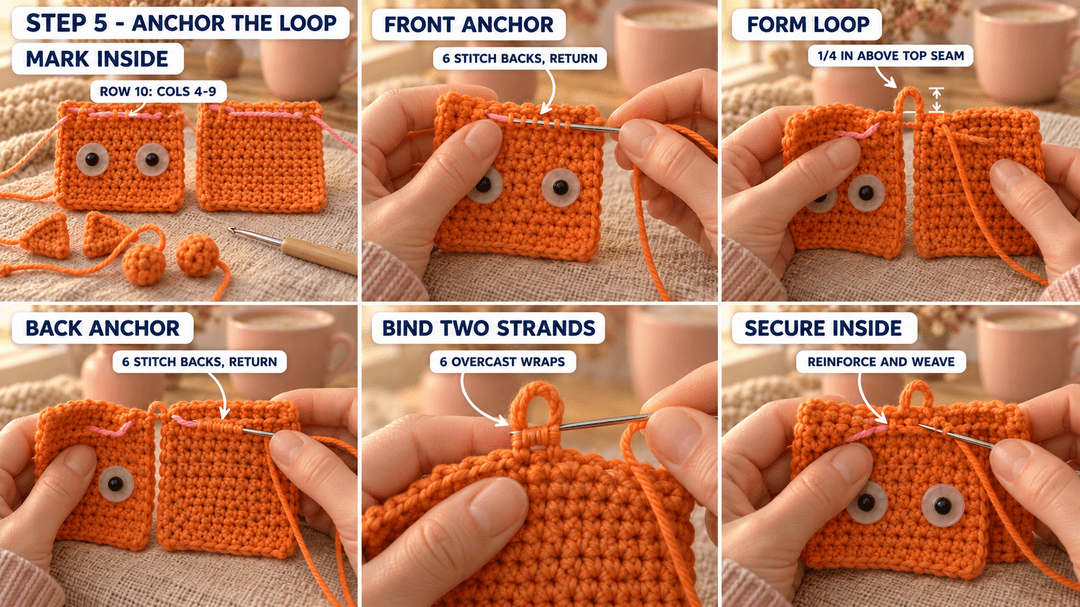
- Lay both panels right sides down, foundation edges at the bottom. On each panel, mark the six stitch backs in Row 10, columns 4–9, counting from the left of the panel as it lies in front of you.
- Cut 36 in (90 cm) orange cotton. Leave a 6 in (15 cm) starting tail. Weave the working end under the six marked stitch backs of the front panel and back through the same six in the other direction. Keep the needle on the wrong side.
- Bring the working strand up to the middle of Row 12 on that panel. Form a small loop that will stand ¼ in (0.6 cm) above the finished top seam. Take the strand down onto the back panel and weave it under its six marked Row 10 stitch backs, then back through those six in the other direction.
- Bring the strand back to the top of the back panel. Lay it alongside the first strand, following the same little loop back to the front panel. Hold the panels with their wrong sides together briefly to check the loop height, then open them again.
- Bind the two loop strands together with six close overcast wraps, working around the loop itself. Weave the working end under the front panel's six marked Row 10 stitch backs, reverse through them, then knot it to the starting tail on the inside. Weave both tails in and trim.
Tip. The loop should stand just high enough for the jump ring. If it grows longer with use, remove the hardware and reinforce the loop with another orange strand, anchored through the same six stitch backs on each panel.
Join the square and add a little filling
Place the panels wrong sides together, face looking toward you, with the loop above the top edge. Match the bottom corners and pin the panels together. Cut 30 in (75 cm) orange yarn for the seam.
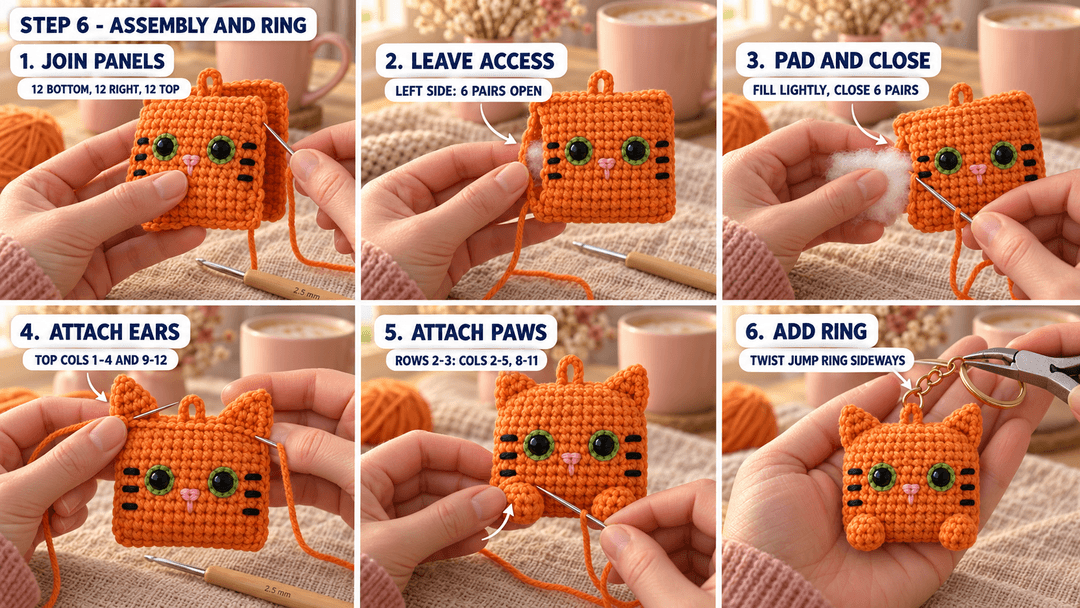
Start at the bottom-left corner. Whipstitch along the bottom, one stitch through each of the 12 matching foundation positions. Turn up the right side, taking one stitch through each of the 12 matching row ends. Sew across the top through the 12 matching Row 12 stitches, keeping the little hanging loop free above the middle. Finish by sewing down the left side through the first six row-end pairs.
Stuff now, through the six-row opening on the left. Tuck a thin layer of filling behind the eye washers, then nudge a little into each corner. Press the front and back between your palms: Marmalade should feel like a small cushion. Close the remaining six row-end pairs, secure the seam inside and hide the end through the filling.
Sew on the ears and paws
Hold Marmalade upright, face toward you. The ears point up, and the rounded paw toes point down.
- Ears. Set one ear's four-stitch base along the top seam at front columns 1–4, and the other at columns 9–12. With each orange tail, sew one stitch through each of the four ear-base stitches and the matching top-seam position, then sew back through the same four positions. Keep the tips upright.
- Paws. Place each flattened four-pair edge along the gap between front Rows 2 and 3: one across columns 2–5, the other across columns 8–11. The toes hang down toward the bottom corners. Take one stitch through each of the four closed pairs and the matching front-panel position, then sew back through all four. Catch the front layer only, keeping the needle away from the eye washers above.
- Ends. Secure each tail close to its seam, pass it through the filling and bring it out at the back. Pull gently, then trim so the end slips inside.
Add the metal ring
With two pairs of pliers, twist the jump ring open sideways, one end toward you and the other away. Slip it through the orange loop between the ears and through the last chain link. Twist it closed until the ends meet without a gap.
Hold the split ring up over your palm. Marmalade hangs from the middle, with his ears on either side of the chain and his little paws below his face.
A tiny orange cat to tuck into a gift
I like Marmalade tucked into a small paper envelope, with the keyring peeking out of the top. The orange looks lovely against a plain cream card. A little handwritten note leaves his green eyes to do the talking.
If he's going on a zip pull, use the same short chain and split ring, and keep the jump ring snugly closed. Check the loop and the small seams whenever you move him to a different bag.
UK terms: US sc = UK dc; ch and sl st keep the same names.
Made your own Marmalade? Tag #wavodecrochet on Pinterest so I can see your little orange cat.