No-Sew Crochet Cupcake Free Pattern

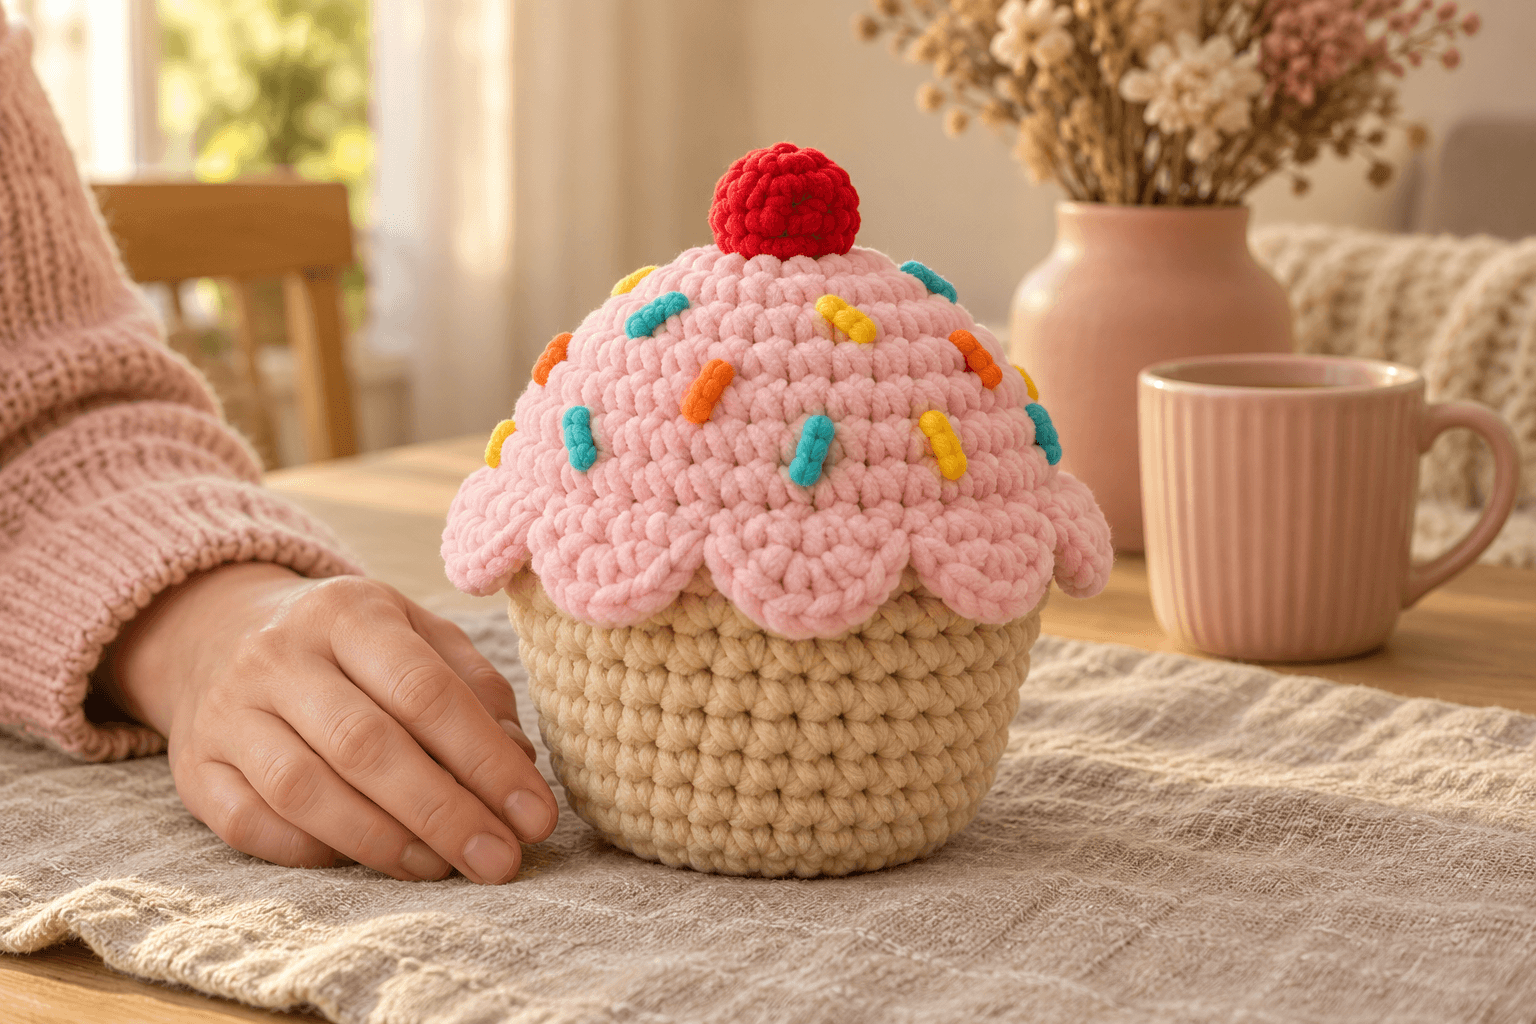
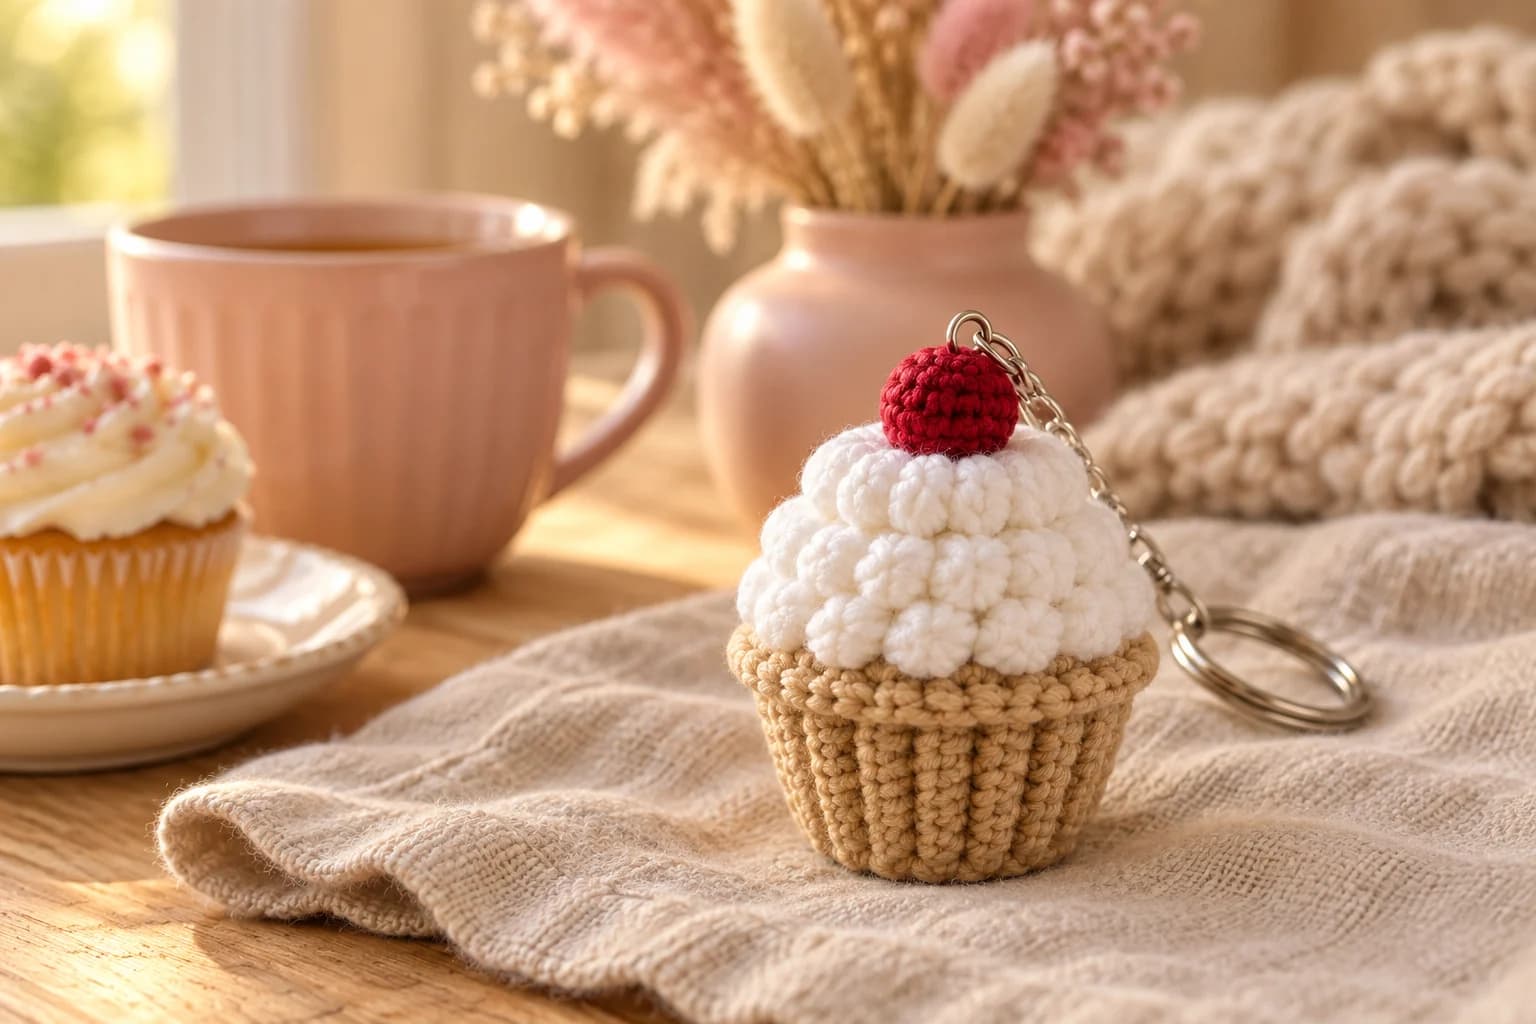
I have a soft spot for pink frosting with far too many sprinkles. Confetti is a crochet cupcake about 7 in (18 cm) tall, with a plump red cherry and a beige cake tucked under a soft scalloped edge. The chenille makes the frosting look almost whipped.
The crochet starts at the cherry and travels down to the bottom of the cake. I keep the scallops on their own little ledge, then pick up the beige base underneath. Add the sprinkles while the frosting is open. Every end tucks neatly inside.
| At a glance | |
|---|---|
| Finished size | about 7 in (18 cm) tall; dome about 4½ in (11.5 cm) wide, excluding scallops |
| Yarn | bulky #5 polyester chenille; smooth worsted #4 yarn for sprinkles |
| Hook | 5 mm (H/8) throughout |
| Pieces | 1 continuous crocheted piece |
| Time | about 2–3 hours |
| Skill | easy: magic ring, increases, decreases, double crochet shells and working in free loops |
Yarn and tools for a plush pink cupcake
- Chenille: bulky #5, 100% polyester, about 131 yd (120 m) per 100 g. Keep the same yarn line for all three colors. Allow about 30 yd pink, 24 yd beige and 4 yd red.
- Sprinkles: smooth worsted #4 cotton or acrylic, about 1 yd each of turquoise, yellow and orange. A smooth strand slides through the frosting more easily than chenille.
- Hook: 5 mm (H/8) for the whole cupcake.
- Small things: polyester fiberfill, a locking stitch marker, a contrasting scrap strand, a blunt tapestry needle with a large eye and scissors.
Tension. Work at about 3 sc per inch (2.5 cm), with about 3 rounds per inch. I keep the stitches snug so the stuffing stays tucked inside. Confetti's dome is about 4½ in (11.5 cm) across, before the scallops, and the full cupcake is about 7 in (18 cm) tall. Chenille and stuffing change the shape a little, so these are approximate sizes.
Stitches for the cherry, frosting and scalloped edge
US terms: magic ring (MR), single crochet (sc), double crochet (dc), slip stitch (sl st), increase (inc: 2 sc in one stitch), decrease (dec: single crochet two stitches together), front loop only (FLO) and back loop only (BLO). R means round; st means stitch. For decreases, pick up the front loops of the next two stitches, yarn over and pull through both front loops, then yarn over and pull through both loops on the hook.
Work in a continuous spiral, moving the marker into the first stitch of each round. R13 is a separate edging branch and is joined as described below. The number in parentheses is the finished stitch count; joining slip stitches are excluded.
Changing color: begin the last sc of the named round in the old color. With two loops on the hook, pull the new color through both. Cut the old color, leaving a 6 in (15 cm) tail, and weave both ends through several stitches on the inside.
Part 1 — Making the cherry on top
Cupcake — red, then pink and beige; 5 mm hook; Make 1. The magic ring becomes the top of the cherry. The last round will close underneath the beige cake.
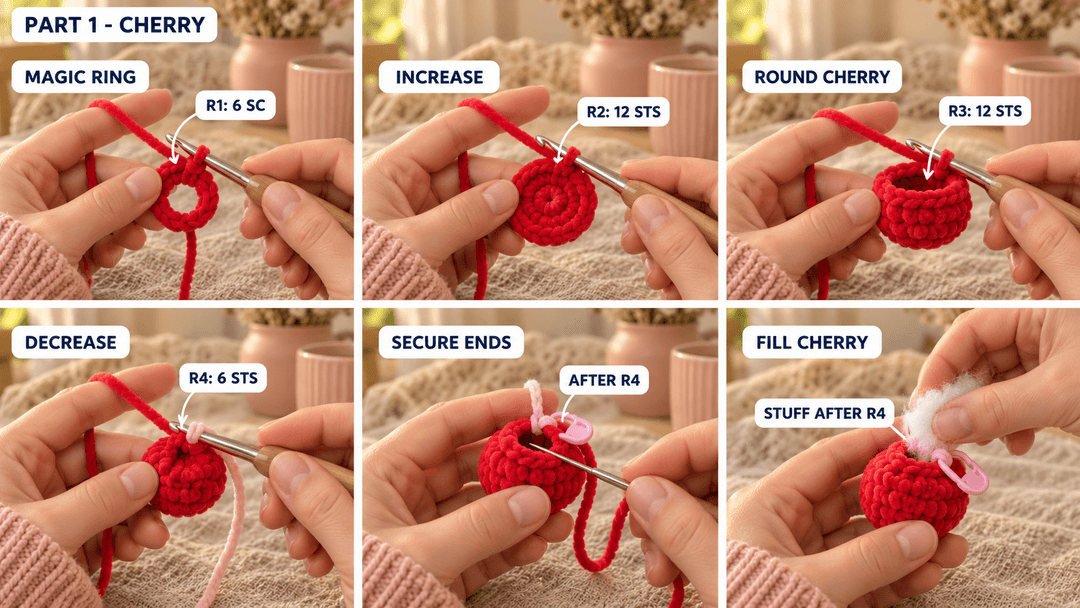
- R1: MR, 6 sc in the ring. (6)
- R2: inc × 6. (12)
- R3: sc around. (12)
- R4: dec × 6. (6) Change to pink in the last decrease, pulling pink through the final two loops.
Cut red, leaving a 6 in (15 cm) tail, and weave it inside the cherry through several stitch backs. Close the magic ring slowly and secure its starting tail inside too. Push a small pinch of stuffing through the six-stitch opening after R4. Keep the cherry round and softly firm.
Tip. Hold the bases of the red stitches while tightening the ring. If the chenille starts shedding, stop pulling and thread the starting tail through the six stitch bases with your needle to draw them together.
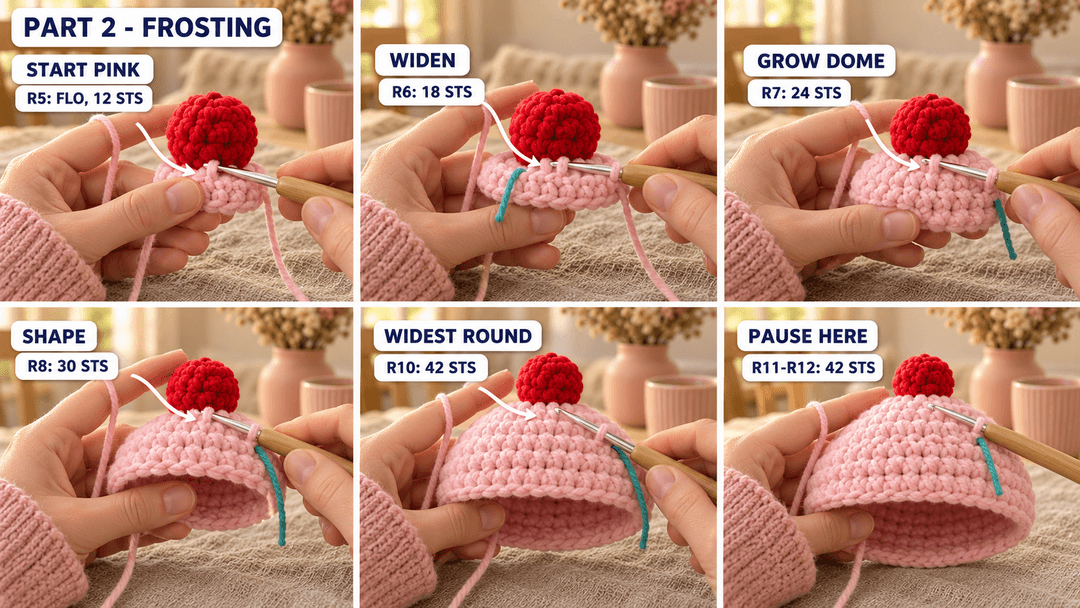
Part 2 — Shaping the pink cupcake frosting
Continue in pink with the 5 mm hook. Hold the cherry above your hand, with its opening facing you. The pink stitches spread out below it like a little umbrella. From R5 onward, run a contrasting scrap strand through the first stitch of each round as you go; leave it in place for the sprinkles and the beige base.
- R5: FLO inc × 6. (12)
- R6: (sc, inc) × 6. (18)
- R7: (sc 2, inc) × 6. (24)
- R8: (sc 3, inc) × 6. (30)
- R9: (sc 4, inc) × 6. (36)
- R10: (sc 5, inc) × 6. (42)
- R11–R12: sc around. (42) 2 rounds.
After R5, return to working through both loops. Leave the unused red back loops of R4 inside the frosting.
At R12, leave the contrasting scrap strand through the first stitch of R12. Keep the usual round marker in the live stitch as well. The scrap strand marks where the edging and beige base will begin.
Pause here for the sprinkles. Put the live pink loop on the locking marker, leave the frosting empty and follow “Adding colorful sprinkles to the frosting” below. Come back to Part 3 when all embroidery ends are secured inside.
Part 3 — Crocheting the scalloped frosting edge
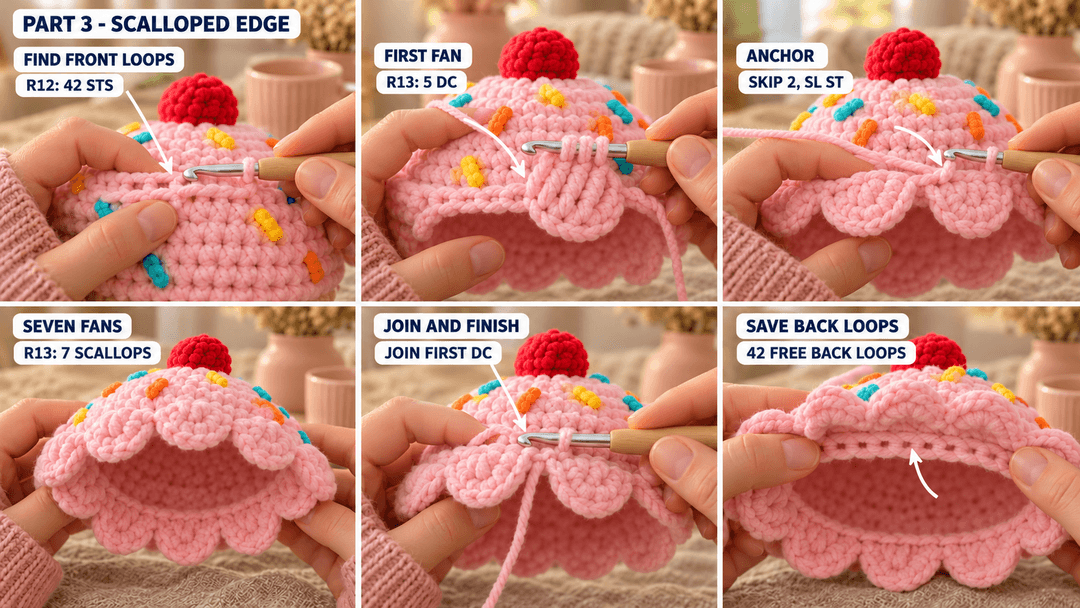
Put the pink loop back on the 5 mm hook. Hold Confetti with the cherry pointing up and the open frosting facing you. Work into the front loops of R12 only, beginning at the scrap strand.
- R13: (skip 2 sts, 5 dc in the next st, skip 2 sts, sl st in the next st) × 7. (42)
There are seven scallops, each made of five dc and anchored by a slip stitch. After the seventh anchor, join with a sl st into the top of the first dc of the first scallop. Fasten off, leaving a 6 in (15 cm) pink tail, and weave it through the stitch backs on the inside of the edging.
Let the scallops spread outward over your fingers. Keep the 42 unused back loops of R12 free underneath them; that's where the beige cake begins.
Tip. If the first fan looks pinched, loosen the five double crochets a little. The anchor slip stitches should sit against the frosting without pulling its edge into a drawstring.
Part 4 — Working the beige cupcake base
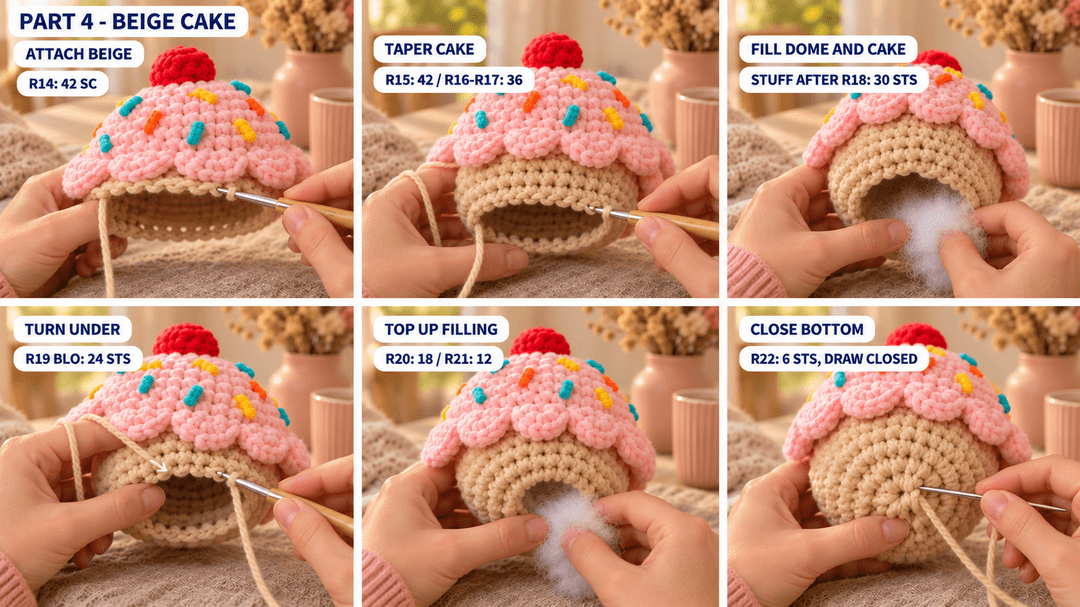
Continue with beige and the 5 mm hook. With the cherry up and the scallops pushed gently away, find the unused back loop of R12 beside the scrap strand.
Put a slip knot on the hook. Insert the hook in that back loop, pull up a loop and pull through both loops on the hook to make the first sc. Mark this sc as the start of R14. Work 41 more sc through the unused back loops to finish R14; the first sc is included in its count.
- R14: BLO sc around into the unused back loops of R12. (42)
- R15: sc around. (42)
- R16: (sc 5, dec) × 6. (36)
- R17: sc around. (36)
- R18: (sc 4, dec) × 6. (30)
After R14, use both loops until R19 says otherwise. Weave the 6 in (15 cm) beige starting tail inside the cake now, then remove the scrap strand.
Stuff after R18. Fill the pink dome first, pushing small tufts up around the cherry's neck, then fill the beige cake. Keep the dome rounded and the cake softly firm. Fan the seven scallops out with your fingers, like the edge of a paper cupcake case.
- R19: BLO (sc 3, dec) × 6. (24)
- R20: (sc 2, dec) × 6. (18)
- R21: (sc, dec) × 6. (12)
After R19, work through both loops again. Top up the stuffing after R21, keeping the underside level rather than domed.
- R22: dec × 6. (6)
Cut beige, leaving a 10 in (25 cm) tail, and pull it through the live loop. Thread the tail through the front loop of each of the six remaining stitches, pull the bottom opening closed and secure it through several stitch backs. Pass the needle through the stuffing and out at the side, gently sink the end inside and trim.
Set Confetti down with the cherry upright. Press the beige underside flat against your palm and smooth the frosting with your other hand.
Adding colorful sprinkles to the frosting
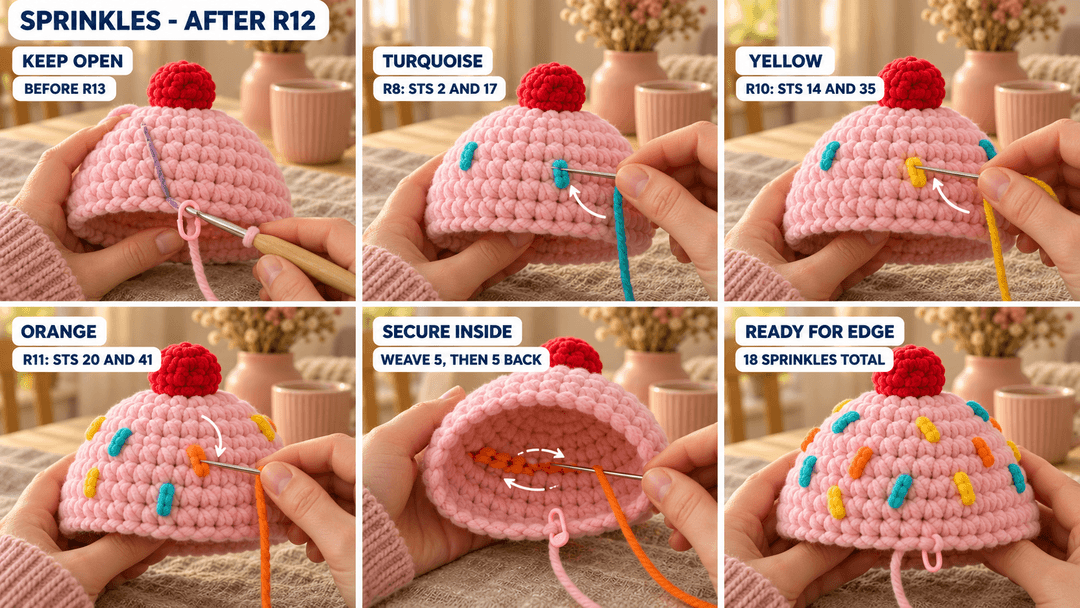
Do this after R12, before Part 3. Keep the pink live loop on its marker. Turn the open frosting toward you so one hand can reach inside. All stitch positions below are counted from the first stitch of their own round, following the direction you crocheted.
I like short sprinkles that sit on the pile instead of disappearing into it. Thread a 1 yd length of smooth yarn onto the needle and leave a 4 in (10 cm) tail inside. Each sprinkle is one straight stitch across the top of one round, from the gap immediately before a named stitch to the gap immediately after it.
| Color | R8 positions | R10 positions | R11 positions |
|---|---|---|---|
| Turquoise | sts 2 and 17 | sts 7 and 28 | sts 13 and 34 |
| Yellow | sts 7 and 22 | sts 14 and 35 | sts 6 and 27 |
| Orange | sts 12 and 27 | sts 21 and 42 | sts 20 and 41 |
For each color, work the two R8 sprinkles, then the two on R10 and the two on R11. Carry the strand loosely along the inside between them, catching it under an inside stitch back every 2–3 stitches. Leave enough slack that the dome can stretch when stuffed.
Secure the starting and finishing ends by weaving each through five stitch backs, reversing direction and weaving through five more. Trim inside. Work the next color the same way, then return to Part 3.
Safety. For a young child's cupcake, leave off the embroidered sprinkles and keep the frosting plain. Check the closed bottom and all yarn ends before handing it over.
A little cupcake for a birthday gift
I like Confetti tucked into a small gift box with pink tissue peeking around the frosting. Keep any ribbon on the box, where it can come off before the cupcake is played with. The red cherry looks lovely against that little nest of pink.
For a pastel pair, make another Confetti with cream frosting and the same beige cake. Keep the turquoise, yellow and orange sprinkles, and the two look as though they belong in the same bakery window.
UK terms: US sc = UK dc; US dc = UK tr; sl st is the same in both.
Made your own Confetti? Tag #wavodecrochet on Pinterest so I can see your cupcake.