Coquette Crochet Bunny

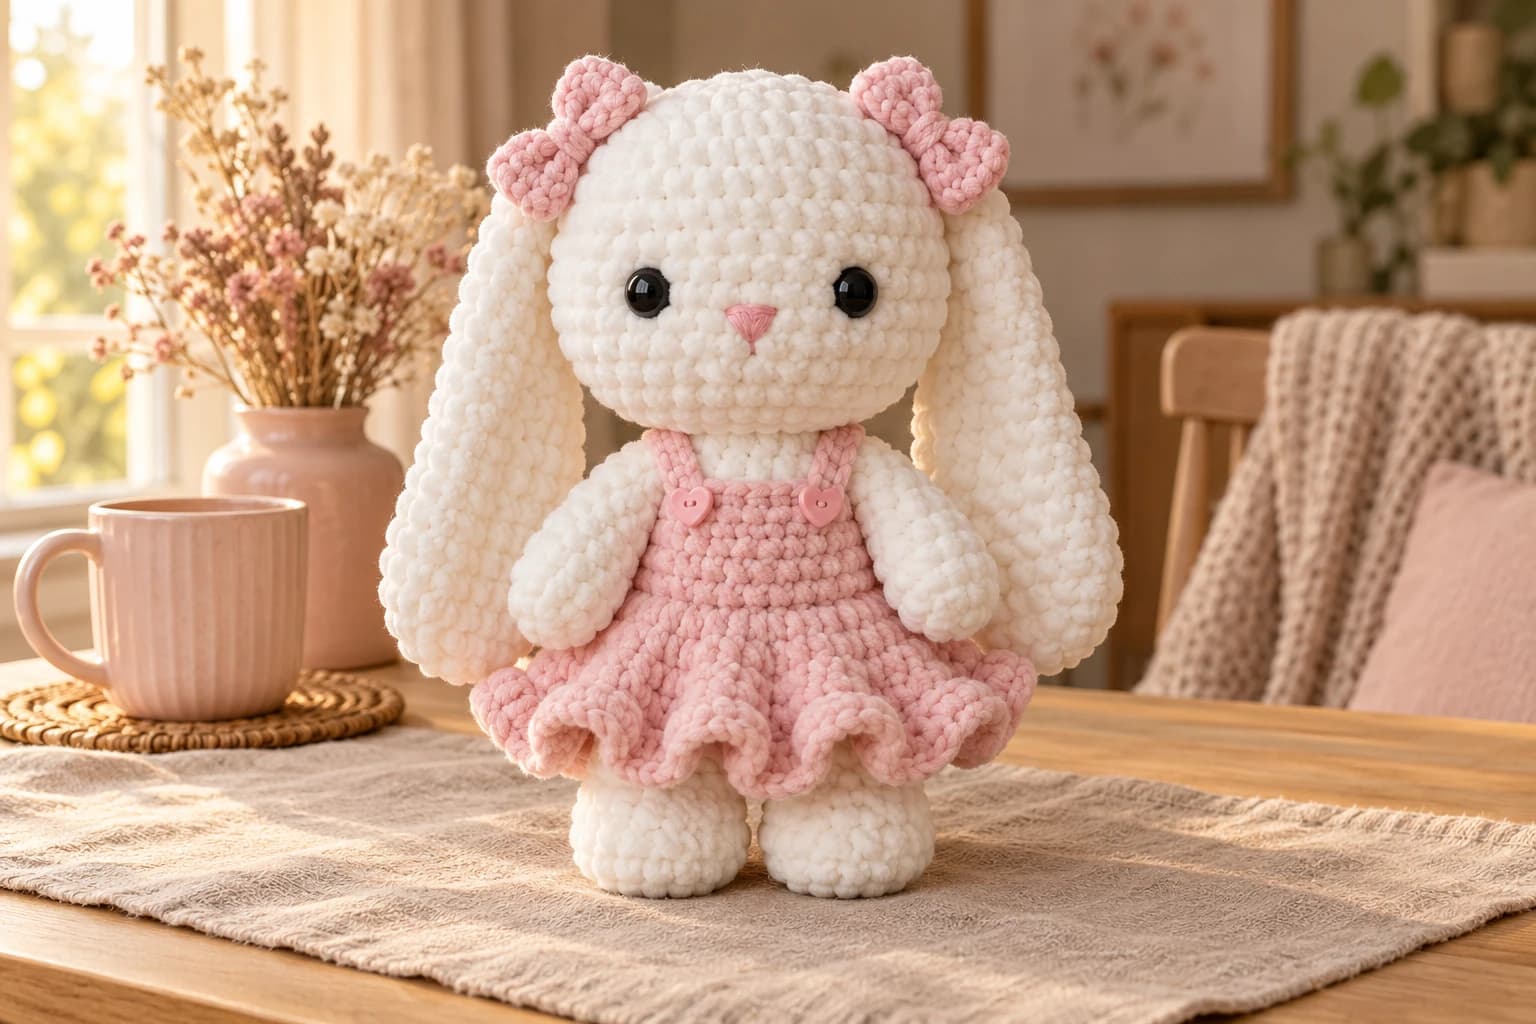
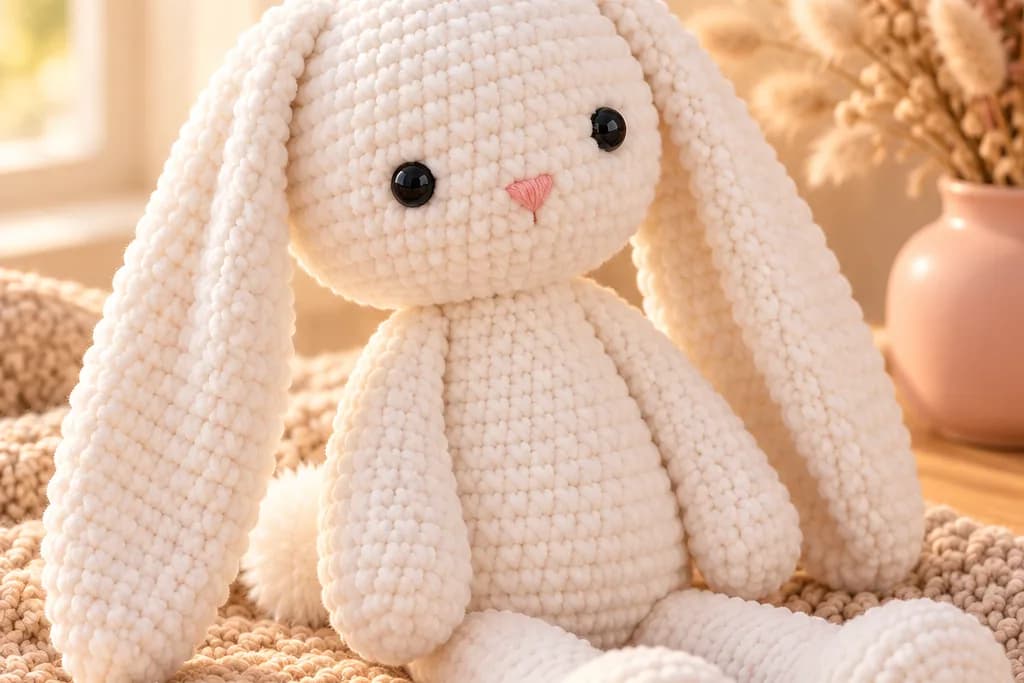
I have a soft spot for a bunny whose ears need their own space on the shelf. Rosie is a coquette crochet bunny about 13–14 in (33–36 cm) tall, with long white ears, little pink bows and a dress that ripples around her feet. Her tiny pink nose is embroidered straight onto the chenille.
I like the dress in the same plush yarn as her bows. It makes the hem thick and soft, like the edge of a little cushion. The dress slips onto the body before the head and arms are sewn on, so the straps can sit neatly over her shoulders.
| At a glance | |
|---|---|
| Finished size | about 13–14 in (33–36 cm) tall; head about 5⅓ in (13.6 cm) wide |
| Yarn | super bulky #6 polyester chenille in white and pastel pink |
| Hook | 5 mm (H/8) throughout |
| Pieces | 12 including the optional tail; 11 without it |
| Time | about 7–9 hours |
| Skill | intermediate: tight chenille stitches, shaping, flat rows and sewn assembly |
What you’ll need for Rosie’s soft chenille finish
- Chenille: Premier Parfait Chunky, 100% polyester, 131 yd (120 m) per 100 g, in White and Cotton Candy, or a similarly sized #6 polyester chenille. Allow about 190 yd white and 75 yd pink. Have two 100 g balls of white and one of pink ready.
- Smooth sewing yarn: about 8 yd white and 4 yd pink worsted #4 acrylic or cotton, including a little pink for the nose. I use smooth yarn for the seams because it passes through the pile without shedding.
- Hook: 5 mm (H/8) for every crocheted part.
- Face and dress: two 14 mm black safety eyes with washers, two 12 mm pink heart-shaped sew-through buttons, and pink sewing thread with a small needle for the buttons.
- Small things: polyester fiberfill, tapestry needle, scissors, pins, stitch markers and contrasting scrap yarn for the front line.
Tension. Work at about 2½ sc per inch (2.5 cm), with about 2½ rounds per inch, snug enough that the stuffing doesn't show. At that tension Rosie is about 13–14 in (33–36 cm) tall. Chenille varies between brands, so check a small stuffed swatch before starting her head.
Safety. With plastic eyes and heart buttons, Rosie is a display plush for ages 3 and up. For a younger child, embroider the eyes and stitch little pink hearts in place of the buttons; sew the dress and bows down firmly.
Stitches for the bunny, ruffles and bows
These are US terms: magic ring (MR), chain (ch), slip stitch (sl st), single crochet (sc), stitch (st), increase (inc: 2 sc in one st) and decrease (dec: sc 2 together). R means round. For a dec, pick up the front loop of each of the next 2 sts, yarn over and pull through both front loops, then yarn over and pull through the remaining 2 loops.
Work the stuffed pieces in a continuous spiral, with a marker in the first stitch. Move that marker up each round. The dress has joined rounds, described below. Flat rows start with ch 1 and a turn; that chain never counts as a stitch. Counts in parentheses are the stitches made.
Tip. Chenille can snap if you yank a magic ring shut. Pull slowly, holding the stitch bases. If the pile starts to strip, thread smooth matching yarn through the bases of the 6 starting stitches, draw it closed and knot it inside.
Making Rosie’s head and placing her eyes
Head
White chenille, 5 mm hook, Make 1.
The magic ring is the crown. The last round stays open at the neck, with the finishing tail there. Leave a 6 in (15 cm) starting tail and secure it inside once the ring is closed.
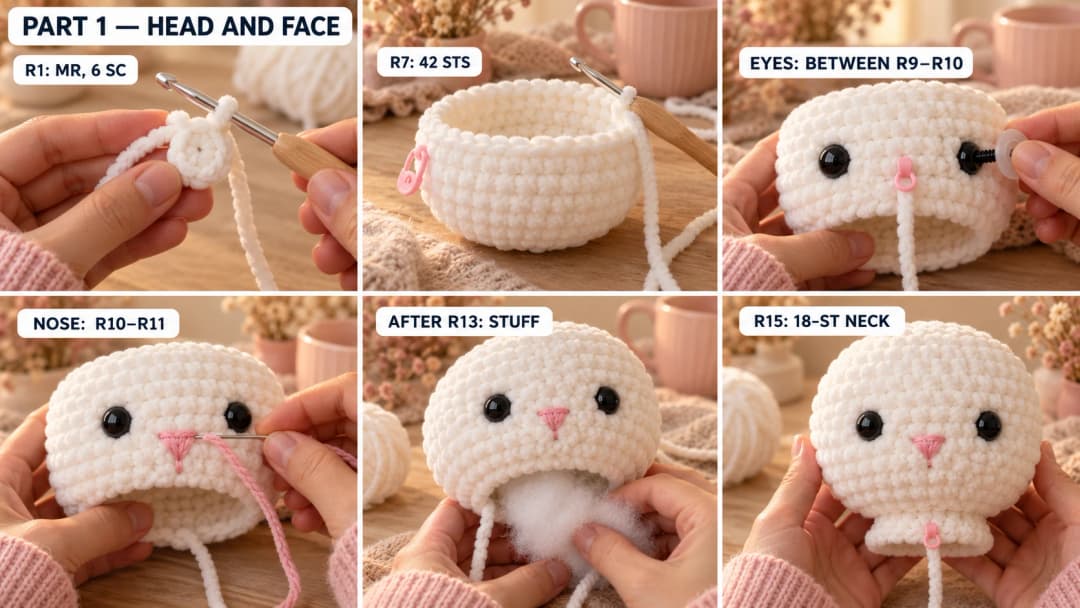
- R1: MR, 6 sc in the ring. (6)
- R2: inc × 6. (12)
- R3: (sc, inc) × 6. (18)
- R4: (sc 2, inc) × 6. (24)
- R5: (sc 3, inc) × 6. (30)
- R6: (sc 4, inc) × 6. (36)
- R7: (sc 5, inc) × 6. (42)
- R8–R11: sc around. (42) 4 rounds.
Slip the live loop onto a marker while you work on the face.
Mark the front and embroider the nose
Mark st 22 of R9 as center front, counting from the first-stitch marker. Lay a scrap strand down the front through that stitch, from the crown toward the neck. Keep it in place until assembly is finished. The first-stitch marker sits at the back.
- Eyes. Place the posts in the gaps between R9 and R10, one 4 stitch-widths to either side of the center-front strand. The posts are 8 stitch-widths apart along the front. Pin first, look straight at the face and lock the washers inside.
- Nose. With smooth pink yarn, embroider a tiny downward-pointing triangle on the front. Its top edge sits between R10 and R11, spanning 2 stitch-widths centered on the strand. Bring its bottom point down to the lower edge of R11. Fill the triangle with 4 or 5 short straight stitches, keeping them gently snug.
- Knot the embroidery yarn inside and weave the ends through the inside stitch backs. Rosie has a small nose and a plain white face beneath it; keep the embroidery within that little triangle.
For embroidered eyes, use smooth black yarn and make 5 short vertical stitches over each eye spot, spanning 1 round in height and about 1 stitch in width. Knot and secure the ends inside while the head is open.
Narrow the head to the neck
Put the working loop back on your hook.
- R12: (sc 5, dec) × 6. (36)
- R13: (sc 4, dec) × 6. (30)
Stuff after R13, firmly enough to round the cheeks, but leave a little give around the nose. Keep the washers covered with filling on the inside.
- R14: (sc 3, dec) × 6. (24)
- R15: (sc 2, dec) × 6. (18)
Top up through the neck opening. Sl st in the next st and fasten off with a 6 in (15 cm) tail at the neck. Secure the tail inside the neck edge. Keep the opening unclosed; the head will be sewn on with smooth white yarn.
Rosie’s body and little feet
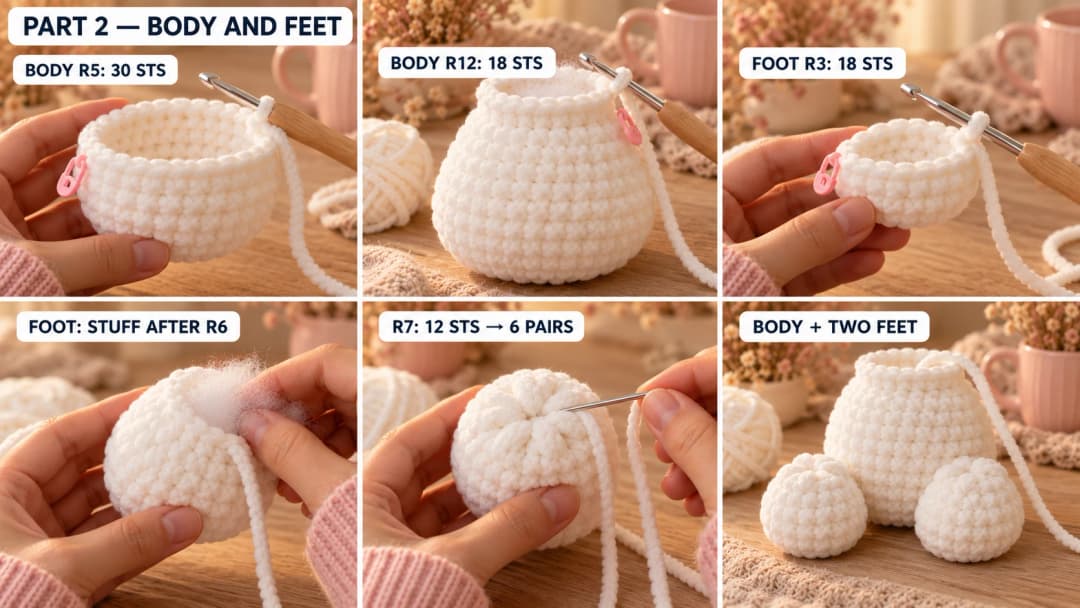
Body
White chenille, 5 mm hook, Make 1.
The magic ring becomes the bottom of the body; the last round is the neck opening. Leave a 6 in (15 cm) starting tail and secure it inside.
- R1: MR, 6 sc in the ring. (6)
- R2: inc × 6. (12)
- R3: (sc, inc) × 6. (18)
- R4: (sc 2, inc) × 6. (24)
- R5: (sc 3, inc) × 6. (30)
- R6–R9: sc around. (30) 4 rounds.
Mark st 16 of R7 as center front, with the first-stitch marker at the back. Run a contrasting scrap strand vertically through this stitch, down toward the magic ring and up toward the neck. This is Rosie's body-front line.
- R10: (sc 3, dec) × 6. (24)
Stuff after R10, firmly through the lower belly and softly near the shoulders.
- R11: (sc 2, dec) × 6. (18)
- R12: sc around. (18)
Top up the filling. Sl st in the next st and fasten off with a 6 in (15 cm) tail at the neck, securing it inside the edge. Leave the neck opening unclosed.
Feet
White chenille, 5 mm hook, Make 2.
The magic ring is the rounded bottom of each foot. The last round is the top opening that meets the underside of the body. Leave a 6 in (15 cm) starting tail and secure it inside.
- R1: MR, 6 sc in the ring. (6)
- R2: inc × 6. (12)
- R3: (sc, inc) × 6. (18)
- R4–R6: sc around. (18) 3 rounds.
Stuff after R6, firmly in the rounded end and lightly near the top.
- R7: (sc, dec) × 6. (12)
Sl st in the next st and fasten off with an 8 in (20 cm) tail at the top. Secure the chenille tail inside. Flatten the top opening into 6 facing pairs and sew it shut with smooth white yarn, one stitch through each pair. Leave 12 in (30 cm) of that smooth strand for attaching the foot.
The floppy ears, arms and round tail
Ears
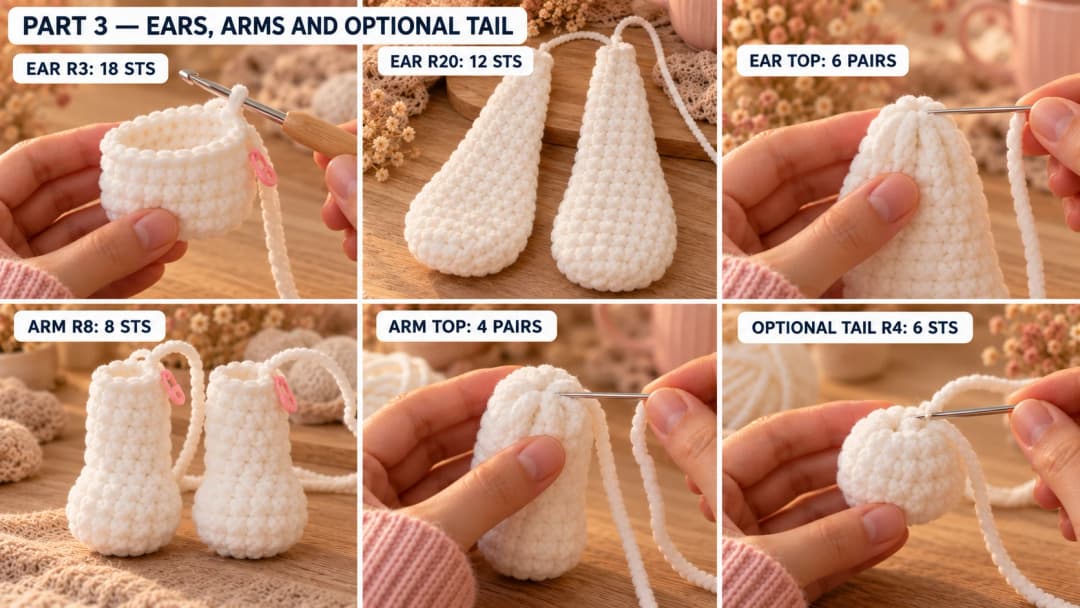
White chenille, 5 mm hook, Make 2.
The magic ring is the broad, rounded lower tip. The last round becomes the top edge beside Rosie's crown. Leave a 6 in (15 cm) starting tail and secure it inside.
- R1: MR, 6 sc in the ring. (6)
- R2: inc × 6. (12)
- R3: (sc, inc) × 6. (18)
- R4–R13: sc around. (18) 10 rounds.
- R14: (sc, dec) × 6. (12)
- R15–R20: sc around. (12) 6 rounds.
Leave the ears unstuffed. Press each one flat with the magic ring at the lower tip. Sl st in the next st and fasten off with an 8 in (20 cm) tail at the top; secure it inside. Close the top with 6 stitches through 6 facing pairs, using smooth white yarn. Leave a 16 in (40 cm) smooth sewing tail at the top edge.
I keep Rosie's ears empty so they feel like little blankets. Hold one by its narrow top and let the wide end drop before pinning it to her head.
Arms
White chenille, 5 mm hook, Make 2.
The magic ring is the hand; the last round is the shoulder opening. Leave a 6 in (15 cm) starting tail and secure it inside.
- R1: MR, 6 sc in the ring. (6)
- R2: inc × 6. (12)
- R3–R6: sc around. (12) 4 rounds.
Stuff after R6, lightly in the hand through R4. Keep the shoulder end empty.
- R7: (sc, dec) × 4. (8)
- R8: sc around. (8)
Sl st in the next st and fasten off with an 8 in (20 cm) tail at the shoulder; secure it inside. Flatten the opening and close it with smooth white yarn, 4 stitches through 4 facing pairs. Leave a 12 in (30 cm) smooth tail at the shoulder for sewing.
Optional tail
White chenille, 5 mm hook, Make 1.
The tail sits behind the skirt. Optional: skip it if you prefer Rosie's back smooth. The reference view shows her front; this little tail is an extra detail for the back.
The magic ring is the outer tip, and the last round closes the side that touches the body. Leave a 6 in (15 cm) starting tail and secure it inside.
- R1: MR, 6 sc in the ring. (6)
- R2: inc × 6. (12)
- R3: sc around. (12)
Stuff after R3 with a small pinch of filling.
- R4: dec × 6. (6)
Sl st in the next st and fasten off with an 8 in (20 cm) tail at the attachment side. Thread it through the front loops of the 6 remaining sts and draw the opening closed. Secure the end there; attach a fresh 12 in (30 cm) strand of smooth white yarn at that closed end for sewing.
A pink ruffle dress for Rosie
Dress
Pink chenille, 5 mm hook, Make 1.
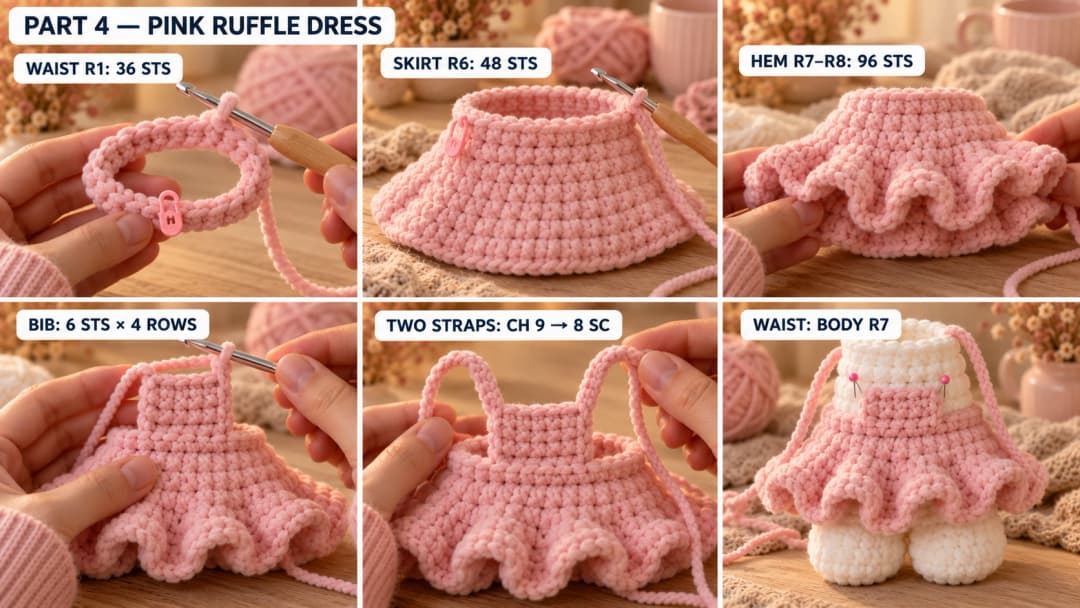
Start at the waist and work down to the ruffled hem. The bib and straps grow directly from the waistband. Leave an 8 in (20 cm) starting tail, ch 36 and sl st into the first ch, keeping the chain untwisted.
For these rounds, ch 1, work the instructions, then sl st into the first sc. Neither the chain nor the joining slip stitch counts. Keep the join at the back. Mark the first sc of R1 and number the waistband stitches 1–36 from that marker.
- R1: sc in each ch around. (36)
- R2: sc around. (36)
- R3: (sc 5, inc) × 6. (42)
- R4: (sc 6, inc) × 6. (48)
- R5–R6: sc around. (48) 2 rounds.
- R7: inc × 48. (96)
- R8: sc around. (96)
After the R8 join, fasten off with an 8 in (20 cm) tail at the hem. Weave it through the inside stitch backs. Secure the starting tail along the inside waistband. Leave the skirt empty.
Spread the doubled hem with your fingers into soft waves. The straight part of the skirt hangs down; the last two rounds curl outward into the ruffle.
Work the bib up from the front waistband
Hold the dress with the hem pointing down and the outside facing you. The front is opposite the back join, halfway between waistband sts 18 and 19. With pink, pull up a loop through the free underside of foundation ch 16, leaving an 8 in (20 cm) starting tail. Work toward ch 21.
- Row 1: ch 1, sc in the underside of each of foundation ch 16–21. (6)
- Rows 2–4: ch 1, turn, sc 6. (6) 3 rows.
Fasten off with an 8 in (20 cm) tail at the bib's upper corner. Weave both tails through the back of the bib. The bib sits above the waistband, like the front of a tiny pinafore.
Grow the straps from the bib corners
Work one strap at a time in pink, with the 5 mm hook. Each starts at an upper corner of bib Row 4 and is part of the dress.
Pull up a loop through the first corner stitch, leaving an 8 in (20 cm) tail, and ch 9.
- Row 1: sc in the 2nd ch from the hook and in each ch across. (8)
Sl st back into the same bib corner and fasten off, leaving an 8 in (20 cm) tail. Secure both tails behind the corner. Repeat the same strap at the other upper corner of Row 4. Keep their free ends loose until the dress is on Rosie.
Dress the body while the neck is open
Pin the feet temporarily under the body to check where the hem will fall. Keep the bib at the front and hem toward the feet, then slip the waistband down over the body's open neck. Bring the waistband to body R7, with the middle of the bib over the body-front strand. Tack the waistband at front and back to R7 with 3 small smooth-pink stitches at each spot.
The bib's upper edge rests against body R11. Tack its two upper corners there, 3 stitch-widths to either side of the front line, with 3 small pink stitches each. Leave its middle free and bring the straps over the shoulders for now.
Tip. Check that the hem makes waves before sewing the waistband down. If the fabric feels stiff, smooth out each fold by hand. Keep the waistband relaxed when you tack it so the skirt can swing around the belly.
Two pink bows beside her ears
Bows
Pink chenille, 5 mm hook, Make 2.
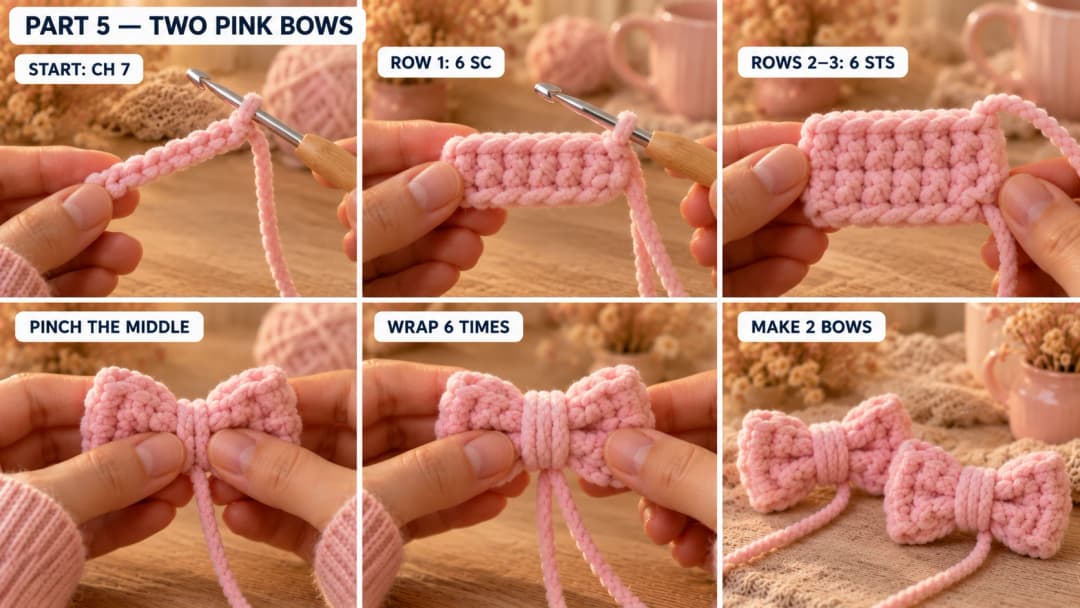
Worked flat. Leave an 8 in (20 cm) starting tail and ch 7.
- Row 1: sc in the 2nd ch from the hook and in each ch across. (6)
- Rows 2–3: ch 1, turn, sc 6. (6) 2 rows.
Fasten off with a 20 in (50 cm) tail at the final corner. Weave the starting tail through the back. Run the finishing tail through the back of Row 3 to the middle, pinch the rectangle from top to bottom and wrap the middle 6 times. Knot at the back of the wrap and secure the remaining chenille there.
Attach 12 in (30 cm) of smooth pink yarn at the back of the wrapped middle for sewing. Keep the wings plump; I like them to stand just above the white ears.
Putting Rosie together and embroidering her nose
Look Rosie in the face before you pick up the sewing needle. Check that her pink nose still makes a neat little triangle, then keep her marked front line facing you as you pin her together.
Use smooth matching yarn for every seam. Take small bites through the stitch backs beneath the pile. Knot each sewing end against the fabric, run it through the stuffing and bring it out a little way away. Pull gently so the knot slips inside, then trim.
Set the head on the shoulders
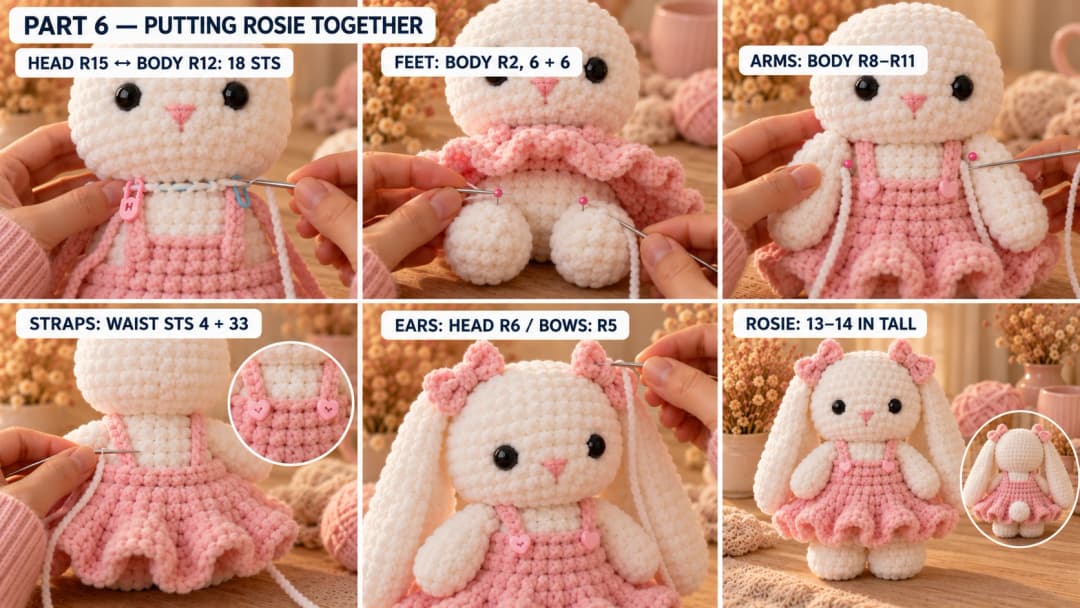
Set the head upright with the face above the bib. Match the head-front strand to the body-front strand. Whipstitch head R15 to body R12, one stitch through each matching pair, 18 stitches around. Before the last 4 stitches, push a little more stuffing into the neck. Finish the seam and go around again with 18 more stitches.
Feet under the skirt
Lift the skirt toward the bib. Hold the feet rounded ends downward, with their smooth closed edges against the body's underside. Put one on each side of the front line. Pin each closed edge along body R2, using the 6 consecutive stitches on its side of the front line. The inner ends meet below the front strand; the feet hang side by side.
Sew each 6-stitch closed edge to its 6 marked body stitches. Go back along that seam once more, 6 stitches each way. Point the round ends slightly forward, then lower the skirt over their tops.
Arms beside the bib and straps over the shoulders
Lay Rosie on her back, facing you. Find each side of the body, 7 stitch-widths to either side of the front strand on R9. Pin a flattened shoulder there, its closed edge lying vertically from R8 through R11, with the hand pointing out and slightly down.
Sew the arm's 4 closed-edge stitches to those 4 body rounds, one stitch at each round. Go back over the same seam, 4 more stitches. Keep the skirt below the arm and the strap above it.
Bring each strap over the shoulder toward the back, keeping it flat. Sew its free end to the back waistband at R1 st 4 or st 33, with 4 small smooth-pink stitches through the strap end and waistband. Tack each strap to its shoulder with 2 small stitches.
Sew the two heart buttons to the bib's upper corners, one over each strap root at bib Row 4, with their points down. Use pink sewing thread and make 6 passes through each button's holes and the fabric. Knot behind the bib.
Let the long ears fall beside her cheeks
Hold each ear rounded end down and smooth face forward. Pin its 6-stitch closed top along head R6, with the middle 8 stitch-widths to either side of the face-front strand, following the strand upward from R9. Set 3 closed-edge stitches on each side of that middle point.
Sew each top edge to those 6 head stitches, then go back along the seam with 6 more stitches. Let the ear fall down the side of the head, behind the arm. If a seam rolls forward, hold the ear flat at the crown and add 2 anchoring stitches through its top and head R5.
Bows and the optional tail
Pin a bow at each ear's top seam, with its wrapped middle on head R5, 8 stitch-widths to either side of the front strand. Sew through the wrap and head with 6 smooth-pink stitches, then tack each bow wing once at head R4 so the bow faces forward.
For the optional tail, lift the skirt at the back. Center the tail's closed end on body R3 at center back, opposite the body-front strand. Sew around the 6-stitch closure with 6 smooth-white stitches, then go around once more. Let the skirt fall over it.
Remove the front strands and give the ears a gentle sweep with your hands. Rosie is ready for her little place on the shelf.
A ribbon-lined box for Rosie
I'd wrap Rosie in tissue with the ears laid alongside her dress, then nestle her in a shallow gift box. A pink ribbon around the box picks up the bows without hiding her face. Keep the ribbon with the wrapping when she comes out.
For cleaning, gently spot-clean the finished plush with mild soap and cool water, press the damp area with a towel and let her dry fully in the air. Keep hot irons away from the chenille.
Using UK terms? US sc = UK dc; US sl st = UK ss.
Made your own Rosie? Tag #wavodecrochet on Pinterest so I can see her.