Crochet Tea Bag Bookmark

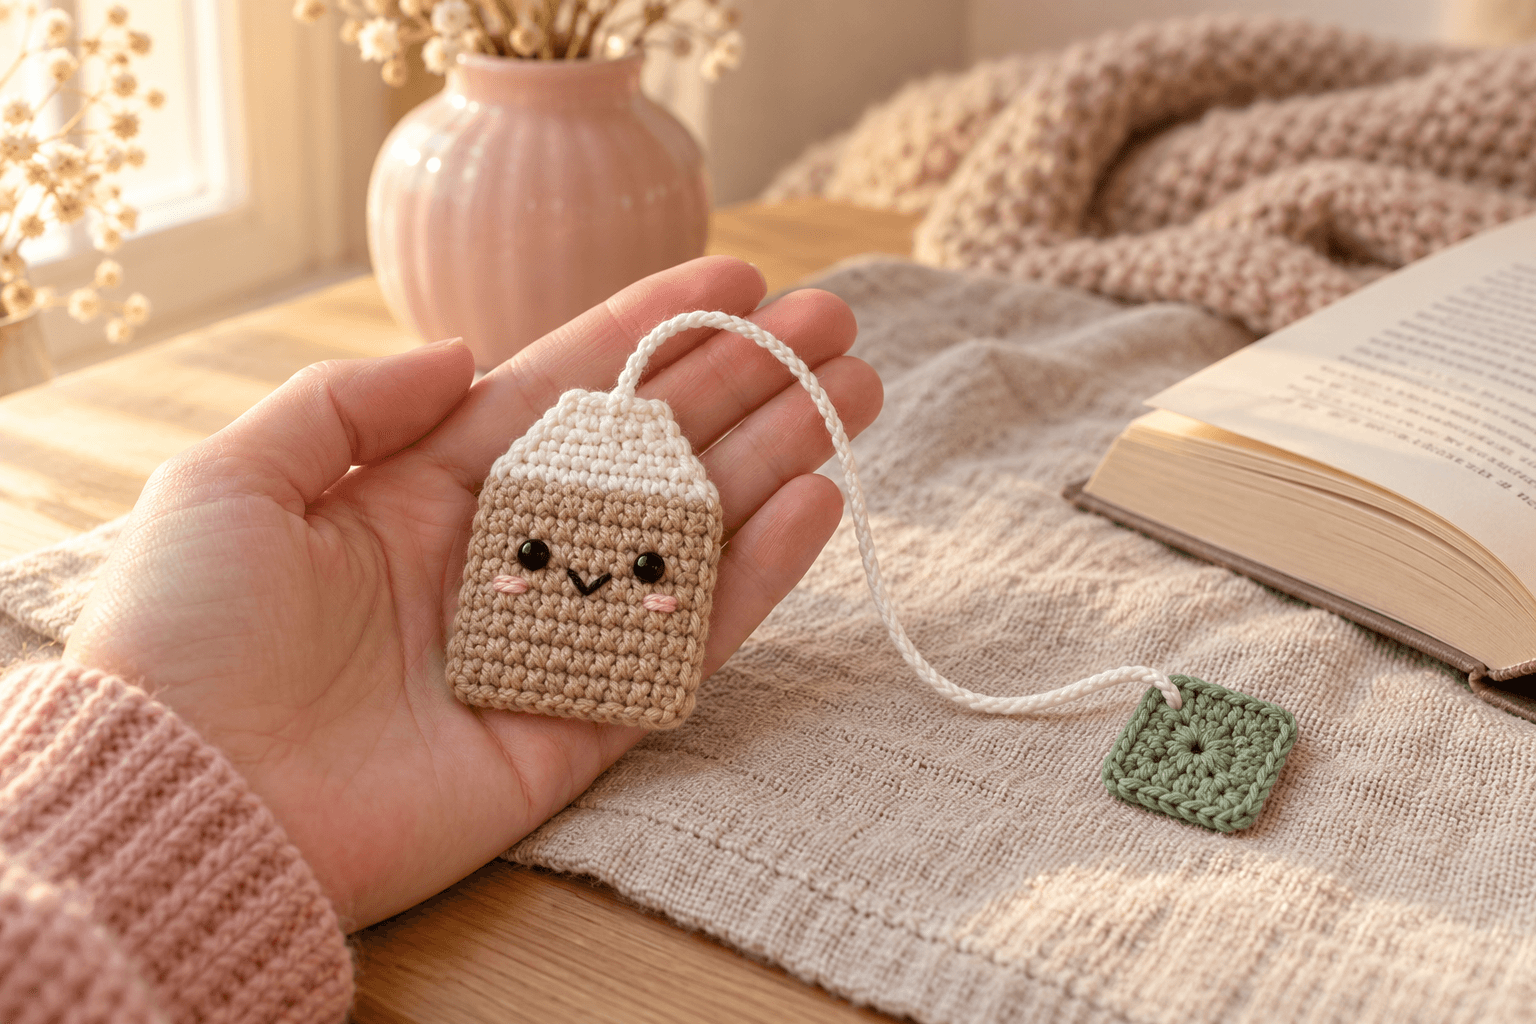
Tea and a book are my favorite excuse to sit still for a few minutes. This crochet tea bag bookmark has a little beige-and-white sachet about 2¼ in (5.5 cm) tall, with black eyes, pink cheeks and a sage green tag. The white cord rests between the pages while the smiling tea bag peeks over the top.
I keep the filling light, just enough to soften the corners. The cord is worked back over its starting chain so it feels firmer in your hand, and its ends are stitched down before the sachet closes. A tiny green square finishes the other end, like the tag hanging over a teacup.
| At a glance | |
|---|---|
| Tea bag | about 2¼ in (5.5 cm) tall, 1¾ in (4.5 cm) wide |
| Cord | about 7 in (18 cm) free between the tea bag and tag |
| Green tag | about ¾ in (2 cm) across |
| Yarn | DK #3 cotton in biscuit beige, white and sage green |
| Hook | 2.5 mm throughout |
| Pieces | 4 |
| Time | about 1½–2 hours |
| Skill | easy: rows of sc, decreases, a magic ring and simple sewing |
Cotton scraps for a little tea bag bookmark
I like smooth cotton for the white cord. It slides neatly between paper pages and lets the little green tag keep its shape.
- Yarn: 100% cotton, DK #3, about 125 m (137 yd) per 50 g. Allow about 12 yd biscuit beige, 12 yd white and 2 yd sage green, including the sewing ends.
- Face: two 6 mm black safety eyes with washers; about 1 yd smooth black embroidery cotton for the smile and ½ yd pink for the cheeks.
- Hook: 2.5 mm for every piece.
- Small things: a tiny pinch of fiberfill, tapestry needle, embroidery needle, scissors, stitch markers and contrast scrap yarn.
Tension. Use about 6 sc per inch (2.5 cm), with about 6 plain rows per inch, measured flat and unstretched. Keep the stitches close enough that the filling stays inside. At that tension, the tea bag is about 2¼ in (5.5 cm) tall. Cotton and seam tension can make yours a little wider or narrower.
Safety. The plastic eyes and long cord make this a reading accessory for adults and older children, not a toy for children under 3. Embroider the eyes if you prefer a softer finish; the long cord still needs to stay away from babies and toddlers.
Stitches for the tea bag and its green tag
US terms: ch = chain; sc = single crochet; sl st = slip stitch; dec = single crochet two stitches together; MR = magic ring; st = stitch. Row means a flat row; R means a round. Numbers in parentheses are the stitch counts.
For the panels, ch 1 and turn before each new row. That turning chain never counts as a stitch. Work through both loops unless the instruction names a chain back bump. Put a marker in the first stitch of each row if the edges are hard to see. The tag has one joined round, with a marker in its first sc.
Part 1 — The beige tea bag with a white top
Tea bag panels
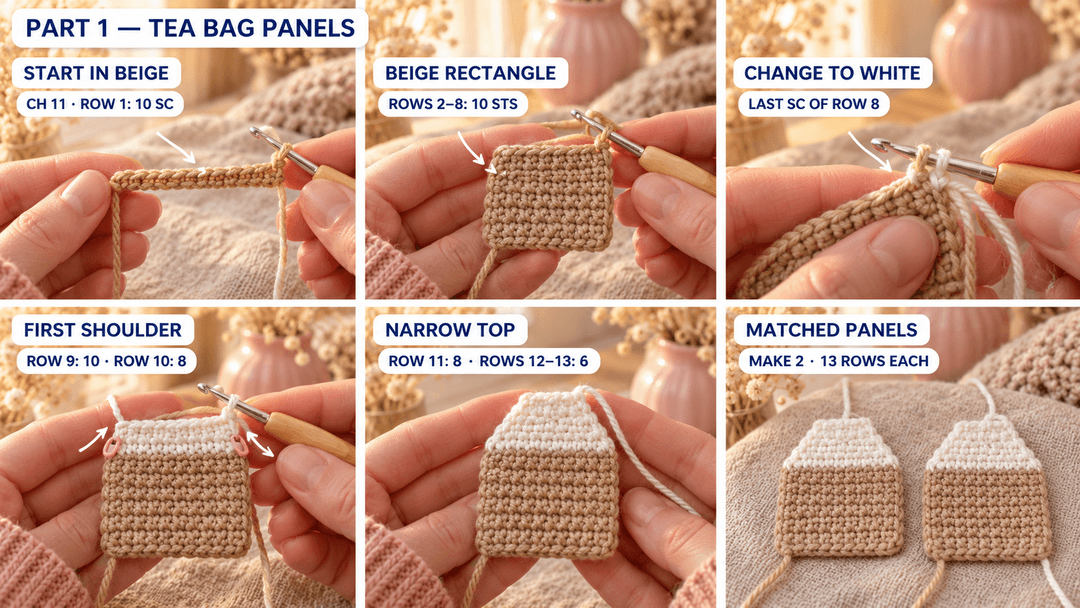
Biscuit beige, then white; 2.5 mm hook; Make 2. Start at the broad lower edge and work toward the narrow white top. Leave a 24 in (60 cm) beige starting tail, then ch 11.
- Row 1: sc in the 2nd ch from the hook and in each ch across. (10)
- Rows 2–8: ch 1, turn, sc 10. (10) 7 rows.
Change to white in the last sc of Row 8: insert the hook, pull up a beige loop, then yarn over with white and pull through both loops. Cut beige, leaving a 6 in (15 cm) tail. Leave a 6 in (15 cm) white starting tail. Weave these short ends into the backs of their own colors.
- Row 9: ch 1, turn, sc 10. (10)
- Row 10: ch 1, turn, dec, sc 6, dec. (8)
- Row 11: ch 1, turn, sc 8. (8)
- Row 12: ch 1, turn, dec, sc 4, dec. (6)
- Row 13: ch 1, turn, sc 6. (6)
Fasten off, leaving an 18 in (46 cm) white tail at the narrow top. Lay the panels flat beside each other and leave the filling for the final seam. The beige starting tails are at the bottom corners; the white finishing tails are at the top corners.
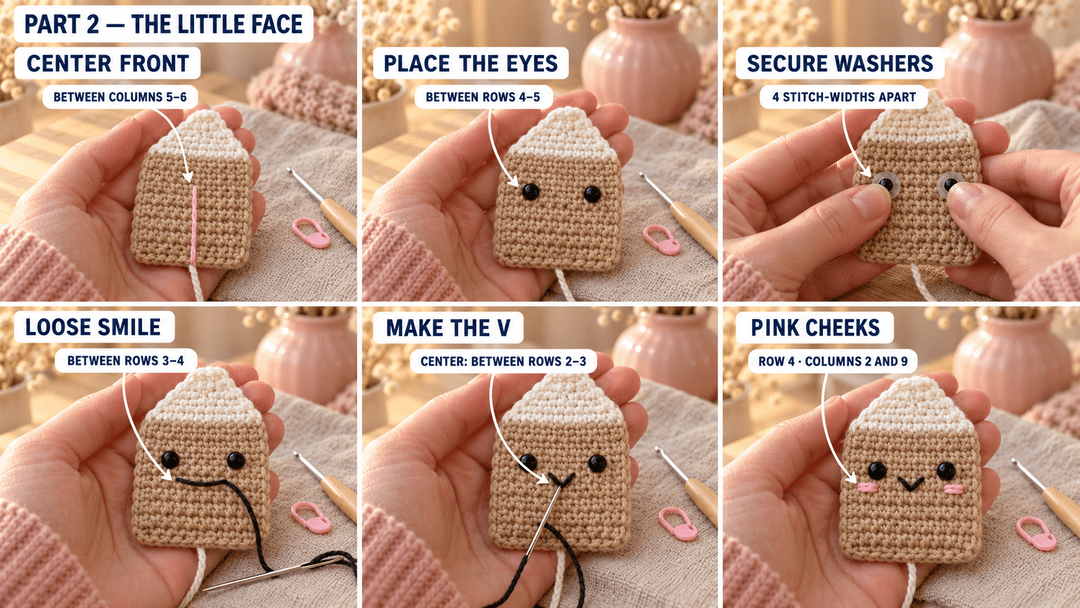
Choose the panel that will carry the face. Hold it with the white end up and the starting-chain edge down. Its side facing you is now the front. Run a contrast scrap strand vertically up the gap between columns 5 and 6 of the beige section, counting from your left as you look at it. Use that line to center the face.
Adding the tea bag's smile and pink cheeks
I put the face on while I can still lay the little panel flat on the table. Lay it flat with its white top pointing away from you.
- Eyes. Place the two 6 mm safety-eye posts in the gaps between Rows 4 and 5, one between columns 3 and 4, the other between columns 7 and 8. There are four stitch-widths between the posts. Check that they sit level, then secure the washers on the back.
- Smile. With black embroidery cotton, come out between Rows 3 and 4, in the gap between columns 4 and 5. Make a loose straight stitch across to the gap between columns 6 and 7 at the same height. Bring the needle out between Rows 2 and 3, on the marked center line. Catch the loose black strand and pull it down into a small V. Take the needle back in just below that point to hold the smile.
- Cheeks. With pink, make two short horizontal stitches over column 2 of Row 4, then two over column 9 of Row 4. Keep the stitches soft so the cotton stays flat.
Secure the embroidery ends on the back and weave them through nearby stitches. Remove the center strand. If you choose embroidered eyes, replace each plastic eye with four short black stitches over the same marked eye position, securing every end on the back.
Tip. Pull the smile just until the V appears. A tight stitch makes the tea bag look pinched in the middle.
The white bookmark cord and little green tag
Reinforced page cord
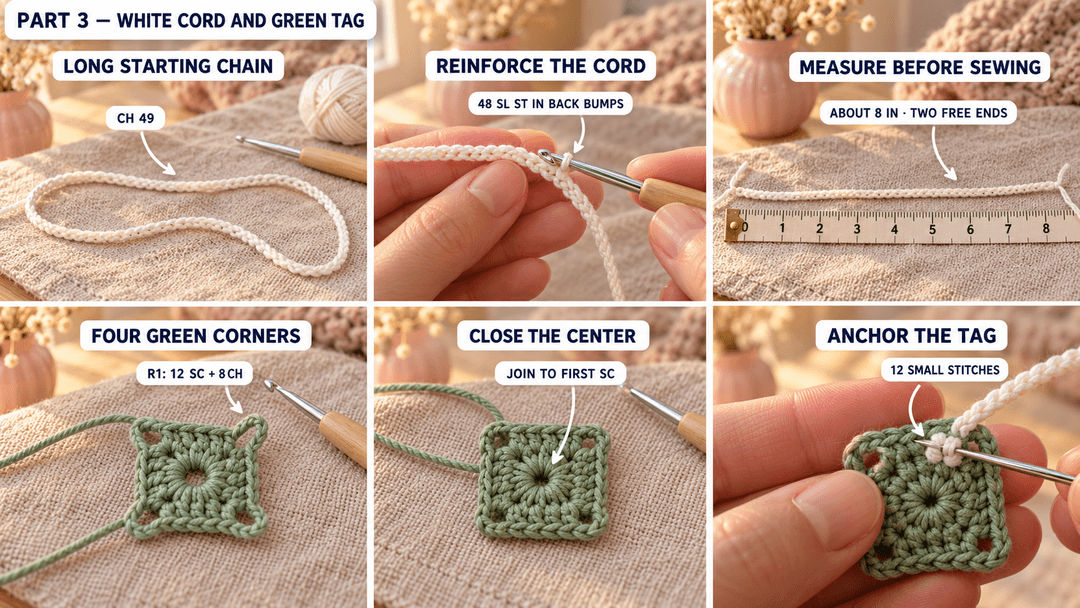
White, 2.5 mm hook, Make 1. Leave a 16 in (40 cm) starting tail and ch 49. Keep the chain relaxed.
- Row 1: sl st in the back bump of the 2nd ch from the hook and in each remaining back bump across. (48)
Fasten off, leaving a second 16 in (40 cm) tail. The first and last ends stay separate: one attaches to the tea bag, the other to the tag. Lay the cord flat without pulling and check its length, about 8 in (20 cm) before attachment. Slip-stitch tension varies, so measure yours without stretching it. Keep it unstuffed.
Tip. If the cord curls, loosen the slip stitches. Draw each loop up to the full thickness of the hook before pulling it through.
Little square tag
Sage green, 2.5 mm hook, Make 1. Leave an 8 in (20 cm) starting tail and make a magic ring. The ring is the center of the tag; the four ch-2 spaces become its corners.
- R1: MR, (sc 3 in the ring, ch 2) × 4. (20)
The edge has 12 sc and 8 chains, with the chains arranged as four ch-2 corners. Sl st in the first sc to join; the joining stitch is outside the count. Fasten off, leaving an 8 in (20 cm) finishing tail at that corner. Pull the ring closed and weave both green tails across the back in two directions. Keep the tag flat and unstuffed, then pinch each corner gently into shape.
Attach the tag now. Hold it with one ch-2 corner pointing up. Lay one end of the white cord against the back of that corner, overlapping the tag by ¼ in (6 mm). With that white cord tail, take 12 small stitches through the cord and the backs of the three green sc beside the corner. Spread the stitches across those three sc, keeping the white sewing on the back. Knot securely and weave the tail across the back twice.
Closing the tea bag and securing the cord
I sew the edges in their own colors so the white top stays crisp. Keep the face turned toward you while you line up the panels.
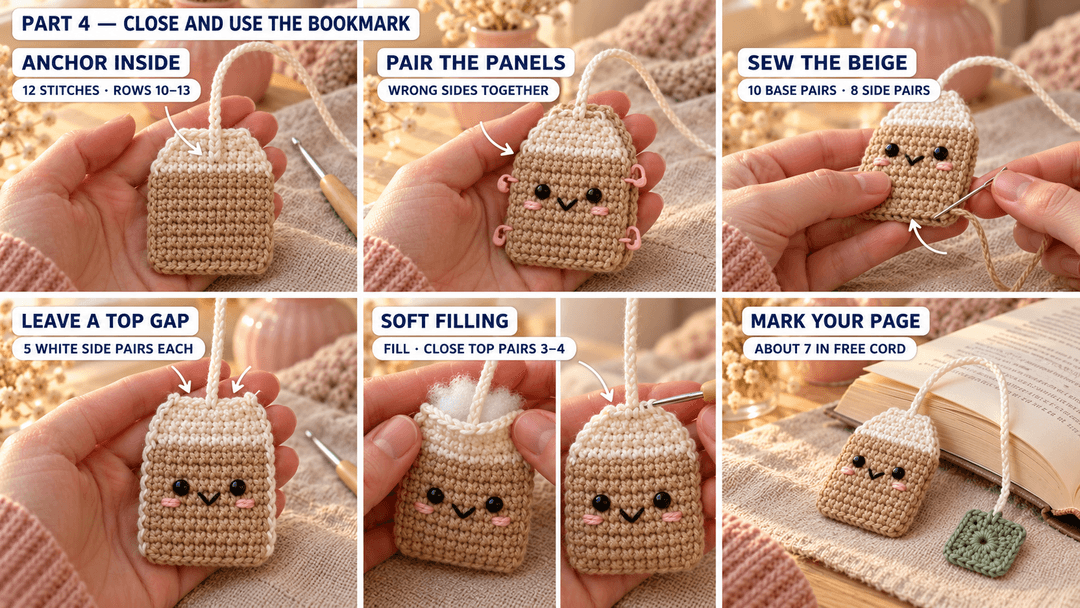
- Anchor the free cord end. On the back of the face panel, lay the remaining cord end down the middle of the white top. Its first visible cord stitch should emerge between stitches 3 and 4 of Row 13. Overlap the panel down to Row 10. With the retained white cord tail, take 12 small stitches through the cord and the backs of the center stitches of Rows 10–13. Knot and weave the tail securely inside.
- Line up the panels. Put their wrong sides together, face outward, matching the two beige starting edges and the narrow white tops. Pin the color-change lines together. Leave the cord pointing out between the middle stitches at the top.
- Sew the beige edges. With one beige starting tail, whipstitch across the 10 paired foundation-chain positions along the bottom. Then sew up one beige side, one stitch through each matching pair of row ends from Row 1 to Row 8. With the other beige tail, sew the other side over its 8 matching row-end pairs. At a corner, change direction into the side row end beside the bottom seam. Knot and weave the beige tails inside.
- Sew the white shoulders. With the white panel tails, sew each white side through the 5 matching row-end pairs from Row 9 to Row 13. At the top, sew together stitches 1 and 2, and stitches 5 and 6, leaving the central two pairs open beside the cord.
- Add a little filling. Through that top gap, push a tiny pinch of fiberfill between the panels, around the eye washers. Use the blunt end of your hook to nudge the soft filling into the lower corners. Press the sachet between your palms; it should feel softly padded, with its broad front still quite flat.
- Close around the cord. Sew the final two top pairs, stitches 3 and 4, with the cord emerging between them. Take three extra stitches through both panels and the cord at that center point. Knot and bury the remaining white tails inside the sachet.
The free cord between the two attachments is about 7 in (18 cm) long. Give each attachment a gentle tug. The cord should stay firm at the white top and at the green tag. If an end moves, add more small stitches before putting the bookmark into a book.
Tucking your tea bag bookmark into a book
Rest the white cord between the pages, with the padded tea bag outside the top edge. Let the green tag fall beyond the bottom edge of a small paperback. For a taller book, tuck the flat tag just inside the lower part of the page and leave the padded sachet outside.
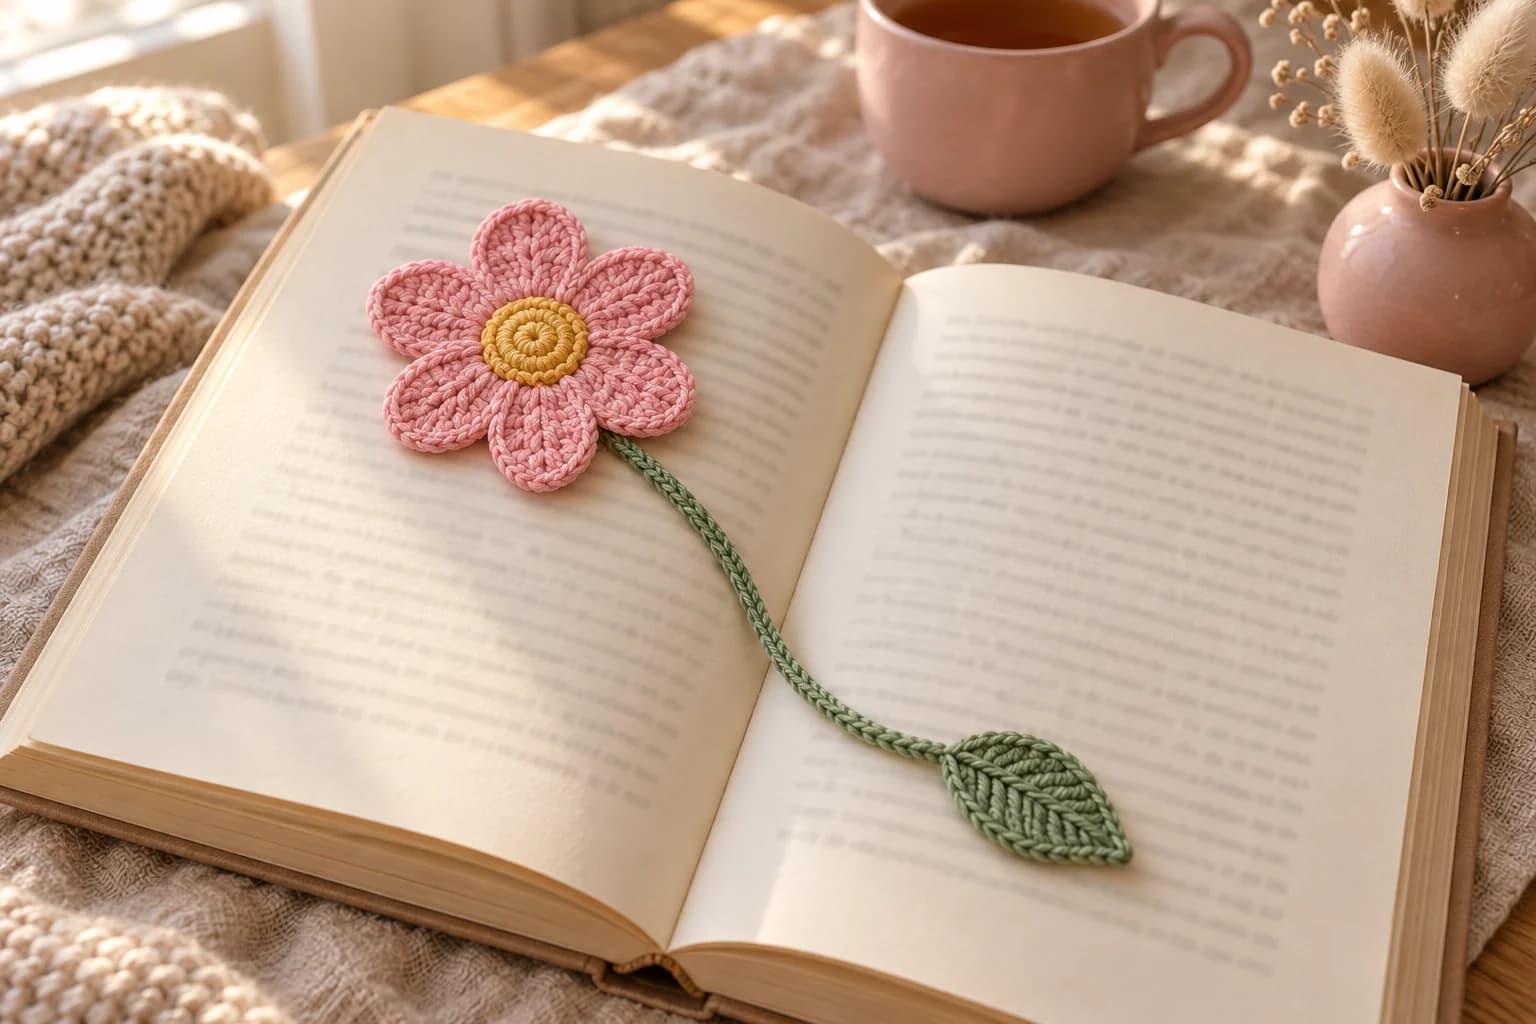
I like to wrap this one around a paperback and slip a real tea sachet inside the gift bag. For a different little reading companion, the flower bookmark with a leaf uses a long green stem between the pages.
Spot-clean the cotton with a barely damp cloth and let it dry flat away from the book. Keep the padded tea bag outside the closed pages so it doesn't press against the paper.
UK terms: US sc = UK dc; US sl st = UK ss.
Made a tea bag bookmark? Tag #wavodecrochet on Pinterest so I can see what's on your reading pile.