Textured Leaf Mini Bonsai in a Brown Crochet Pot

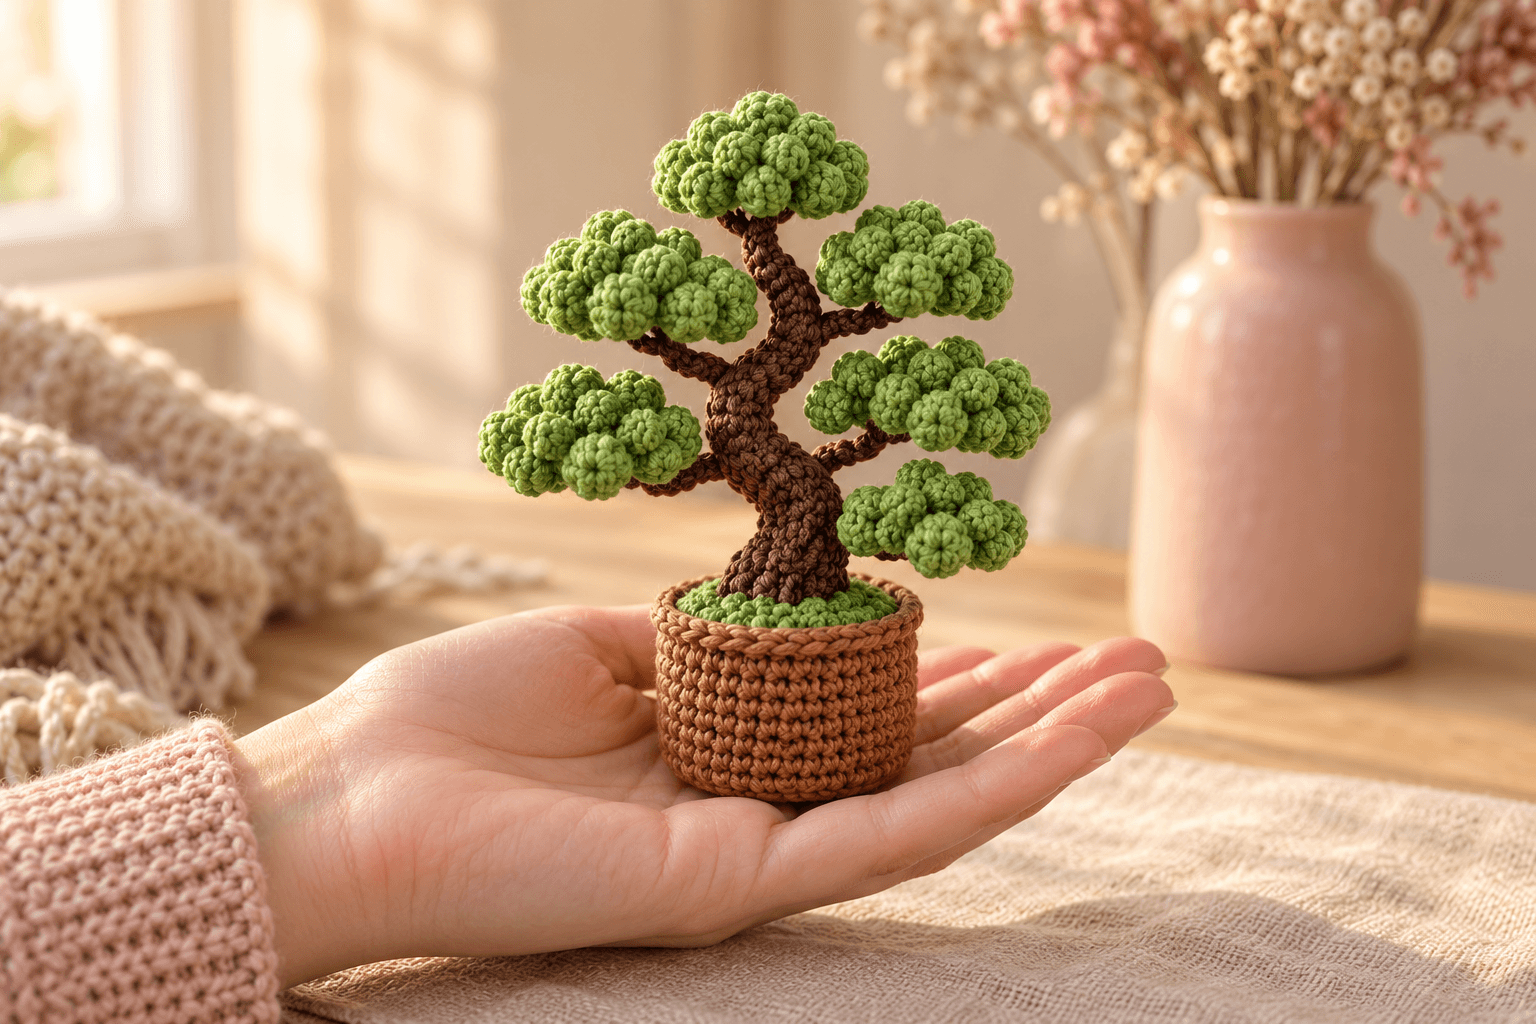
I love the little spaces between a bonsai's branches. You can see the curve of the trunk through them, even when the leaves are thick. This crochet mini bonsai is about 5 in (13 cm) tall, with bumpy green foliage, a warm brown pot and a trunk that bends gently from side to side.
I keep the bark stitches plain so the green bobbles get the attention. A hidden wire frame holds the branches where you bend them, and the pot has a firm insert under its filling. The nicest part comes at the end: turning each little leafy cushion until the tree looks balanced from the front.
| At a glance | |
|---|---|
| Finished size | about 5 in (13 cm) tall, 3½ in (9 cm) across the shaped canopy |
| Pot | about 1⅝ in (4 cm) across and 1½ in (3.8 cm) high |
| Yarn | DK #3 cotton in warm brown, dark brown and leaf green |
| Hook | 2.5 mm throughout |
| Pieces | 19 |
| Time | about 5–6 hours |
| Skill | intermediate: bobbles, tapered rows, reverse sc and wire-frame assembly |
Yarn, tools and hidden support for the mini bonsai
I like smooth cotton here. It gives the pot a crisp edge and keeps the little green bumps separate.
- Yarn: smooth 100% cotton, DK #3, about 125 m (137 yd) per 50 g. Allow about 18 yd warm brown, 26 yd dark brown and 70 yd leaf green, including the sewing ends. Keep all three colors in the same yarn range.
- Hook: 2.5 mm for every crocheted piece.
- Frame: one 12 in (30 cm) length of 1.5 mm aluminum craft wire for the base and trunk, and five 4 in (10 cm) lengths of 1 mm aluminum craft wire for the branches.
- Wire tools: wire cutters, round-nose pliers and narrow cloth binding tape for covering the frame and its folded ends.
- Firm base: a smooth plastic disc about 1⅜ in (3.5 cm) across, cut from a clean plastic lid with its edges rounded; a small piece of cotton fabric to wrap it.
- Filling and small things: fiberfill, thin cotton batting, strong dark brown sewing thread, sewing needle, tapestry needle, scissors, pins, stitch markers and contrast scrap yarn.
Tension. Use 6 sc per inch (2.5 cm), with about 6 plain rows or rounds per inch, measured unstretched. Keep the stitches snug enough that the stuffing doesn't show. The pot should be about 1⅝ in (4 cm) across; the finished tree's height and spread depend on the curves you give the frame.
Safety. This bonsai contains wire and a firm base insert. I keep it as a display piece, out of reach of children under 3 and pets. Keep the wire completely covered, including every cut end.
Stitches for the pot, bark and textured foliage
US terms: ch = chain; sl st = slip stitch; sc = single crochet; dc = double crochet; inc = 2 sc in one stitch; dec = single crochet two stitches together; BLO = back loop only; MR = magic ring; st = stitch. R means round. The number in parentheses is the stitch count.
Work the pot, ground cover and foliage in continuous spirals. Put a marker in the first stitch of each round and move it up as you work. The trunk and branch covers are worked flat. Their ch 1 turning chain never counts as a stitch.
The four-leg bobble
Yarn over, insert the hook in the next stitch, yarn over and pull up a loop, then yarn over and pull through two loops. Work that same movement 4 times in total in the same stitch. With five loops on the hook, yarn over and pull through all five. That makes one bobble stitch. Work the following sc in the next base stitch.
Push the bump toward the outside of the foliage. Leave its top loop loose enough for your hook to find on the next round; the bobble counts as one stitch. Pull through those five loops, then go straight into the next stitch.
The twisted pot rim
Reverse sc is single crochet worked backward. For a right-handed crocheter, insert the hook in the stitch immediately to the right, pull up a loop, then yarn over and pull through both loops. Keep moving right around the edge. Left-handed crocheters move left.
Part 1 — The brown bonsai pot and its firm base
Pot
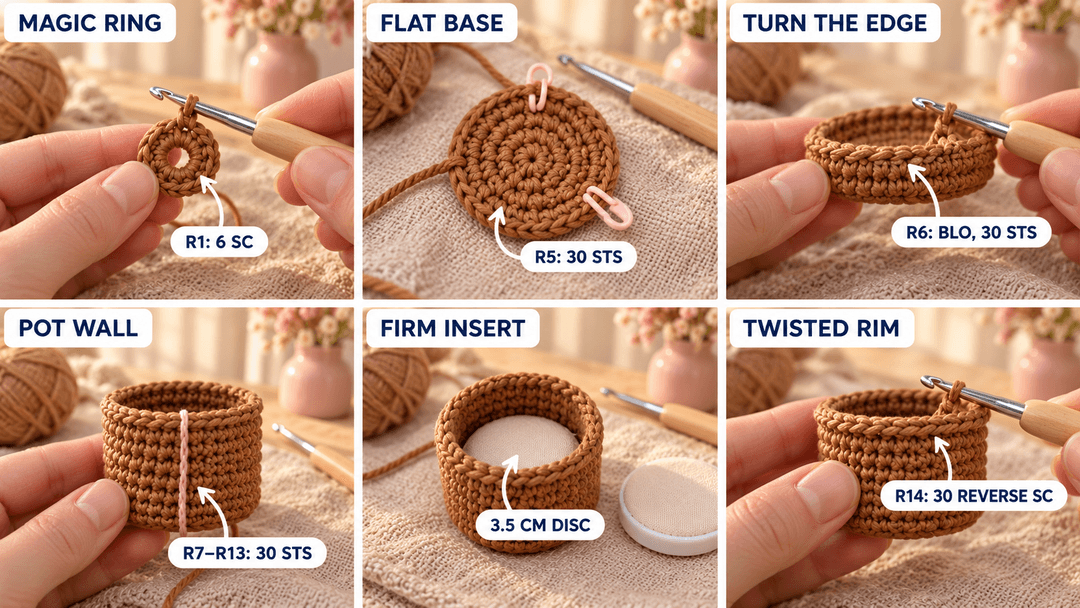
Warm brown, 2.5 mm hook, Make 1. The magic ring is the center underneath the pot; the final round is its open top. Keep the first-stitch marker at the back. At R5, add a second marker to stitch 16 for center front, and carry a scrap strand straight up from there through R13.
- R1: MR, 6 sc in the ring. (6)
- R2: inc × 6. (12)
- R3: (sc, inc) × 6. (18)
- R4: (sc 2, inc) × 6. (24)
- R5: (sc 3, inc) × 6. (30)
- R6: in BLO, sc around. (30)
- R7–R13: sc around. (30) 7 rounds.
Pause after R13. Wrap the plastic disc in cotton fabric and sew the fabric closed underneath. Set it inside the pot, flat against the crocheted base. It should lie flat without stretching the wall. Keep the pot empty above the insert while you work its edge.
- R14: reverse sc in each st around. (30)
Sl st in the first reverse sc and fasten off, leaving an 8 in (20 cm) tail at the rim. Weave it inside the wall. Leave the top open for the frame and filling.
Tip. Hold the rim stitches a little loosely. A tight reverse-sc edge can pull the mouth of the pot inward.
The green cover inside the bonsai pot
Ground cover
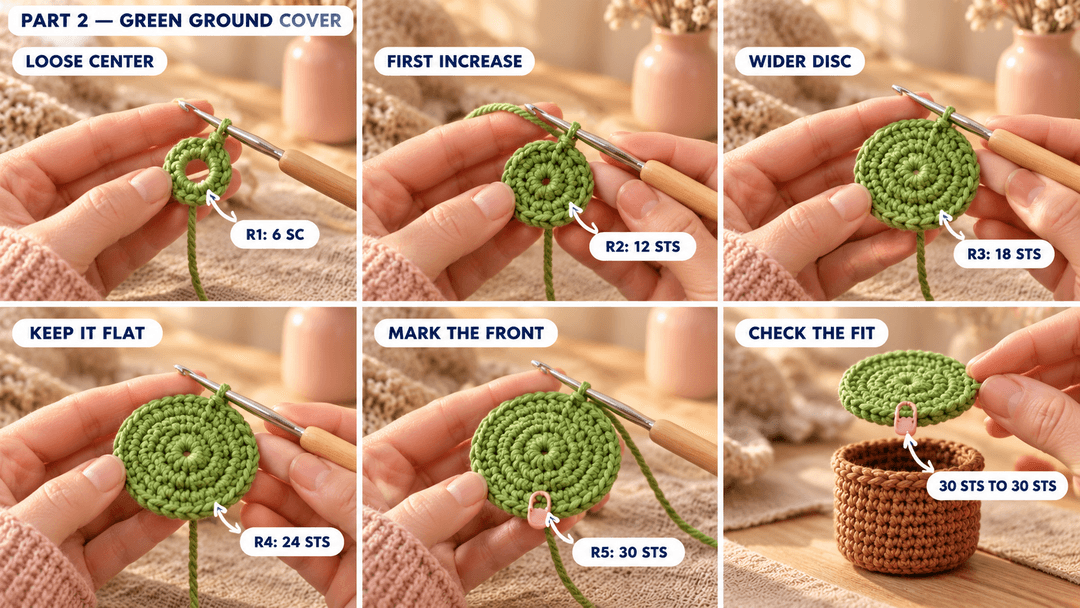
Leaf green, 2.5 mm hook, Make 1. The magic ring sits under the trunk; the final round fits inside the pot rim. Leave an 8 in (20 cm) starting tail and keep the ring loose enough to pass the taped trunk wire through later.
- R1: MR, 6 sc in the ring. (6)
- R2: inc × 6. (12)
- R3: (sc, inc) × 6. (18)
- R4: (sc 2, inc) × 6. (24)
- R5: (sc 3, inc) × 6. (30)
Sl st in the next st and fasten off, leaving a 24 in (60 cm) sewing tail at the outer edge. Mark stitch 16 of R5 as center front. Keep both tails free and leave the disc unstuffed; it will rest on the pot filling.
Building the hidden trunk and branch armature
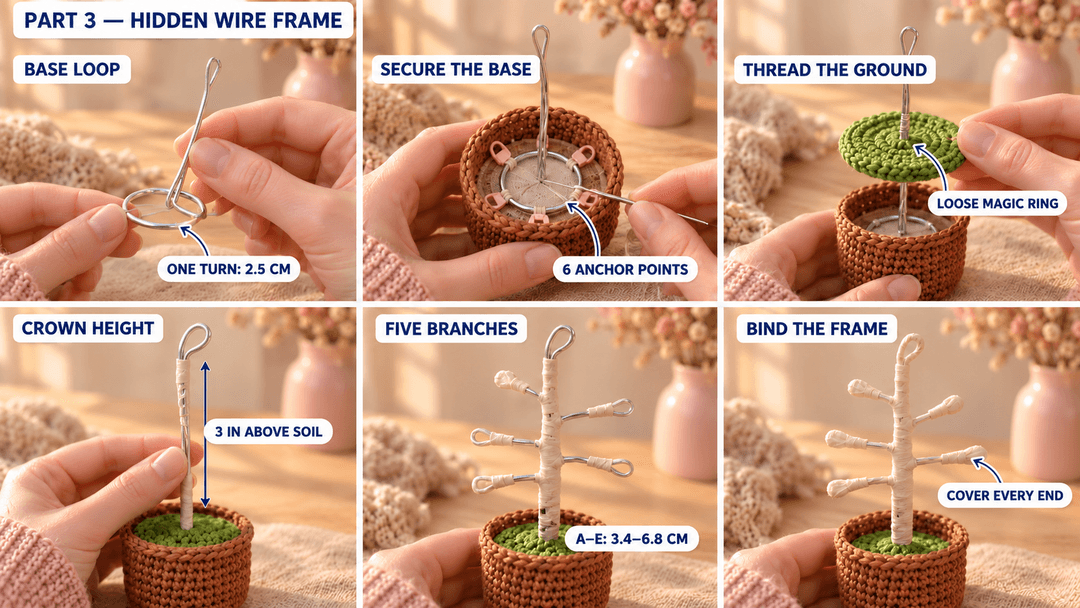
I build the frame while the pot is open. A single flat wire loop sits above the covered plastic insert, with the upright wire coming from its middle.
- Make the base loop. With the 12 in (30 cm) trunk wire, fold the first ¼ in (6 mm) back tightly with the pliers. Shape a single open circular loop about 1 in (2.5 cm) across, bringing the remaining wire back beside the folded end after one turn. Bend the remaining wire across the loop toward its center, then upward. Press the crossing flat with the pliers.
- Bind the base loop. Cover the entire loop and its crossing with cloth tape, including its folded end. Set it on the fabric-covered insert. Using strong thread, stitch through the fabric around six evenly spaced points of the loop, catching the wire under each stitch. Keep the insert flat as you tighten.
- Set the soil level. Hold the green cover inside the pot, its outer edge level with R13, just below the twisted rim. With its marked front toward the pot's front strand, pass the upright wire through its loose magic ring. Slide the cover down to that level and mark the wire there with a small piece of tape.
- Leave room for the crown. Above the soil mark, measure 3 in (7.6 cm) along the upright wire. Fold the next ¼ in (6 mm) back into a smooth closed loop, trimming excess first if needed. Bind the folded tip with tape. Slide the ground cover down into the pot while you finish the branches.
- Mark the branch levels. Above the soil mark, measure 1⅓, 1⅔, 2, 2⅓ and 2⅔ in (3.4, 4.2, 5.1, 5.9 and 6.8 cm) along the trunk. Label these positions A through E, from lowest to highest.
- Add the branch wires. At each level, leave 1⅙ in (3 cm) of branch wire projecting sideways, measured to the outside of its folded tip. Fold ¼ in (6 mm) back at that tip. Use the remaining length to wind tightly downward around the trunk below the attachment. Bind each junction and the entire trunk with tape. Set A and C toward the left, B and D toward the right, and E slightly toward the back-left, looking from the pot's marked front.
Keep each taped branch thinner than ¼ in (6 mm). Run your fingers from the base loop to each tip; every taped end should feel smooth. Leave the trunk nearly straight until the covers are sewn on.
Tip. Pull gently on each branch before covering it. If a junction turns around the trunk, rewind that attachment snugly and bind it again.
Crocheting the curved trunk and branch covers
Tapered trunk cover
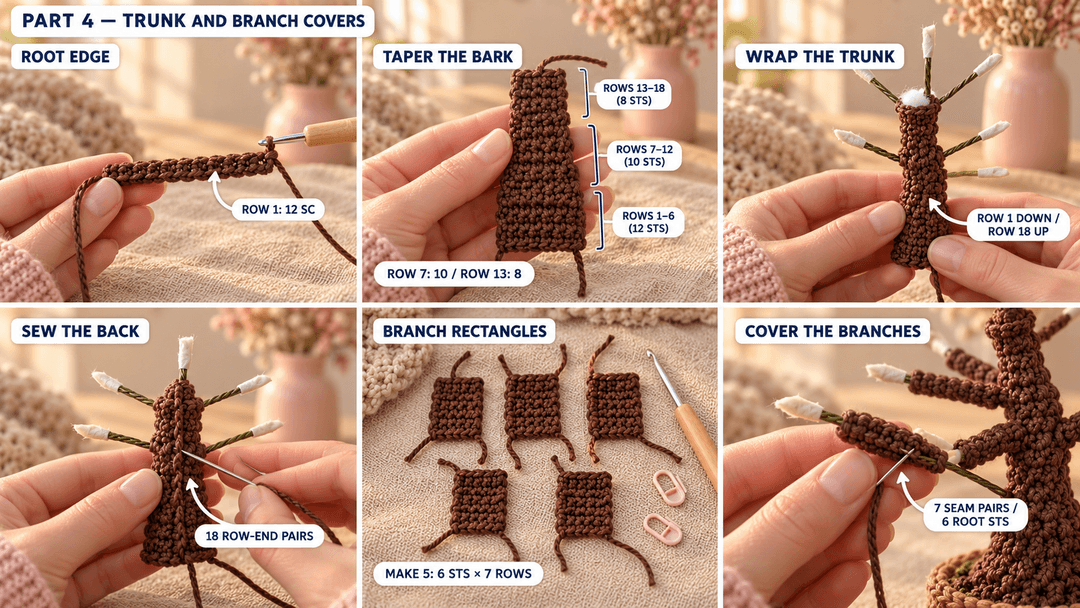
Dark brown, 2.5 mm hook, Make 1. Work from the wide root end toward the crown. Ch 13, leaving a 12 in (30 cm) starting tail for the root seam.
- Row 1: sc in the 2nd ch from the hook and in each ch across. (12)
- Rows 2–6: ch 1, turn, sc 12. (12) 5 rows.
- Row 7: ch 1, turn, dec, sc 8, dec. (10)
- Rows 8–12: ch 1, turn, sc 10. (10) 5 rows.
- Row 13: ch 1, turn, dec, sc 6, dec. (8)
- Rows 14–18: ch 1, turn, sc 8. (8) 5 rows.
Fasten off, leaving a 24 in (60 cm) tail at the narrow crown end. Lay the cover flat, root edge toward you. Mark stitch 5 of Rows 8, 10 and 12, and stitch 4 of Rows 14 and 16, counting across from the edge where that row begins. These marks correspond to branch levels A–E.
Wrap a thin layer of cotton batting around the taped trunk, from the soil mark to the crown. Keep the branch junctions clear. Hold the crocheted cover with its wide Row 1 edge at soil level and its narrow Row 18 edge at the crown. Wrap it around the trunk, with the two long edges meeting at the back.
At each marked row, ease the matching branch through a gap between stitches near that row's middle. Use the gap on the side toward which the branch points, within two stitches of the middle marker. Spread the stitches with the blunt tapestry needle, then pass the taped tip through. Keep the yarn strands intact.
With the crown tail, gather the 8 stitches of Row 18 around the folded trunk tip. Sew the two long edges together down the back, taking one whipstitch through each pair of matching row ends, 18 pairs from crown to root. Keep the Row 1 starting tail for planting.
Branch covers
Dark brown, 2.5 mm hook, Make 5. Each cover starts at its branch tip and ends at the trunk. Ch 7, leaving an 8 in (20 cm) starting tail.
- Row 1: sc in the 2nd ch from the hook and in each ch across. (6)
- Rows 2–7: ch 1, turn, sc 6. (6) 6 rows.
Fasten off, leaving a 12 in (30 cm) tail at the trunk end. Keep the covers unstuffed. With Row 1 at the wire tip and Row 7 against the trunk, wrap each cover around its taped branch. Sew its long edges together underneath, one stitch through each of the 7 pairs of row ends.
Gather Row 1 over the folded branch tip with the starting tail, taking the yarn through all 6 stitches. Knot and hide it inside the cover. With the Row 7 tail, sew the branch base to the trunk cover with 6 small stitches around the opening, catching the fabric beside the junction. Hide the tail inside the trunk cover.
Making the textured green foliage clusters
Leafy cushions
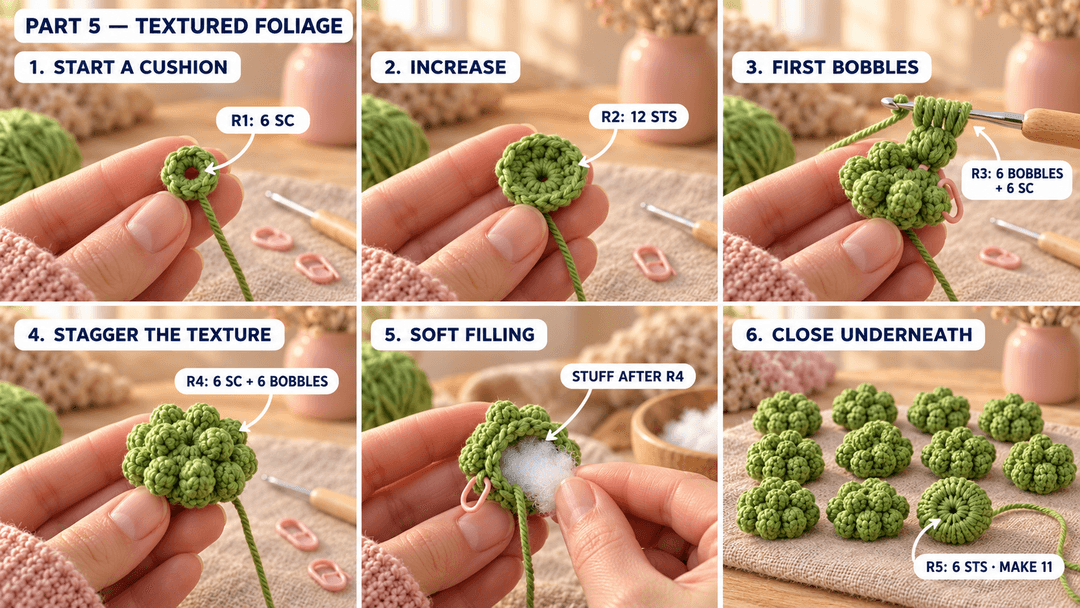
Leaf green, 2.5 mm hook, Make 11. The magic ring becomes the upper center of each cushion; the final round closes underneath, against the branch. Push the bobbles outward as you work.
- R1: MR, 6 sc in the ring. (6)
- R2: inc × 6. (12)
- R3: (bobble, sc) × 6. (12)
- R4: (sc, bobble) × 6. (12)
After R4, add a small pinch of fiberfill. Keep the cushion soft enough to flatten slightly between your fingers. Push the filling away from the next stitches.
- R5: dec × 6. (6)
Fasten off, leaving an 18 in (46 cm) tail underneath. Thread it through the front loops of the remaining 6 stitches and draw the opening closed. Secure the yarn with a small stitch through the gathered center, then keep the tail for attachment.
Turn each cushion until its bumpy face points up and outward. I press my thumb into the smooth underside to make a little seat for the branch.
Tip. A firm ball can hide the bobbles. Pull a little filling back out before R5 if the surface feels stretched smooth.
Planting the bonsai and arranging its leafy canopy
Keep the front strand of the pot facing you throughout this part. The open spaces between the leafy cushions are where the brown branches show.
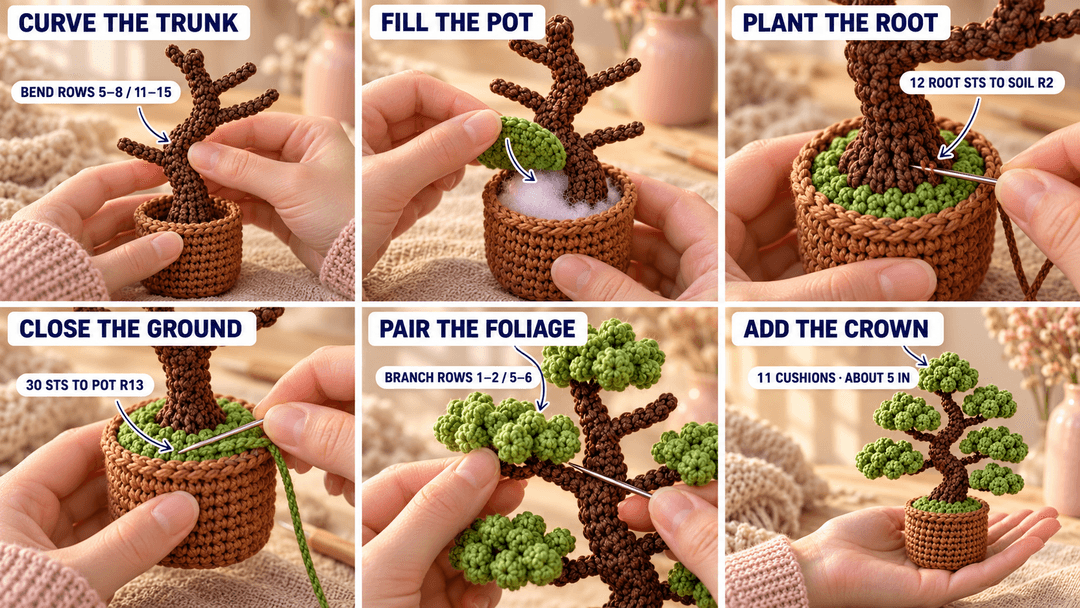
- Shape the trunk. Hold the wire through its crochet cover close to soil level. Make a shallow bend to the left around Rows 5–8, then curve it back toward the right around Rows 11–15. Keep the lower trunk over the middle of the pot. Support each bend with both hands.
- Fill the pot. Bring the center of the green cover to the soil mark, just under the wide root edge. Keep its center there and lift its outer edge like a flap. Pack fiberfill firmly around the upright wire and over the base loop, stopping just below R13 of the pot. Press the bottom against the table so it stays flat.
- Set the ground cover. Lay its outer edge onto the filling, matching its marked stitch 16 to the pot's front strand. Tighten the starting magic-ring tail snugly around the taped wire and secure it underneath the disc with two small stitches, lifting the edge to reach it. Trim and tuck that tail under the cover.
- Plant the root edge. Spread the trunk cover's Row 1 around the center of the green disc. With its starting tail, sew the 12 root-edge stitches to the 12 stitches of ground-cover R2, one to one. Ease the base flat as you go. Hide the brown tail under the green cover.
- Close the pot. With the green outer tail, whipstitch the 30 stitches of ground-cover R5 to the 30 stitches of pot R13, one to one, just inside the rim. Add the last pinch of filling through the remaining gap, finish the seam, then hide the tail. Remove the pot's front strand after the canopy is arranged.
- Set the branch pairs. On each branch, place one cushion with its gathered underside centered over Rows 1–2 of the branch cover, at the tip. Place the second over Rows 5–6, closer to the trunk. Turn one a little forward and the other a little back so their bumpy faces stay visible.
- Sew the foliage. For each cushion, use its retained green tail to take 6 small stitches through the gathered underside and the branch-cover fabric. Spread those stitches around the cushion's lower R5 edge, then knot and bury the tail inside the cushion. Support the branch while tightening.
- Finish the crown. Sew the remaining cushion over the gathered Row 18 of the trunk cover, with its smooth underside downward. Take 6 small stitches around its R5 edge into the crown fabric. Hide the tail and turn the tree to the front.
Bend the lower branches outward and let the upper ones rise slightly. Keep the crown above the pot, with the outer foliage reaching roughly 1¾ in (4.5 cm) to either side of center. Leave enough daylight between the groups to see the curved trunk. Turn the pot a quarter turn and check it from the side, too.
Tip. If the tree leans, bring the canopy back over the base before bending the branches farther outward. Press the pot gently on the table and check that its underside sits flat.
Displaying and caring for your crochet bonsai
I like this little tree beside a stack of books, where the green stands out against the paper edges. A low shelf lets you look slightly down into the pot and see the branch curves at the same time.
Dust it with a soft, dry brush. For a small mark, dab the cotton with a barely damp cloth and let it dry standing upright. Keep the frame dry and reshape by supporting the trunk with one hand while moving a branch with the other. Lift the finished bonsai by its pot.
UK terms: US sc = UK dc; US dc = UK tr; US sl st = UK ss.
Made a little bonsai? Tag #wavodecrochet on Pinterest so I can see where you've planted it.