Crochet Red Panda Pattern

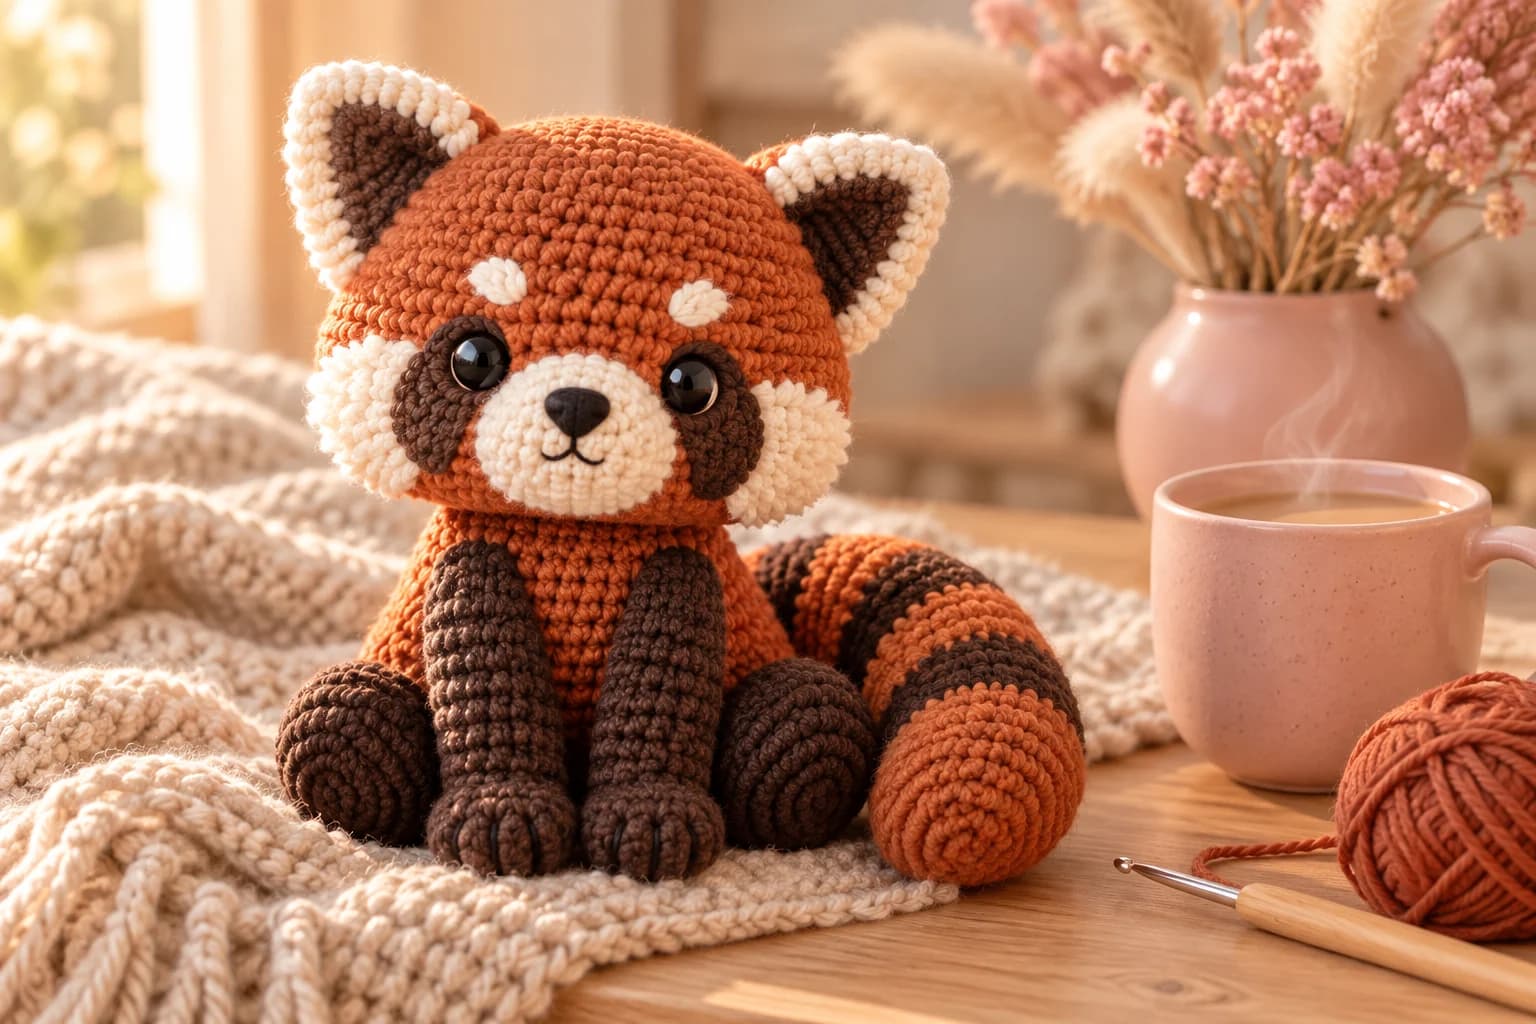
This free crochet red panda pattern makes a sitting red panda, about 8 inches tall, with a cream and brown face and a big striped tail. It's worked in worsted yarn on a 3.5 mm hook, almost all in single crochet rounds. The face is built from small flat pieces that you sew on, so you never juggle three colors in one round. Plan on about 240 yards of yarn and 8 to 10 hours.
Key Takeaways
- Three colors: rust for the head, body and tail, dark brown for the legs and markings, cream for the face.
- The face is appliqué: a muzzle, 2 eye patches, 2 cheeks and 2 brow spots, sewn onto a plain rust head.
- The tail has 3 dark brown rings and a rust tip, worked as one stuffed tube.
- Budget ~240 yd (220 m) of worsted #4: about 125 yd rust, 90 yd dark brown, 20 yd cream.
Why I love this red panda
Red pandas are the animal I get asked for most after bears. The trick to making one look right is the face, not the body. A red panda has a cream mask, dark tear marks running down from the eyes and pale ears with dark centers. Get those in the right place and anyone will know what it is at a glance.
So I kept the head a plain rust ball and moved all the markings to small flat pieces. You make them first, slip the safety eyes through the dark patches, and sew the rest on at the end. It's much easier than colorwork, and you can move a piece around with pins until the face looks happy.
The body sits on a flat base with a dark brown bottom. Long front legs hold it upright, and the hind legs fold at the sides. The tail is the fun part: a fat tube with rings, curled around the body like a scarf.
Isn't that tail the best bit?
Skill level. Intermediate. You need a magic ring, sc, inc and dec in the round, working around a chain, simple rows and color changes. There are quite a few pieces to sew, so take your time with pins.
What you'll need
Yarn: worsted #4 acrylic, such as Red Heart Super Saver or Lion Brand Basic Stitch. Acrylic stays soft, holds its shape and comes in good rust and chocolate shades.
| Color | Used for | Amount |
|---|---|---|
| Rust (red-orange brown) | Head, body, tail, back of the ears | about 125 yd (110–140 yd) |
| Dark brown | Base, front and hind legs, tail rings, eye patches, ear centers | about 90 yd (80–100 yd) |
| Cream | Muzzle, cheeks, brow spots, ear edges | about 20 yd |
| Black | Nose and mouth (embroidery) | about 2 yd |
I worked those amounts out from the stitch counts: about 1,870 single crochet in rust, 1,300 in dark brown and 210 in cream, at about 2.2 inches of yarn each, plus sewing tails.
Hook and notions
- 3.5 mm (US E-4) hook. It's smaller than the yarn label suggests, so the fabric is tight and the stuffing doesn't show through.
- 10 mm black safety eyes, or black yarn to embroider them (see the safety note below).
- About 3 oz (85 g) of polyester fiberfill.
- Stitch markers, a tapestry needle, pins and scissors.
- A pet slicker brush or a clean toothbrush, for the fluffy cheeks (optional).
Gauge and finished size
Gauge isn't critical, but tension is. Your stitches should be tight enough that the stuffing doesn't peek through. As a check, Rnd 8 of the head (48 sc) should measure about 3.3 in (8.5 cm) across lying flat. If it's bigger, go down to a 3.25 mm hook.
Finished red panda: about 8 in (20 cm) tall sitting, to the tips of the ears. The head is about 3.3 in wide, and the tail is about 5.5 in long. Measure your first one: tension changes the size more than you'd think.
Abbreviations (US crochet terms)
- ch = chain
- sl st = slip stitch
- sc = single crochet
- inc = 2 sc in the same stitch
- dec = single crochet two together (I use the invisible decrease through the front loops)
- BLO = back loop only
- MR = magic ring
- st(s) = stitch(es)
- rnd(s) = round(s)
UK crocheters: this pattern uses US terms. US single crochet = UK double crochet.
Work every piece in continuous spiral rounds, unless the pattern says to join or turn. Move your marker up to the first stitch of every new round.
Color changes: work the last stitch of the old color until 2 loops are left on the hook, then finish it with the new color. On the body and tail, carry the unused color loosely inside the piece. The stuffing hides it.
The pieces at a glance
| Piece | Color | Make | Size |
|---|---|---|---|
| Muzzle | cream | 1 | an 18-st oval |
| Eye patch | dark brown | 2 | a 16-st oval |
| Cheek | cream | 2 | an 18-st flat oval |
| Brow spot | cream | 2 | an 8-st oval |
| Head | rust | 1 | 48 sts at the widest |
| Ear | rust + dark brown + cream | 2 | a triangle, 8 sts wide at the base |
| Body | dark brown + rust | 1 | 42 sts at the widest |
| Front leg | dark brown | 2 | about 3 in long |
| Hind leg | dark brown | 2 | a 2-in pod |
| Tail | rust + dark brown | 1 | about 5.5 in long |
The pattern — step by step
Part 1 — The face pieces
Make these first. The eye patches have to go on with the safety eyes, before you close the head.
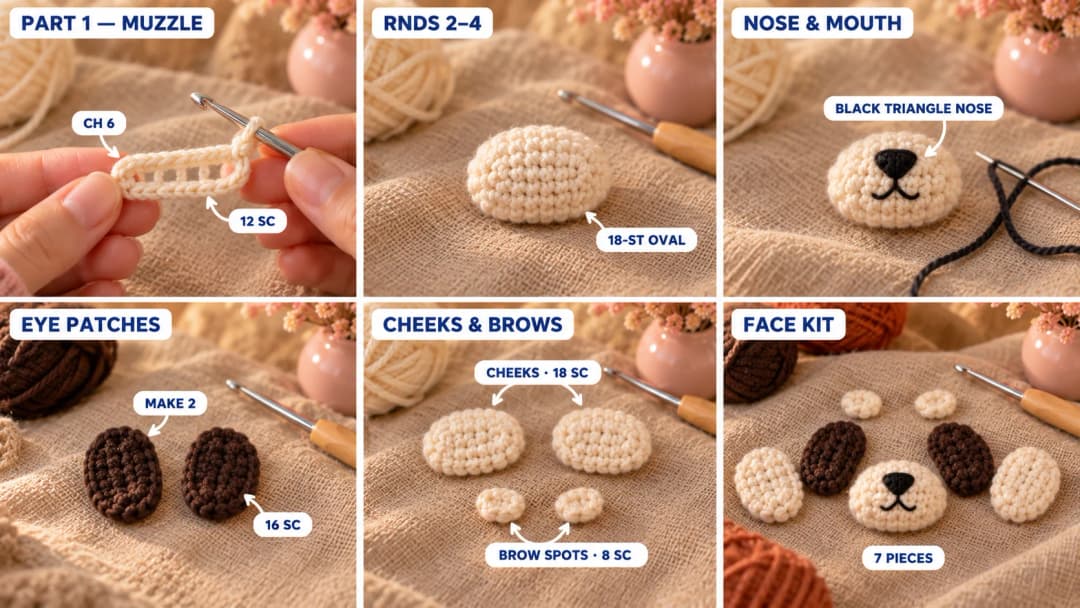
Muzzle (cream). Worked around a chain, so it comes out oval.
- Rnd 1: Ch 6. Sc in the 2nd ch from the hook and in the next 3 ch, 3 sc in the last ch. Working along the other side of the chain, sc in the next 3 ch, 2 sc in the last ch. (12)
- Rnd 2: Inc, 3 sc, inc in each of the next 3 sts, 3 sc, inc in each of the last 2 sts. (18)
- Rnds 3–4: Sc in each st around, 2 rounds. (18)
Sl st in the next st and fasten off, leaving a 15-in tail. The muzzle is a shallow cup that pops out from the face.
Embroider the nose and mouth now, while the muzzle is still loose. With black, fill a small upside-down triangle near the top edge, about 4 sts wide and 2 rounds tall, with straight stitches. Make one short straight stitch down from the point of the nose, then a small curved stitch to each side of it, like a little "w", for the mouth.
Eye patches (make 2, dark brown).
- Rnd 1: Ch 5. Sc in the 2nd ch from the hook and in the next 2 ch, 3 sc in the last ch. Working along the other side of the chain, sc in the next 2 ch, 2 sc in the last ch. (10)
- Rnd 2: Inc, 2 sc, inc in each of the next 3 sts, 2 sc, inc in each of the last 2 sts. (16)
Sl st in the next st and fasten off, leaving a 12-in tail. Each patch is a flat oval, a little longer than it's wide.
Cheeks (make 2, cream). Work Rnds 1–2 exactly as for the muzzle (18). Sl st in the next st and fasten off, leaving a 12-in tail. Don't work Rnds 3–4: the cheeks stay flat.
Brow spots (make 2, cream).
- Rnd 1: Ch 4. Sc in the 2nd ch from the hook and in the next ch, 3 sc in the last ch. Working along the other side of the chain, sc in the next ch, 2 sc in the last ch. (8)
Sl st in the next st and fasten off, leaving an 8-in tail.
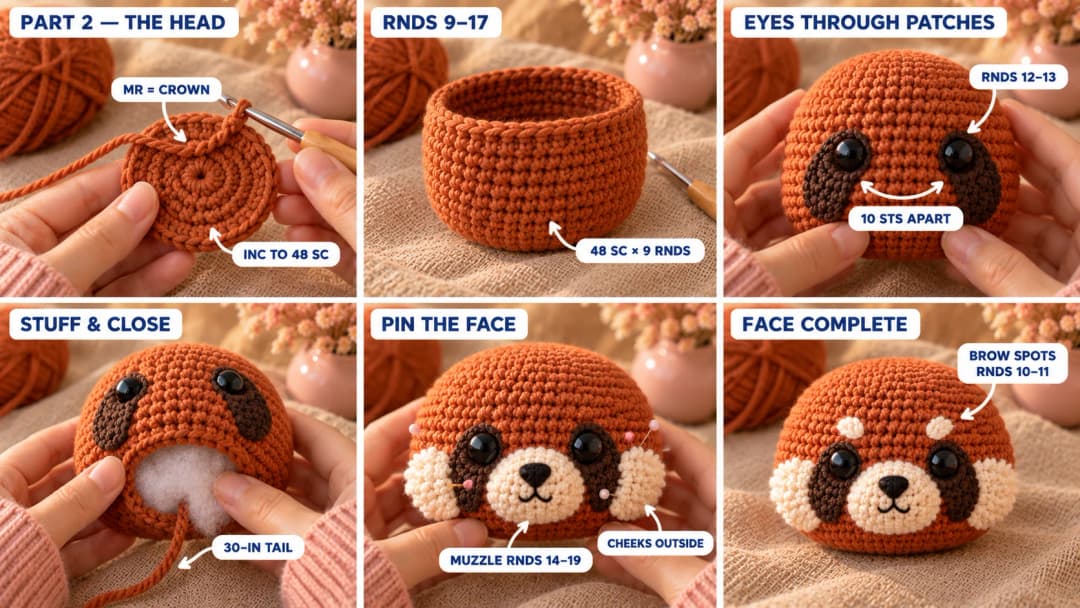
Part 2 — The head and face
With rust. The magic ring is the crown of the head. The last round is the bottom, at the neck.
- Rnd 1: MR, 6 sc in the ring. (6)
- Rnd 2: Inc in each st around. (12)
- Rnd 3: (Sc, inc) × 6. (18)
- Rnd 4: (2 sc, inc) × 6. (24)
- Rnd 5: (3 sc, inc) × 6. (30)
- Rnd 6: (4 sc, inc) × 6. (36)
- Rnd 7: (5 sc, inc) × 6. (42)
- Rnd 8: (6 sc, inc) × 6. (48)
- Rnds 9–17: Sc in each st around, 9 rounds. (48)
Place the eyes and eye patches. Choose the side opposite the start of your rounds as the face. Push the post of a safety eye through the upper end of an eye patch, then into the head between Rnds 12 and 13. Do the same for the second eye, with 10 sts between the eyes. Turn each patch so it runs down and slightly outward from the eye, like a tear mark, with its lower end around Rnd 17. The muzzle will sit between the two patches, and the cheeks just outside them. Fix the eye backs on firmly from the inside.
- Rnd 18: (6 sc, dec) × 6. (42)
- Rnd 19: (5 sc, dec) × 6. (36)
- Rnd 20: (4 sc, dec) × 6. (30)
- Rnd 21: (3 sc, dec) × 6. (24)
Stuff firmly, shaping the head round and a little wider than tall.
- Rnd 22: (2 sc, dec) × 6. (18)
- Rnd 23: (Sc, dec) × 6. (12)
- Rnd 24: Dec × 6. (6)
Top up the stuffing. Fasten off, leaving a 30-in (75 cm) tail. Thread it through the front loops of the last 6 sts and pull closed. Keep this tail: it sews the head to the body.
Sew the face. Pin every piece before you sew, then step back and look.
- Eye patches: sew around the edge of each patch with its tail, so it lies flat around the eye.
- Muzzle: center it between the two patches, with its top edge on Rnd 14 and its bottom around Rnd 19. The nose sits at the top. Sew it on, adding a little stuffing before you close the last few stitches. The sides of the muzzle should touch the inner edge of each eye patch.
- Cheeks: set one on each side of the face, just outside the eye patch, over Rnds 13–18, so the cream wraps around the side of the head. Sew them on flat.
- Brow spots: one just above each eye, over Rnds 10–11, angled slightly outward.
Fluffy cheeks (optional). Brush the outer edge of each cheek gently with a slicker brush until it fuzzes into a little tuft. Skip it if you don't have a brush: the cheeks look neat and smooth without it.
Part 3 — The ears
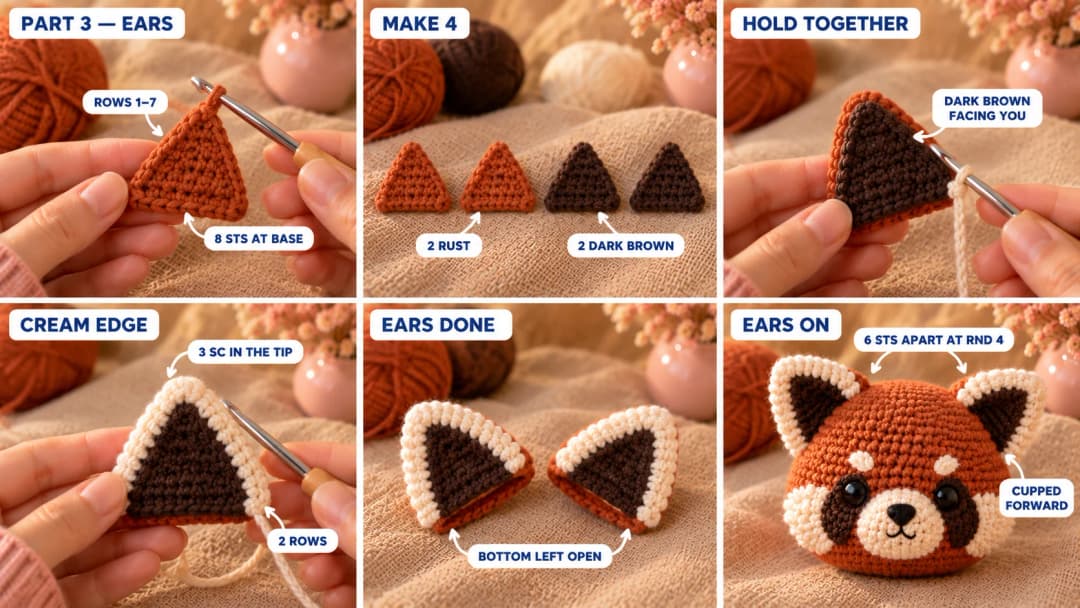
Each ear is two flat triangles, rust at the back and dark brown at the front, joined with a cream edge.
Ear triangles (make 2 in rust and 2 in dark brown). Worked in rows, from the tip down.
- Row 1: Ch 2. 2 sc in the 2nd ch from the hook. (2)
- Row 2: Ch 1, turn. Inc in each st. (4)
- Row 3: Ch 1, turn. Sc in each st. (4)
- Row 4: Ch 1, turn. Inc, 2 sc, inc. (6)
- Row 5: Ch 1, turn. Sc in each st. (6)
- Row 6: Ch 1, turn. Inc, 4 sc, inc. (8)
- Row 7: Ch 1, turn. Sc in each st. (8)
Fasten off. Weave in the ends on the dark brown triangles. On the rust ones, leave a 12-in tail.
Cream edge. Hold one dark brown and one rust triangle together, wrong sides facing, with the dark brown facing you. Join cream at the bottom right corner. Work through both layers:
- Row 1: Sc evenly up the side (7 sc, one in each row end), 3 sc in the tip, then sc evenly down the other side (7 sc). (17)
- Row 2: Ch 1, turn. Sc in each of the next 8 sts, 3 sc in the next st (the middle of the tip), sc in each of the last 8 sts. (19)
Fasten off and weave in the cream ends. Leave the bottom edge open. Don't stuff the ears.
Sew the ears. Pin each ear on top of the head with the dark brown side facing forward. Set the bottom edge on a slant: the inner corner on Rnd 4, the outer corner down at Rnd 9 on the side of the head. Leave about 6 sts between the inner corners of the two ears at Rnd 4. Curve the bottom edge a little as you sew, so the ear cups forward. Sew through both layers and the head with the rust tail.
Part 4 — The body and legs
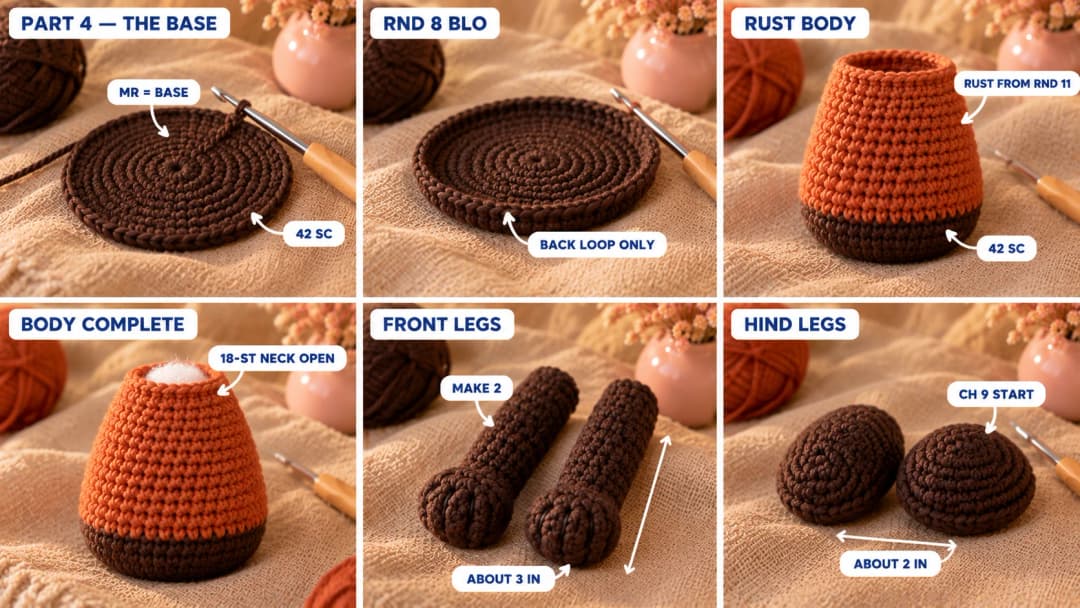
Body. The magic ring is the base the red panda sits on. The last round is the neck.
With dark brown:
- Rnd 1: MR, 6 sc in the ring. (6)
- Rnd 2: Inc in each st around. (12)
- Rnd 3: (Sc, inc) × 6. (18)
- Rnd 4: (2 sc, inc) × 6. (24)
- Rnd 5: (3 sc, inc) × 6. (30)
- Rnd 6: (4 sc, inc) × 6. (36)
- Rnd 7: (5 sc, inc) × 6. (42)
- Rnd 8: BLO sc in each st around. (42) This makes the edge of the flat base.
- Rnds 9–10: Sc in each st around, 2 rounds. (42)
Change to rust:
- Rnds 11–16: Sc in each st around, 6 rounds. (42)
- Rnd 17: (5 sc, dec) × 6. (36)
- Rnds 18–19: Sc in each st around, 2 rounds. (36)
- Rnd 20: (4 sc, dec) × 6. (30)
- Rnds 21–22: Sc in each st around, 2 rounds. (30)
- Rnd 23: (3 sc, dec) × 6. (24)
- Rnd 24: Sc in each st around. (24)
Stuff the body firmly, pressing the base flat with your hand so it sits steady.
- Rnd 25: (2 sc, dec) × 6. (18)
Top up the stuffing. Sl st in the next st and fasten off. Leave this 18-st neck open: the head sits on it.
Front legs (make 2, dark brown). The magic ring is the paw. The last round is the top of the leg.
- Rnd 1: MR, 6 sc in the ring. (6)
- Rnd 2: Inc in each st around. (12)
- Rnd 3: (3 sc, inc) × 3. (15)
- Rnds 4–5: Sc in each st around, 2 rounds. (15)
- Rnd 6: (3 sc, dec) × 3. (12)
- Rnds 7–15: Sc in each st around, 9 rounds. (12)
Stuff firmly all the way up: these legs hold the red panda upright. Flatten the opening and leave a 15-in tail.
Toes. With black or a darker brown yarn, make 2 straight stitches from the tip of each paw back over Rnds 1–3, about 2 sts apart. They split the paw into three little toes.
Hind legs (make 2, dark brown). Worked around a chain, like a little pod.
- Rnd 1: Ch 9. Sc in the 2nd ch from the hook and in the next 6 ch, 3 sc in the last ch. Working along the other side of the chain, sc in the next 6 ch, 2 sc in the last ch. (18)
- Rnd 2: Inc, 6 sc, inc in each of the next 3 sts, 6 sc, inc in each of the last 2 sts. (24)
- Rnds 3–5: Sc in each st around, 3 rounds. (24)
- Rnd 6: (2 sc, dec) × 6. (18)
Stuff lightly. Flatten the opening and sew it closed, leaving a 15-in tail. You have a soft, rounded pod about 2 in long, with the spiral oval of Rnds 1–2 on one face: the folded thigh and foot of a sitting red panda.
Part 5 — The striped tail and assembly
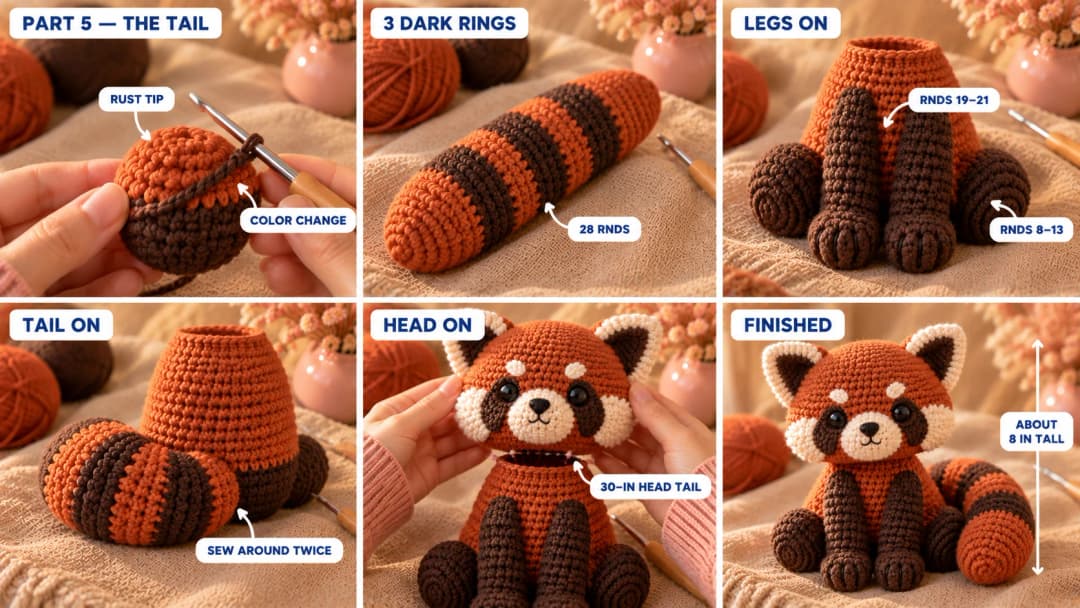
Tail (rust and dark brown). The magic ring is the tip. The last round is the base, which sews to the body.
With rust:
- Rnd 1: MR, 6 sc in the ring. (6)
- Rnd 2: Inc in each st around. (12)
- Rnd 3: (Sc, inc) × 6. (18)
- Rnd 4: (2 sc, inc) × 6. (24)
- Rnd 5: (3 sc, inc) × 6. (30)
- Rnds 6–8: Sc in each st around, 3 rounds. (30)
Then work the stripes:
- Rnds 9–11 (dark brown): Sc in each st around. (30)
- Rnds 12–15 (rust): Sc in each st around. (30)
- Rnds 16–18 (dark brown): Sc in each st around. (30)
- Rnd 19 (rust): (8 sc, dec) × 3. (27)
- Rnds 20–22 (rust): Sc in each st around. (27)
- Rnd 23 (dark brown): (7 sc, dec) × 3. (24)
- Rnds 24–25 (dark brown): Sc in each st around. (24)
- Rnd 26 (rust): (2 sc, dec) × 6. (18)
- Rnds 27–28 (rust): Sc in each st around. (18)
Stuff the tail medium-firm, a little softer near the base so it can bend. Sl st in the next st and fasten off, leaving a 20-in (50 cm) tail. Leave the base open. You have a rust tip, 3 dark brown rings and a rust base.
Put the red panda together. Choose the side of the body with the neatest stitches as the front.
- Front legs. Pin both legs to the front of the body, side by side with 3 sts between them. The flat tops sit on Rnds 19–21, just below the neck, and the paws rest on the table in front of the base. Sew around each top twice with the leg tails.
- Hind legs. Set one pod against each side of the base, over Rnds 8–13, with the sewn seam against the body and the spiral oval facing out and a little forward. The pod should sit on the table just beside a front paw. Sew all around each pod.
- Tail. Pin the open base of the tail to the back of the body over Rnds 9–14, a little to one side. Sew all the way around twice with the tail's long end. Curl the tail around the side of the body and tack it to the hind leg with 2 or 3 stitches so it stays curled.
- Head on body. Set the head on the open neck, with the face above the front legs. Pin it. With the head's 30-in tail, sew all the way around the neck twice, going deep into both pieces, so the head doesn't wobble. Add a little more stuffing in the neck just before you close the last stitches.
Weave in all your ends inside the body. Your red panda is ready to curl up on a shelf.
Safety and care. Safety eyes are a choking hazard for babies and toddlers, even when fitted correctly. If the red panda is for a child under 3, embroider the eyes with black yarn instead: a small oval of satin stitch, 3 sts wide and 2 rounds tall, on top of each eye patch. Sew every seam twice. To clean it, hand wash in cool water, squeeze it gently in a towel and let it air dry.
Make it yours — quick variations
| Variation | Change from base pattern |
|---|---|
| Golden-ring tail | Add a caramel or mustard round on each side of every dark brown ring. |
| Sleepy red panda | Skip the safety eyes and embroider two curved closed eyes on the patches. |
| Baby-safe red panda | Embroider the eyes, and use cotton yarn so it can go through a gentle wash. |
| Big cuddle size | Use bulky #5 yarn and a 5 mm hook. Same rounds, about 11 in tall. |
| Lying-down red panda | Sew the front legs flat along the base, pointing forward, and wrap the tail around the front. |
Troubleshooting the three things that go wrong
The face looks like a fox or a raccoon
It's almost always the eye patches. On a red panda, the dark marks run down from the eyes, between the muzzle and the cheeks. If you see rust between a patch and the muzzle, move the muzzle up against the patches. If the cheeks sit too far back, the face looks long, like a fox: bring them forward until they touch the patches.
The red panda falls over backward
The tail pulls it back, or the base isn't flat. Press the base on the table a few times so it flattens, and stuff the front legs very firmly. You can also sew the tail a round lower, so it rests on the table and works like a third leg.
The head flops forward
The neck seam isn't firm enough, or the neck isn't stuffed enough. Add stuffing through a gap in the seam, then sew around the neck one more time, going deep. Tip: stuff the body and head very firmly before you join them.
Frequently asked questions
How long does the red panda take? About 8 to 10 hours. The face pieces take about an hour, the head about 2 hours, and the body and legs about 3 hours. The tail, ears and sewing take the rest.
How much yarn do I need? About 240 yd (220 m) of worsted #4 yarn: about 125 yd of rust, 90 yd of dark brown, 20 yd of cream and a little black for the nose. One skein each of rust and dark brown is plenty.
Is this red panda safe for a baby? Only with embroidered eyes. Safety eyes can come loose and are a choking hazard for children under 3. Embroider the eyes, sew every seam twice, and check the plush now and then for loose stitches.
Is this a good pattern for beginners? It's a good third or fourth amigurumi. Every stitch is basic, but there are 16 pieces to make and place. If you're new, start with my crochet lion plush, which has fewer face pieces, then come back to the red panda.
Can I sell red pandas made from this pattern? Yes, you're welcome to sell finished red pandas made from this free pattern at markets, on Etsy or as gifts. Please credit "Pattern by Wavode" in your listing and link back to this page. What you can't do is republish this write-up or my photos as your own pattern.
Related patterns on Wavode
- Crochet lion plush: another sitting nursery animal, with a scalloped mane.
- Pippa the little elephant: a soft gift for a new baby.
- Barnaby the teddy bear lovey: a bear lovey for the crib.
- Chunky lamb plush: a cuddly lamb in chunky yarn.
- Panda car charm: the red panda's black and white cousin, on a swing.
Made a red panda? Tag #wavodecrochet on Pinterest. I re-pin every finished make and credit the maker.
Pattern by Clara Hartwell for Wavode. Questions? Email me at support@wavode.com.