Crochet Opossum Amigurumi Pattern

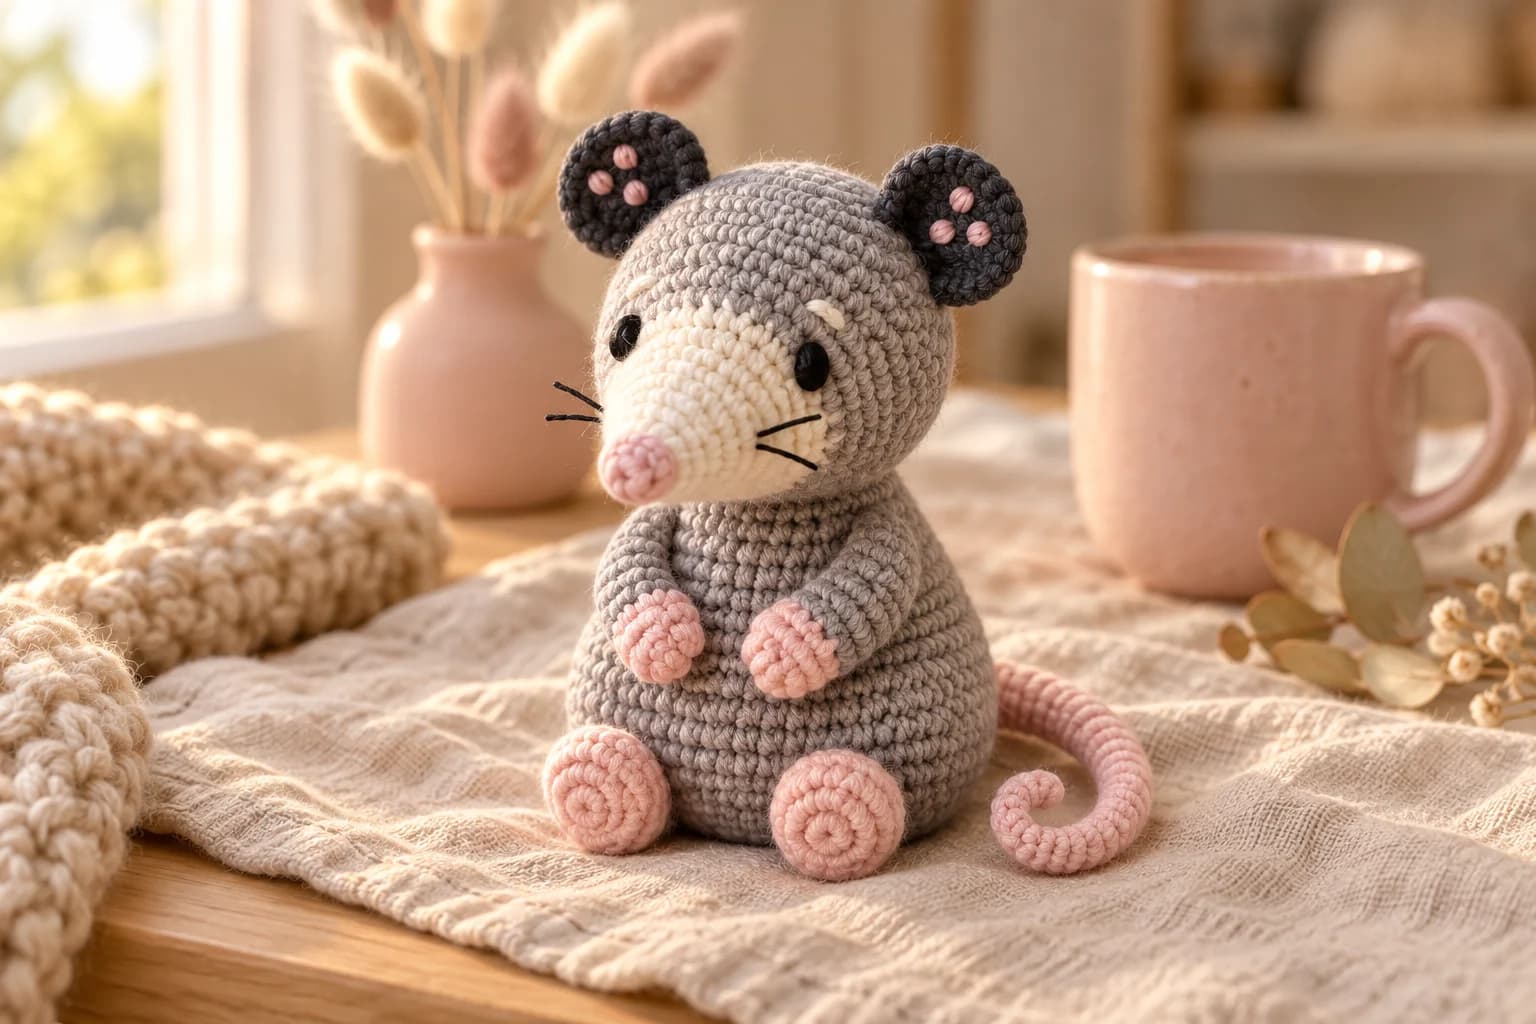
This crochet opossum amigurumi pattern makes Plume, a mini sitting opossum about 3¾ inches (9.5 cm) tall, in DK cotton with a 2.5 mm hook. Plume has a round grey head with a pointed cream muzzle, dark round ears, pink paws and feet, and a long, soft pink tail that curls around one side into a loop. It's all single crochet in spirals, with no wire anywhere. Plan on about 55 yards of yarn in four colors and about 3 hours.
Key Takeaways
- Ten pieces: head, muzzle, 2 ears, body, 2 arms, 2 feet and a tail.
- The muzzle is a cone that grows from the nose to a 12-st base, so it points forward on its own.
- The tail is soft, with no wire: its tip is curled into a loop and held with two stitches.
- About 55 yd of DK cotton: ~33 yd grey, ~13 yd pink, ~5 yd charcoal, ~4 yd cream, plus a scrap of black.
Why I love this little opossum
Opossums have a reputation, but up close they're all pink toes and pointy noses. Plume is my favorite of the forest set because the long curled tail makes it so easy to recognize. The grey and charcoal are calm, and the pink paws, nose and tail make it sweet instead of spooky.
It's made like the other minis: a round head, a pear-shaped body and small tubes. The muzzle is the one new shape, a cone that starts at the nose and widens to its base, and the tail is just a long, thin tube that you curl at the end.
Skill level. Advanced beginner. You need a magic ring, sc, inc and the invisible decrease in the round, a color change, closing a piece with sc through both layers, and some sewing.
What you'll need
Yarn: DK #3 cotton, such as Paintbox Yarns Cotton DK or Scheepjes Catona:
- Grey (main color): about 33 yd (30 m), sewing tails included.
- Soft pink (nose, paws, feet and tail): about 13 yd (12 m).
- Charcoal (ears): about 5 yd (4.6 m).
- Cream (muzzle and brows): about 4 yd (3.7 m).
- Black, about 1 yd, for the eyes and whiskers (black DK or 3 strands of embroidery floss).
I worked these amounts out from the stitch counts (about 910 sc in all, at roughly 1½ in of DK cotton per stitch) plus the sewing tails.
Hook and notions
- 2.5 mm (US B/1 or C/2) hook, or whatever size gives you a tight fabric.
- A small handful of polyester fiberfill.
- A stitch marker, a tapestry needle, pins and scissors.
Gauge and finished size
Gauge isn't critical, but tension is. Your stitches should be tight enough that the stuffing doesn't show through. As a check, Rnd 5 of the body (30 sc) is still a flat circle: it should be about 1¾ in (4.5 cm) across.
| Yarn | Hook | Approximate height |
|---|---|---|
| DK #3 cotton | 2.5 mm | about 3¾ in (9.5 cm), this pattern |
| Worsted #4 | 3.5 mm | about 4¾ in (12 cm) |
These are estimates from the stitch counts, so measure your first one.
Abbreviations (US crochet terms)
- MR = magic ring
- sl st = slip stitch
- sc = single crochet (UK double crochet)
- inc = 2 sc in the same st
- dec = invisible decrease: insert the hook in the front loop only of the next 2 sts, yarn over, pull through both front loops, yarn over and pull through the 2 loops on the hook
- st(s) = stitch(es)
- rnd(s) = round(s)
Work in continuous spirals: don't join and don't chain at the start of a round. Move your marker up every round. The number in brackets is the stitch count at the end of the round.
Color changes: work the last stitch of the old color until 2 loops are left on the hook, then finish it with the new color. Cut the old color, leaving a short tail to tie inside.
The pieces at a glance
| Piece | Color | Make | Starts at (MR) | Ends at |
|---|---|---|---|---|
| Head | Grey | 1 | Crown | Neck, closed |
| Muzzle | Pink + cream | 1 | Nose | 12-st base, open |
| Ears | Charcoal | 2 | Center | Flattened |
| Body | Grey | 1 | Sitting base | Neck, open |
| Arms | Pink + grey | 2 | Paw | Flattened |
| Feet | Pink | 2 | Toe | Closed, sewn on |
| Tail | Pink | 1 | Tip | Base, open |
The pattern — step by step
Part 1 — The head and the face
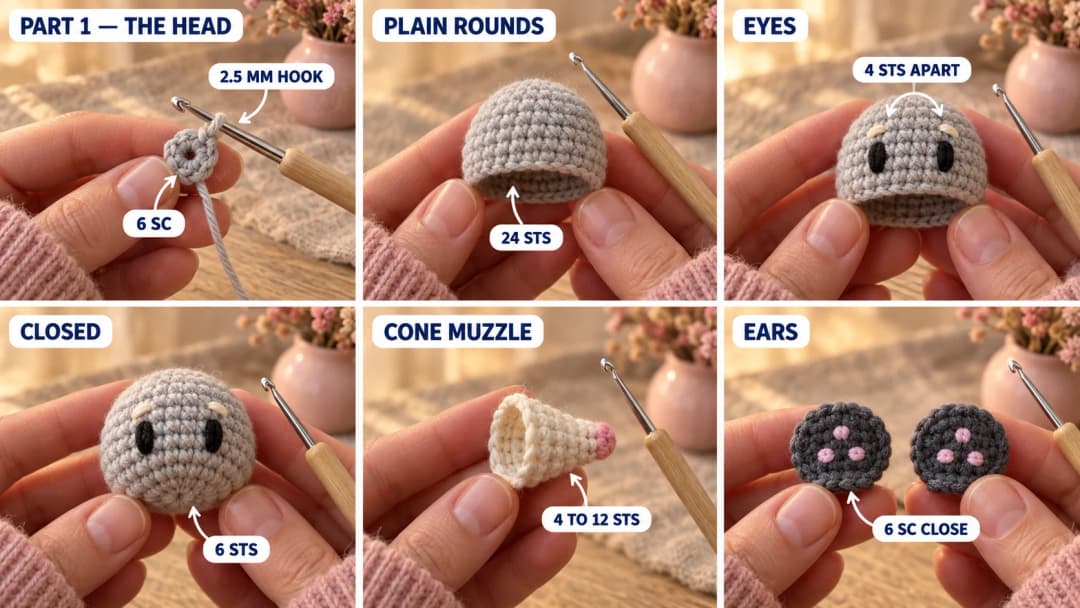
Head (grey). The magic ring is the crown. The last round closes the neck, underneath.
- Rnd 1: MR, 6 sc in the ring. (6)
- Rnd 2: Inc in each st around. (12)
- Rnd 3: (Sc, inc) × 6. (18)
- Rnd 4: (2 sc, inc) × 6. (24)
- Rnds 5–8: Sc in each st around, 4 rounds. (24)
- Rnd 9: (2 sc, dec) × 6. (18)
Embroider the eyes and brows now, while the head is still open. Stuff it lightly first. Choose the center front, opposite the round jog, and pin it on Rnd 6: the muzzle will sit on Rnds 5–8 under this pin.
- Eyes. Each eye is a small upright oval of black: 3 straight stitches side by side, covering Rnds 4 and 5, over 1 st width. Leave 4 sts between the eyes, 2 on each side of the pin, so they sit on each side of the muzzle's top edge.
- Brows. With cream, one short horizontal stitch above each eye, on Rnd 3.
Knot all the ends inside the head.
- Rnd 10: (Sc, dec) × 6. (12)
Stuff the head firmly, shaping it round.
- Rnd 11: Dec in each st around. (6)
Fasten off, leaving a 6-in (15 cm) tail. Thread it through the front loops of the last 6 sts, pull tight to close, and hide the tail inside.
Muzzle (pink and cream). A cone, worked from the nose to the base you sew on. Start in pink: the first round is the round pink nose.
- Rnd 1: MR, 4 sc in the ring. (4)
Change to cream on the last stitch of Rnd 1.
- Rnd 2: (Sc, inc) × 2. (6)
- Rnd 3: Sc in each st around. (6)
- Rnd 4: (2 sc, inc) × 2. (8)
- Rnd 5: (3 sc, inc) × 2. (10)
- Rnd 6: (4 sc, inc) × 2. (12)
Sl st in the next st and fasten off, leaving a 10-in (25 cm) tail. Stuff the cone lightly, pushing the fiberfill into the pink tip with the back of your hook, so the nose stays round.
Attach the muzzle. Pin the 12-st base on the front of the head, centered on your pin, with its top edge on Rnd 5 and its bottom edge on Rnd 8, the point aiming forward. Whipstitch it on all the way around.
Ears (make 2, charcoal). Don't stuff them.
- Rnd 1: MR, 6 sc in the ring. (6)
- Rnd 2: Inc in each st around. (12)
- Rnd 3: Sc in each st around. (12)
- Rnd 4: Flatten the opening and close it with 6 sc worked through both layers. (6)
Fasten off, leaving an 8-in (20 cm) tail. With pink, embroider three tiny dots in the middle of one side of each ear.
Part 2 — The body, arms, feet and tail
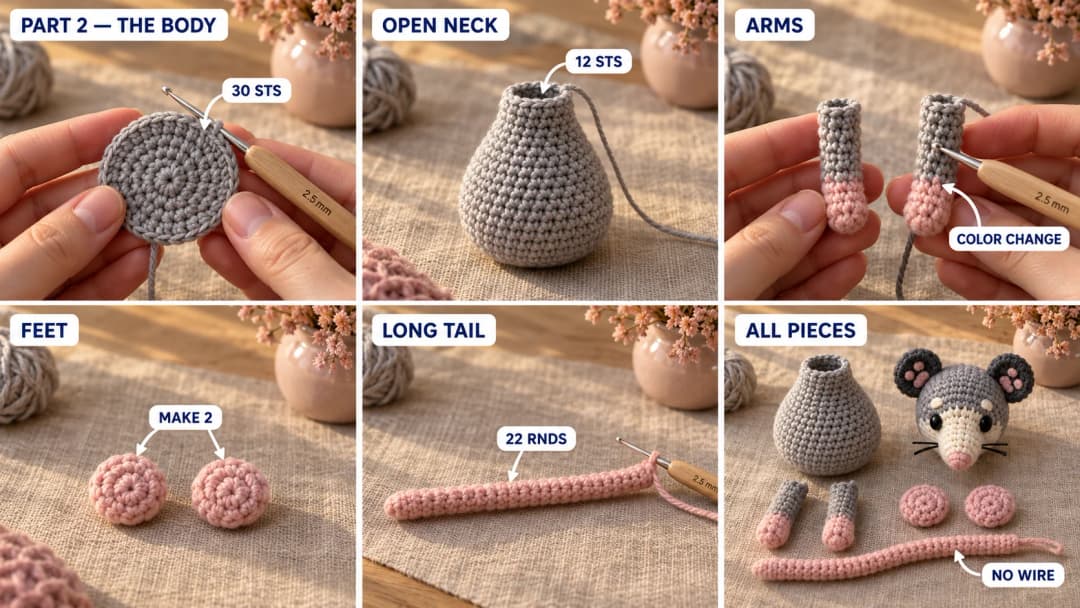
Body (grey). The magic ring is the sitting base. The body grows up into a pear shape and ends at the neck, which stays open.
- Rnd 1: MR, 6 sc in the ring. (6)
- Rnd 2: Inc in each st around. (12)
- Rnd 3: (Sc, inc) × 6. (18)
- Rnd 4: (2 sc, inc) × 6. (24)
- Rnd 5: (3 sc, inc) × 6. (30)
- Rnds 6–9: Sc in each st around, 4 rounds. (30)
- Rnd 10: (3 sc, dec) × 6. (24)
- Rnds 11–12: Sc in each st around, 2 rounds. (24)
- Rnd 13: (2 sc, dec) × 6. (18)
- Rnd 14: (Sc, dec) × 6. (12)
- Rnd 15: Sc in each st around. (12)
Stuff the body firmly, pressing the base flat so it sits level. Sl st in the next st and fasten off, leaving a 12-in (30 cm) tail for sewing on the head. Leave the 12-st neck open.
Arms (make 2). The magic ring is the paw. Start in pink.
- Rnd 1: MR, 6 sc in the ring. (6)
- Rnd 2: Sc in each st around. (6)
Change to grey on the last stitch of Rnd 2.
- Rnds 3–7: Sc in each st around, 5 rounds. (6)
- Rnd 8: Flatten the opening and close it with 3 sc worked through both layers. (3)
Don't stuff them. Fasten off, leaving an 8-in (20 cm) tail.
Feet (make 2, pink).
- Rnd 1: MR, 6 sc in the ring. (6)
- Rnd 2: (Sc, inc) × 3. (9)
- Rnds 3–4: Sc in each st around, 2 rounds. (9)
- Rnd 5: (Sc, dec) × 3. (6)
Stuff lightly. Fasten off, leaving an 8-in (20 cm) tail. Thread it through the front loops of the last 6 sts and pull tight to close. Keep the tail for sewing.
Tail (pink). A long, thin tube. The magic ring is the tip, and the last round is the base you sew to the body.
- Rnd 1: MR, 5 sc in the ring. (5)
- Rnds 2–22: Sc in each st around, 21 rounds. (5)
Don't stuff it, and don't add wire. Sl st in the next st and fasten off, leaving a 14-in (35 cm) tail at the base.
Part 3 — Putting Plume together
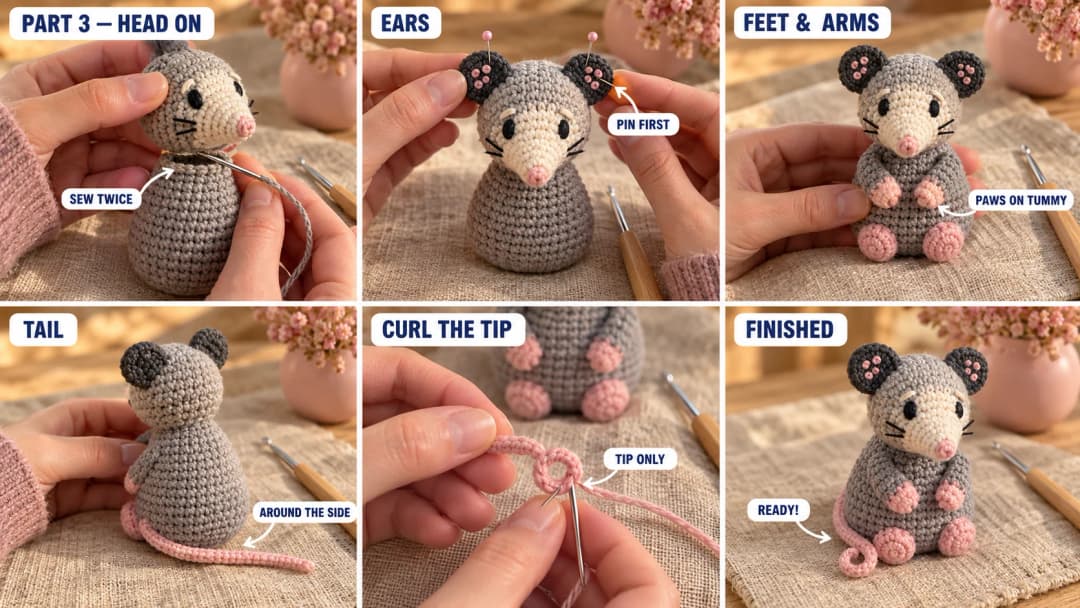
Pin everything before you sew. The body's front is the side away from its round jog. Sew each piece with its own tail, going a little way into the body with each stitch, then knot the tail and pull the end inside.
- Head on body. Set the head on the open neck, with the neck centered on the head's closing point and the muzzle pointing straight ahead. The seam follows the head's Rnd 10 (12 sts), which matches the 12 sts of the neck one for one. Sew all the way around with the body's 12-in tail, then go around a second time. Add a little stuffing into the neck before the last stitches.
- Ears. Pin them on each side of the top of the head, on Rnds 2–4, about 8 sts apart, behind the brows, with the pink dots facing forward. Sew across each flattened base.
- Feet. Sew them to the front of the body on Rnds 2–4, about 3 sts apart, with the magic ring facing forward like a little round sole.
- Arms. Sew the flat top of each arm to the side of the body on Rnds 12–13, just below the head, with the pink paws resting on the tummy.
- Tail. Sew the open base of the tail to the lower back, on Rnds 3–4. Bring the tail around one side of the body, toward the front. Then curl the tip end (Rnds 1–6 of the tail) into a loop, and hold the loop with two small pink stitches between Rnd 1 and Rnd 6. Don't stitch the rest of the tail down: it stays soft and moves.
- Whiskers. With black, two short whiskers on each side of the muzzle, near its base.
Check before you finish: Plume should sit on both feet with the muzzle pointing forward, and the tail should curl at the tip, not at the base. If it leans back, move the feet one round further forward before knotting the tails.
Safety and care. Plume has no safety eyes, no wire and no hard parts: the face is embroidered and the tail is plain crochet. A handmade toy still isn't a certified baby toy, so sew every seam twice and check the tail and ears before giving it to a small child. Hand wash in cool water and let it air dry.
Make it yours — quick variations
| Variation | Change from base pattern |
|---|---|
| Classic white face | Make the whole head in cream and keep the muzzle cream too. |
| Sleepy opossum | Embroider each eye as a small downward curve on Rnd 5. |
| Night opossum | Charcoal body and ears, grey head, cream muzzle. |
| Flower | Sew a tiny pink French knot flower between the ears. |
| Hanging tail | Leave the tail uncurled and hang Plume from a branch by it, tacked with a stitch. |
Troubleshooting the three things that go wrong
The muzzle droops
It's stuffed too little or sewn too low. Push stuffing right into the tip, and keep its top edge on Rnd 5, just between the eyes.
The tail curls at the wrong end
The magic ring of the tail is the tip. Sew the last round (Rnd 22) to the body and curl Rnds 1–6, not the other way around.
Plume tips backward
The head and tail pull it back. Move the feet one round forward, and bring the tail around the side, not straight behind.
Frequently asked questions
How long does this mini opossum take? About 3 hours: an hour for the head and face, half an hour for the body, and the rest for the long tail, small pieces and sewing.
How much yarn do I need? About 55 yd of DK cotton: around 33 yd grey, 13 yd pink, 5 yd charcoal and 4 yd cream, plus a yard of black.
Can I use safety eyes? Yes, 6 mm safety eyes fit between Rnds 4 and 5, 4 sts apart, inserted before Rnd 10. Skip them for a child under 3.
Can I make it bigger? Use worsted #4 yarn with a 3.5 mm hook: Plume comes out about 4¾ in tall with the same stitch counts.
Can I sell opossums made from this pattern? Yes, you're welcome to sell finished opossums made from this free pattern at markets, on Etsy or as gifts. Please credit "Pattern by Wavode" in your listing and link back to this page. What you can't do is republish this write-up or my photos as your own pattern.
Related patterns on Wavode
- Aster the dragon: a mini sitting dragon in the same DK cotton.
- Nenu the pond frog: a wide, round frog with big eye bumps.
- Moka the otter: a little otter holding a pebble.
- Hazel the baby deer: a lying fawn with embroidered spots.
- Crochet red panda: another woodland friend.
Made a little opossum? Tag #wavodecrochet on Pinterest. I re-pin every finished make and credit the maker.
Pattern by Clara Hartwell for Wavode. Questions? Email me at support@wavode.com.