Crochet Rose Keychain

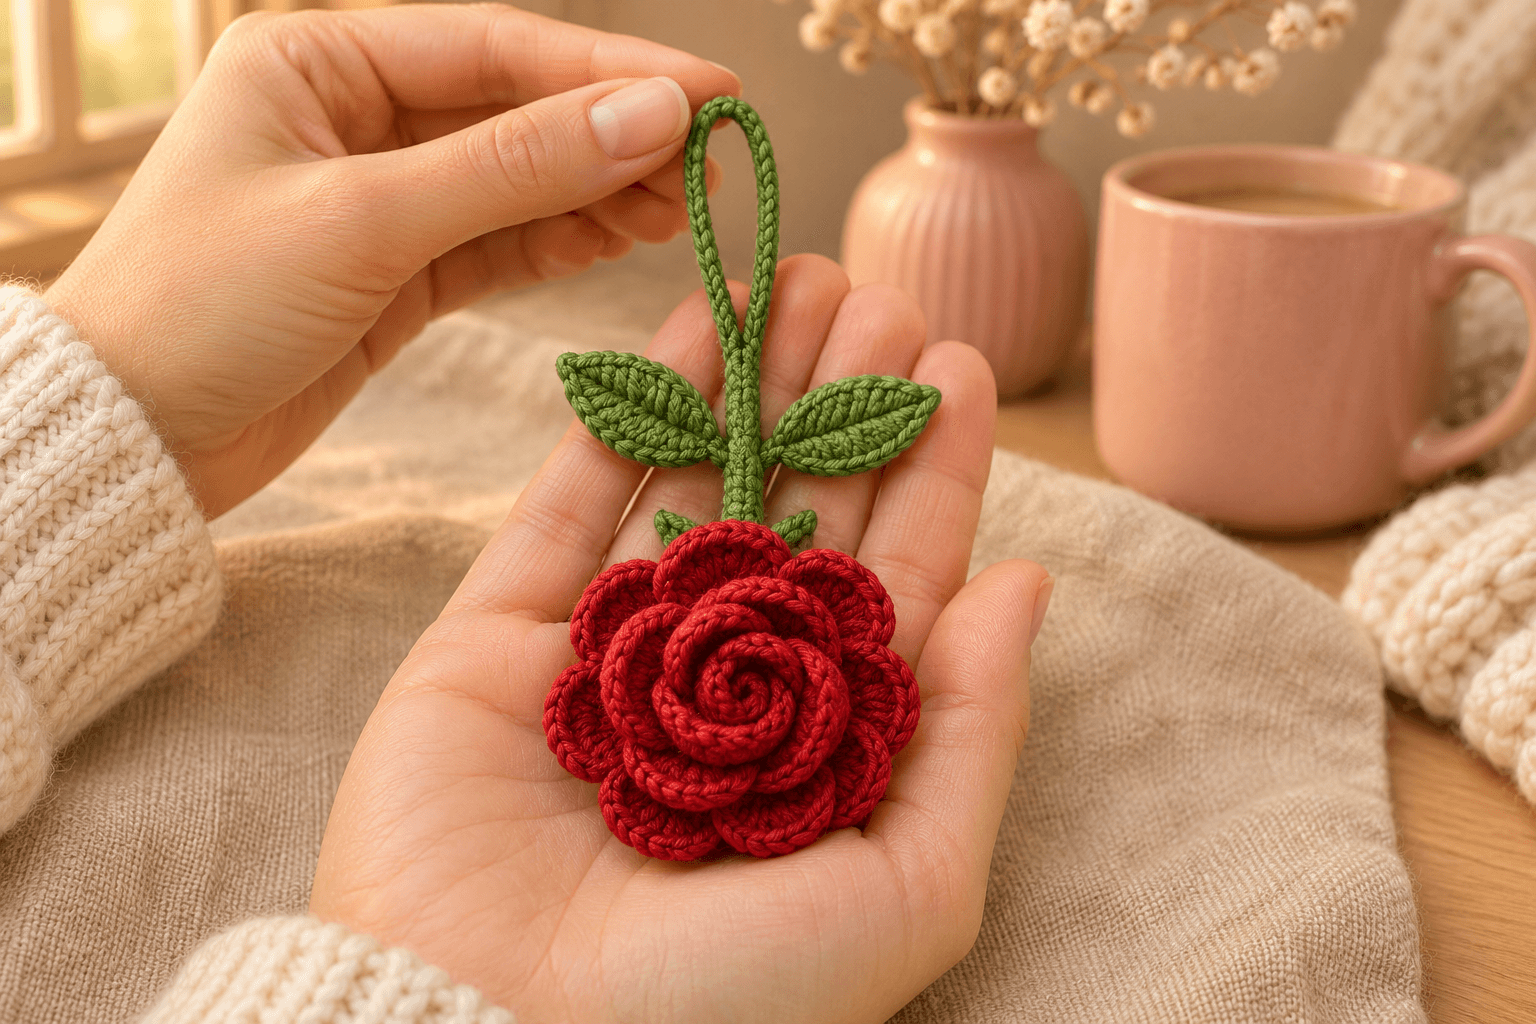
I like a rose with a tight little center and outer petals that open just enough to show their edges. This crochet rose keychain has a red bloom about 1½ in (4 cm) across, two pointed green leaves and a narrow hanging loop. The whole charm is about 4½ in (11 cm) tall, including that loop.
The flower begins as a scalloped strip, which I roll up like a ribbon. This written adaptation follows the ten-petal rose and five-sepal calyx in Kane Crochet's tutorial, with a 15-chain foundation and a defined stem, loop and sewing sequence. The green strip is anchored through the flower's base so the rose hangs beneath the leaves.
| At a glance | |
|---|---|
| Finished size | about 4½ in (11 cm) tall with loop; rose about 1½ in (4 cm) across |
| Yarn | sport #2 cotton in red and leaf green |
| Hook | 3 mm throughout |
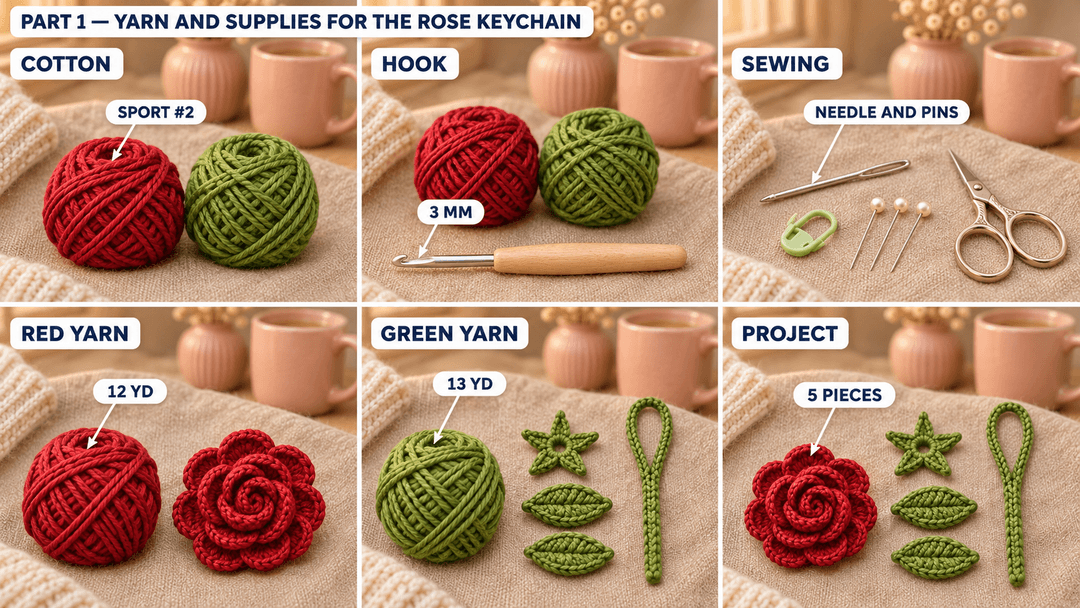
| Crocheted pieces | 5 |
| Time | allow about 1½–2 hours |
| Skills | ch, sc, hdc, dc, sl st, working around a chain and simple hand sewing |
Yarn and supplies for the rose keychain
- Yarn: smooth sport #2 cotton, about 137 yd (125 m) per 50 g. Gather about 12 yd red and 13 yd leaf green, including the lengths for sewing. This is the yarn specification for this written version; the video describes its yarn as 4-ply cotton about 2 mm thick.
- Hook: 3 mm for every piece.
- Tools: a tapestry needle, scissors, a stitch marker and sewing pins.
- For clipping to keys: an optional split keyring or small swivel clasp, slipped through the finished green loop.
Tension: about 6 sc per inch (2.5 cm), with about 6 sc rows per inch. Keep the fabric snug and even. The size is an estimate at that tension; the way you roll and spread the petals also affects the bloom. Leave the flower, calyx, leaves and loop unstuffed.
Stitches, in US terms: chain (ch), single crochet (sc), half double crochet (hdc), double crochet (dc), slip stitch (sl st), magic ring (MR), stitch (st), chain space (ch-sp). Row means a back-and-forth row; R means a round. The calyx rounds are joined, and the leaves go around both sides of a chain. Starting chains and joining slip stitches are excluded from the stated counts unless a line specifically includes them.
Making the strip of ten rose petals
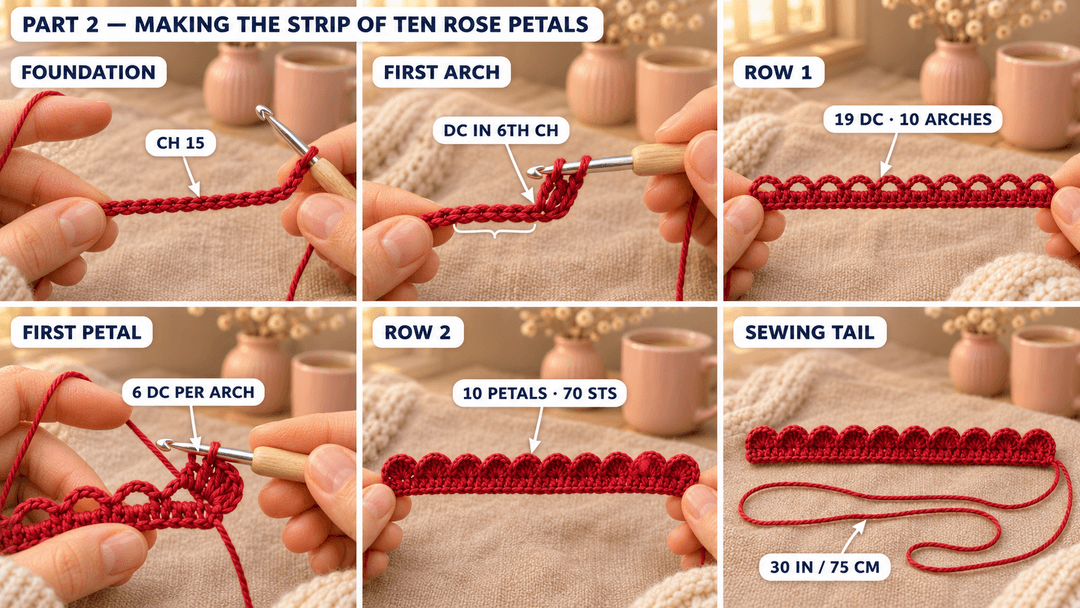
Rose strip — red, 3 mm hook. Make 1. Leave a 6 in (15 cm) starting tail and ch 15.
- Row 1: dc in the 6th ch from the hook, (dc, ch 2, dc) in each of the next 9 ch. (19) Nineteen actual dc and ten arches; the skipped starting chains form the rise and first arch.
- Row 2: turn, (ch 3, 6 dc in the next arch, ch 3, sc in that same arch) × 10. (70) Ten petals, each with six dc and one sc; the side chains are outside this count.
On Row 1, the two dc of each repeated pair share one foundation chain. On Row 2, work into the open spaces between the dc pairs. Begin in the arch nearest the hook and finish in the arch formed by the skipped starting chains. The ch 3 on each side of a fan gives its edge a soft curve.
Fasten off with a 30 in (75 cm) tail. Keep it for sewing the rose. Weave the short starting tail into the straight foundation edge.
Tip. Count ten open arches before making the petals. Each arch receives one six-dc fan. If you miss an arch, the strip will have a bare notch when you roll it.
Rolling and securing the rose
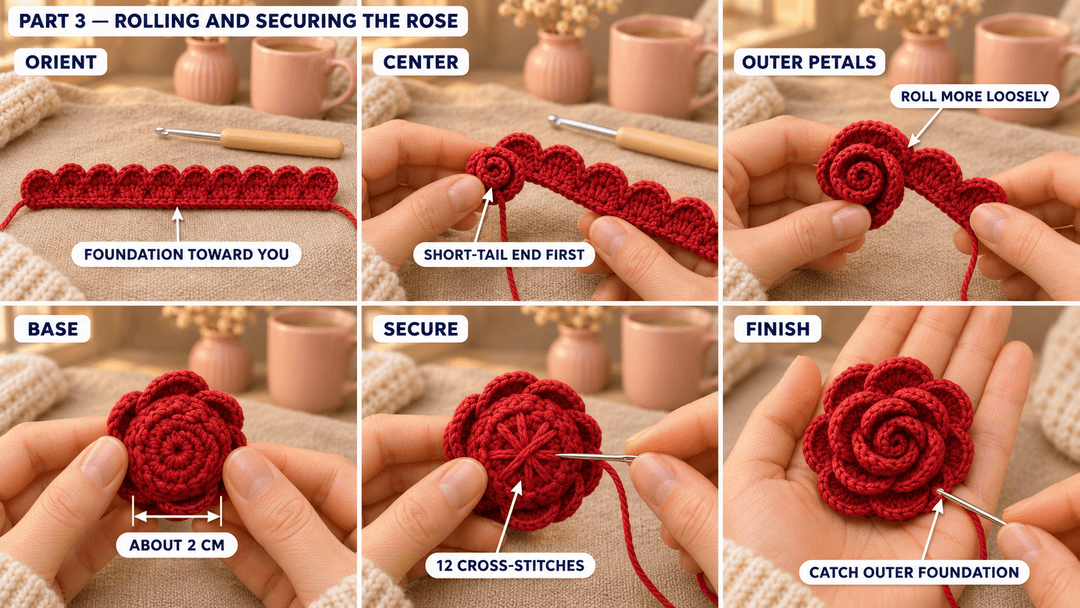
Lay the strip with its straight foundation edge toward you and the scalloped petal edge away from you. Start rolling at the end with the short woven-in tail, so the long sewing tail finishes on the outside.
- Curl the first petal into a small center. Keep the straight lower edge level as you wrap the next petals around it.
- Let the outer petals sit a little more loosely. Pin the last petal against the outside, with the long tail below the bloom.
- Turn the rose over. Pinch the rolled foundation into a compact round base about ¾–⅞ in (2 cm) across. The petal edges flare beyond this base.
- Thread the long red tail. Take 12 small stitches across the underside, changing direction every few stitches and catching several neighboring coils each time. Keep the needle below the petal faces.
- Go around the outside foundation edge with a second line of small stitches, catching the outer wrap to the coil beneath it. Secure the yarn and hide the end through the base.
Turn the rose face-up and ease the outside petal edges outward with your fingertips. Keep the center curled. Set it aside while you make the green backing.
Tip. If the whole rose opens when you lift it, one of the inner coils escaped the sewing. Turn it over and catch that coil to its neighbors before adding the calyx.
The green calyx with five pointed sepals
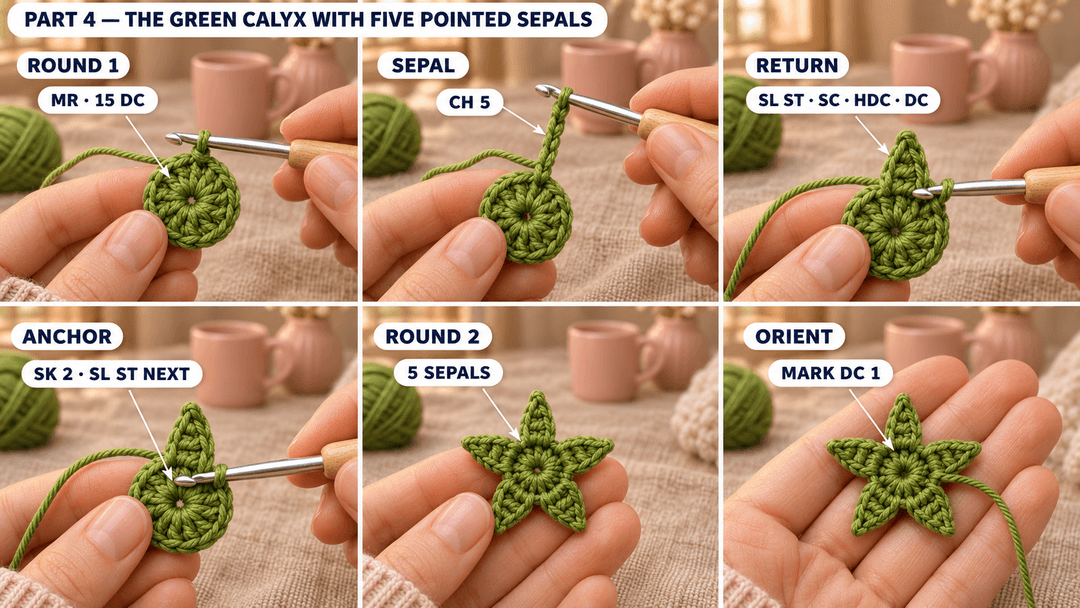
Calyx — green, 3 mm hook. Make 1. The magic ring becomes the center of the flower's back. Leave a 6 in (15 cm) starting tail.
- R1: MR, ch 2, 15 dc in the ring. (15) Join with a sl st in the first dc; the ch 2 does not count. Mark that first dc as stitch 1.
- R2: (ch 5, sl st in the 2nd ch from the hook, sc in the next ch, hdc in the next ch, dc in the last ch, skip the next 2 dc of R1, sl st in the next dc of R1) × 5. (5 sepals)
For the last repeat, the anchoring sl st returns to the marked first dc. Keep the five points flat while you work, like a little green star. Pull the magic ring closed and weave its short tail into the back of the disc.
Fasten off with a 24 in (60 cm) tail, keeping the marker in stitch 1. The long tail sits at the edge of the round disc, ready to sew that disc beneath the rose. Leave the pointed sepals free.
Two leaves joined at the stem
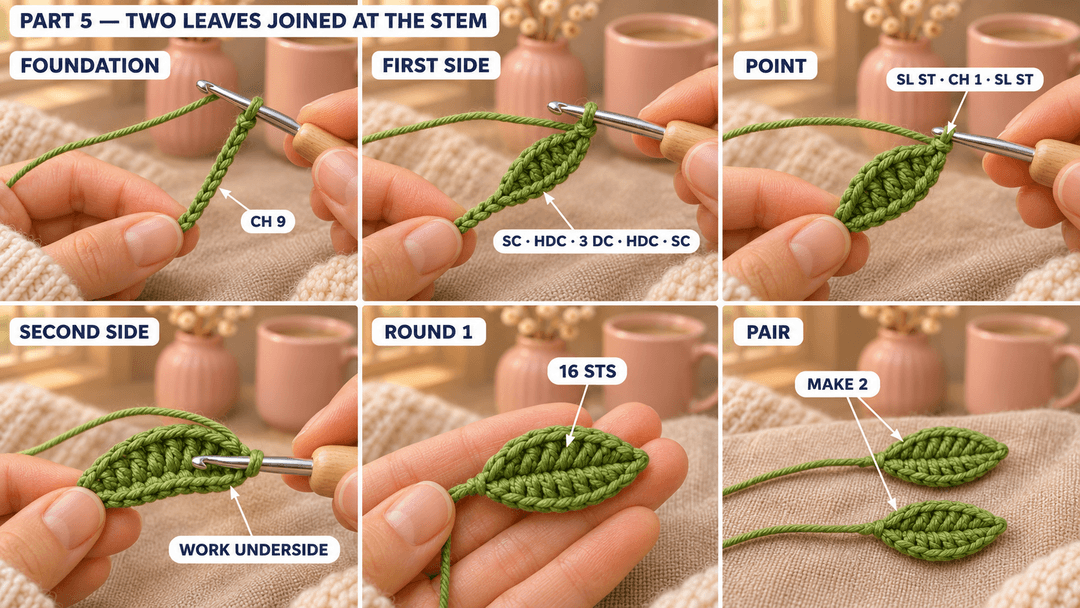
Leaves — green, 3 mm hook. Make 2. Leave a 6 in (15 cm) starting tail and ch 9 for each leaf. Work around the chain, keeping the same side facing you.
- R1: sc in the 2nd ch from the hook, hdc in the next ch, dc in each of the next 3 ch, hdc in the next ch, sc in the next ch, (sl st, ch 1, sl st) in the last ch; along the other side of the chain, sc in the next ch, hdc in the next ch, dc in each of the next 3 ch, hdc in the next ch, sc in the last ch. (16) Fourteen sc/hdc/dc plus two tip sl sts. Join with a sl st in the first sc.
The ch 1 makes the pointed outer tip. The end where you start and finish is the narrow base that will sit against the stem. Fasten off each leaf with a 12 in (30 cm) tail and weave in its short starting tail. Lay the pair side by side, points facing away from each other.
Set the leaves beside the rose while you make the loop. Their little bases will cover the join just below it.
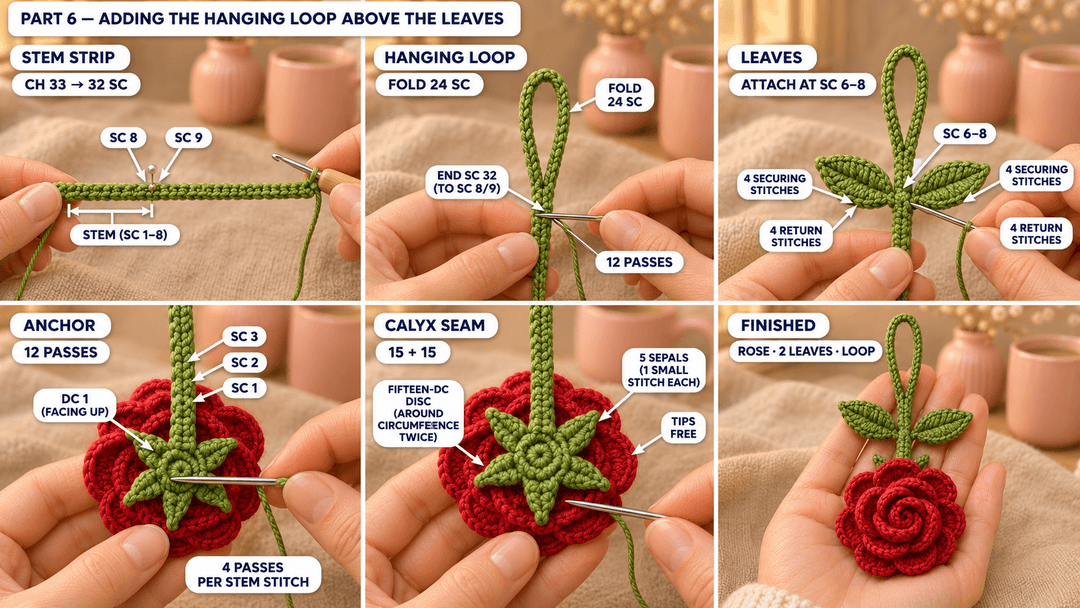
Adding the hanging loop above the leaves
Stem-and-loop strip — green, 3 mm hook. Make 1. Leave a 6 in (15 cm) starting tail.
- Row 1: ch 33, sc in the 2nd ch from the hook and in each ch across. (32)
Fasten off with a 24 in (60 cm) tail. Number the sc from the end beside the short starting tail: that is stitch 1; the end with the long finishing tail is stitch 32. Count eight stitches up from the short-tail end and slip a pin between stitches 8 and 9.
Fold the loop and add the leaves
Keep stitches 1–8 straight, pointing downward: this is the stem. Curve stitches 9–32 upward into an oval loop and bring the end at stitch 32 back to the pin between stitches 8 and 9. Keep the strip flat as it curves, with its stitch faces toward you.
With the long finishing tail, sew the end of stitch 32 to the strip beside stitch 8, 12 small passes, catching the full width of both sections. Secure and hide the tail along the stem. Weave the short starting tail into the lower stem.
Pin one leaf base to each side of the stem, spanning stem stitches 6–8, immediately below the loop join. The points face outward and slightly upward. With each leaf's tail, sew its base to the stem with 4 small stitches, then follow that seam back with 4 more. Keep the rest of each leaf free so it can lift away from the stem.
Anchor the stem through the rose
Place the rose face-down and center the green calyx on its sewn base. Turn the calyx so its marked R1 stitch 1 points straight up, toward the hanging loop. Pin the round disc against the rose, letting its five points reach outward beneath the petals.
Lay the bottom of the stem over the outside of the calyx. Stem stitch 1 sits at the magic-ring center; stitches 2 and 3 run upward toward the marked dc 1. The loop and leaves extend above the flower. Pin those three stem stitches in place.
Cut a 24 in (60 cm) green sewing strand. Take 12 small stitches through the stem, the calyx disc and the rose's sewn foundation, distributing four stitches along each of the three stem sc. Catch the firm rolled base beneath the disc each time. Secure the yarn and bury both ends through the base.
With the calyx's long edge tail, sew the round disc to the rose's base, one stitch through the top of each of the 15 dc of R1. Work beneath the bases of the pointed sepals and leave their tips free. Go around once more, then secure and hide the tail. Remove the marker and pins.
With the flower facing away from you, lift each green point gently against the back of an outer petal. With a fresh 12 in (30 cm) green strand, take one tiny holding stitch halfway along each of the five points, catching the back of the nearest outer petal. Leave the pointed ends lifted and hide the strand under the calyx.
Lift the charm by the loop and check that the flower faces forward beneath the leaves. If the cotton loop stretches with use, sew another matching strand through its joining seam and through the three-stitch stem anchor. Slip a split ring or small swivel clasp through the oval loop if you want to clip it to keys.
Safety. Keep this small looped charm for bags and keys, away from babies and children under 3. Metal keyrings and clasps add small parts.
I like the red rose against a cream tote, with its leaves left slightly lifted. For a gift, slip the loop through a hole in a plain card and let the bloom sit below a handwritten name.
UK terms: US sc = UK dc; US hdc = UK htr; US dc = UK tr.
Made a little rose? Tag #wavodecrochet on Pinterest so I can see it.
Written adaptation by Clara Hartwell for Wavode, based on the rose tutorial by Kane Crochet. Questions? Email support@wavode.com.