Crochet Button Keychain

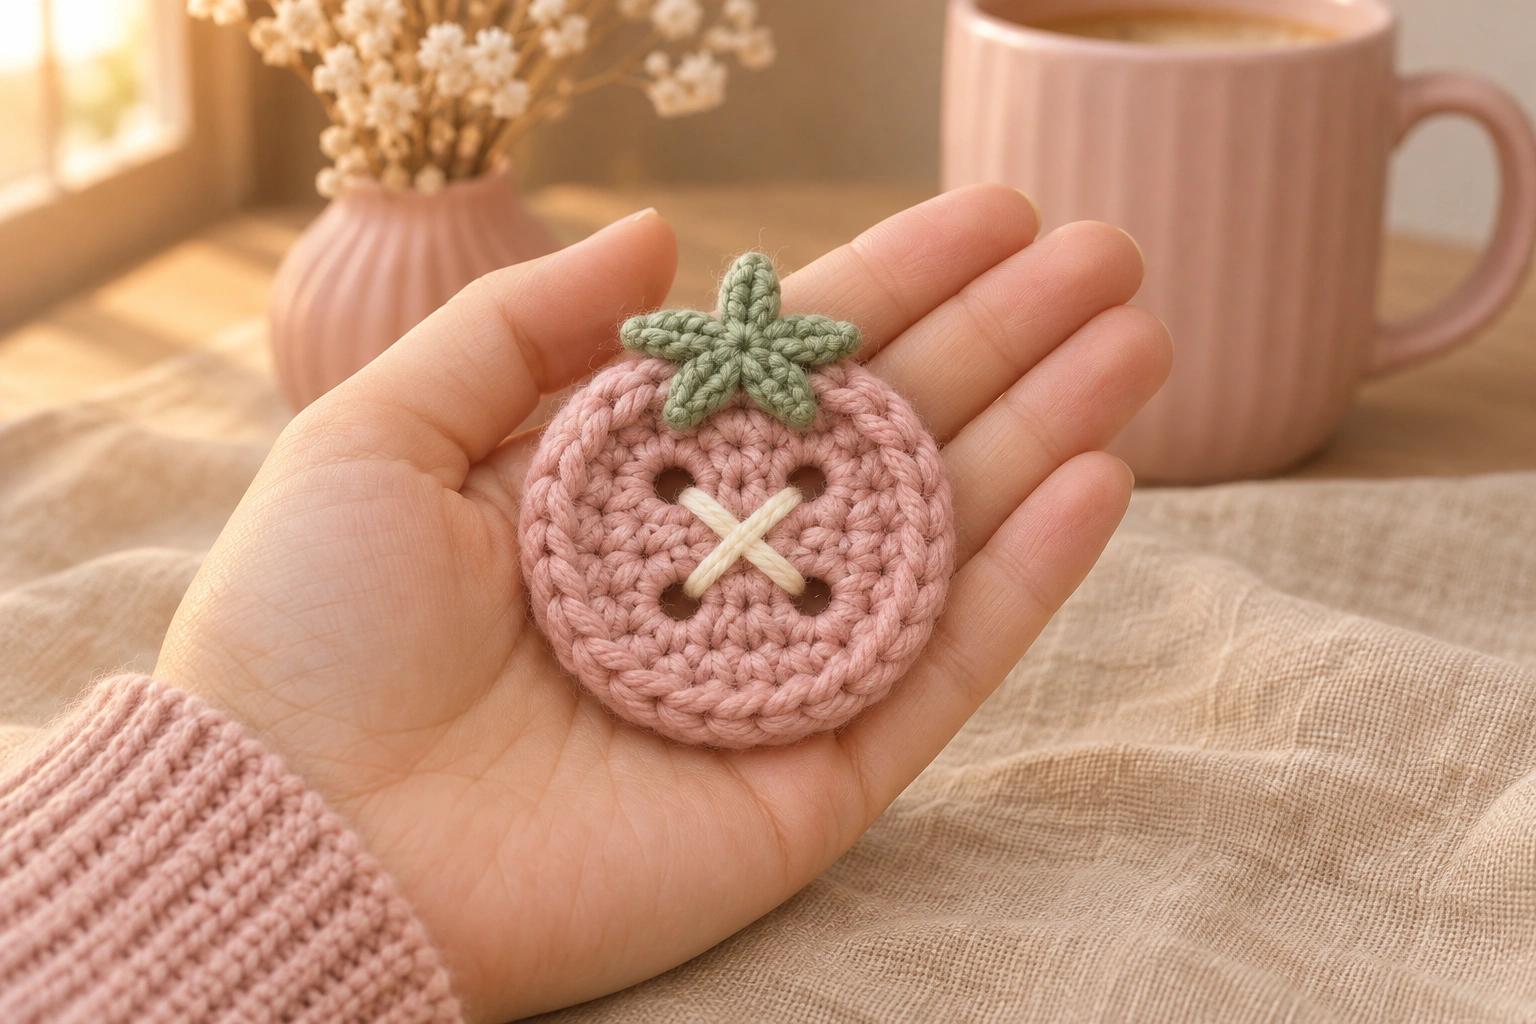
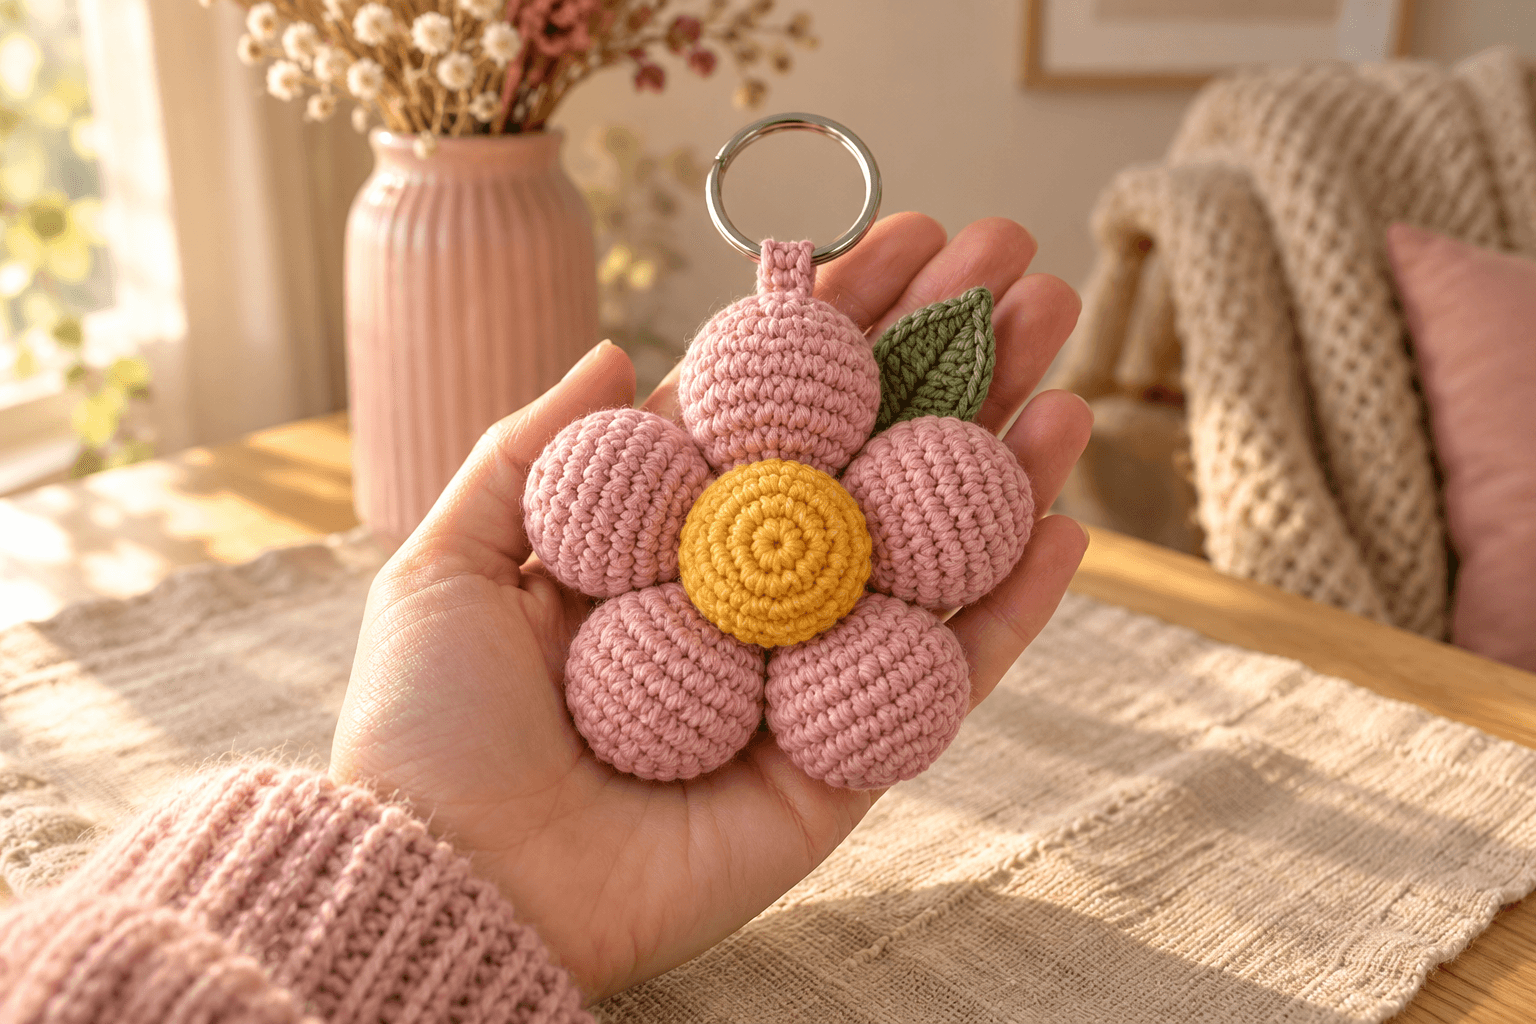
I like the little X in the middle of a sewing button. A strand of ivory makes it stand out beautifully against pink. This crochet button is about 2 in (5 cm) across, with a softly padded rim and a sage green leaf tucked against the top.
Four small chain arches leave the holes for the ivory X. Turn the button over, and the unused loops give you a place to start its second face. I keep the filling light: the shape wants to feel like a plump button between your fingers.
| At a glance | |
|---|---|
| Finished size | button about 2 in (5 cm) across, excluding leaf and hardware |
| Yarn | DK #3 cotton in blush pink, sage green and ivory |
| Hook | 3 mm throughout |
| Pieces | 2: button body and five-point leaf |
| Construction | joined rounds; the second face grows from unused loops |
| Skill | magic ring, sc, increases, front and back loops, slip-stitch joining |
Supplies for the blush pink button
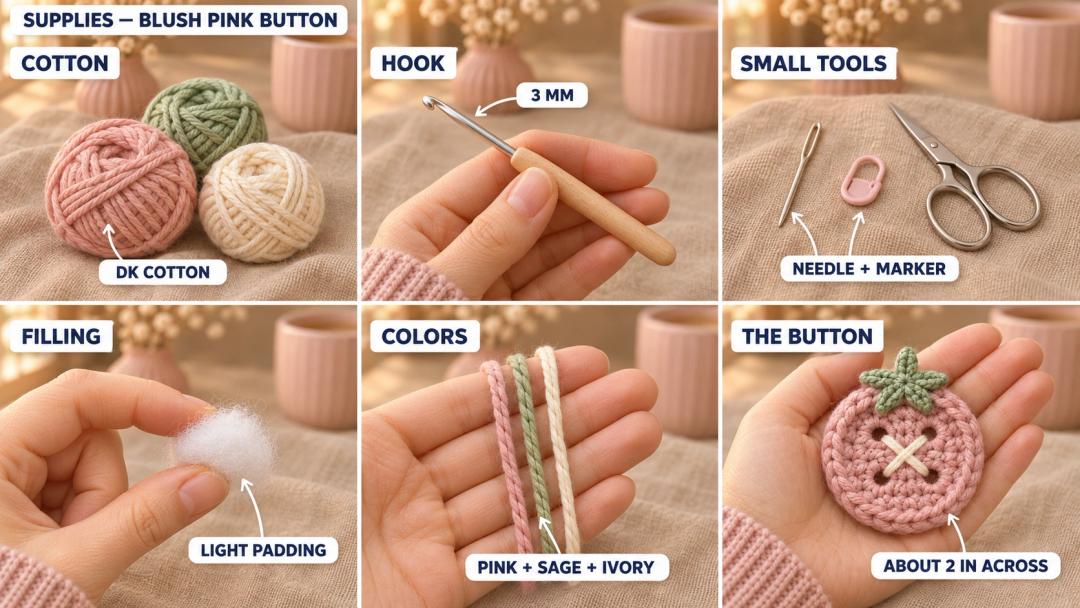
- Yarn: Paintbox Yarns Cotton DK, 100% cotton, 137 yd (125 m) per 50 g ball. Set aside about 14 yd blush pink, 2 yd sage green and 1 yd ivory, including finishing yarn. Pick soft shades of pink and sage, with a warm ivory for the X.
- Hook: 3 mm for the button and leaf.
- Small things: a little fiberfill, a tapestry needle, a stitch marker and scissors.
- Optional: craft glue suitable for yarn, if you prefer to glue the leaf instead of sewing it. Skip the glue if you're sewing.
The yarn details are listed on the Paintbox Yarns Cotton DK product page. This cotton is the yarn choice for this color version.
Tension. Use 6 sc per inch (2.5 cm), with about 6 rounds per inch, snug enough that the stuffing doesn't show. At that tension the button is about 2 in (5 cm) across. That's an estimate from the stitch counts; measure the finished button after adding the filling.
Stitches, in US terms: magic ring (MR), chain (ch), single crochet (sc), slip stitch (sl st), increase (inc: 2 sc in the same stitch), front loop only (FLO) and back loop only (BLO). R means round; st means stitch.
Joined rounds throughout. Start each button round with ch 1 and finish with a sl st into the first sc. The starting ch 1 and closing sl st don't count as stitches. Put your marker in the first sc and move it up each round. Work the first sc into the same stitch as the joining sl st, and keep the right side facing you without turning.
The pattern — crocheting the button's first face
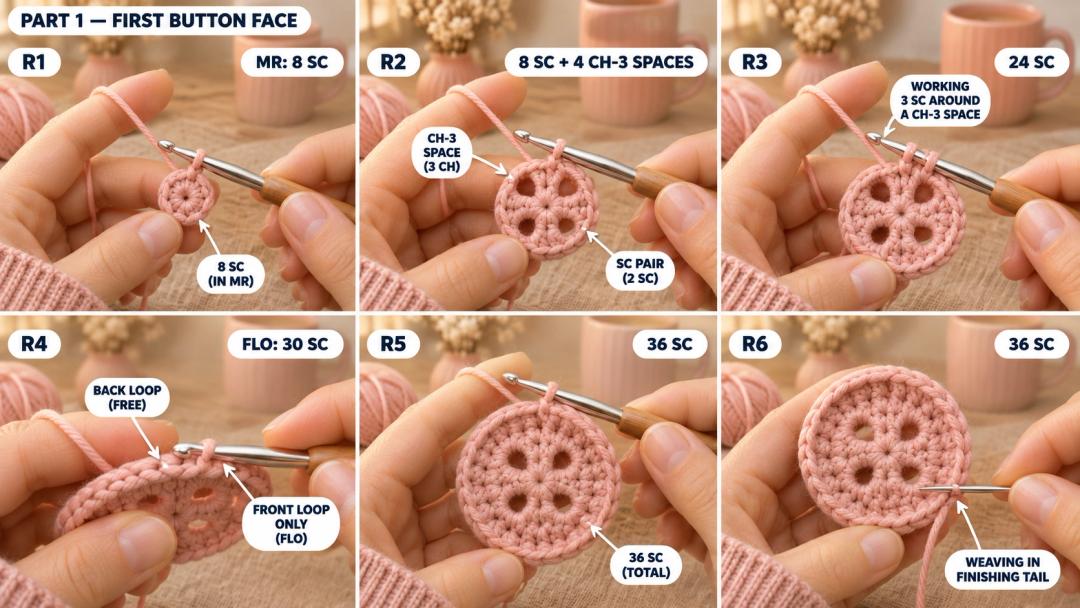
Button body — blush pink, 3 mm hook. Make 1. The magic ring sits at the center of the button. R6 becomes the outer edge of the first face; R8 becomes the matching edge of the second face.
Make ch 1 in the magic ring before working the first sc; this chain doesn't count.
- R1: MR, 8 sc in the ring. (8)
Pull the ring closed and join. Start each following round with ch 1 and join as described above.
- R2: (sc 2, ch 3) × 4. (8)
- R3: (sc, inc, 3 sc in the next ch-3 space) × 4. (24)
- R4: in FLO, (sc 3, inc) × 6. (30)
- R5: (sc 4, inc) × 6. (36)
- R6: sc around. (36)
R2 has 8 sc and four ch-3 spaces; its count of 8 refers to the sc. After joining R6, cut the pink yarn, leaving about 6 in (15 cm) to secure and weave in the end. Weave the starting tail into the inside too, keeping the four chain spaces open.
Tip. At R3, put all three sc around the chain arch, under the whole chain. Those four little windows are where the ivory X will sit.
Working the second button face in the unused loops
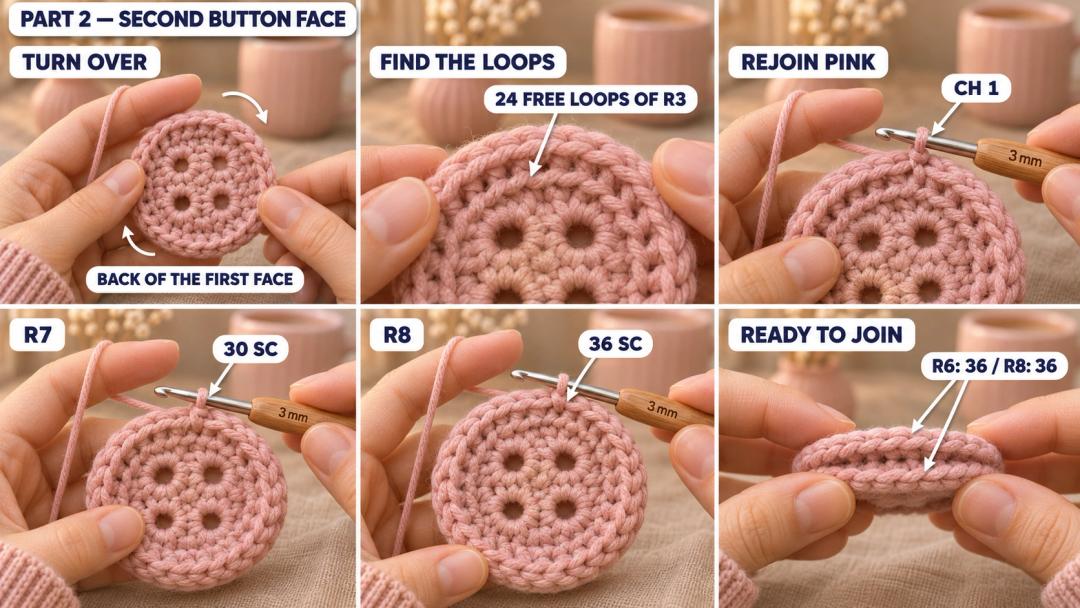
Continue the same pink body with the 3 mm hook. Turn it over so you can see the unused loops behind the ridge where R4 began. These are the 24 back loops of R3, left free when R4 was worked in FLO.
Pick any free loop, join fresh blush pink yarn and ch 1. Start R7 right there, then follow the little loops around the ridge.
- R7: (sc 3, inc) × 6. (30)
- R8: (sc 4, inc) × 6. (36)
Join both rounds in the first sc, with ch 1 before R8. After joining R8, keep the yarn attached for the outer seam.
Tip. Run a finger around the ridge before starting R7. Pick up the little loops immediately behind it; the outer edge of R6 stays free for the joining step.
Joining and stuffing the button
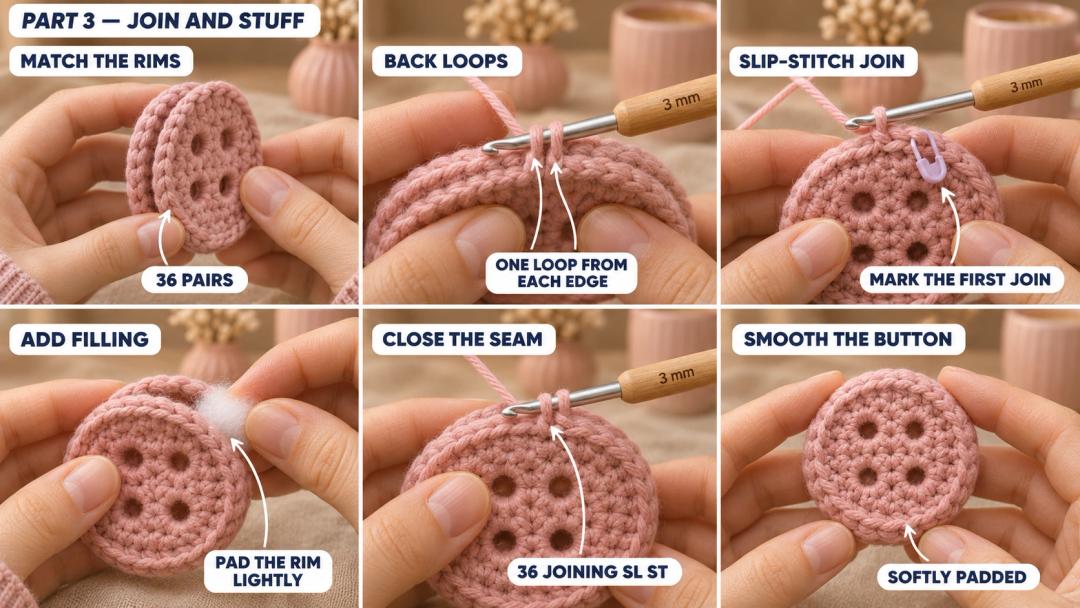
Bring the two outer edges together, right sides facing out. The inside surfaces face each other. Line up the 36 stitches of R6 with the 36 stitches of R8, pairing the first stitch on the working side with the stitch directly opposite it.
Slip-stitch seam through both edges
- Keep the pink working loop on your hook. Insert the hook through the back loop of the first edge stitch and the back loop of its partner on the other face.
- Yarn over and pull through both edge loops and the loop already on your hook. Mark this first joining sl st.
- Continue with one sl st through each matching pair of back loops, working around the button.
- Before the opening becomes too small for your finger, tuck a little fiberfill between the faces. Spread it gently around the rim and keep it clear of the four central holes. The button should feel softly padded, with the middle still easy to see.
- Finish joining all 36 pairs. Sl st into the first joining sl st to finish the seam, then cut the yarn, leaving about 6 in (15 cm). Secure it and bury the end inside the padded rim.
Hold the button between your palms and smooth the filling around the edge. I like a soft rim here; pushing in more filling makes the center harder to embroider.
The sage leaf and ivory embroidered X
Crossing the four button holes with ivory
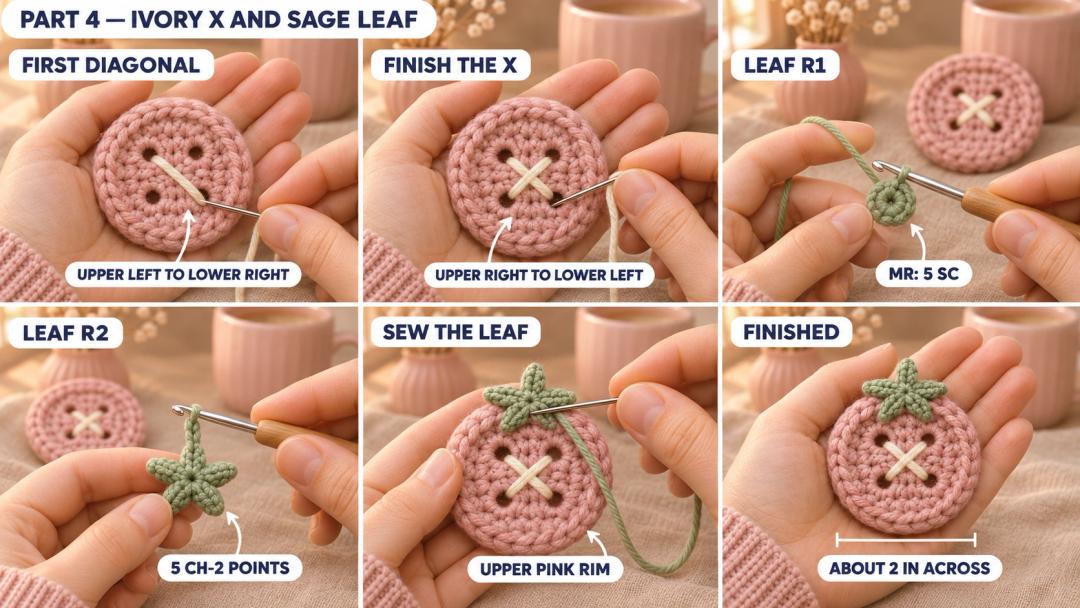
Hold the first face toward you and turn the button until its four holes sit like the corners of a small square.
Thread about 18 in (45 cm) of ivory yarn onto the needle. Secure the starting end on the back, working through the pink fabric beside a central hole. Bring the needle to the front through the upper-left hole, then down through the lower-right hole. Carry the yarn across the back to the upper-right hole and bring it to the front. Go down through the lower-left hole to complete the X.
Keep both diagonal strands resting gently on the front. Secure the end on the back and bury it inside the pink rim. The ivory should cross neatly in the middle without pulling the four holes toward each other.
A five-point leaf in sage green
Leaf — sage green, 3 mm hook. Make 1. The magic ring becomes the center of the leaf, and the chain points form its outer edge.
- R1: MR, 5 sc in the ring. (5)
Pull the ring closed and sl st into the first sc. The next round starts with the first point's ch 2.
- R2: (ch 2, sl st in the 2nd ch from the hook, sl st in the next sc of R1) × 5. (5 points)
Each ch 2 makes a little point. The sl st in the next sc brings you back to the circle before you start the next one. After the fifth point, cut the yarn, leaving about 12 in (30 cm) for sewing.
Tucking the leaf against the top edge
Keep the ivory X facing you. Place the sage leaf against the upper edge of the button, with its points spreading over the pink rim as in the reference. Bring the green tail along the underside of the leaf to its center and sew it securely to the pink fabric, keeping the points visible. Hide the end inside the rim.
Optional glue finish. If you prefer glue, cut a shorter finishing tail and weave it in. Apply a small amount of yarn-suitable craft glue to the underside of the leaf, press it into place and let it dry according to the glue instructions. Skip this step when the leaf is sewn.
The video tutorial shows the button and leaf construction. Its spoken instructions cover the crochet and embroidery; a method for attaching keychain hardware is not included here.
Safety. Keep this small accessory away from children under 3, especially if you add metal keychain hardware. It's a decoration for bags and keys.
I like the pink and sage against an oatmeal canvas pouch. The ivory X picks up the pale fabric, and the little leaf gives the round button a soft splash of green.
UK terms: US sc = UK dc; ch and sl st keep the same names.
Made a blush pink button? Tag #wavodecrochet on Pinterest so I can see your colors.