Mini Crochet Bunny Keychain with Sage-Tipped Ears

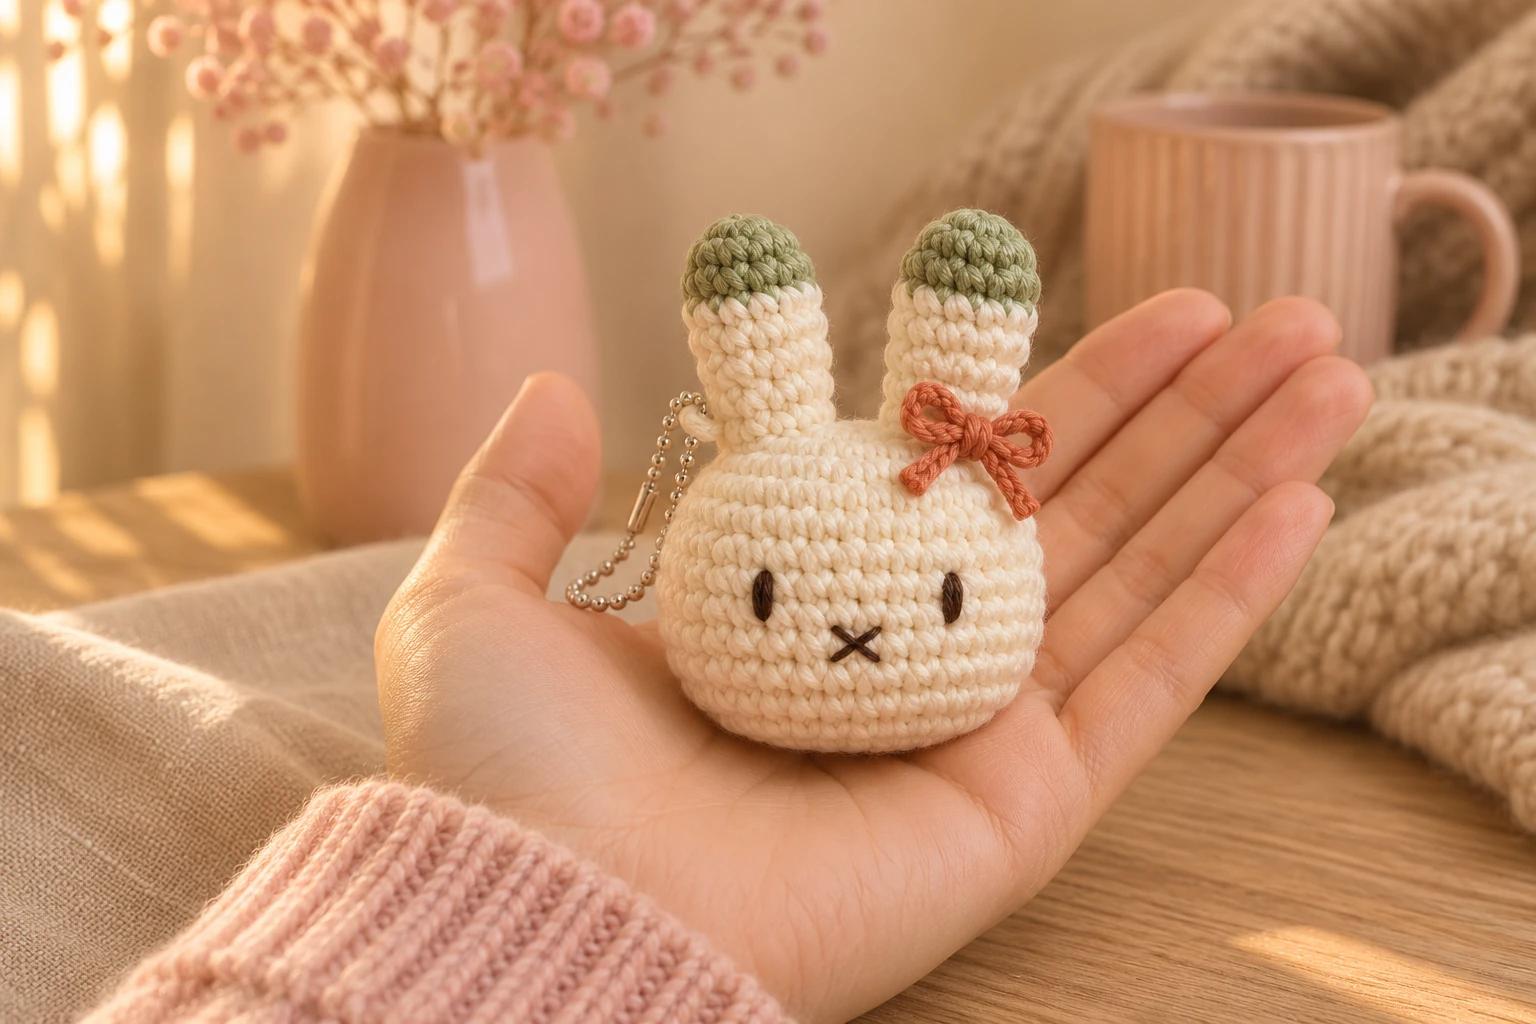
I like the bit of green at the top of a cream ear. It makes me think of a leaf poking out of a flowerpot. Clover is a mini crochet bunny keychain about 3⅓ in (8.5 cm) tall before the chain, with sage ear tips, a little espresso face and a terracotta bow.
The head grows right out of the ears. I keep the opening underneath wide enough to reach the inside for the embroidery, then fill the tips first so they stay plump when Clover hangs from a bag.
| At a glance | |
|---|---|
| Finished size | About 3⅓ in (8.5 cm) tall including the ears and 1⅝ in (4 cm) across the head, before the chain |
| Yarn | DK #3 cotton in cream, sage and terracotta, plus espresso embroidery floss |
| Hook | 2.5 mm throughout |
| Pieces | 2 crocheted pieces, joined as the head begins |
| Time | About 2 hours |
| Skill | Easy. Spiral rounds, a two-ear join and simple embroidery |
What You’ll Need for the Sage-Tipped Bunny
- Cotton. Paintbox Yarns Cotton DK or a comparable 100% cotton DK #3, about 137 yd (125 m) per 50 g. Set aside about 20 yd cream, 2 yd sage and 1 yd terracotta. The terracotta is for the tied bow.
- Hook and filling. A 2.5 mm crochet hook and a little fiberfill.
- Face and findings. About 1 yd of espresso embroidery floss, a short metal ball chain with its clasp, a tapestry needle, an embroidery needle, scissors, pins, a stitch marker and a contrast scrap strand.
Tension. I aim for 6 sc per inch and about 6 rounds per inch, snug enough to keep the filling tucked inside.
US stitches. MR = magic ring, sc = single crochet, inc = 2 sc in the same stitch, dec = decrease over the next 2 stitches, ch = chain, sl st = slip stitch, st = stitch, R = round. Work in a continuous spiral and move your marker to the first stitch of each round. The number in parentheses is the stitch count.
For a dec, pick up the front loop of each of the next 2 sts. Yarn over and pull through both front loops, then yarn over and pull through the remaining 2 loops. The decrease across the ear join uses both loops and has its own instructions below.
Making the Bunny’s Two-Tone Ears
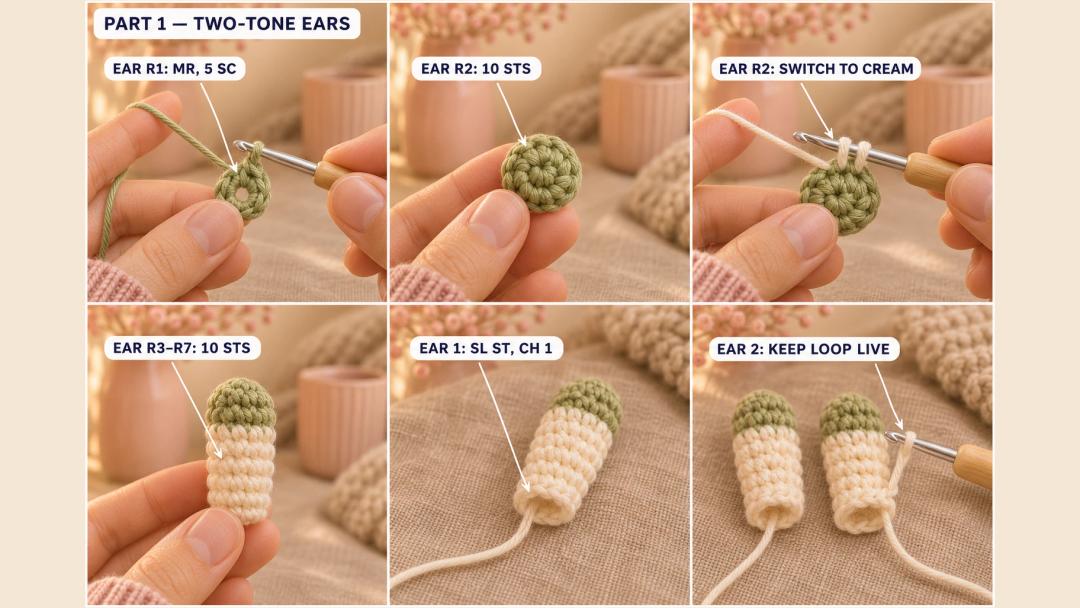
First ear (sage and cream, 2.5 mm, Make 1). The magic ring is the tip and R7 is the open base.
- R1: MR, 5 sc in the ring. (5)
- R2: inc × 5. (10) Switch to cream on the last yarn-over of the last sc. Cut the sage.
- R3–R7: sc around. (10) 5 rounds in cream.
Weave the sage tail into the green stitches. Sl st in the first sc of R7, ch 1 and fasten off with a 6 in (15 cm) cream tail at the base. Keep it handy for the join.
Second ear (sage and cream, 2.5 mm, Make 1). Work from the tip to the open base again.
- R1: MR, 5 sc in the ring. (5)
- R2: inc × 5. (10) Switch to cream on the last yarn-over of the last sc. Cut the sage.
- R3–R7: sc around. (10) 5 rounds in cream.
Weave in the sage tail and keep the cream loop on the hook. The filling goes in through the head opening later.
Joining the Ears and Shaping the Bunny’s Head
Head (cream, 2.5 mm). The ear bases sit at the top of the head. The last round closes under Clover’s chin.
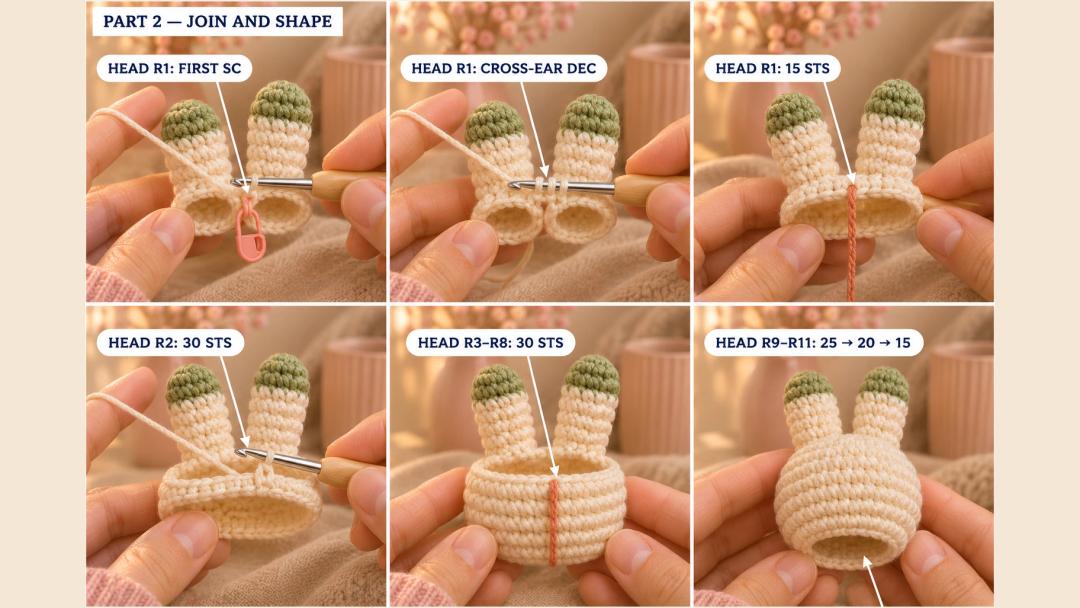
- R1: sc in the first ear to join, (dec, sc 2) × 4, dec, sc. (15)
Here’s the join slowly:
- Hold the ears side by side with both tips pointing up. With the cream loop from the second ear, reach across to the first ear. Sc in the R7 stitch underneath its slip stitch and mark this new sc as stitch 1 of the head.
- Work (dec, sc 2) × 2 around the first ear. You’ll have one stitch of that ear left at the inside edge.
- Decrease across the gap. Insert the hook under both loops of that last stitch and pull up a loop. Then pull up a loop under both loops of the first unworked stitch of the second ear, just after the stitch the cream loop came out of. Yarn over and pull through all 3 loops on the hook. Mark this decrease with a contrast strand. It’s stitch 8 of R1 and sits at the center front, between the ears.
- Work sc 2, dec, sc 2, dec, sc on the second ear. The last sc goes in the R7 stitch where your cream loop started. The next stitch is the marked sc of the head. Skip the first ear’s slip stitch and fastening chain when counting.
Tip. See daylight between the ears? Draw the gap together with 2 small stitches from the first ear’s cream tail, then tuck the end inside.
For a closer look at how the hook crosses from one ear to the other, watch the ear join in the reference tutorial. Follow Clover’s sage and cream color changes in the written steps above.
- R2: inc × 15. (30)
At R2, bring the front strand up into the gap between the two sc worked into stitch 8. Carry that strand straight down the front on the outside as the head grows. Clover’s little X will sit on that line.
- R3–R8: sc around. (30) 6 rounds.
- R9: sc 3, (dec, sc 4) × 4, dec, sc. (25)
- R10: (dec, sc 3) × 5. (20)
- R11: sc, (dec, sc 2) × 4, dec, sc. (15)
Stitching the Face and Closing the Bunny
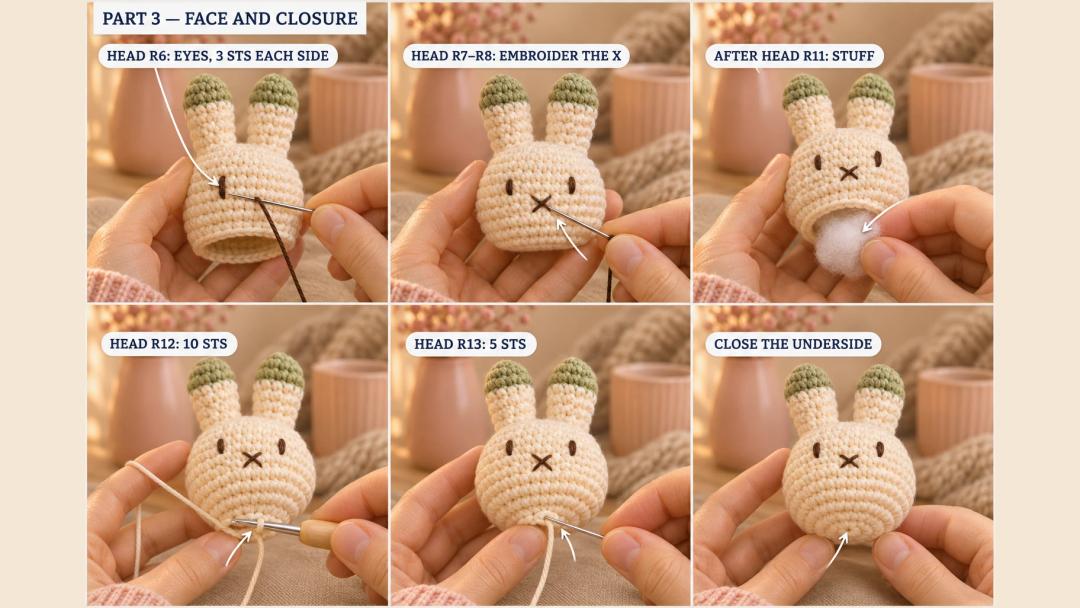
Slip your working loop onto the marker. Set Clover on her back with the front strand facing you and the ears pointing away. On head R6, count 3 sts to each side of the strand and mark the two eye spots. With two strands of espresso floss, make 3 short vertical stitches over each spot. Bring both ends inside and secure them there.
For the little X, straddle the front strand on head R7–R8. Make one diagonal stitch from a stitch to the left at R7 down to a stitch to the right at R8. Cross it with a second diagonal from right to left. Take out the front strand and check the face from arm’s length.
After R11, tuck small pinches of fiberfill into the sage tips first. Then fill the cream part of each ear and the head. I leave the bottom soft enough to pinch between two fingers while I close it.
- R12: (dec, sc) × 5. (10)
- R13: dec × 5. (5)
Fasten off with a 6 in (15 cm) tail under Clover’s chin. Run it through the front loops of the 5 remaining stitches, draw them together like a drawstring, and tuck the tail inside.
Adding the Terracotta Bow and Keychain Loop
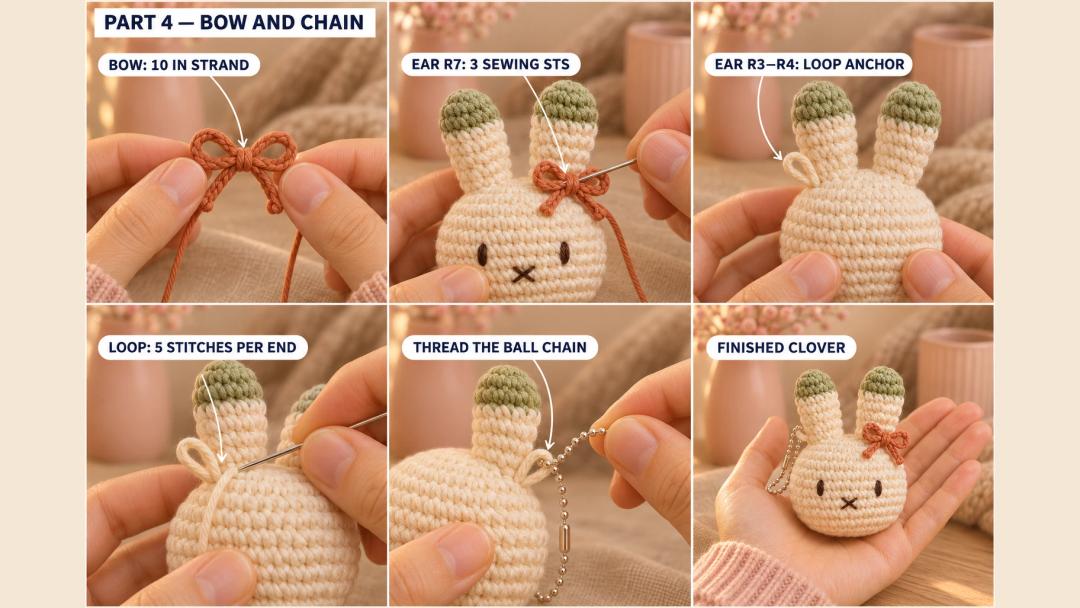
Bow. Tie a 10 in (25 cm) terracotta strand into a little bow. With Clover facing you, count 3 stitches out along ear R7 from the inner edge of the right-hand ear. Pin the knot on the front of that stitch. Sew through the knot with matching terracotta yarn, take 3 small stitches, and bury the ends. Leave the bow’s two tips short enough to clear the eye below.
Loop. The chain hangs behind the other ear. Turn Clover over and find the middle two stitches on the back of that ear, between ear R3 and R4. Fold a 12 in (30 cm) cream strand in half. Leave the folded end outside as a loop about ¼ in (6 mm) high and bring the two ends into the fabric at the two marked stitches.
Sew back and forth 5 times with each end, taking deep stitches through the cream ear fabric beside the loop. Knot the two ends snug against the ear and bury them. Feed the open ball chain through the loop and snap the clasp shut. Give the loop a gentle tug. If the cotton stretches with use, add a second cream strand through the same anchor stitches.
Safety. Keep the metal chain and finished charm away from children under three. For a little one, leave off the chain and the tied bow and keep the face embroidered.
UK terms. US sc is UK dc, and a US sc decrease is UK dc2tog.
I’d clip Clover to a canvas bag where those sage tips can peek over the zipper. Made your own Clover? Tag #wavodecrochet so I can see which ear you gave the bow to.