Mini Crochet Teddy Bear with a Tiny Top Hat

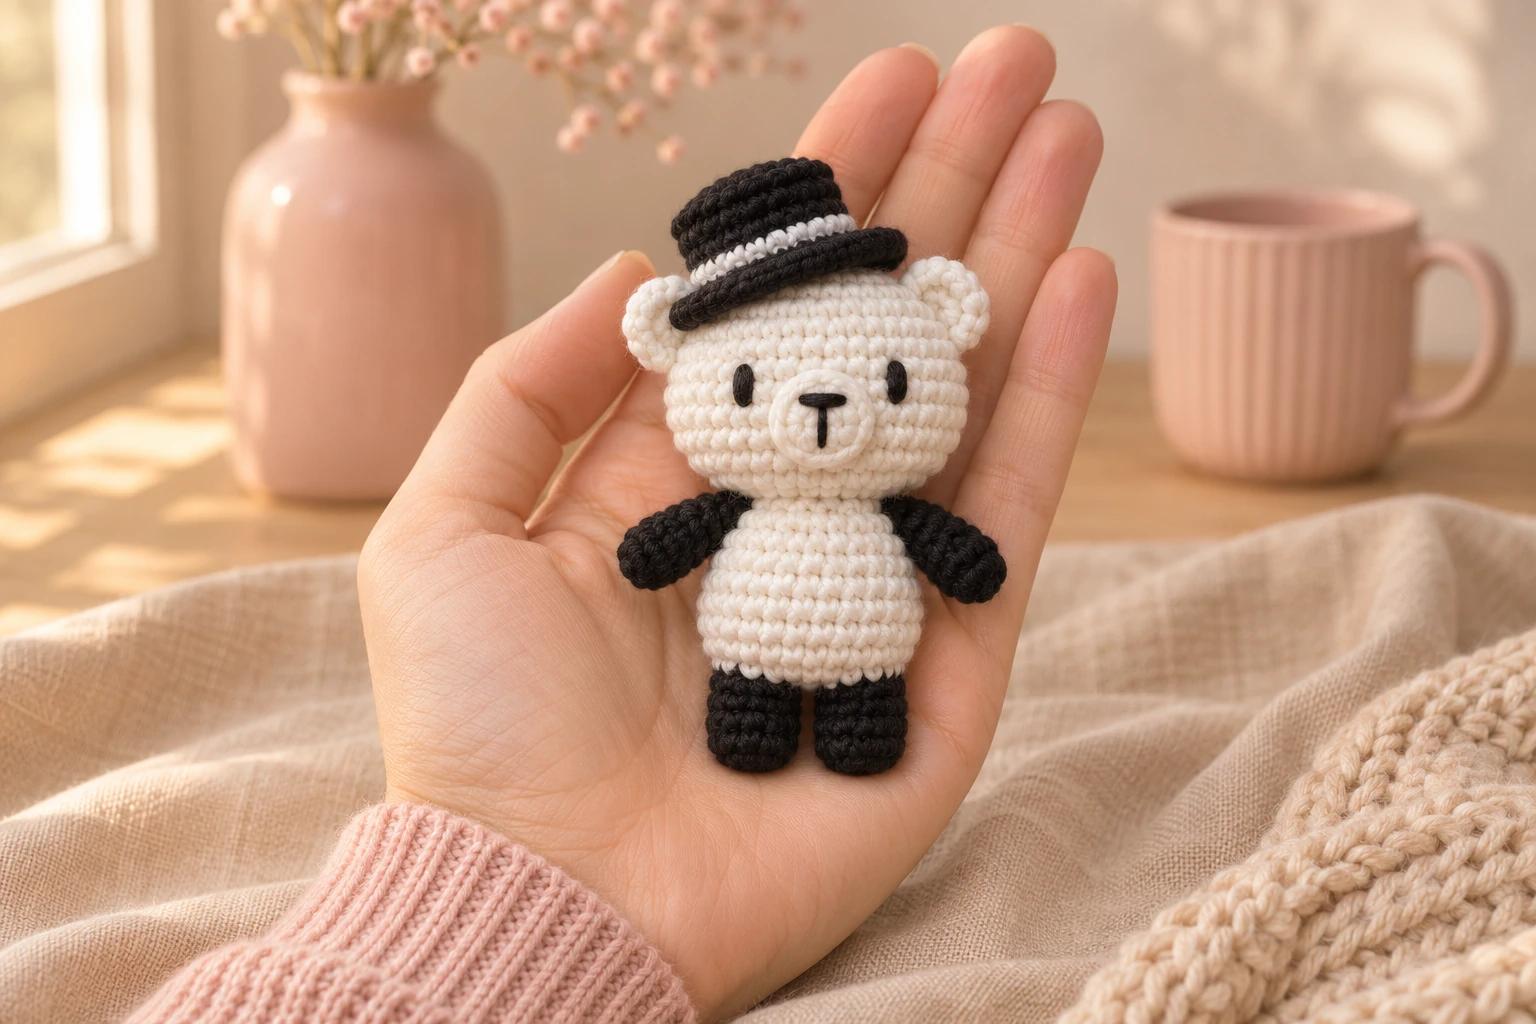
I like a bear with a slightly crooked hat. It makes him look as though he put it on in a hurry. Pip is a mini crochet teddy bear, about 3⅓ in (8.5 cm) from feet to crown before the hat, with black paws and a little white band around his top hat.
The paws join straight into the white belly. From there, the same strand goes all the way to the top of his head. I stitch the eyes while I can still get a finger behind the fabric, then add the raised white muzzle and tip the hat just enough to show both ears.
| At a glance | |
|---|---|
| Finished size | About 3⅓ in (8.5 cm) from feet to crown before the hat |
| Yarn | DK #3 cotton in black and white, plus black embroidery floss |
| Hook | 2.5 mm throughout |
| Pieces | 8 crocheted pieces |
| Time | About 2–3 hours |
| Skill | Easy. Spiral rounds, a two-leg join, simple sewing and embroidery |
What You’ll Need for the Black-and-White Bear
- Yarn. Paintbox Yarns Cotton DK, 100% cotton, 137 yd (125 m) per 50 g. Set aside about 8–9 yd of Pure Black (402) and 17 yd of Paper White (401).
- Hook. 2.5 mm for every piece.
- Face. About 1 yd of black embroidery floss. I use two strands at a time.
- Small things. Fiberfill, a stitch marker, a short strand of contrast scrap yarn, sewing pins, a blunt tapestry needle, an embroidery needle and scissors.
Tension. I aim for 6 sc per inch, with about 6 rounds per inch, snug enough that the filling stays tucked inside. At that tension Pip measures about 3⅓ in (8.5 cm) before the hat, and his head is about 1¼ in (3.2 cm) across.
Stitches for the Mini Teddy Bear
US terms. MR = magic ring, ch = chain, sl st = slip stitch, sc = single crochet, inc = 2 sc in one stitch, dec = single crochet decrease, inv dec = invisible decrease, FLO = front loop only, BLO = back loop only, st = stitch, R = round.
Work in a continuous spiral. Mark the first stitch and move the marker up as you go. The number in parentheses is the stitch count for each round.
Invisible decrease. Pick up the front loop of each of the next 2 sts. Yarn over and pull through those two front loops. Yarn over again and pull through the two loops left on the hook.
Making the Black Paws and Joining Them in White
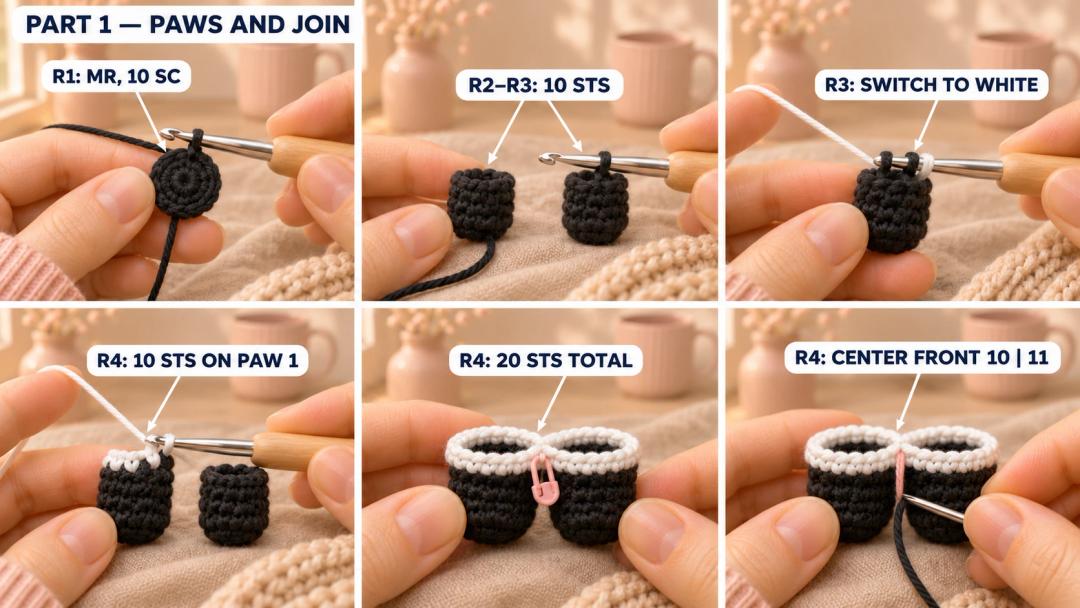
First paw (black, 2.5 mm, Make 1). The ring sits under the foot. R3 is the open edge where the white belly begins.
- R1: MR, 10 sc in the ring. (10)
- R2–R3: sc around. (10) 2 rounds.
Ch 1 and fasten off with a 6 in (15 cm) tail for the gap between the paws. Tuck the ring tail inside the foot.
Second paw (black, 2.5 mm, Make 1). Work from the sole to the open edge just as you did on the first paw.
- R1: MR, 10 sc in the ring. (10)
- R2–R3: sc around. (10) 2 rounds.
On the last sc of R3, switch to white for the final yarn-over. Cut the black and keep the white loop on the hook. Tuck the ring tail inside and weave the cut tail into the black stitches.
The white join
Set the paws side by side with their soles down. The white belly will grow right out of those two openings.
- R4: sc 10 around the first paw, then sc 10 around the second paw. (20)
- With the white loop on your hook, reach across to the first paw. Make a sc in the black stitch where the paws touch and mark it as stitch 1 of R4.
- Work around the outside of the first paw, one sc in each of the other 9 black stitches. Pass over the fastening chain.
- Return to the second paw. Start in the stitch just after the one the white loop came out of. Work all 10 black stitches, ending in the stitch the loop came out of. Your next stitch is the marked white sc.
Lay Pip on his back with his feet toward you. Slip a contrast strand through the front gap between stitches 10 and 11 of R4. Keep the loose end on the outside and bring it straight up the belly and face as you work. Use the gap between the two stitches closest to the strand as your center at each round.
Tip. The space between the paws is easiest to reach now. Thread the black tail from the first paw, take 2 or 3 small stitches across the gap and pull just until the edges meet. Weave the tail into the black stitches.
From the White Belly to the Teddy Bear’s Head
Belly and head (white, 2.5 mm). The same white strand runs from the join to the crown.
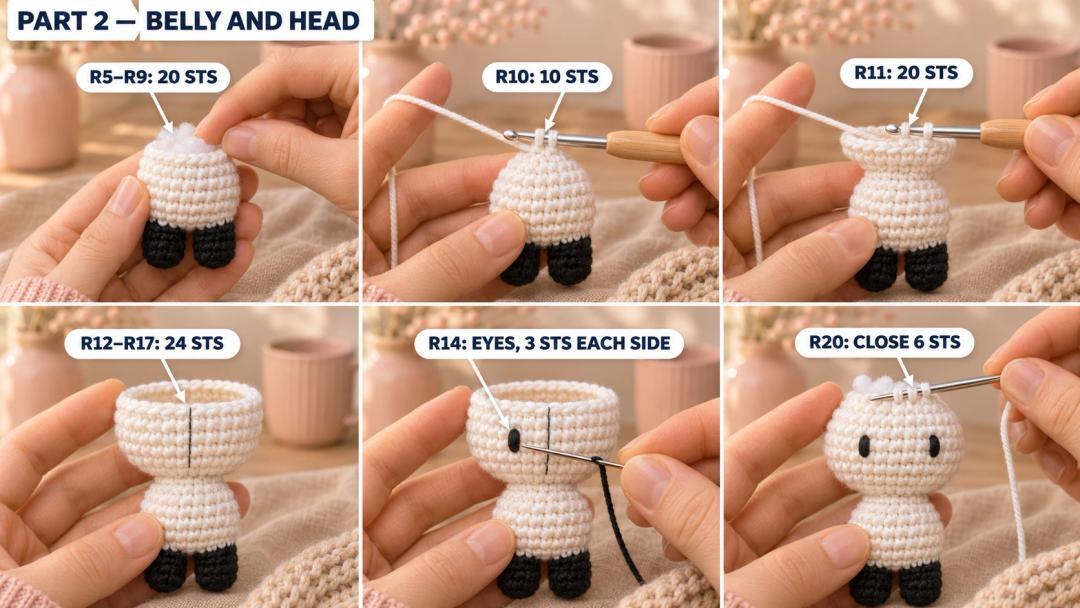
- R5–R9: sc 20. (20) 5 rounds, with 1 sc in each st.
After R9, tuck little tufts of filling into the toes first. Then fill the belly until it feels springy.
- R10: inv dec × 10. (10)
Top up the belly through the neck opening. Keep the filling level with the neck so you can reach the front loops for the next round.
- R11: in FLO, inc × 10. (20)
- R12: (sc 4, inc) × 4. (24)
- R13–R17: sc around. (24) 5 rounds.
Stitch Pip’s eyes while the head is open
Set the working loop on a marker. On R14, count the third stitch from the center-front line on each side. With two strands of black floss, make 3 short vertical stitches over each marked sc to build a small oval. Start and secure the floss inside the head. Look at Pip from the front before securing the second eye.
Round off the crown
- R18: (sc 2, inv dec) × 6. (18)
- R19: (sc, inv dec) × 6. (12)
After R19, fill the head in small tufts. Give the cheeks a gentle squeeze to settle the stuffing and leave the top soft enough to draw closed.
- R20: dec × 6. (6)
For R20, insert the hook under both loops of the next st and pull up a loop. Repeat in the next st, then yarn over and pull through all three loops on the hook. Fasten off with a 6 in (15 cm) tail at the crown. Run it through the front loops of the 6 remaining stitches, draw them shut and bury the tail.
Black Arms, White Ears, and a Round Muzzle
Black arms
Arms (black, 2.5 mm, Make 2). The ring is the hand. R4 is the shoulder edge.
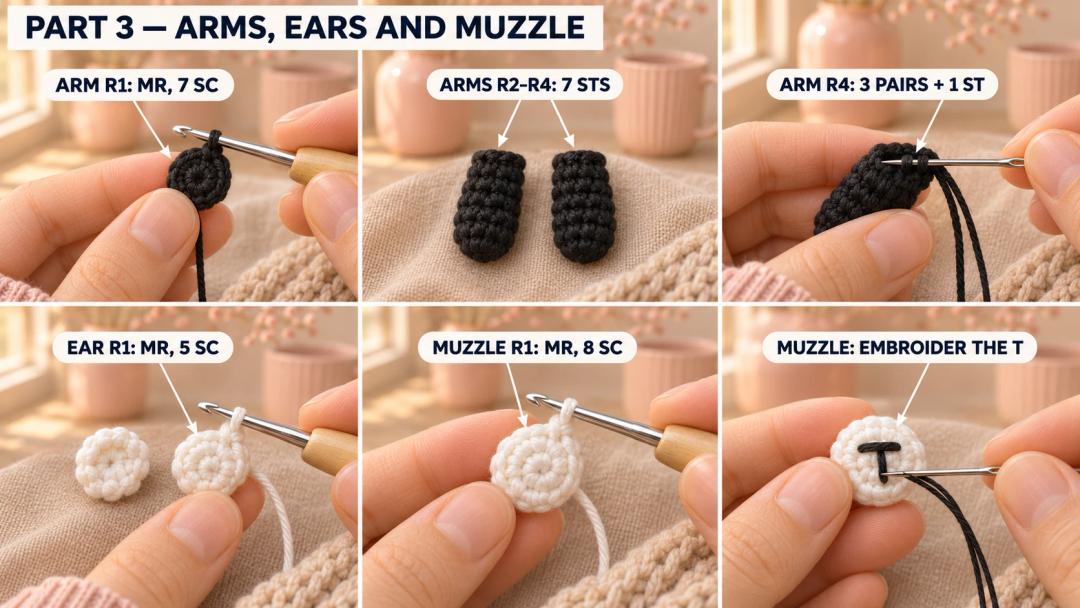
- R1: MR, 7 sc in the ring. (7)
- R2–R4: sc around. (7) 3 rounds.
After R4, put a small pinch of filling at the hand end and leave the shoulder edge flat. Fasten off with an 8 in (20 cm) tail. Flatten R4 and sew through 3 pairs of stitches, then catch the seventh stitch at the fold. Keep the rest of the tail for the shoulder seam.
White ears
Ears (white, 2.5 mm, Make 2). The ring is the middle of the ear. The R1 stitches make the outer edge.
- R1: MR, 5 sc in the ring. (5)
Pull the ring snug and fasten off with a 6 in (15 cm) tail at the edge. Keep the ears flat.
White muzzle
Muzzle (white, 2.5 mm, Make 1). The ring marks the center of the muzzle and the last round forms the sewing edge.
- R1: MR, 8 sc in the ring. (8)
Pull the ring snug, sl st in the first sc and fasten off with an 8 in (20 cm) tail. While the disk is flat, embroider a little black T. Make a short horizontal stitch just above the ring for the nose, then come out at its midpoint and take one stitch down across the ring. Secure the floss on the back of the disk. Keep the disk flat for sewing.
A Tiny Black Top Hat with a White Band
Hat (black and white, 2.5 mm, Make 1). The ring is at the top of the hat. The last round flares out into the brim.
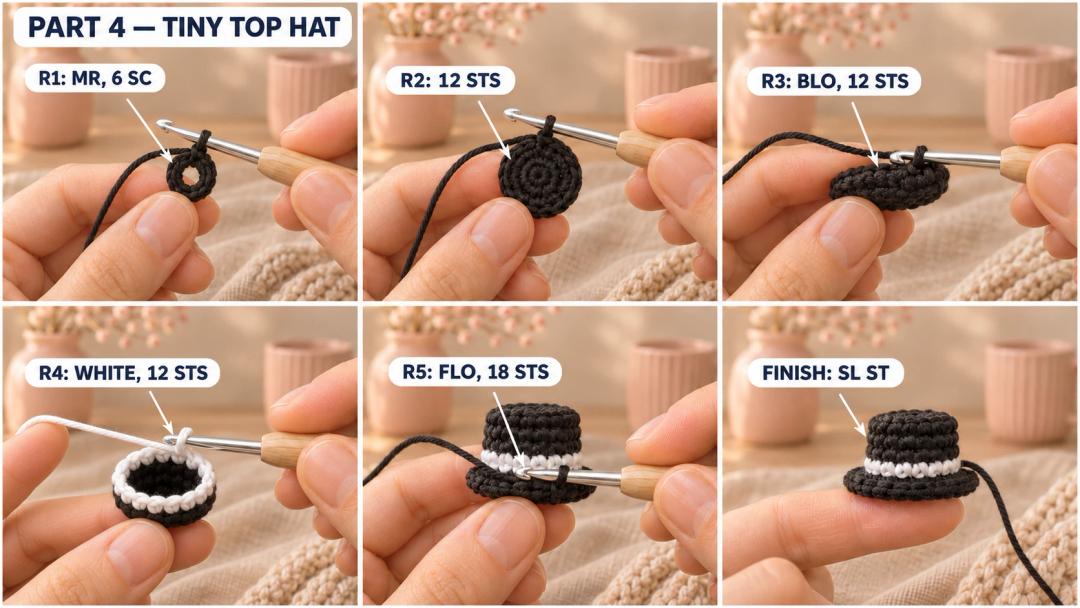
- R1: MR, 6 sc in the ring. (6)
- R2: inc × 6. (12)
- R3: in BLO, sc around. (12)
- R4: sc around. (12)
- R5: in FLO, (sc, inc) × 6. (18)
Start in black. On the last sc of R3, use white for the final yarn-over and cut the black. Work R4 in white. On its last sc, use a fresh black strand for the final yarn-over and cut the white. Keep the color jog at the back when you pin the hat.
Sl st in the first sc of R5 and fasten off with an 8 in (20 cm) tail for sewing. Tuck the color-change ends inside the hat. Leave the crown empty so it can sit over the curve of Pip’s head.
Putting the Teddy Bear Together and Stitching His Face
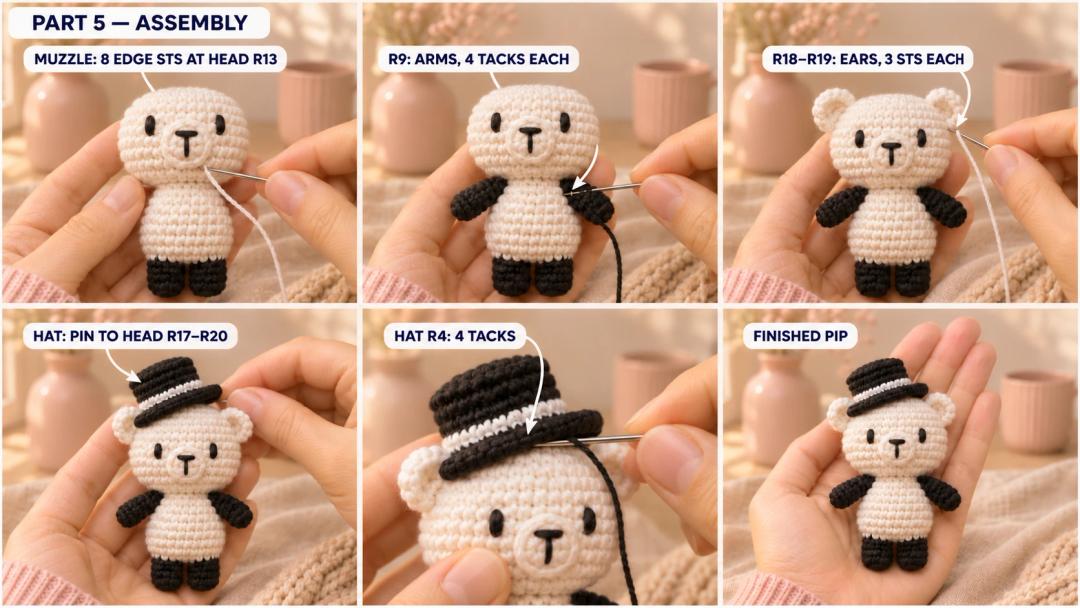
- Set the muzzle. Lay Pip on his back. Line up the black T with the front strand and set the lower edge of the disk on R13. Sew through each of the 8 edge stitches with the white tail. Keep the top edge below the middle of the eyes so the little black ovals show on either side.
- Attach the arms. Lay the arms against the sides of the belly with the hands pointing slightly down. At R9, count 5 stitches out from the front line on each side. Center each shoulder edge at its pin and take 4 small stitches through the flattened edge and into the belly. Bury each black tail back through its arm.
- Set the ears. Count 5 stitches out from the front line on each side at R18 and place the ears there, with the rounded edges pointing up. Use 3 small stitches along the lower edge of each ear across R18–R19. Pin both ears before you sew and check how they look from the front.
- Tip the hat. Sit the hat on the crown with the color jog at the back. Tip it slightly to one side until both ears peek out. Pin the hat across R17–R20 where it touches the head. Bring the black tail under the brim, then take 4 small tacks through the free back loops of R4 and into the head beneath each tack. Space the tacks 3 stitches apart around the band and leave the brim loose. Pull out the contrast strand.
Safety. I embroider the face and sew the hat down firmly. Check that the hat and ears hold when you give them a gentle tug.
UK terms. US sc is UK dc, and a US sc decrease is UK dc2tog.
I’d tuck Pip into a small gift box with his hat already tipped. The first thing you’d see when the lid came off would be that little white band.
Made a Pip of your own? Tag #wavodecrochet so I can see where his hat ended up.