Mini Lemon Slice Crochet Keychain

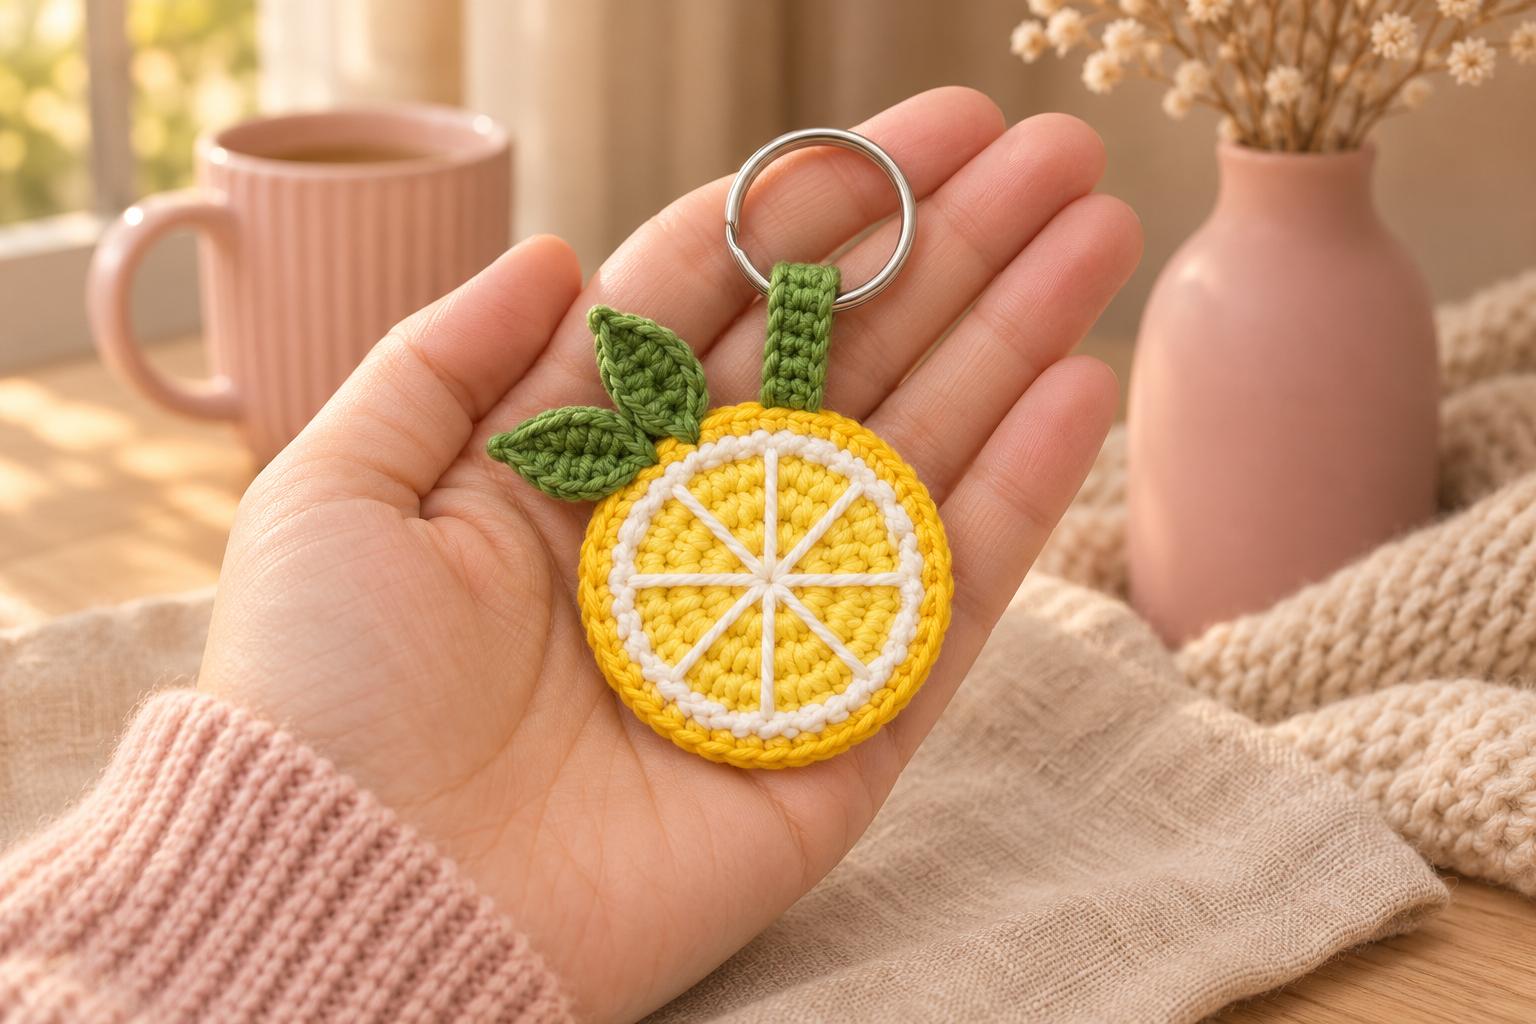
I like a splash of yellow on a plain canvas bag. This mini lemon slice crochet keychain is about 2 in (5 cm) across, with a bright yellow middle, crisp white segment lines and two green leaves tucked beside its hanging loop. The deeper yellow edge makes the lemon stand out against the white pith.
I tuck the embroidery between two cotton discs, where the loose ends stay hidden. I keep the slice flat and sew the loop into the back before joining the edges. It feels firm between my fingers, like a little fabric coin.
| At a glance | |
|---|---|
| Finished size | lemon disc about 2 in (5 cm) across, excluding leaves, loop and ring |
| Yarn | DK #3 cotton in light yellow, deep lemon yellow, white and green |
| Yarn amounts | about 4 yd light yellow, 10 yd deep yellow, 3 yd white and 7 yd green |
| Hook | 2.5 mm for every crocheted piece |
| Pieces | 5, assembled into 1 keychain |
| Time | about 1½–2 hours |
| Skill | easy: joined rounds, sc, hdc, dc, embroidery and sewing |
Cotton and tools for the lemon slice keychain
- Yarn: smooth 100% cotton, DK #3, about 137 yd (125 m) per 50 g. Use about 4 yd light yellow for the fruit, 10 yd deep lemon yellow for the rind, back and seam, 3 yd white for the pith and segment lines, and 7 yd green for the leaves, strap and reinforcement.
- Hook: 2.5 mm for the discs, leaves and strap.
- Hardware: one silver split key ring about 1 in (2.5 cm) across. The green strap passes straight through its center.
- Small things: a tapestry needle, stitch markers, sewing pins, scissors and a little contrasting scrap yarn.
Tension. Use 6 sc per inch (2.5 cm), with about 6 rows per inch, measured relaxed. Keep the cotton stitches close and firm, with the discs lying flat. At that tension the lemon disc is about 2 in (5 cm) across. Keep both panels unstuffed.
Stitches, US terms: magic ring (MR), chain (ch), slip stitch (sl st), single crochet (sc), half double crochet (hdc), double crochet (dc), increase (inc, 2 sc in one stitch). R means round; st means stitch.
Disc rounds are joined. After every round, sl st into the first sc. Before R2–R6, ch 1; it doesn't count as a stitch. Put the marker in the first actual sc and move it up each round. Work through both loops unless instructed otherwise. Counts in parentheses are working stitches; the joining sl st and starting ch 1 are excluded. The leaves go around a foundation chain, and the strap is one flat row.
The pattern: a little round lemon slice
Lemon front
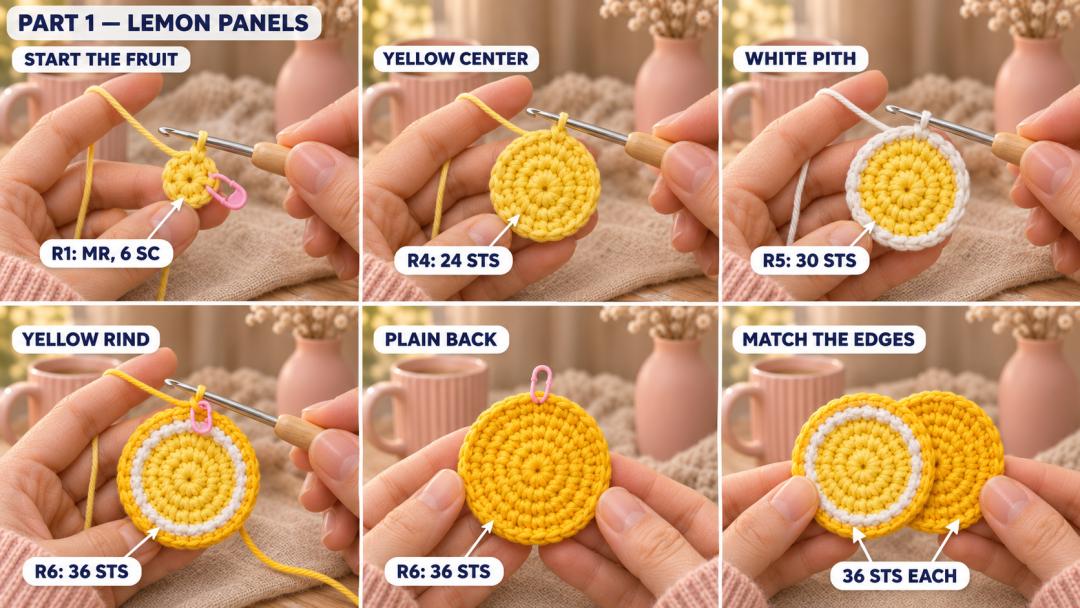
Light yellow, white and deep yellow cotton; 2.5 mm hook. Make 1. Start in light yellow, leaving a 6 in (15 cm) tail. The magic ring is the center of the fruit; the last round is the outer rind.
- R1: MR, 6 sc in the ring. (6)
- R2: inc × 6. (12)
- R3: (sc, inc) × 6. (18)
- R4: (sc 2, inc) × 6. (24)
In the last sc of R4, stop with 2 loops on the hook and pull through with white. Join to the first sc with white. Cut the light yellow, leaving 6 in (15 cm), and keep the white joining end about the same length.
- R5: (sc 3, inc) × 6. (30)
In the last sc of R5, pull through the final 2 loops with deep yellow, then join with deep yellow. Cut the white, leaving 6 in (15 cm); leave a 6 in (15 cm) deep-yellow joining end too.
- R6: (sc 4, inc) × 6. (36)
Join and fasten off, leaving a 24 in (60 cm) deep-yellow sewing tail at the outer edge. Put a marker in stitch 1 of R6 for the top of the slice. Keep that marker and the long tail; weave the other ends into the back of the panel. Pull the magic ring snugly closed.
Deep-yellow back
Deep yellow cotton, 2.5 mm hook. Make 1. Leave a 6 in (15 cm) starting tail. The magic ring is the middle of the back; the final round meets the front panel's outer edge.
- R1: MR, 6 sc in the ring. (6)
- R2: inc × 6. (12)
- R3: (sc, inc) × 6. (18)
- R4: (sc 2, inc) × 6. (24)
- R5: (sc 3, inc) × 6. (30)
- R6: (sc 4, inc) × 6. (36)
Join and fasten off, leaving a 6 in (15 cm) tail. Mark stitch 1 of R6 as the top, then weave in both ends on the wrong side.
Tip. Lay the panels on top of each other before sewing. They should sit edge to edge under your fingertips. If one curls, ease the stitches flat with your fingers and check your tension before continuing.
Adding the white pith and lemon segments
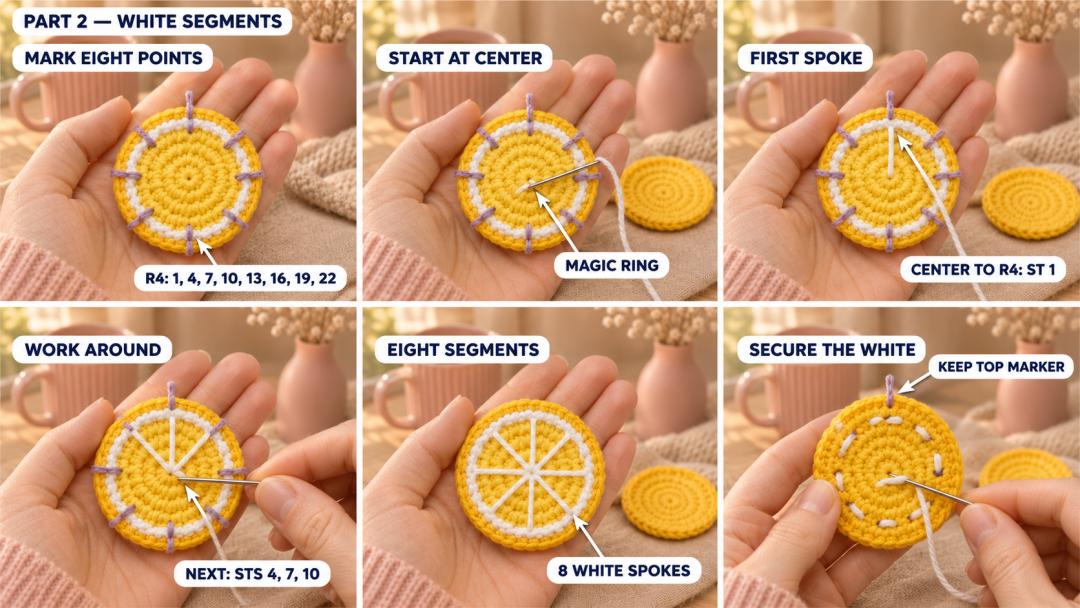
The white R5 ring is the pith. The eight dividing lines are embroidered over the light-yellow center while the front panel is still separate.
Lay the front right side up, its top marker above the magic ring. Count around R4, starting from its first sc, and place a tiny scrap marker in stitches 1, 4, 7, 10, 13, 16, 19 and 22.
Cut 24 in (60 cm) white cotton. Secure its beginning under several stitches on the wrong side, then bring the needle out through the center of the magic ring.
- Take the needle down through the gap just outside R4, directly above its marked stitch 1, touching the white pith ring. Let the white strand lie straight over the yellow stitches.
- On the wrong side, return to the center and bring the needle out beside the first entry point.
- Make the next spoke to R4 stitch 4, then continue in the same way to 7, 10, 13, 16, 19 and 22. Each spoke runs from the center to the inner edge of the white ring.
- Secure the white end under several stitches on the wrong side. Remove the eight little spoke markers and keep the top marker on R6.
Tip. Keep the spokes gently snug. Pulling them hard makes the lemon cup like a saucer. Set it on the table after every few lines and smooth it flat.
Two green leaves for the lemon slice
Pointed leaves
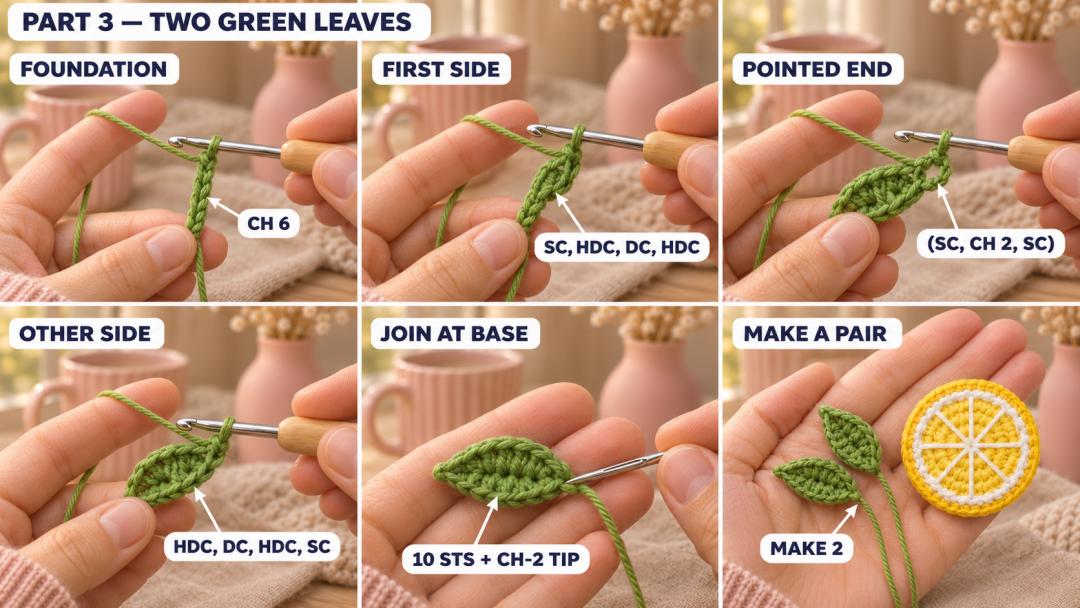
Green cotton, 2.5 mm hook. Make 2. Leave a 6 in (15 cm) starting tail and ch 6. Work along one side of the chain, then back along its other side. The end beside the first sc is the leaf base; the ch-2 space at the far end is the pointed tip.
- R1: sc in the 2nd ch from the hook, hdc in the next ch, dc in the next ch, hdc in the next ch, (sc, ch 2, sc) in the last ch, then along the other side of the chain, hdc in the next ch, dc in the next ch, hdc in the next ch and sc in the last ch. (10)
The ch 2 makes the pointed space and isn't included in the 10 stitch count. Sl st into the first sc and fasten off, leaving a 10 in (25 cm) tail at the base. Weave the starting tail into the back of the leaf, and keep the finishing tail for sewing. Leave both leaves unstuffed.
Attaching the leaves and reinforced keyring loop
Green hanging strap
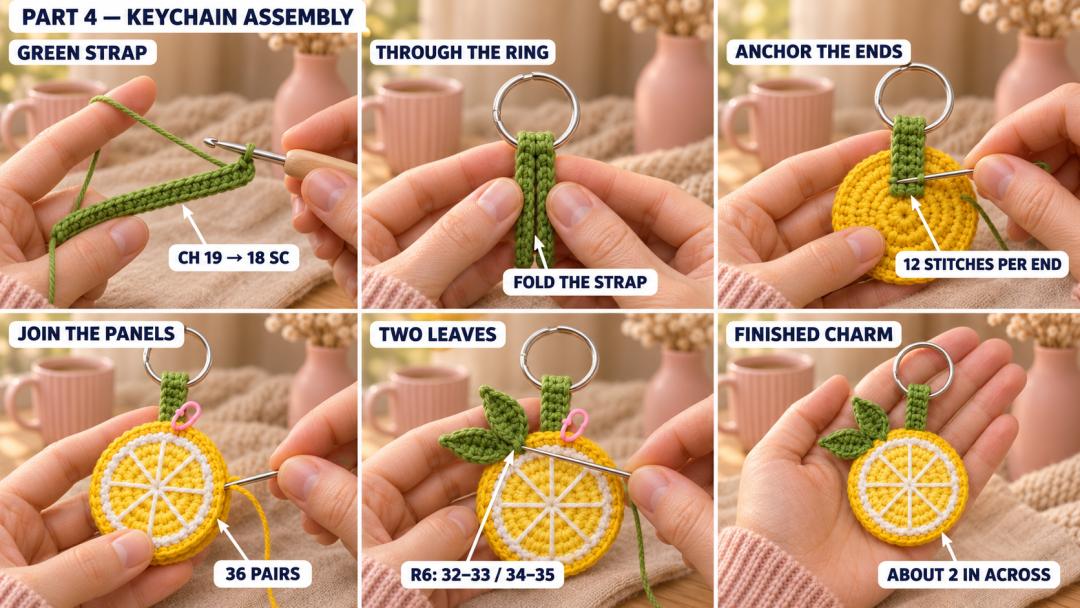
Green cotton, 2.5 mm hook. Make 1. Leave a 12 in (30 cm) starting tail and ch 19. Work one row.
- Row 1: sc in the 2nd ch from the hook and in each ch across. (18)
Fasten off, leaving a second 12 in (30 cm) tail at the opposite end. The strip should be about 3 in (7.6 cm) long. Keep the tails at their own ends.
Anchor the strap before closing the slice
The strap's smooth side faces out, with the silver ring at the fold. Pass one end of the strip through the center of the ring, then bring the two short ends together. The ring should slide freely at the top of the folded strap.
- Set the back panel. Put it right side down, marked top away from you. The side facing up will be inside the keychain.
- Place the strap ends. Set them side by side at the marked top, one beside stitch 36 of R6 and one beside stitch 1. Let about ½ in (1.3 cm) of each end lie against the panel, extending inward over R4–R6. The folded loop rises above the outer edge.
- Reinforce both ends. With the tail from that end, take 12 small backstitches through the green strip and the deep-yellow panel: six down toward R4 and six back up toward R6. Spread the stitches across the attached length. Secure and weave the end on this inside face. Do the same with the other tail.
- Check the anchor. Hold the back panel and pull firmly on the ring. The strap should stay put. If the cotton strip stretches, use up to 1 yd green cotton to run an extra strand down one edge of the strip and back up the other, then reinforce both anchors again with 12 small stitches each.
Join the lemon panels
Put the panels wrong sides together, yellow segments facing out, and align their two top markers. Tuck the strap's sewn ends between them. Pin the matching edges at the top, bottom and sides.
With the front panel's long deep-yellow tail, whipstitch around the outside, taking one stitch through each pair of facing R6 stitches, 36 pairs altogether. Work around the lower edge and back to the top. Keep the strap clear above the seam, and leave the slice flat. Secure the tail between the layers and hide the end inside the seam. Remove the back panel's top marker and keep the front marker for placing the leaves.
Set the two leaves at the upper left
Keep the segment side facing you and the green loop upright. For these leaf placements, count the front panel's R6 stitches clockwise from the marked top stitch, calling that top stitch 1. Use this placement direction with either hand.
- Pin the first leaf base over R6 stitches 32 and 33, with its tip pointing up and left, like the ten on a clock. Sew through its base with 4 small green stitches, two into each yellow stitch.
- Pin the second leaf base over R6 stitches 34 and 35, with its tip pointing left, like the nine. Let its base overlap the first leaf slightly. Sew it down with 4 small stitches, again two into each yellow stitch.
- Take one small tack through the underside of each leaf just above its base, catching the rind beneath. Let the pointed ends lift a little from the slice. Secure and weave the green tails inside the edge seam, then remove the front top marker.
Hold it up by the silver ring. The white segments should face forward, with the leaves fanning out beside the loop.
Safety. This keychain has a metal ring and a hanging loop, so it isn't a toy for children under 3. I keep it on an adult bag, away from babies and small children.
A sunny lemon charm, ready to gift
I like the yellow against a cream canvas tote, where the white spokes stay easy to see. Slip the ring around a narrow ribbon on a wrapped parcel, and the lemon becomes part of the wrapping.
For a tiny mark, dab the cotton with a damp cloth and let the slice dry flat. Keep the metal ring dry and smooth the leaves back into place with your fingers.
UK terms: US sc = UK dc; US hdc = UK htr; US dc = UK tr; US sl st = UK ss; ch is the same.
Made a little lemon slice? Tag #wavodecrochet on Pinterest so I can see it on your bag.