Christmas Wreath Crochet Keychain

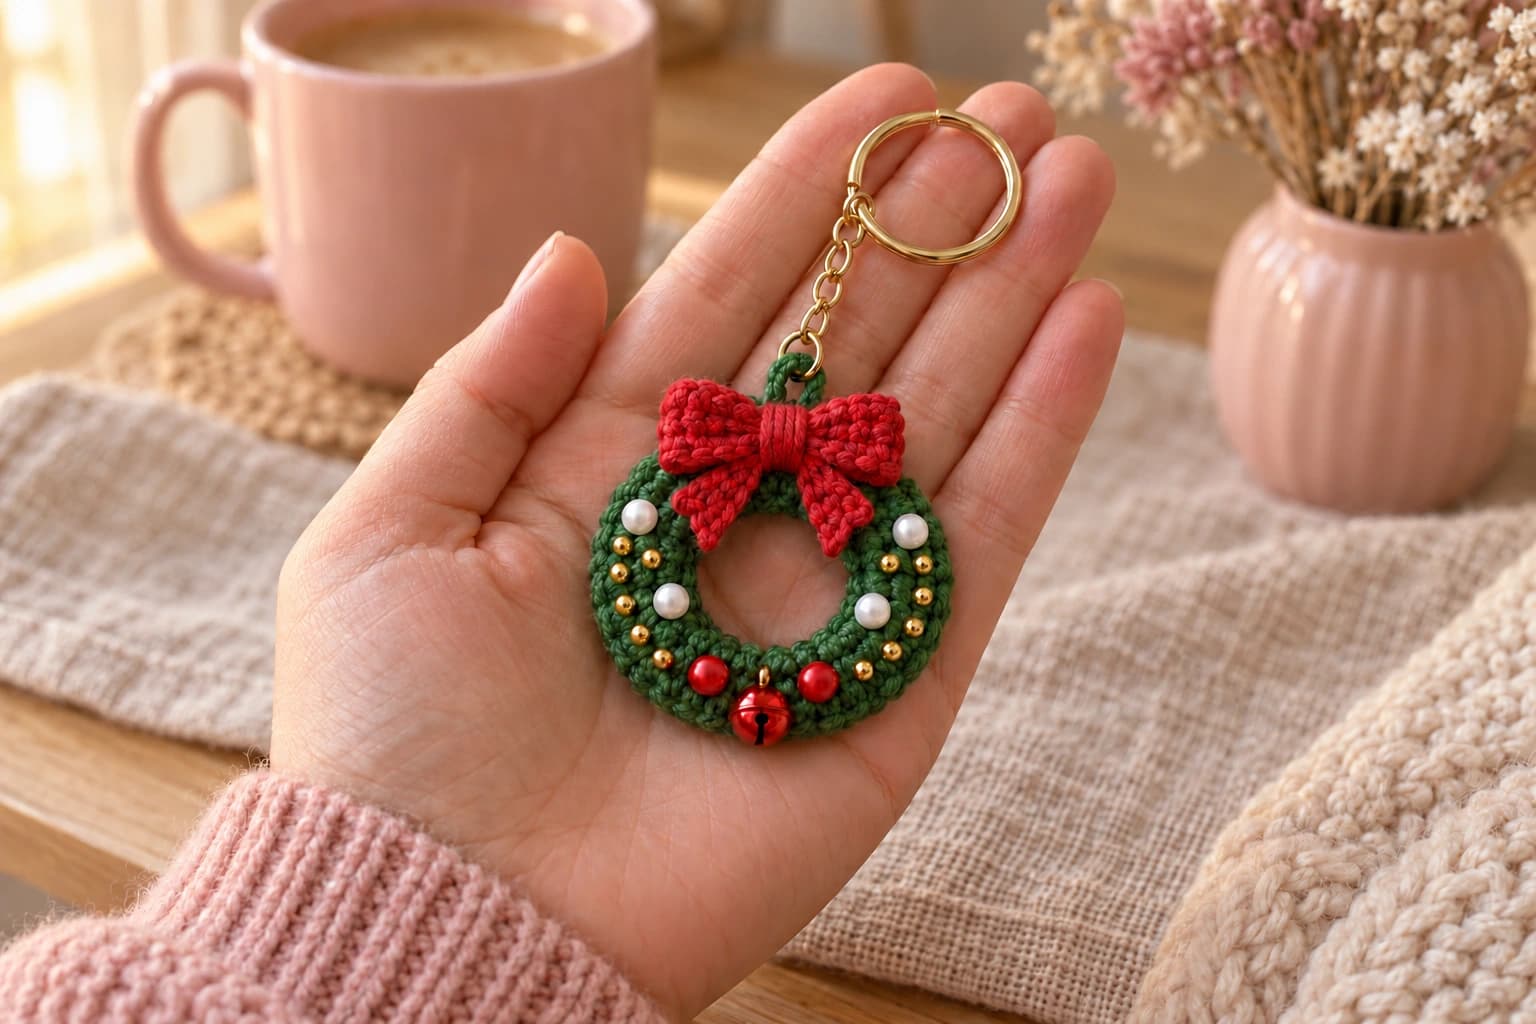
I love a Christmas decoration that fits in the little pocket of a gift bag. This Christmas wreath crochet keychain is about 2 in (5 cm) across, with a soft green ring, a red bow and tiny beads that catch the light. A little red bell sits between the berries at the bottom.
The wreath starts as a narrow tube, lightly stuffed and curved into a circle. I keep the join at the top, tucked behind the bow. The gold chain hangs from a reinforced loop on the back, so the decorated face stays easy to see.
| At a glance | |
|---|---|
| Finished size | about 2 in (5 cm) across; chain and key ring excluded |
| Yarn | DK #3 cotton; about 15 yd green and 7 yd red |
| Hook | 2.5 mm throughout |
| Pieces | 4 |
| Time | about 1½–2 hours |
| Skill | easy crochet, with small beads sewn on by hand |
Cotton and tiny decorations for the Christmas wreath
- Yarn: Paintbox Yarns Cotton DK, 100% cotton, 137 yd (125 m) per 50 g. Allow about 15 yd of forest green and 7 yd of Christmas red, including the sewing ends and hanging loop.
- Hook: 2.5 mm for the wreath, bow band and tails.
- Decorations: 4 white round beads, 4 mm; 2 red round beads, 4 mm; 12 gold seed beads, about 2 mm; and 1 red jingle bell, about 5 mm, with a sewing loop at the top. Check that the needle passes through each bead before starting.
- Hardware: one gold split key ring about 1 in (2.5 cm) across, with a short gold chain about ¾ in (2 cm) long and a small open jump ring at its free end; two pairs of flat pliers.
- Small things: a little fiberfill, a tapestry needle, a fine beading needle, about 2 yd of matching green polyester sewing thread, scissors, sewing pins, a stitch marker and contrasting scrap yarn.
Tension. Use 6 sc per inch (2.5 cm), with about 6 rounds or rows per inch, tight enough that the stuffing doesn't show. The finished wreath is about 2 in (5 cm) across, with a center opening about 1 in (2.5 cm) wide. The red bow is about 1 in (2.5 cm) across. Measure after shaping; a little stuffing goes a long way in this tube.
Stitches, in US terms: chain (ch), slip stitch (sl st), single crochet (sc), decrease (dec, sc 2 together), stitch (st) and round (R). I use an invisible decrease: work through the front loops of the next 2 stitches together. The number in parentheses is the stitch count.
The green tube is worked in a continuous spiral after the foundation chain is joined. Put the marker in the first stitch of each round and move it up as you go. The red pieces are worked in rows; the turning ch 1 does not count as a stitch.
Safety. This wreath has beads, a bell and metal keychain hardware, so it isn't a toy for children under 3. I keep this version for bags, keys and gift wrapping.
Part 1 — Crocheting the little green wreath
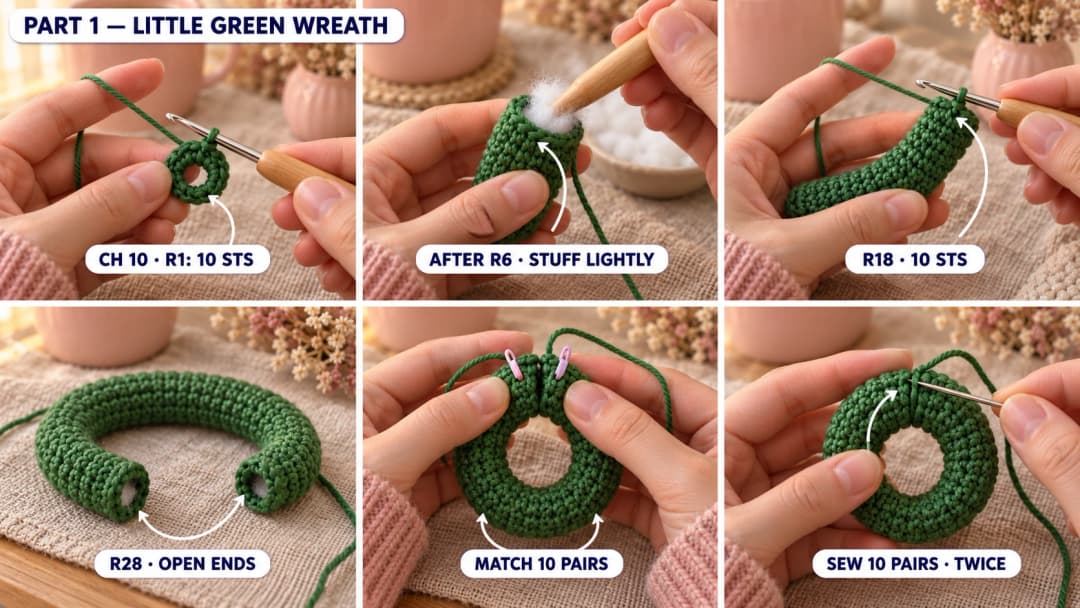
Wreath tube — forest green, 2.5 mm hook. Make 1. Leave a 6 in (15 cm) starting tail, ch 10 and sl st into the first ch to form a small ring. Keep the chain untwisted and the center open. The chain edge and the last round will meet at the top of the wreath.
- R1: sc in each of the 10 ch. (10)
- R2–R6: sc around. (10) 5 rounds.
After R6, add a small pinch of stuffing. Push it down toward the starting edge with the blunt end of the hook. Leave that first opening open.
- R7–R12: sc around. (10) 6 rounds.
After R12, add another small pinch. Keep the tube soft enough to bend around a finger.
- R13–R18: sc around. (10) 6 rounds.
After R18, add more stuffing, easing it along the tube so the thickness stays even.
- R19–R24: sc around. (10) 6 rounds.
After R24, add another little pinch. Curl the tube gently in your palm to check that it bends easily.
- R25–R28: sc around. (10) 4 rounds.
Sl st in the next st and fasten off, leaving a 24 in (60 cm) tail at the working end. Top up the stuffing after R28, keeping the last opening accessible. Weave the short starting tail through 5 stitch backs beside the chain edge.
Curving the tube into a wreath
- Set the top first. Bring the two open ends together at the top of a circle, with the tube curving down and around below them. Let both ends stay round as they meet. Match the first stitch of R28 to the chain beneath the first stitch of R1, then pin the edges together.
- Check the front. Keep the matched first stitches facing you and put a contrast marker at the join on that face. This is the top of the wreath. The rounds run clockwise from R1 on your right, around the bottom and back to R28 on your left. Rotate the whole circle in your hands if necessary before sewing.
- Join the ends. With the long green tail, whipstitch one R28 stitch to one foundation chain, following the edge for 10 paired stitches. At the finishing sl st, use the original sc beneath it. Go around a second time, another 10 paired stitches, and pull just snug enough to close the seam.
- Secure the tail, weave it through 6 stitch backs on the rear of the wreath and hide the end inside. Keep the contrast top marker in place.
The ring should sit softly rounded on the table, with an open middle. Ease the stuffing along it with your fingers if one side looks fuller.
Tip. A tube stuffed hard will fight the curve and make a sharp corner at the join. Before sewing, pull out a little filling through the open end until the circle bends comfortably.
Part 2 — Making the red bow and its tails
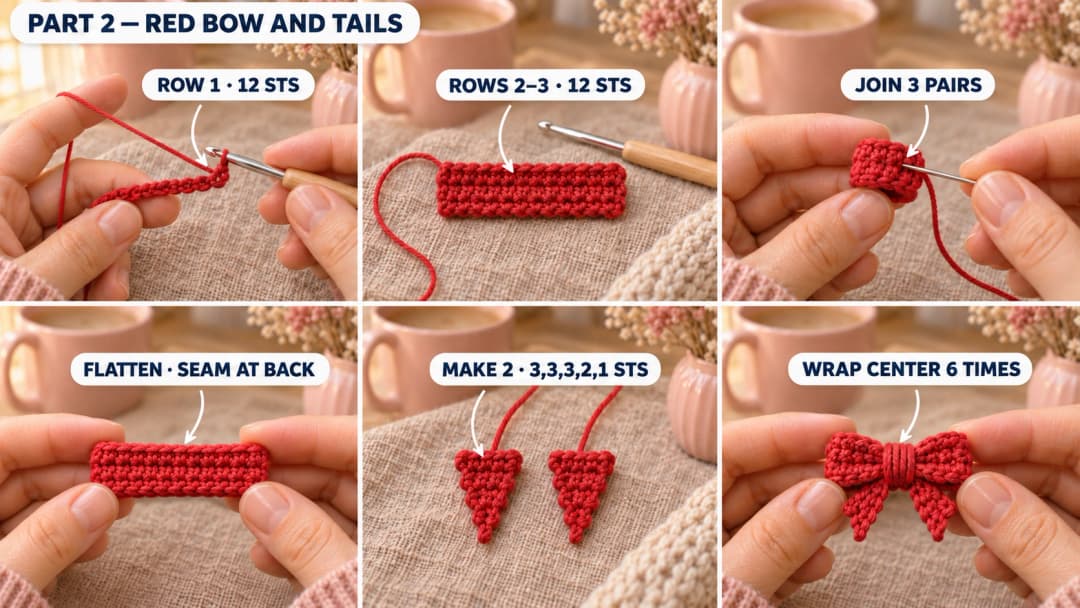
The bow band
Bow band — red, 2.5 mm hook. Make 1. Leave a 6 in (15 cm) starting tail and ch 13.
- Row 1: sc in the 2nd ch from the hook and in each ch across. (12)
- Rows 2–3: ch 1, turn, sc 12. (12) 2 rows.
Fasten off, leaving a 36 in (90 cm) tail at the end of Row 3. Weave the short starting tail through 5 stitches on the wrong side.
Bring the short edges together with the right side facing out. Sew 3 pairs of row ends, one pair for each row, into a little loop. Flatten the loop with the seam at the middle of the back and the folds pointing left and right. Save the long tail for the pinch in the middle.
Two pointed bow tails
Bow tails — red, 2.5 mm hook. Make 2. For each tail, leave an 8 in (20 cm) starting tail and ch 4. The foundation edge is the wide top that gets sewn behind the bow; the last row is the pointed tip.
- Row 1: sc in the 2nd ch from the hook and in each ch across. (3)
- Rows 2–3: ch 1, turn, sc 3. (3) 2 rows.
- Row 4: ch 1, turn, sc, dec. (2)
- Row 5: ch 1, turn, dec. (1)
Fasten off, leaving 6 in (15 cm) at the tip. Weave that end back through 5 stitch backs, keeping the point relaxed. Keep the long starting tail at the wide top for sewing. Leave the red pieces unstuffed.
Gathering the bow
Lay the flattened bow band face down. Overlap the wide tops of the tails at the center seam, with the points splayed down and outward. Sew each foundation edge to the center back with its starting tail, 3 small stitches across the 3 foundation stitches, then go back across with 3 more. Weave the ends into the bow band.
Turn the bow face up. Pinch the band at the middle and wrap its long red tail around the pinch 6 times, catching the tops of both tails beneath the wraps. Knot securely at the back and keep the remaining tail for attaching the bow later.
Decorating the wreath with beads and a tiny bell
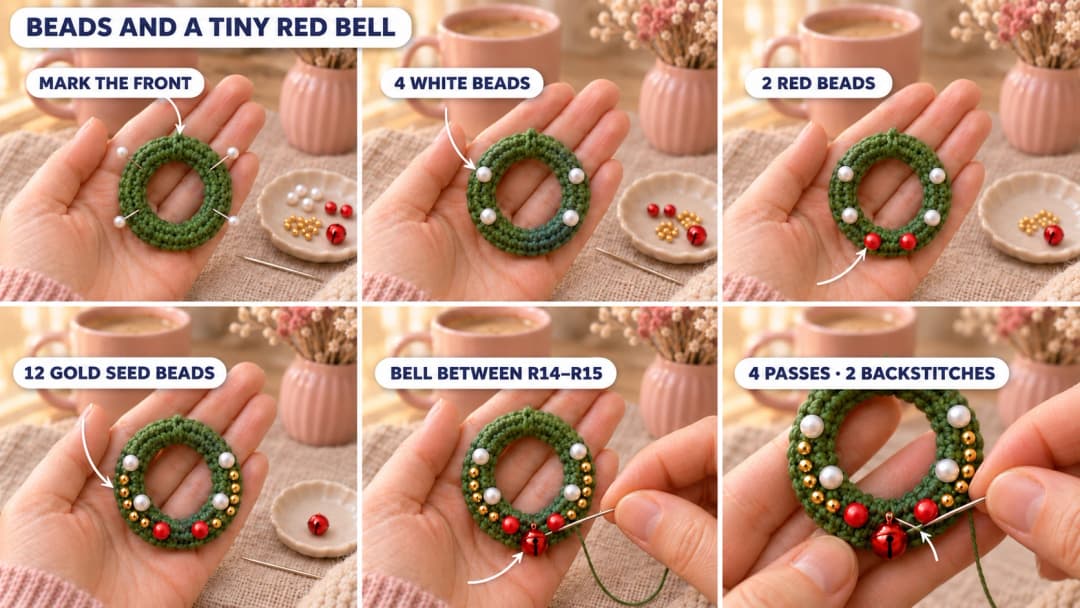
Set the wreath face up with the marked seam at the top. Follow the rounds clockwise from R1 just to the right of the seam. Put each decoration on the front-facing surface of its numbered round, midway between the inner and outer edges of the green ring.
| Decoration | Placement on the green tube |
|---|---|
| White beads | one each at R5, R10, R19 and R24 |
| Red beads | one each at R13 and R16 |
| Gold seed beads | one each at R6, R7, R8, R9, R11, R12, R17, R18, R20, R21, R22 and R23 |
| Red bell | centered between R14 and R15, with its sewing loop toward the center opening |
The white beads sit in two pairs down the sides. The red beads sit near the bottom, with the little bell nestled between them. The gold beads fill the spaces along the lower side arcs. Keep the marked top clear for the bow.
Thread the fine needle with green sewing thread. Knot the end, tuck it under a stitch at the back and bring the needle through the crochet to the first bead position. Pass through the bead and under the adjacent crochet stitch 4 times, then take 2 small backstitches beside it. Work into the fabric on the front of the tube, keeping the needle clear of the rear face.
Move between nearby decorations through the green fabric, following the curve of the wreath. Let the thread rest against the green stitches. For the bell, sew through its top loop 4 times, then anchor with 2 backstitches. Finish each length with a knot tucked under a crochet stitch and weave the thread through 6 stitch backs before trimming.
Tip. If the green ring puckers between beads, the thread is too tight. Ease that section before securing the next bead, so the wreath keeps its round shape.
Attaching the gold keyring behind the bow
Keep the top marker in place. At the seam, call the stitch facing you stitch 1 of each opening; count around the tube from there. Stitch 6 is at the back. Turn the wreath over with the marked top still uppermost.
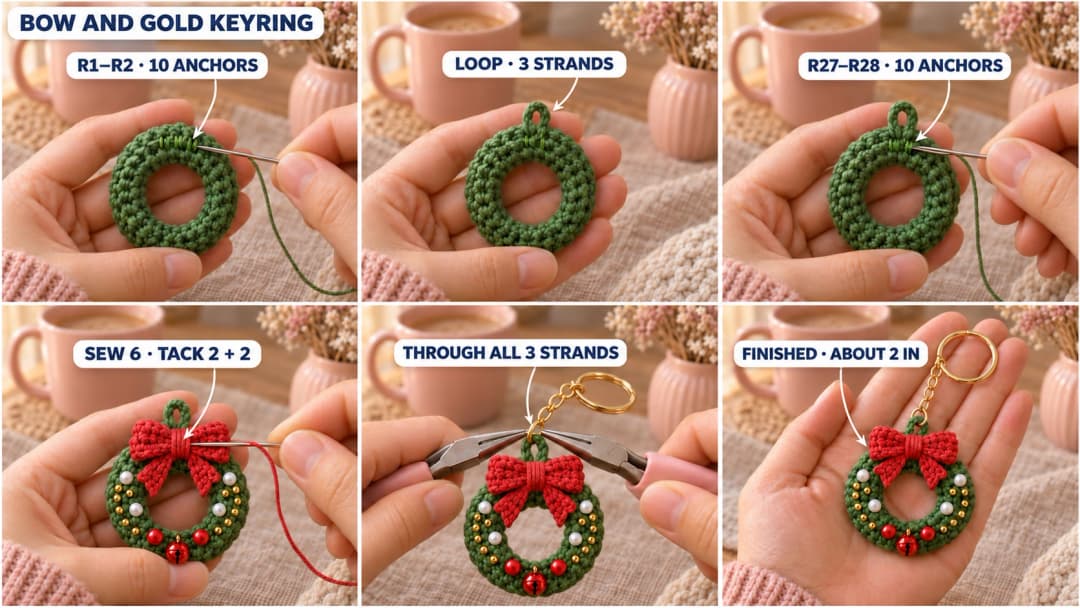
- Cut 24 in (60 cm) of green, thread the tapestry needle and leave a 6 in (15 cm) starting tail. Take 10 small backstitches through the crochet on the back: one under both top loops of stitches 4–8 of R1, then stitches 4–8 of R2. Knot the working strand to the starting tail.
- Bring the needle out at the rear top of the seam, beside stitch 6 of R1. Go back into the fabric beside stitch 6 of R28, leaving a small arch about ⅛ in (3 mm) above the green ring. Follow this path twice more, making a loop of 3 parallel strands. Keep a spare tapestry needle through the loop to hold its size as you sew.
- Remove the spacer needle. Anchor the working end with 10 backstitches, one under both top loops of stitches 4–8 of R27 and stitches 4–8 of R28. Knot securely under a stitch. Weave both ends through 6 stitch backs on the rear and hide them inside the tube.
- Turn the wreath face up again. Center the bow's wrapped middle over the marked top seam. Sew through the back of the wraps and into the green fabric at R1 and R28, 6 small stitches, keeping the hanging loop free behind it. Tack the right bow wing to R3 and the left wing to R26, 2 stitches each, then hide the red end inside the bow.
- Remove the top marker. Open the jump ring at the end of the gold chain with two pairs of pliers, twisting the ends sideways. Slip it through all 3 green loop strands, then twist it closed until the ends meet. The chain and split key ring sit above the bow.
Hold the wreath by the ring and give the attachment a gentle tug. If the cotton loop starts to loosen, sew another green strand along the same path and repeat the 10 anchor stitches at each end before using it on a bag.
I like this little wreath as the gift tag itself: thread the gold ring through a ribbon on the parcel and tuck a name card behind the green circle. The red bow can peek over the edge of the paper.
UK terms: US sc = UK dc; US sl st = UK ss.
Made a little Christmas wreath? Tag #wavodecrochet on Pinterest so I can see your bow.
Pattern by Clara Hartwell for Wavode. Questions? Email me at support@wavode.com.