Crochet Cupcake Keychain

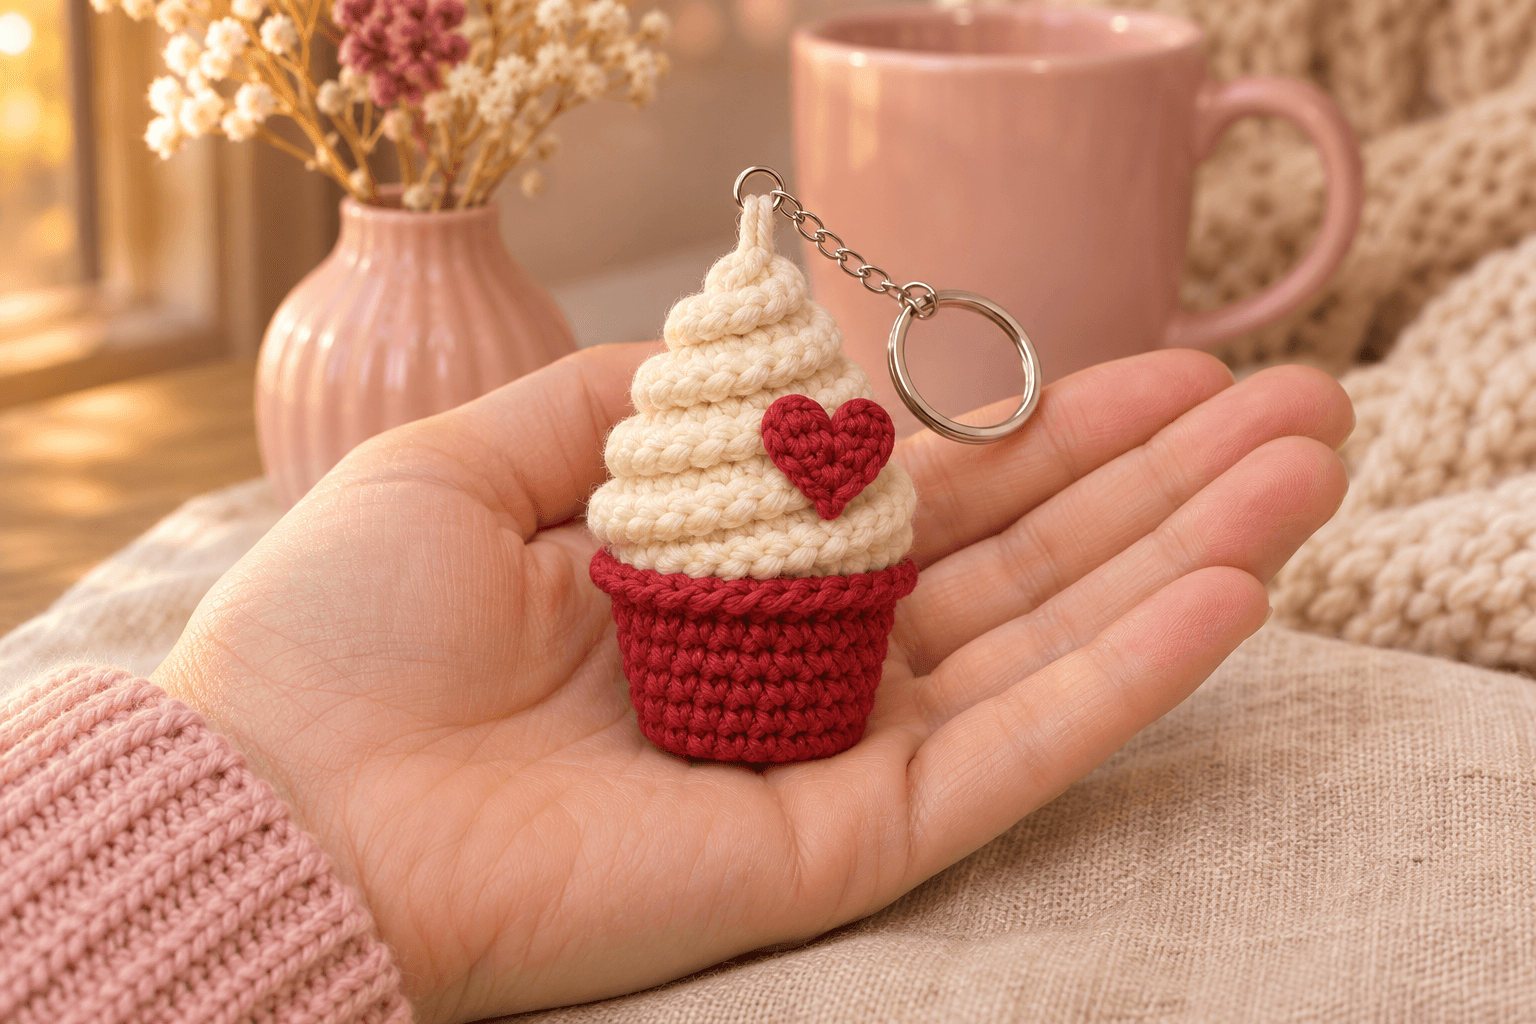
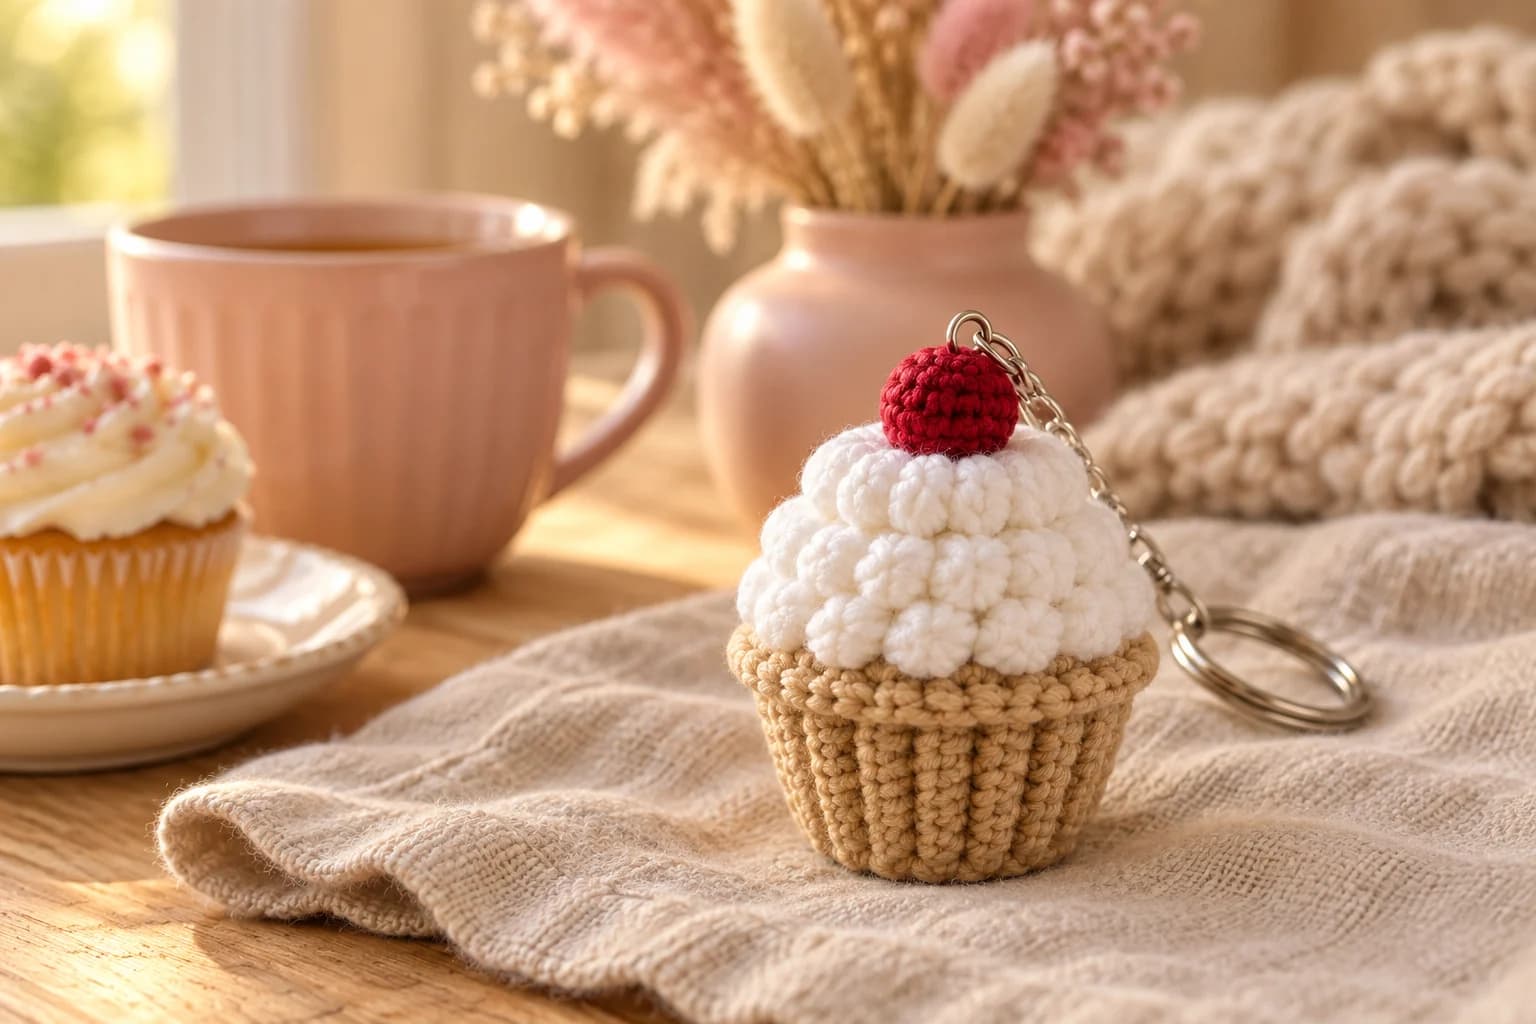
I always like the swirl of frosting best. This crochet cupcake keychain is about 2¾–3 in (7–7.5 cm) tall, with a little red case, a tall cream swirl and a red heart tucked against the front. The heart sits slightly to one side, like the last decoration on a tiny cake.
The frosting has a soft cone underneath and a narrow crocheted cord wrapped around it. Sewing that cord in place is the slow, satisfying part: each turn gets a little smaller as it climbs. I keep the case firmly stuffed and the frosting softer, so the little cake keeps its shape when it hangs.
| At a glance | |
|---|---|
| Finished size | about 2¾–3 in (7–7.5 cm) tall, 1¾ in (4.5 cm) across the frosting; hardware excluded |
| Yarn | DK #3 cotton; about 13 yd red and 24 yd cream |
| Hook | 2.5 mm throughout |
| Pieces | 4 |
| Time | about 2–3 hours |
| Skill | intermediate: small tubes, shaping and sewing a spiral |
Red and cream yarn for the little cupcake
- Yarn: Paintbox Yarns Cotton DK, 100% cotton, 137 yd (125 m) per 50 g. Allow about 13 yd of red and 24 yd of cream, including the heart, sewing and hanging loop.
- Hook: 2.5 mm for every piece.
- Hardware: a silver split key ring about 1 in (2.5 cm) across, a fine short chain about ¾ in (2 cm) long and a small open jump ring at its free end; two pairs of flat pliers.
- Small things: fiberfill, a tapestry needle, scissors, sewing pins, a stitch marker and contrasting scrap yarn.
Tension. Use 6 sc per inch (2.5 cm), with about 6 rounds per inch, tight enough that the stuffing doesn't show. The red case is about 1⅝ in (4.1 cm) across its opening. With its cream spiral, the cupcake is about 1¾ in (4.5 cm) wide and 2¾–3 in (7–7.5 cm) tall. These are estimates; measure after the cord is sewn on.
Stitches, in US terms: magic ring (MR), chain (ch), slip stitch (sl st), single crochet (sc), half double crochet (hdc), double crochet (dc), increase (inc, 2 sc in the same stitch), back loop only (BLO), front loop only (FLO), stitch (st) and round (R). The number in parentheses is the stitch count; chains and the final joining sl st do not count in the heart's total.
Work the case, cone and cord in a continuous spiral without joining rounds. Put the marker in the first stitch of each round and move it up as you go. On the case and cone, run a scrap strand up beside that first stitch, flipping it between the inside and outside at each round. That line marks the back. Count placements from the first stitch of the named round, calling it stitch 1.
Part 1 — Crocheting the red cupcake base
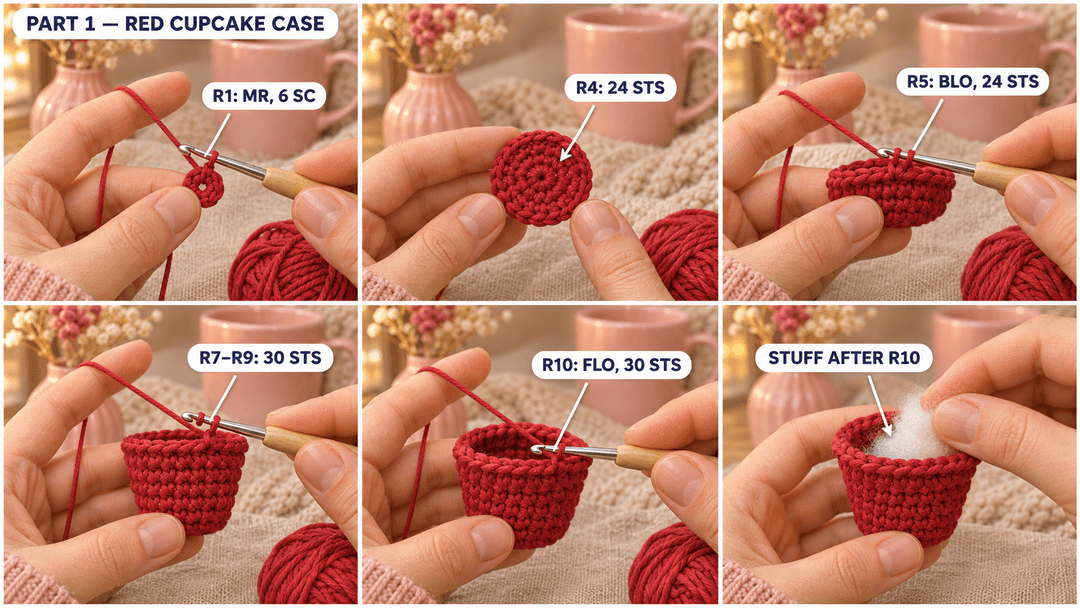
Case — red, 2.5 mm hook. Make 1. The magic ring becomes the center of the flat bottom. The final round forms the raised lip around the top opening.
- R1: MR, 6 sc in the ring. (6)
- R2: inc × 6. (12)
- R3: (sc, inc) × 6. (18)
- R4: (sc 2, inc) × 6. (24)
- R5: in BLO, sc around. (24)
- R6: (sc 3, inc) × 6. (30)
- R7–R9: sc around. (30) 3 rounds.
- R10: in FLO, sc around. (30)
R10 uses the front loops of R9. Leave the back loops of R9 free on the inside: the frosting will be sewn into them.
Sl st in the next st and fasten off, leaving an 8 in (20 cm) tail at the lip. Pull the magic ring closed, weave its starting end through 5 stitches inside the bottom, and weave the finishing end through 6 stitches inside the lip.
Stuff the case after R10, firmly up to R9, keeping those free back loops reachable. Press the little red base against your palm as you add the filling. Leave the top open and the back strand in place.
Tip. The last red round should stand like the rim of a little baking case. Keep the filling below it so you can find the unused loops inside.
Part 2 — Shaping the cream frosting swirl
The soft cone beneath the frosting
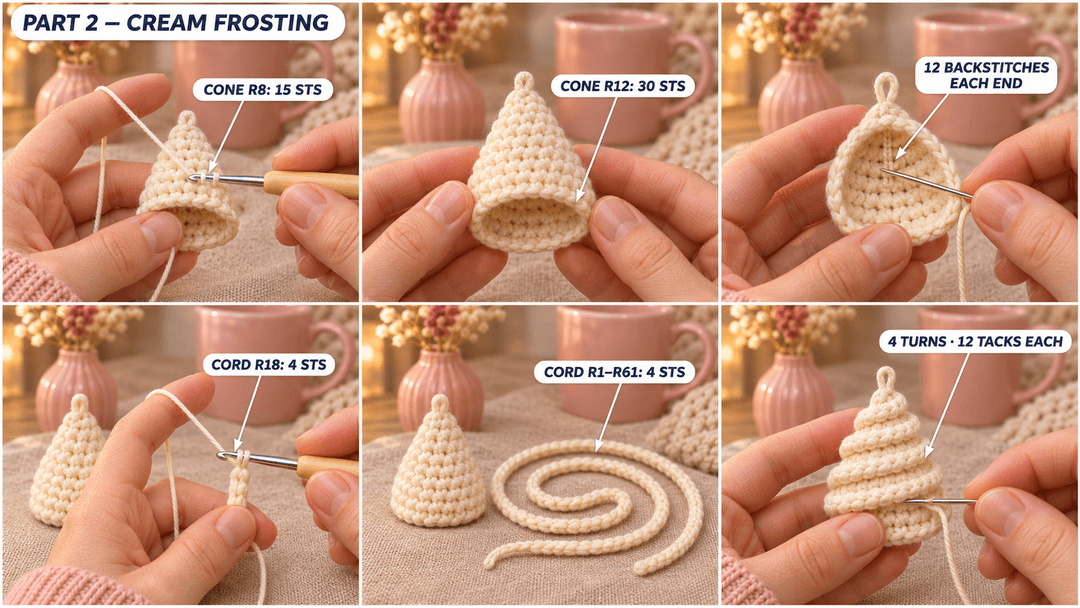
Frosting cone — cream, 2.5 mm hook. Make 1. Start at the point. The magic ring becomes the crown, and the wide last round becomes the opening that meets the red case.
- R1: MR, 4 sc in the ring. (4)
- R2: (sc, inc) × 2. (6)
- R3: sc around. (6)
- R4: (sc, inc) × 3. (9)
- R5: sc around. (9)
- R6: (sc 2, inc) × 3. (12)
- R7: sc around. (12)
- R8: (sc 3, inc) × 3. (15)
- R9: (sc 4, inc) × 3. (18)
- R10: (sc 2, inc) × 6. (24)
- R11: sc around. (24)
- R12: (sc 3, inc) × 6. (30)
Sl st in the next st and fasten off, leaving a 24 in (60 cm) tail at the wide opening. Pull the magic ring snug and weave its starting end through 5 stitch backs inside. Keep the opening empty while you make the hanging loop.
Anchoring the loop while the cone is open
Cut 36 in (90 cm) of cream and leave a 6 in (15 cm) starting tail inside the cone. Take 12 small backstitches through the crochet stitch backs inside R2–R5, then knot the working strand to the starting tail.
Bring the needle outside between R1 and R2, beside R1 stitch 1. Return inside through the opposite gap, beside R1 stitch 3, leaving a tiny arch about ⅛ in (3 mm) above the crown. Follow this path twice more, making 3 parallel strands. Keep a spare tapestry needle through the arch as a spacer.
Remove the spacer. Take 12 more backstitches inside R2–R5, knot securely under a stitch and weave both loose ends through 6 stitch backs. Keep the long opening tail free for assembly.
Stuff the cone after the loop is anchored, with all 12 rounds complete. Use small pinches, just enough to support its taper. Let the cone sit softly in your hand as you sew. Leave the bottom opening accessible for the spiral and heart stitches.
The cord that makes the raised spiral
Frosting cord — cream, 2.5 mm hook. Make 1. Leave an 8 in (20 cm) starting tail. The magic ring is the end that starts at the wide bottom of the frosting; the final end finishes at the point.
- R1: MR, 4 sc in the ring. (4)
- R2–R61: sc around. (4) 60 rounds.
Keep the cord unstuffed. At this tension it is about 10 in (25.5 cm) long. Pull the magic ring closed, sl st in the next st and fasten off, leaving an 8 in (20 cm) tail. Pass that tail through the front loops of all 4 final stitches, pull them closed and keep both end tails for attaching the cord.
Winding the frosting upward
Hold the cone with its point up, wide opening down and marked back facing you. Pin the cord's magic-ring end at R11, stitch 1, just above the flared last round. Keep the hanging loop free at the top.
Wind the cord around the cone in 4 complete rising turns. Start each circuit by carrying the cord from the back around the right side, across the front and around the left side. At the back, use these pins as you climb:
| End of the turn | Cord position on the cone |
|---|---|
| Turn 1 | R8, stitch 1 |
| Turn 2 | R5, stitch 1 |
| Turn 3 | R2, stitch 1 |
| Turn 4 | beside the R1 magic ring, below the hanging loop |
Ease the cord between the pins so it rises smoothly, like a ribbon of piped cream. Let its last rounded end sit close against the crown. The lowest turn rests above the wide last round, leaving the opening clear for the seam.
Cut 72 in (180 cm) of cream for sewing. With the cone opening facing you, take small stitches from inside the cone, through its fabric and into the underside of the cord. Sew 12 evenly spaced tacks around each turn, catching the cord fabric without flattening it. Use the starting and finishing tails to secure each cord end with 4 small stitches, then knot and weave the ends inside the cone.
Tip. Pin all four turns before sewing. If one ridge looks pulled tight, ease the cord back along that turn and spread it evenly before taking the first tack.
A tiny red heart for the frosting
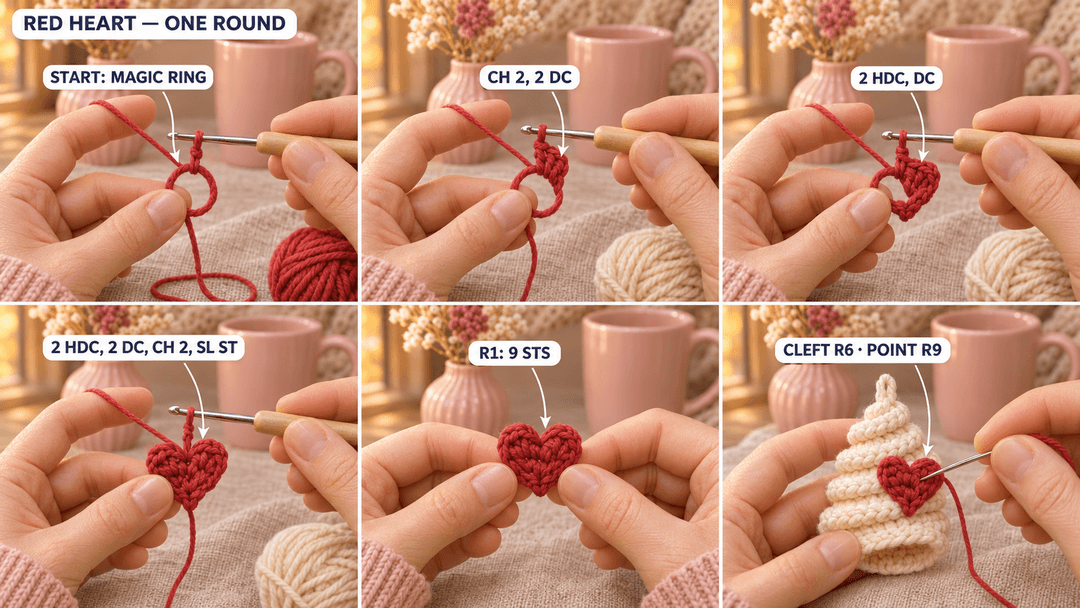
Heart — red, 2.5 mm hook. Make 1. Leave a 6 in (15 cm) starting tail and make a magic ring. Work this little heart in one joined round, all into that same ring:
- R1: ch 2, 2 dc in the ring, 2 hdc in the ring, dc in the ring, 2 hdc in the ring, 2 dc in the ring, ch 2, sl st in the ring. (9)
Fasten off, leaving a 12 in (30 cm) sewing tail. Pull the magic ring closed. The joining sl st sits in the cleft at the top; the single dc in the middle, stitch 5, is the bottom point. Smooth the two lobes with your fingers and weave the short starting tail into the back through 5 stitch backs. Leave the heart unstuffed.
With the cone's marked back away from you, pin the heart slightly to the right of the front center. Put its top cleft at R6, stitch 8, and its point at R9, stitch 11. The heart rests across the raised cream cord. Smooth the little heart over the cream ridge with your thumb.
Use the red tail to take 9 small stitches around the heart, one beneath the top loops of each of its 9 stitches, catching the cream cord or cone underneath. Add 2 small stitches at the top cleft. Knot and weave the end inside the cone through its open bottom.
Joining the cupcake and anchoring the keyring
Keep the cream point uppermost and the red case below it. Set the cone's wide opening just inside the raised red lip. Match the back strands and pin R12 of the cone to the free back loops of R9 of the red case, starting with the marked first stitches at the back.
- With the cone's long cream tail, whipstitch one cream stitch to one unused red back loop. Work 24 paired stitches around the opening, leaving 6 pairs open.
- Top up the filling now, through that opening. Keep the cone softly supported and the case firm; ease a little filling across the join so the frosting sits upright.
- Sew the remaining 6 pairs. Go around the same seam a second time, 30 paired stitches, then knot under a stitch, weave through 6 stitch backs and hide the end inside.
- Pull out both scrap strands. The red lip should frame the cream frosting, with the heart facing forward and the loop at the crown.
- Open the jump ring at the end of the silver chain with two pairs of pliers, twisting its ends sideways. Pass it through all 3 cream loop strands, then twist it closed until the ends meet. The chain and split ring sit above the frosting point.
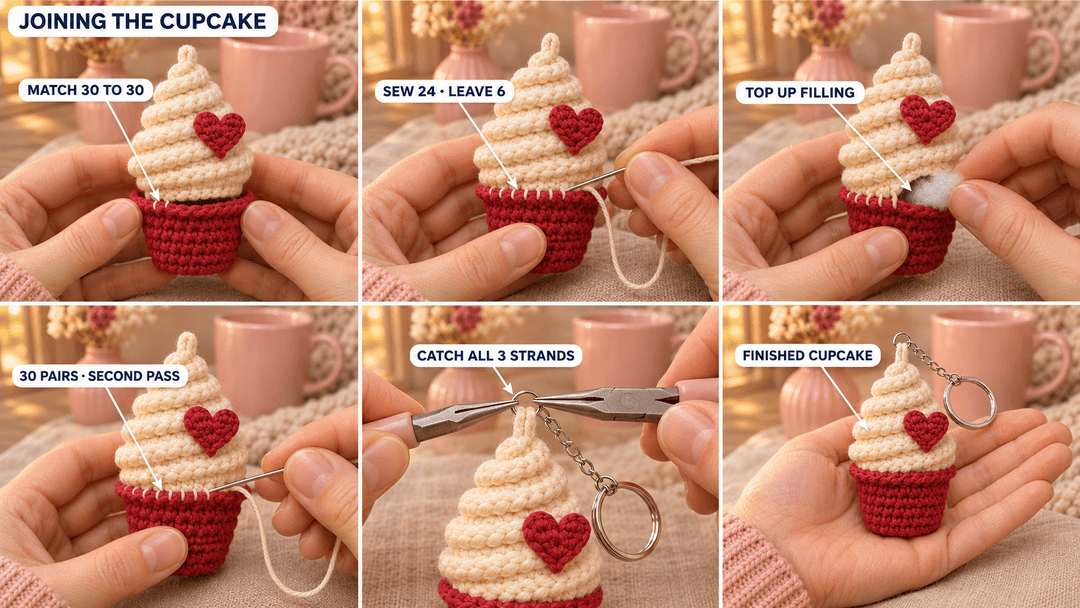
Hold the case while giving the key ring a gentle tug. If the cotton loop loosens, unpick 6 seam stitches at the back, lift out enough filling to reach the inner crown and add a fresh cream strand along the loop. Anchor it with 12 backstitches at each end, replace the filling and resew the opening twice before using the charm.
Safety. This cupcake has metal keychain hardware, so it isn't a toy for children under 3. I keep it as a bag charm or a little gift for a grown-up.
I like this one tucked into a paper cupcake liner in a small gift box, with the silver ring resting beside it. The little red heart can face the lid when the box opens.
UK terms: US sc = UK dc; US hdc = UK htr; US dc = UK tr; US sl st = UK ss.
Made a little cupcake? Tag #wavodecrochet on Pinterest so I can see your cream swirl.
Pattern by Clara Hartwell for Wavode. Questions? Email me at support@wavode.com.