Crochet Rainbow Keychain

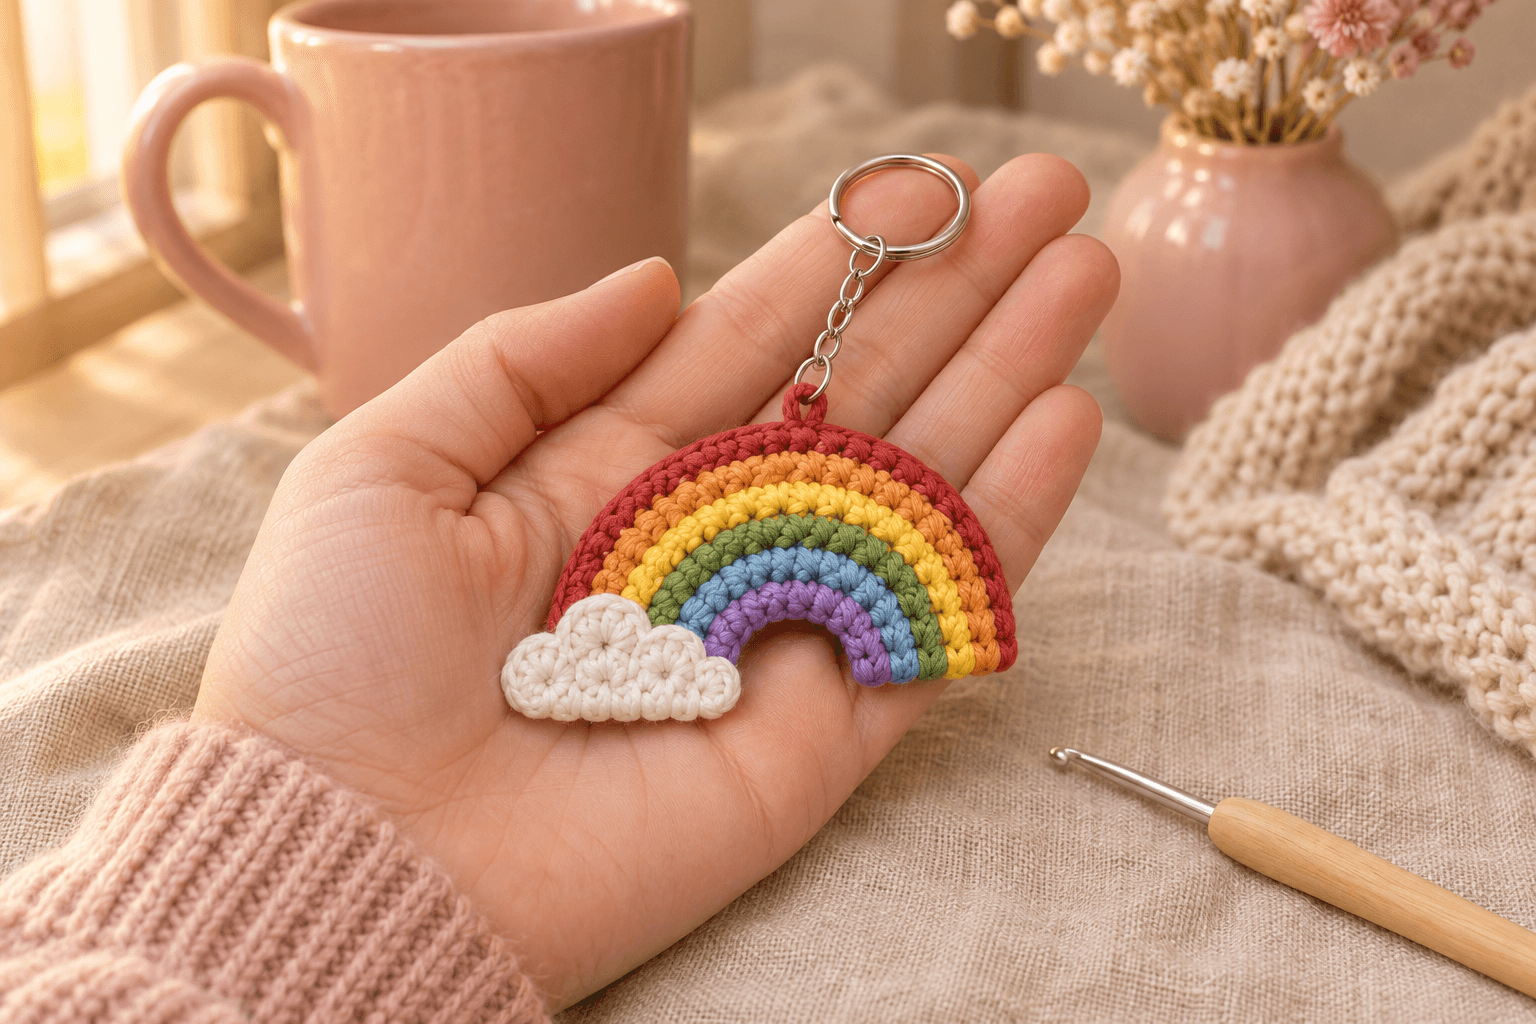
I like a little rainbow against a plain canvas bag: six bright stripes, a soft white cloud, and just enough color to find my keys. This crochet rainbow keychain measures about 2½ in (6.5 cm) across the rainbow, with purple on the inside and red around the top.
This is a written adaptation of Kane Crochet's rainbow keychain tutorial. I keep the six rainbow rounds and the cloud's stitch sequence, and add a complete cloud foundation, lightly padded assembly and a reinforced hanging point. The tutorial lists a finished size of 3½ × 1¾ in (9 × 4.5 cm); the estimate here uses the sport-cotton tension below.
| At a glance | |
|---|---|
| Rainbow size | about 2½ in (6.5 cm) wide, 1¼ in (3.2 cm) tall; cloud and hardware extend beyond it |
| Yarn | sport #2 cotton in purple, blue, green, yellow, orange, red and white |
| Hook | 3 mm for both pieces |
| Crocheted pieces | 2 |
| Time | allow about 1–1½ hours |
| Skills | magic ring, joined sc rounds, increases, hdc, working around a chain and hand sewing |
Yarn and supplies for the rainbow keychain
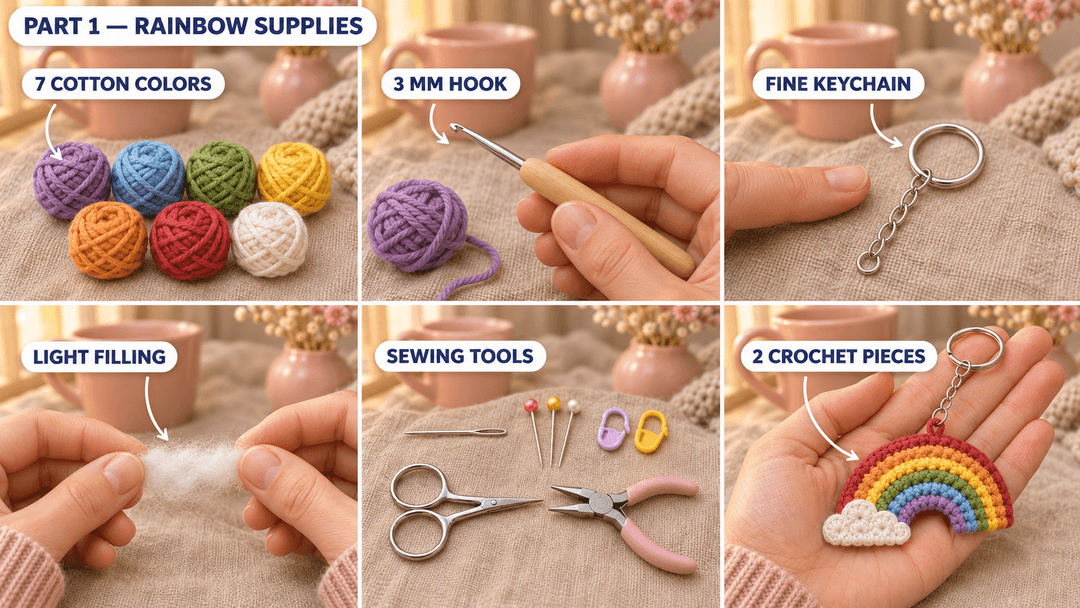
- Yarn: smooth sport #2 cotton, about 137 yd (125 m) per 50 g. Gather about 2 yd purple, 2 yd blue, 2 yd green, 3 yd yellow, 3 yd orange, 4 yd red and 3 yd white, including the sewing lengths. The video's yarn is described as 4-ply cotton about 2 mm thick; use the weight and tension here for this written version.
- Hook: 3 mm.
- Filling: a small pinch of polyester fiberfill, pulled into a thin, loose strip.
- Hardware: a split keyring with a short chain and a closed end link, plus a small jump ring if the chain needs one. Two pairs of pliers help close a jump ring neatly.
- Tools: a tapestry needle, scissors, two stitch markers and sewing pins. Optional fabric glue can hold the cloud while sewing; skip it if you prefer pins.
Tension: about 6 sc per inch (2.5 cm), with about 6 rounds per inch. Keep the stitches snug enough that the filling stays inside. The rainbow size above is an estimate at that tension, measured before the cloud and chain are attached.
Stitches, in US terms: magic ring (MR), chain (ch), slip stitch (sl st), single crochet (sc), half double crochet (hdc), increase (inc: 2 sc in the same stitch), stitch (st), round (R). These are joined rounds. Put a marker in the first sc, join to that sc at the end, and move the marker up. Starting chains and joining slip stitches do not count toward the number in parentheses.
Making the rainbow in six colors
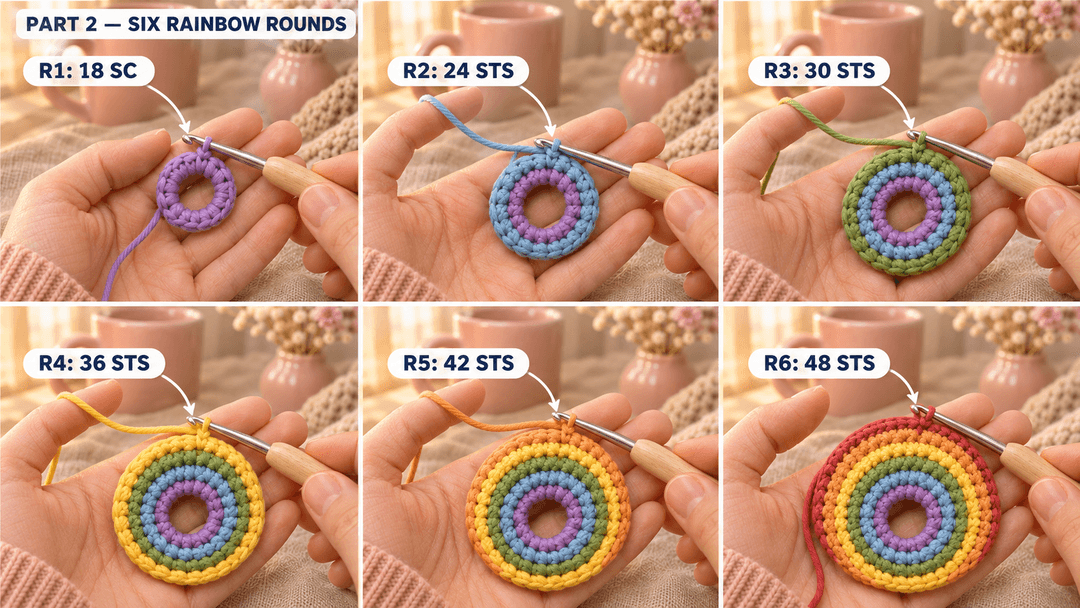
Rainbow — purple first, 3 mm hook. Make 1. The magic ring becomes the little opening inside the rainbow. The last red round becomes the outside arch.
Leave an 18 in (45 cm) purple starting tail for the inner seam. Keep the ring open while working the first round.
- R1: MR, 18 sc in the ring. (18) Join with a sl st in the first sc.
- R2: ch 1, (sc, inc, sc) × 6. (24) Blue. Join with a sl st in the first sc.
- R3: ch 1, (sc 3, inc) × 6. (30) Green. Join with a sl st in the first sc.
- R4: ch 1, (sc 2, inc, sc 2) × 6. (36) Yellow. Join with a sl st in the first sc.
- R5: ch 1, (sc 5, inc) × 6. (42) Orange. Join with a sl st in the first sc.
- R6: ch 1, (sc 3, inc, sc 3) × 6. (48) Red. Join with a sl st in the first sc.
Changing color: for R1–R5, work the last sc until two loops remain. Yarn over with the next color and pull through both loops. Join to the first sc with that new color, then begin the next round with ch 1. Leave a 6 in (15 cm) tail from each cut end and each new color; weave them into the back of their own stripe. Keep the long purple starting tail free.
After the red join, fasten off with a 24 in (60 cm) tail for sewing the red edges together. Fold the color-change ends toward the back; they'll be tucked inside the rainbow.
Lay the piece flat and ease the purple ring into a small, round opening. Keep that opening about ½ in (1.3 cm) across rather than drawing the ring shut. With the long purple tail, take two small securing stitches around the ring strand beside its starting knot. Keep the rest of the tail for sewing.
Tip. Spread the purple stitches around the opening with your fingertips. If the inner edge gathers, loosen the ring a little before securing it. The outer edge should curve smoothly when folded.
Folding and sewing the rainbow
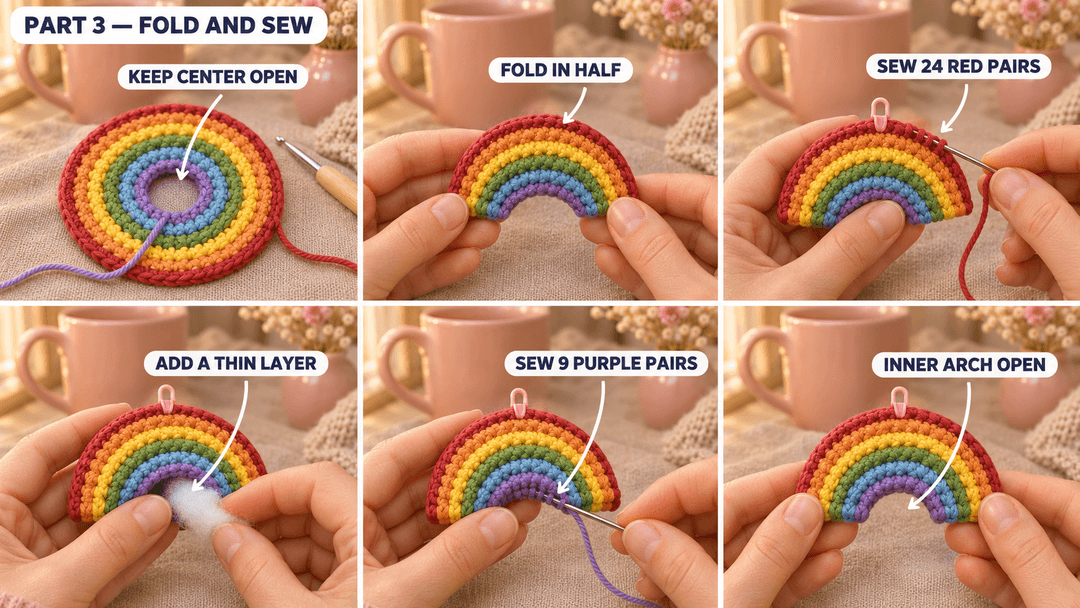
Keep the red edge outside and the purple opening inside, with the ends of the arch level. Fold the ring in half, wrong sides together, so the color-change joins sit at the left end. Match the two red edges and pin them together.
Use the joined first red sc as the start of your count around R6. Match red stitches 1–24 with stitches 48–25, working from the left end to the right. Place a marker between the twelfth and thirteenth paired positions: that is the top center for the keyring.
- Thread the long red tail onto the needle. Whipstitch the matching red edges, passing through both top loops of one stitch on each layer. Sew all 24 pairs, from one end of the rainbow to the other. Secure the tail and hide it inside.
- Feed the loose fiberfill strip through the purple opening. Spread a thin layer between the two faces, reaching both ends. Keep the arch soft enough to flatten gently between your palms.
- Match the purple edges across the inside curve: R1 stitches 1–9 meet stitches 18–10. With the long purple starting tail, whipstitch these 9 pairs, passing through the matching edge loops of both layers. The center opening keeps its curved shape as the two edges meet.
- Secure the purple yarn at the end of the seam. Pass the needle through the filling, bring it out through a nearby stripe and trim the tail close.
Tip. If the rainbow starts looking like a thick crescent, remove a little filling before finishing the purple seam. A thin layer keeps the stripes broad and the cloud easy to attach.
Crocheting the little white cloud
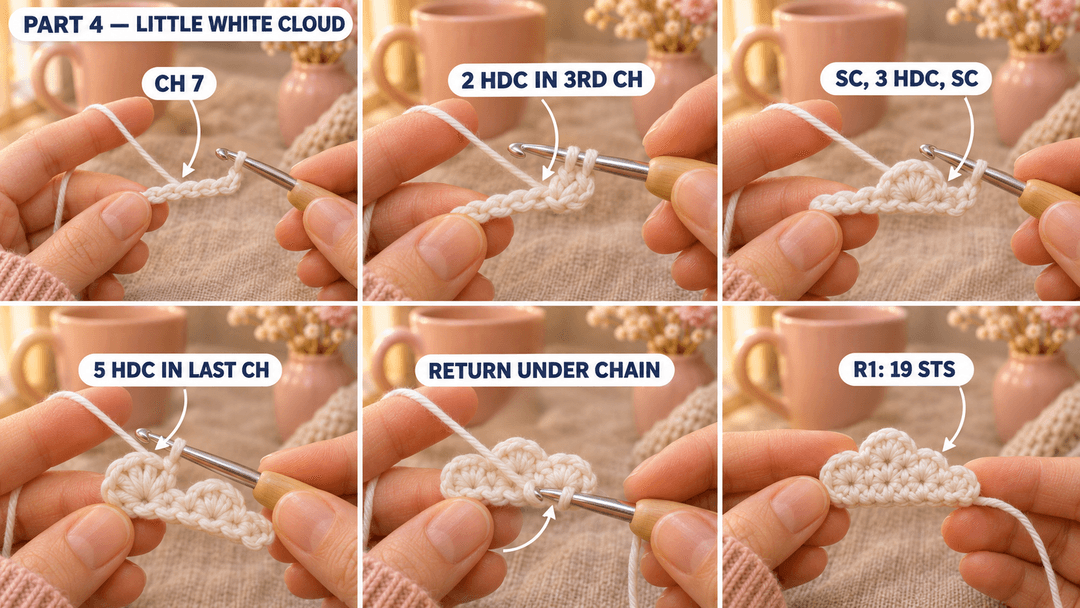
Cloud — white, 3 mm hook. Make 1. Leave a 6 in (15 cm) starting tail and ch 7. Work around both sides of the chain, keeping the same side facing you.
- R1: 2 hdc in the 3rd ch from the hook, sc in the next ch, 3 hdc in the next ch, sc in the next ch, 5 hdc in the last ch; working along the other side of the chain, sc in the next ch, 3 hdc in the next ch, sc in the next ch, 2 hdc in the same foundation ch as the first 2 hdc. (19) Join with a sl st in the first hdc.
The two skipped chains lift the first stitches. Leave them outside the stitch count, and join into the first actual hdc.
Here's the turn slowly: after the group of 5 hdc, swivel the little cloud in your fingers until the unused loops underneath the chain face your hook. Follow those loops back toward where you started. Put the last 2 hdc underneath the very first group.
Fasten off with an 18 in (45 cm) tail. Weave the short starting tail into the back. Press the cloud gently between your fingers and hold its long axis horizontally. Turn its fuller edge upward, ready to sit against the rainbow. Leave it flat and empty.
Attaching the cloud and keyring
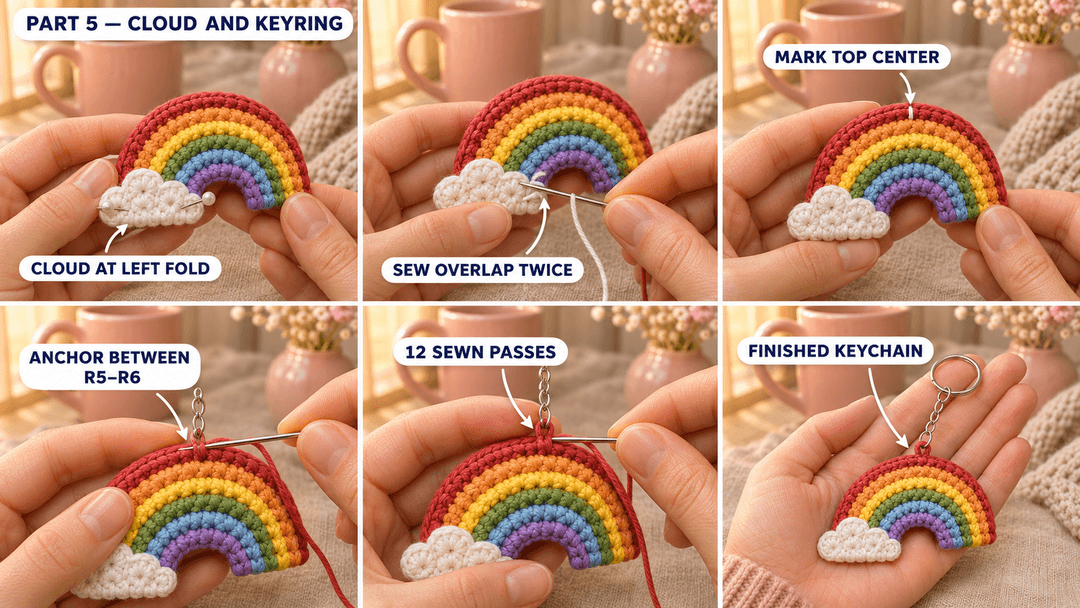
Lay the rainbow with its chosen front facing you and the red arch above the purple curve. Set the cloud horizontally over the left fold, where red R6 stitches 1 and 48 meet and purple R1 stitches 1 and 18 meet. Keep its lower edge level with the bottom of that end. Let its left edge project beyond the rainbow; its right half rests over the ends of the stripes, leaving the center opening visible.
Pin the cloud. With the white tail, take a small stitch through the back of each cloud edge stitch that rests over the rainbow, catching the rainbow's front layer underneath. At the projecting left edge, pass the needle through the backs of the cloud stitches until you reach fabric again. Go around the overlapping section a second time, then secure and hide the end inside the rainbow.
Optional fabric glue can hold that overlap while sewing. Use a thin dab on the cloud's back and follow the glue maker's drying instructions.
For the hanging point, cut a 24 in (60 cm) red strand. Find the marker at the top center of the red seam. Pass the needle through both layers between R5 and R6, immediately below that marker, and leave a 6 in (15 cm) tail.
Thread the needle through the chain's closed end link. Sew back through both layers at the marked center, making a snug red loop around the link. Repeat this path 12 times, catching the orange-and-red fabric below the seam each time. Keep the chain free above the arch. Tie the two yarn ends together against the seam and bury them through the filling in opposite directions. Remove the marker.
If the chain uses a jump ring, twist it open sideways with the pliers, slip it through the reinforced red loop, and twist it shut until the ends meet. Give the little red loop a gentle tug after a snag on your bag. If it loosens, sew through both layers again with matching yarn.
Safety. This keychain has small metal parts and is an accessory, not a toy for children under 3.
I like this one tied to a plain gift tag, with the little cloud hanging just below the bow. A scrap of each bright color is enough to start another rainbow for the same bag.
UK terms: US sc = UK dc; US hdc = UK htr.
Made a rainbow? Tag #wavodecrochet on Pinterest so I can see your colors.
Written adaptation by Clara Hartwell for Wavode, based on the rainbow tutorial by Kane Crochet. Questions? Email support@wavode.com.