Little Cloud Stripes Crochet Baby Blanket

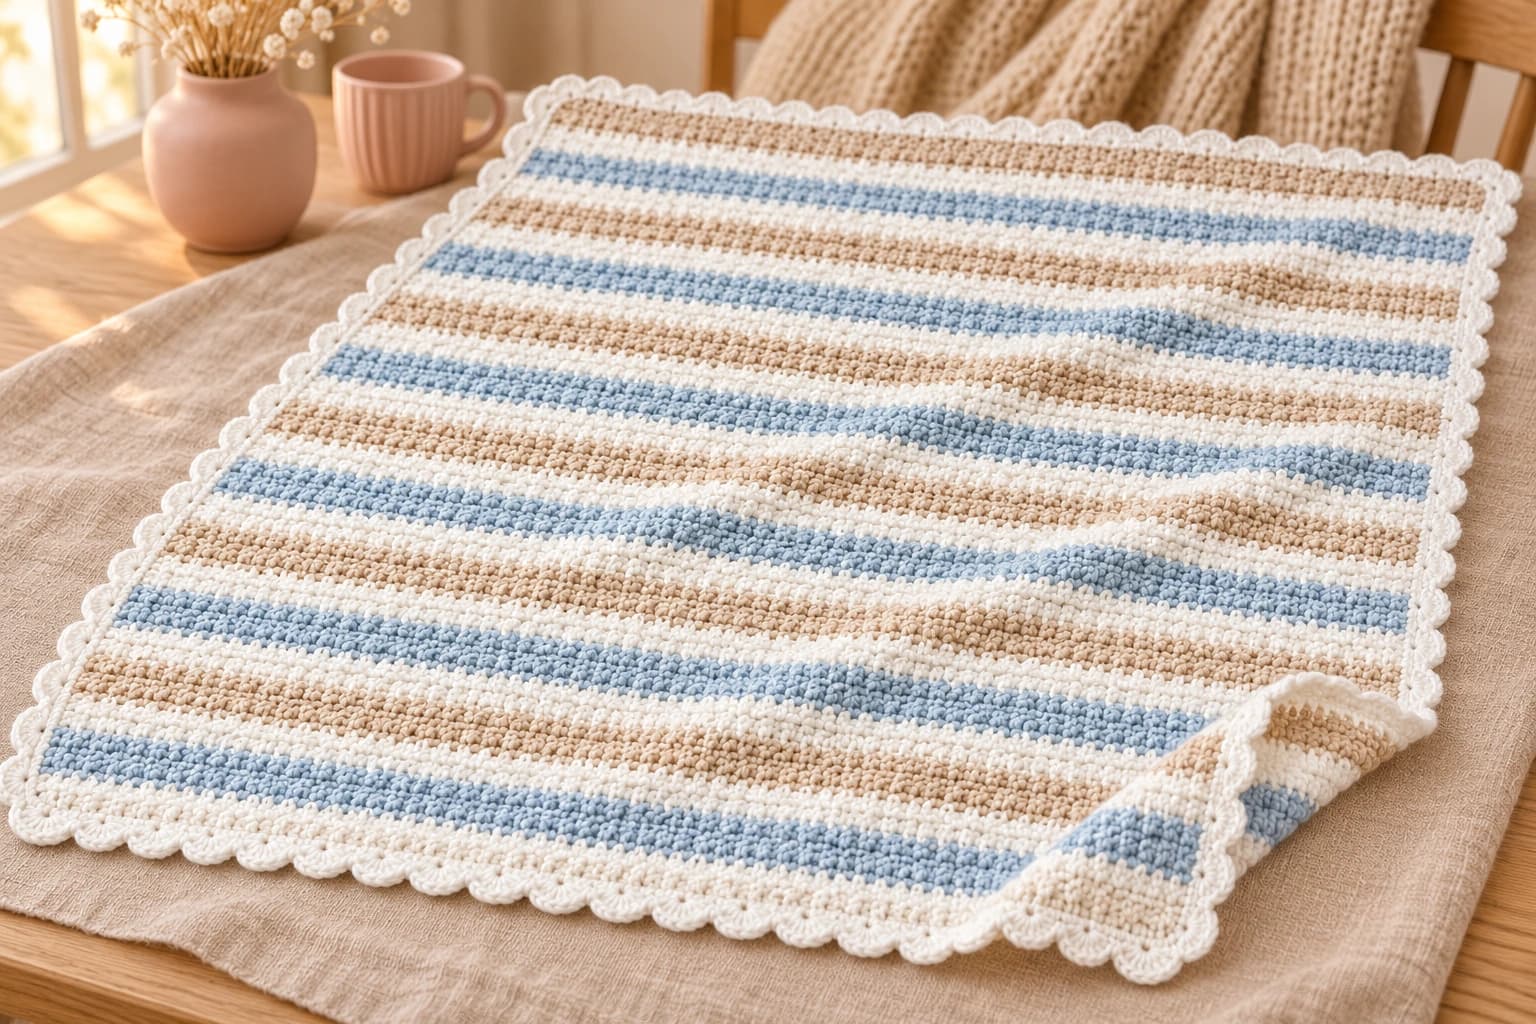
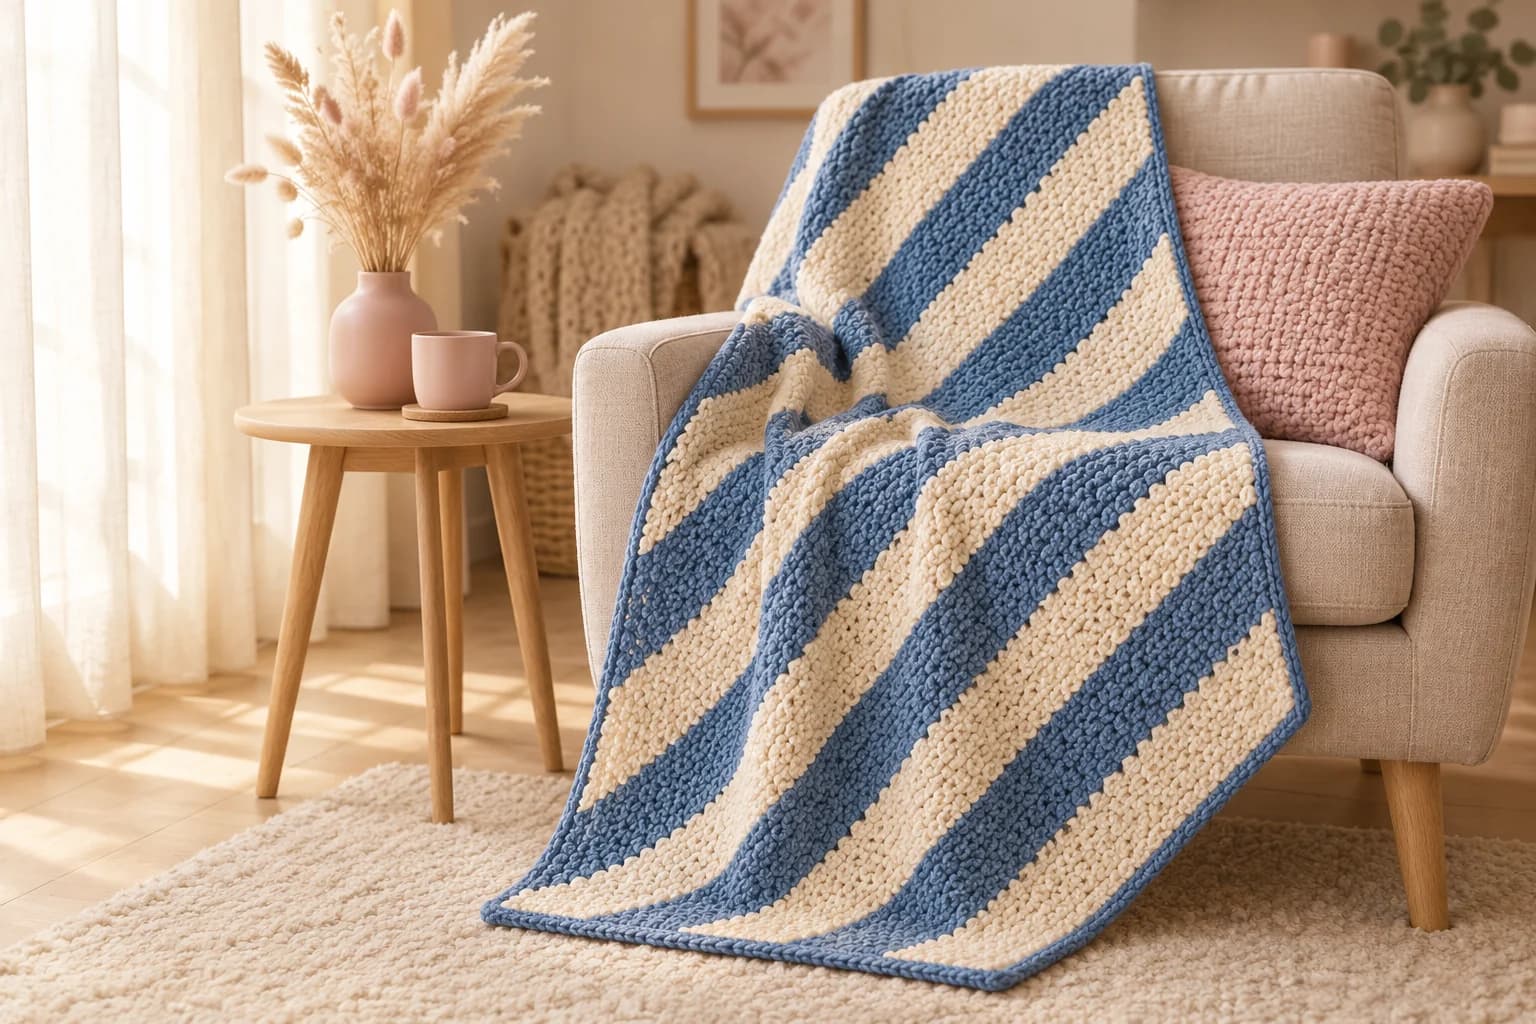
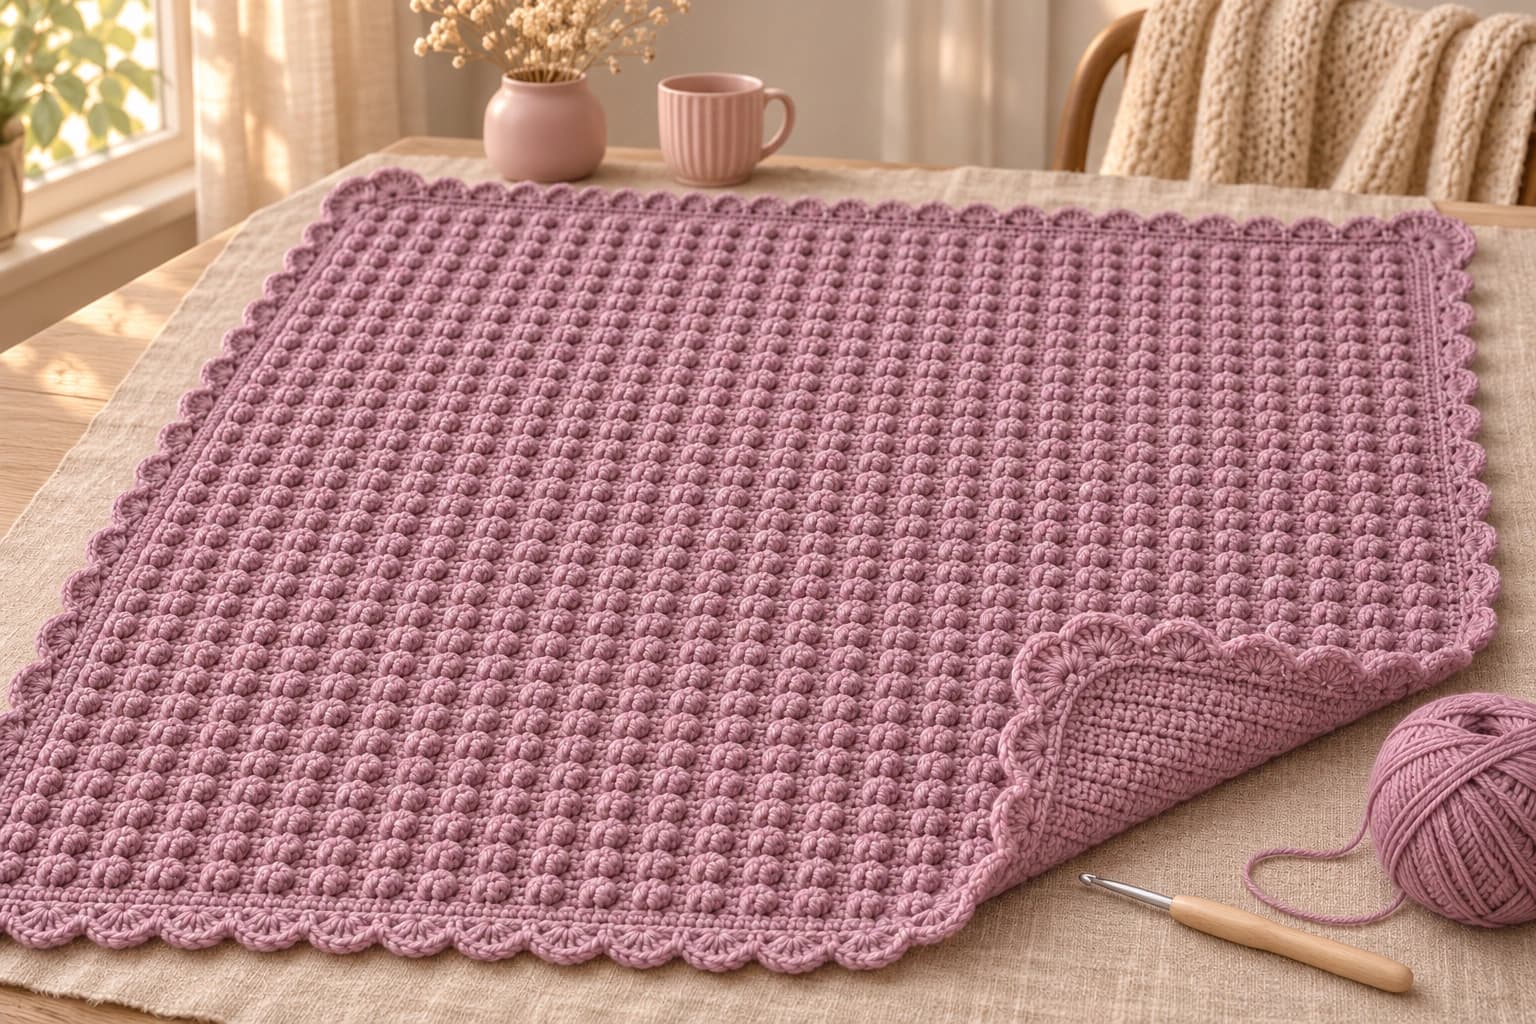
I like a pale blue stripe with plenty of white around it. Add a little sandy beige and it feels softer still, like a cloudy morning by the sea. Little Cloud Stripes is a crochet baby blanket in blue, white and beige, with a target size of about 30 × 36 in (76 × 91 cm), including the white scallops. Check the washed stitch swatch before settling on that size.
The fabric gets its little bumps from alternating a short stitch with a taller one. On the next row, the tall stitch goes into the short one below. I keep the stripes simple and let that pebbled surface catch the light. The white border finishes in rounded shells that feel like little cloud edges when the blanket is folded.
| At a glance | |
|---|---|
| Finished size | target about 30 × 36 in (76 × 91 cm), scallops included; check the washed swatch |
| Yarn | DK #3 acrylic; about 850 yd white, 375 yd blue and 375 yd beige as working estimates |
| Hook | 4 mm (G/6) to start |
| Pieces | 1, with its white border worked directly onto the body |
| Time | several evenings, depending on your pace |
| Skill | easy: sc, dc, color changes and shell edging |
Soft yarn for the Little Cloud stripes
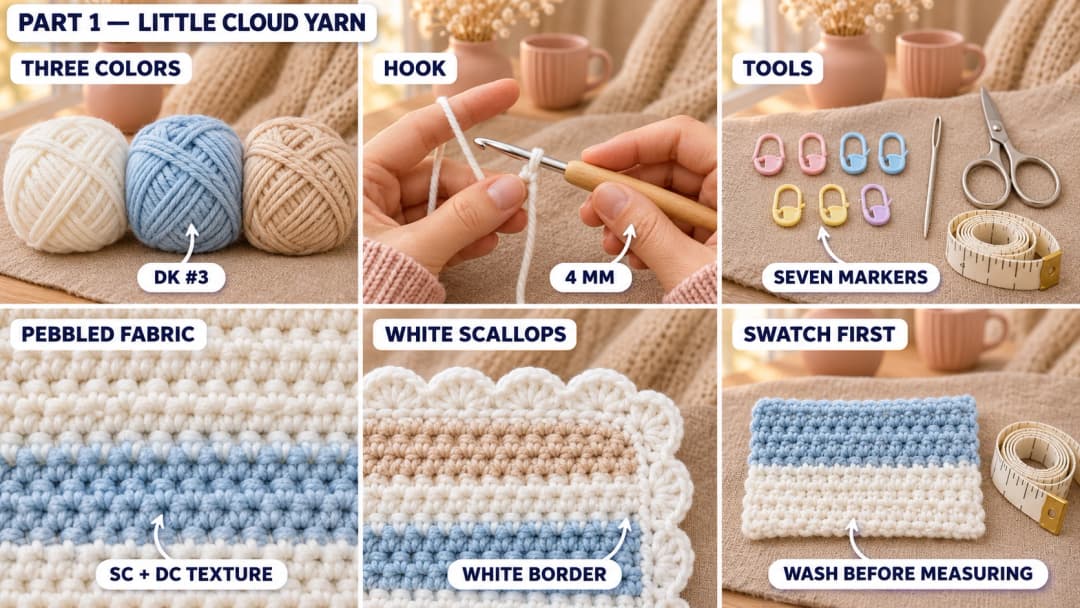
I like a smooth yarn here: the little bumps stay easy to see. I would choose a washable DK acrylic in soft colors, keeping the white bright enough to separate the blue from the beige. All three yarns should come from the same range, so one stripe stays as supple as the next.
- Yarn: Paintbox Yarns Simply DK, or a smooth DK #3 acrylic with similar yardage. The suggested yarn is 100% acrylic, 302 yd (276 m) per 100 g. Paper White, Dolphin Blue and Light Caramel are starting color options; choose a pale sandy beige if you prefer a quieter contrast.
- Amounts: allow about 850 yd white, 375 yd blue and 375 yd beige as working estimates, then check the mixed-stitch swatch. With the suggested yarn, have 3 white balls, 2 blue and 2 beige available, all in matching dye lots within each color.
- Hook: 4 mm (G/6) for the body and border to start.
- Small things: scissors, a tapestry needle, tape measure and 7 removable stitch markers: two for the row ends, one to identify the face and four for the border corners.
Tension. The plain-single-crochet reference is 4 sc per inch, or 16 sc across 4 in (10 cm), within the DK blanket range. Measure the alternating sc-and-dc fabric separately after washing: its width, row height and yarn use differ from plain single crochet. Let the swatch relax on the table before measuring across it and up the rows.
The written body has 113 stitches across and 119 rows. The size goal is roughly 28 × 34 in (71 × 86 cm) before the border. Compare the washed swatch with that goal. Keep the written counts if you like the resulting size; changing the body counts also changes the border placement below.
Getting the textured stripe stitch ready
Stitches, in US terms: chain (ch), single crochet (sc), double crochet (dc), slip stitch (sl st), stitch (st) and yarn over (YO). Each sc and dc counts as one stitch. Counts in parentheses give the number of stitch tops after each row or round.
Work the body back and forth through both top loops. Before every row after Row 1, ch 1 and turn; the chain is outside the count. The first and last stitches of every row are sc. Place a marker in each of those edge stitches and move the markers up as you work. The border uses joined rounds with the chosen face toward you.
How the short and tall stitches fit together
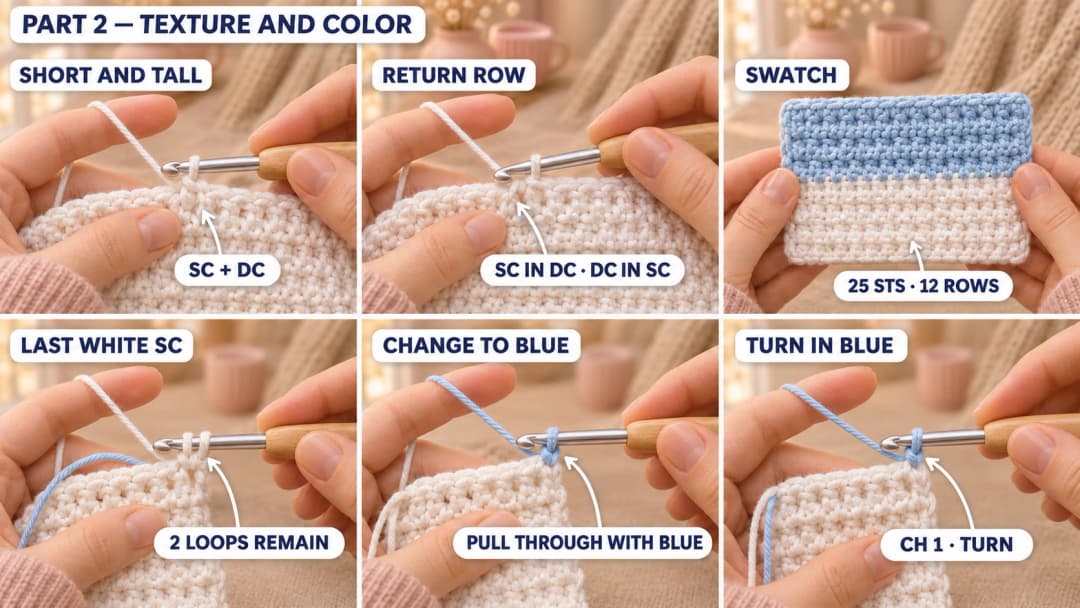
The first row starts and ends with sc. On the return row, keep those two edge stitches as sc, then alternate the interior stitches so a sc lands in a dc and a dc lands in a sc. One edge has a slightly wider plain margin on the return row. The white border covers that little difference.
Double crochet: YO, insert into the next stitch, YO and pull up a loop. YO and pull through 2 loops, then YO and pull through the last 2. Keep its top relaxed enough for the following sc to enter it.
Tip. If a stripe seems to lean, count both edges before undoing it. The body stays at 113 stitches. A common extra stitch comes from working into the turning chain after the last sc.
A two-stripe swatch
With white, ch 26. Work sc in the second chain, then (dc, sc) × 12 across: 25 stitches. On even-numbered rows, ch 1, turn, sc, (sc, dc) × 11, sc 2. On later odd-numbered rows, ch 1, turn, sc, (dc, sc) × 12.
Work 6 white rows, then 6 blue rows, changing color as described below. Wash the twelve-row swatch and dry it flat. Measure the central fabric across several stitch pairs and vertically across both stripes. If you weigh the dry sample, keep separate notes for the white and blue yarn used.
Changing color at the stripe edge
Every stripe ends with a sc. Work that final sc until 2 loops remain on the hook, then pull the next stripe's color through both loops. Cut the old color with an 8 in (20 cm) tail and leave an 8 in (20 cm) tail on the new color. Ch 1 with the new yarn and turn.
Cut and rejoin at every color change. Lay the tails along the back of their matching stripe and weave them through several stitch backs, reverse direction and weave back again. Finish each set while that edge is easy to reach. Keep the tails clear of the stitch tops and the border path.
The pattern — Crocheting the Little Cloud stripes
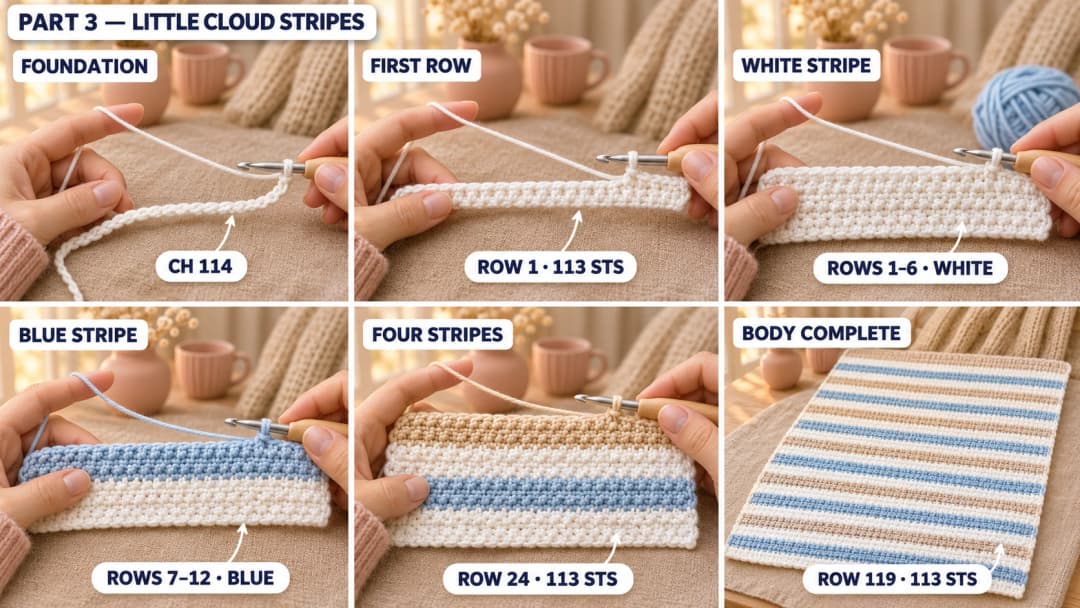
Blanket body — white, blue and beige, 4 mm hook. Make 1. Leave an 8 in (20 cm) starting tail and ch 114 in white. The chain becomes the lower short edge; Row 119 becomes the upper short edge.
The blue, white and beige stripe order
Each stripe has 6 rows, except the final beige stripe, which has 5. Work the table from top to bottom. Change to the next color in the last sc of each listed stripe, before making the next row's turning chain.
| Rows | Color |
|---|---|
| 1–6 | white |
| 7–12 | blue |
| 13–18 | white |
| 19–24 | beige |
| 25–30 | white |
| 31–36 | blue |
| 37–42 | white |
| 43–48 | beige |
| 49–54 | white |
| 55–60 | blue |
| 61–66 | white |
| 67–72 | beige |
| 73–78 | white |
| 79–84 | blue |
| 85–90 | white |
| 91–96 | beige |
| 97–102 | white |
| 103–108 | blue |
| 109–114 | white |
| 115–119 | beige |
Begin with these two rows. Follow the color table throughout; the stitch pattern continues across every change of color.
- Row 1: sc in the 2nd ch from the hook, (dc, sc) × 56 across the remaining chains. (113)
- Row 2: ch 1, turn, sc, (sc, dc) × 55, sc 2. (113)
Lay the work flat after Row 2 and clip a separate marker to the face you want showing. Keep that face marker in place when moving the two edge markers. The pebbled texture is visible on both sides.
- Row 3: ch 1, turn, sc, (dc, sc) × 56. (113)
- Row 4: ch 1, turn, sc, (sc, dc) × 55, sc 2. (113)
- Row 5: ch 1, turn, sc, (dc, sc) × 56. (113)
- Row 6: ch 1, turn, sc, (sc, dc) × 55, sc 2. (113)
- Row 7: ch 1, turn, sc, (dc, sc) × 56. (113)
- Row 8: ch 1, turn, sc, (sc, dc) × 55, sc 2. (113)
- Row 9: ch 1, turn, sc, (dc, sc) × 56. (113)
- Row 10: ch 1, turn, sc, (sc, dc) × 55, sc 2. (113)
- Row 11: ch 1, turn, sc, (dc, sc) × 56. (113)
- Row 12: ch 1, turn, sc, (sc, dc) × 55, sc 2. (113)
- Row 13: ch 1, turn, sc, (dc, sc) × 56. (113)
- Row 14: ch 1, turn, sc, (sc, dc) × 55, sc 2. (113)
- Row 15: ch 1, turn, sc, (dc, sc) × 56. (113)
- Row 16: ch 1, turn, sc, (sc, dc) × 55, sc 2. (113)
- Row 17: ch 1, turn, sc, (dc, sc) × 56. (113)
- Row 18: ch 1, turn, sc, (sc, dc) × 55, sc 2. (113)
- Row 19: ch 1, turn, sc, (dc, sc) × 56. (113)
- Row 20: ch 1, turn, sc, (sc, dc) × 55, sc 2. (113)
- Row 21: ch 1, turn, sc, (dc, sc) × 56. (113)
- Row 22: ch 1, turn, sc, (sc, dc) × 55, sc 2. (113)
- Row 23: ch 1, turn, sc, (dc, sc) × 56. (113)
- Row 24: ch 1, turn, sc, (sc, dc) × 55, sc 2. (113)
- Row 25: ch 1, turn, sc, (dc, sc) × 56. (113)
- Row 26: ch 1, turn, sc, (sc, dc) × 55, sc 2. (113)
- Row 27: ch 1, turn, sc, (dc, sc) × 56. (113)
- Row 28: ch 1, turn, sc, (sc, dc) × 55, sc 2. (113)
- Row 29: ch 1, turn, sc, (dc, sc) × 56. (113)
- Row 30: ch 1, turn, sc, (sc, dc) × 55, sc 2. (113)
- Row 31: ch 1, turn, sc, (dc, sc) × 56. (113)
- Row 32: ch 1, turn, sc, (sc, dc) × 55, sc 2. (113)
- Row 33: ch 1, turn, sc, (dc, sc) × 56. (113)
- Row 34: ch 1, turn, sc, (sc, dc) × 55, sc 2. (113)
- Row 35: ch 1, turn, sc, (dc, sc) × 56. (113)
- Row 36: ch 1, turn, sc, (sc, dc) × 55, sc 2. (113)
- Row 37: ch 1, turn, sc, (dc, sc) × 56. (113)
- Row 38: ch 1, turn, sc, (sc, dc) × 55, sc 2. (113)
- Row 39: ch 1, turn, sc, (dc, sc) × 56. (113)
- Row 40: ch 1, turn, sc, (sc, dc) × 55, sc 2. (113)
- Row 41: ch 1, turn, sc, (dc, sc) × 56. (113)
- Row 42: ch 1, turn, sc, (sc, dc) × 55, sc 2. (113)
- Row 43: ch 1, turn, sc, (dc, sc) × 56. (113)
- Row 44: ch 1, turn, sc, (sc, dc) × 55, sc 2. (113)
- Row 45: ch 1, turn, sc, (dc, sc) × 56. (113)
- Row 46: ch 1, turn, sc, (sc, dc) × 55, sc 2. (113)
- Row 47: ch 1, turn, sc, (dc, sc) × 56. (113)
- Row 48: ch 1, turn, sc, (sc, dc) × 55, sc 2. (113)
- Row 49: ch 1, turn, sc, (dc, sc) × 56. (113)
- Row 50: ch 1, turn, sc, (sc, dc) × 55, sc 2. (113)
- Row 51: ch 1, turn, sc, (dc, sc) × 56. (113)
- Row 52: ch 1, turn, sc, (sc, dc) × 55, sc 2. (113)
- Row 53: ch 1, turn, sc, (dc, sc) × 56. (113)
- Row 54: ch 1, turn, sc, (sc, dc) × 55, sc 2. (113)
- Row 55: ch 1, turn, sc, (dc, sc) × 56. (113)
- Row 56: ch 1, turn, sc, (sc, dc) × 55, sc 2. (113)
- Row 57: ch 1, turn, sc, (dc, sc) × 56. (113)
- Row 58: ch 1, turn, sc, (sc, dc) × 55, sc 2. (113)
- Row 59: ch 1, turn, sc, (dc, sc) × 56. (113)
- Row 60: ch 1, turn, sc, (sc, dc) × 55, sc 2. (113)
- Row 61: ch 1, turn, sc, (dc, sc) × 56. (113)
- Row 62: ch 1, turn, sc, (sc, dc) × 55, sc 2. (113)
- Row 63: ch 1, turn, sc, (dc, sc) × 56. (113)
- Row 64: ch 1, turn, sc, (sc, dc) × 55, sc 2. (113)
- Row 65: ch 1, turn, sc, (dc, sc) × 56. (113)
- Row 66: ch 1, turn, sc, (sc, dc) × 55, sc 2. (113)
- Row 67: ch 1, turn, sc, (dc, sc) × 56. (113)
- Row 68: ch 1, turn, sc, (sc, dc) × 55, sc 2. (113)
- Row 69: ch 1, turn, sc, (dc, sc) × 56. (113)
- Row 70: ch 1, turn, sc, (sc, dc) × 55, sc 2. (113)
- Row 71: ch 1, turn, sc, (dc, sc) × 56. (113)
- Row 72: ch 1, turn, sc, (sc, dc) × 55, sc 2. (113)
- Row 73: ch 1, turn, sc, (dc, sc) × 56. (113)
- Row 74: ch 1, turn, sc, (sc, dc) × 55, sc 2. (113)
- Row 75: ch 1, turn, sc, (dc, sc) × 56. (113)
- Row 76: ch 1, turn, sc, (sc, dc) × 55, sc 2. (113)
- Row 77: ch 1, turn, sc, (dc, sc) × 56. (113)
- Row 78: ch 1, turn, sc, (sc, dc) × 55, sc 2. (113)
- Row 79: ch 1, turn, sc, (dc, sc) × 56. (113)
- Row 80: ch 1, turn, sc, (sc, dc) × 55, sc 2. (113)
- Row 81: ch 1, turn, sc, (dc, sc) × 56. (113)
- Row 82: ch 1, turn, sc, (sc, dc) × 55, sc 2. (113)
- Row 83: ch 1, turn, sc, (dc, sc) × 56. (113)
- Row 84: ch 1, turn, sc, (sc, dc) × 55, sc 2. (113)
- Row 85: ch 1, turn, sc, (dc, sc) × 56. (113)
- Row 86: ch 1, turn, sc, (sc, dc) × 55, sc 2. (113)
- Row 87: ch 1, turn, sc, (dc, sc) × 56. (113)
- Row 88: ch 1, turn, sc, (sc, dc) × 55, sc 2. (113)
- Row 89: ch 1, turn, sc, (dc, sc) × 56. (113)
- Row 90: ch 1, turn, sc, (sc, dc) × 55, sc 2. (113)
- Row 91: ch 1, turn, sc, (dc, sc) × 56. (113)
- Row 92: ch 1, turn, sc, (sc, dc) × 55, sc 2. (113)
- Row 93: ch 1, turn, sc, (dc, sc) × 56. (113)
- Row 94: ch 1, turn, sc, (sc, dc) × 55, sc 2. (113)
- Row 95: ch 1, turn, sc, (dc, sc) × 56. (113)
- Row 96: ch 1, turn, sc, (sc, dc) × 55, sc 2. (113)
- Row 97: ch 1, turn, sc, (dc, sc) × 56. (113)
- Row 98: ch 1, turn, sc, (sc, dc) × 55, sc 2. (113)
- Row 99: ch 1, turn, sc, (dc, sc) × 56. (113)
- Row 100: ch 1, turn, sc, (sc, dc) × 55, sc 2. (113)
- Row 101: ch 1, turn, sc, (dc, sc) × 56. (113)
- Row 102: ch 1, turn, sc, (sc, dc) × 55, sc 2. (113)
- Row 103: ch 1, turn, sc, (dc, sc) × 56. (113)
- Row 104: ch 1, turn, sc, (sc, dc) × 55, sc 2. (113)
- Row 105: ch 1, turn, sc, (dc, sc) × 56. (113)
- Row 106: ch 1, turn, sc, (sc, dc) × 55, sc 2. (113)
- Row 107: ch 1, turn, sc, (dc, sc) × 56. (113)
- Row 108: ch 1, turn, sc, (sc, dc) × 55, sc 2. (113)
- Row 109: ch 1, turn, sc, (dc, sc) × 56. (113)
- Row 110: ch 1, turn, sc, (sc, dc) × 55, sc 2. (113)
- Row 111: ch 1, turn, sc, (dc, sc) × 56. (113)
- Row 112: ch 1, turn, sc, (sc, dc) × 55, sc 2. (113)
- Row 113: ch 1, turn, sc, (dc, sc) × 56. (113)
- Row 114: ch 1, turn, sc, (sc, dc) × 55, sc 2. (113)
- Row 115: ch 1, turn, sc, (dc, sc) × 56. (113)
- Row 116: ch 1, turn, sc, (sc, dc) × 55, sc 2. (113)
- Row 117: ch 1, turn, sc, (dc, sc) × 56. (113)
- Row 118: ch 1, turn, sc, (sc, dc) × 55, sc 2. (113)
- Row 119: ch 1, turn, sc, (dc, sc) × 56. (113)
After Row 119, fasten off the beige with an 8 in (20 cm) tail at the upper corner. Weave in the remaining stripe ends on the back. Spread the rectangle on the table with its marked face up and smooth the sides with your palms.
A white scalloped border around Little Cloud
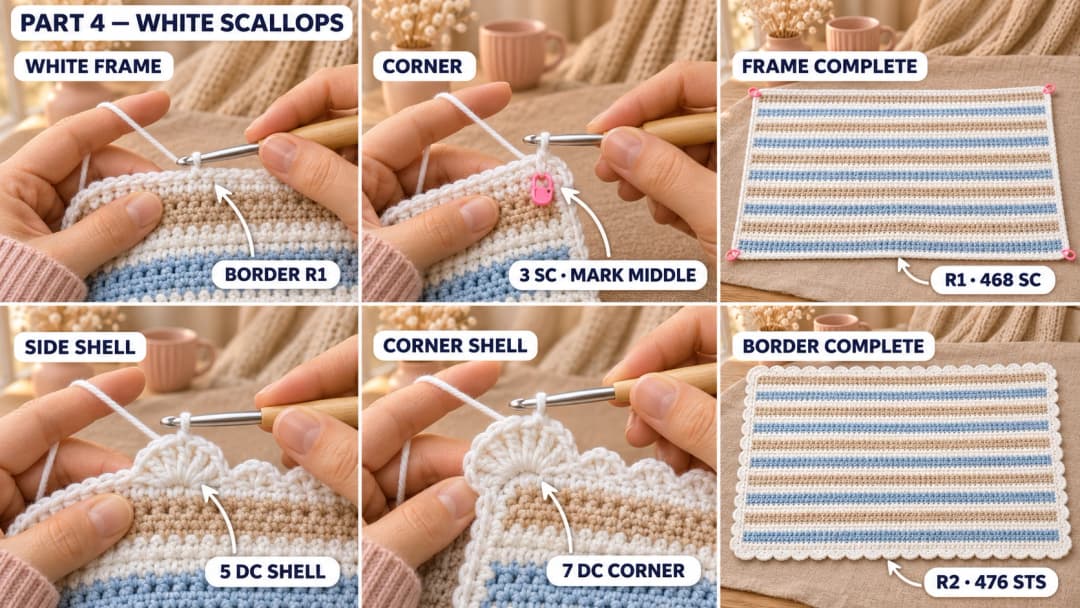
The white edging starts with a plain frame. Keep the marked face toward you, the starting chain nearest you and Row 119 farthest away. Begin at the upper-right corner, then work across the top, down the left side, across the chain edge and up the right side.
First round: the white frame
Join white in the upper-right corner stitch and ch 1. Put a marker in the middle sc of each corner group as you go. The corner groups use the end positions of Rows 1 and 119, so those positions stay outside the long-side row-end counts.
- R1: 3 sc in the upper-right corner stitch, sc in each of the next 111 stitches, 3 sc in the upper-left corner stitch, sc in each of the 117 row ends down the left side, 3 sc in the lower-left foundation chain, sc in each of the next 111 foundation chains, 3 sc in the lower-right foundation chain, sc in each of the 117 row ends up the right side. (468)
On each long side, work into the ends of Rows 2–118, one sc per row end. Along the lower edge, use the unused underside of the foundation chains. Sl st into the first sc and do not turn. The marked corner stitches are 2, 116, 236 and 350, counted from the first sc of R1.
Tip. Set the blanket down before adding the shells. If the frame pulls inward, try a hook 0.5 mm larger for the border; if it ripples, try one 0.5 mm smaller. Keep the counts the same and check the frame again without stretching it. Swatching the border on your sample helps you choose the hook before edging the whole blanket.
Second round: the white scallops
Sl st into the next sc, the marked middle stitch of the first corner. Ch 3, counting as the first dc, then work 6 dc into that same corner stitch. The first corner shell has 7 dc altogether. Each ordinary side shell has 5 dc; the shells have separate stitch tops, like a small fan.
- R2: work 7-dc shells in the four marked corners and 5-dc shells along the sides, with a sc between neighboring shells, following the four sides below. (476)
- Upper short side: (skip 2 sts, sc in the next st, skip 2 sts, 5 dc in the next st) × 18. Then skip 2 sts, sc in the next st, skip 2 sts and work 7 dc in the next marked corner.
- Left long side: (skip 2 sts, sc in the next st, skip 2 sts, 5 dc in the next st) × 19. Then skip 2 sts, sc in the next st, skip 2 sts and work 7 dc in the next marked corner.
- Lower short side: work the upper-short-side instructions, ending with 7 dc in the next marked corner.
- Right long side: (skip 2 sts, sc in the next st, skip 2 sts, 5 dc in the next st) × 19. Then skip 2 sts, sc in the next st and skip the last 2 sts. Sl st into the top of the starting ch 3.
There are 78 shells: 74 side shells and 4 corner shells, with 78 sc between them. The starting ch 3 is included in the first 7-dc shell. The joining sl st is outside the count.
Fasten off, leaving an 8 in (20 cm) tail at the upper-right corner. Weave the tail through stitch backs along the white frame, turn and weave back. Remove all markers. Leave the final trimming until the washed blanket is dry.
Washing and shaping the striped blanket
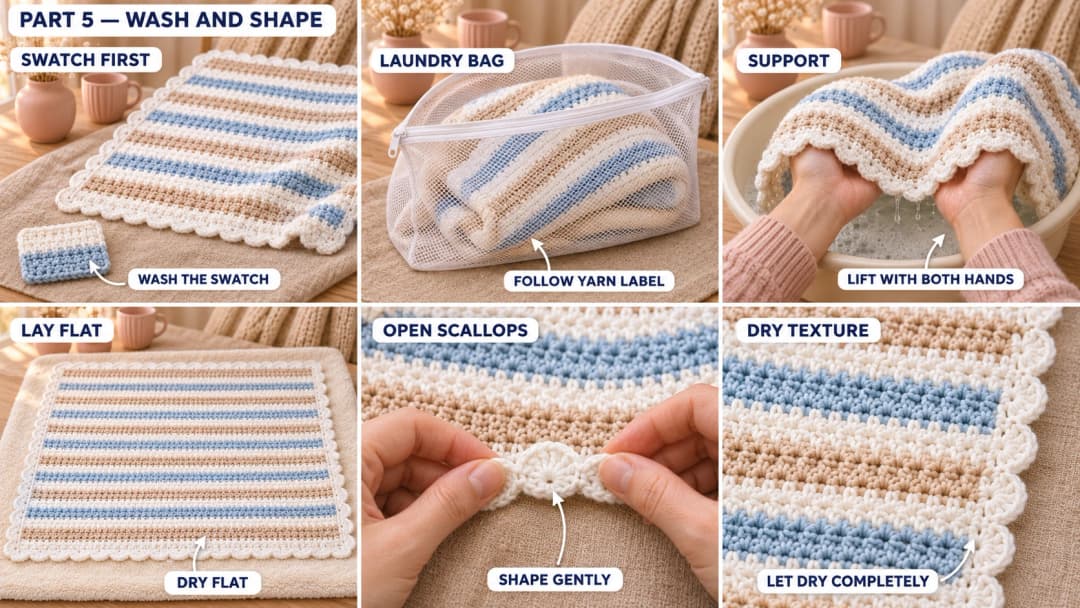
Wash the swatch first and follow the yarn label for the finished blanket. Use a gentle cycle and a roomy laundry bag if machine washing is permitted. Lift the wet blanket with both hands supporting its weight, then spread it on a clean towel, marked face up.
Smooth the stripe edges with your palms, then open the white scallops one by one with your fingers. Let it dry flat without pulling the corners outward. Keep an iron and direct heat away from acrylic yarn; the little bumps should stay soft and rounded.
Safety. I would give this blanket for supervised cuddles while the baby is awake. For sleep, the American Academy of Pediatrics advises keeping blankets and other loose bedding out of the baby's sleep space.
UK terms: US sc = UK dc; US dc = UK tr; US sl st = UK ss.
Wrapping Little Cloud as a baby gift
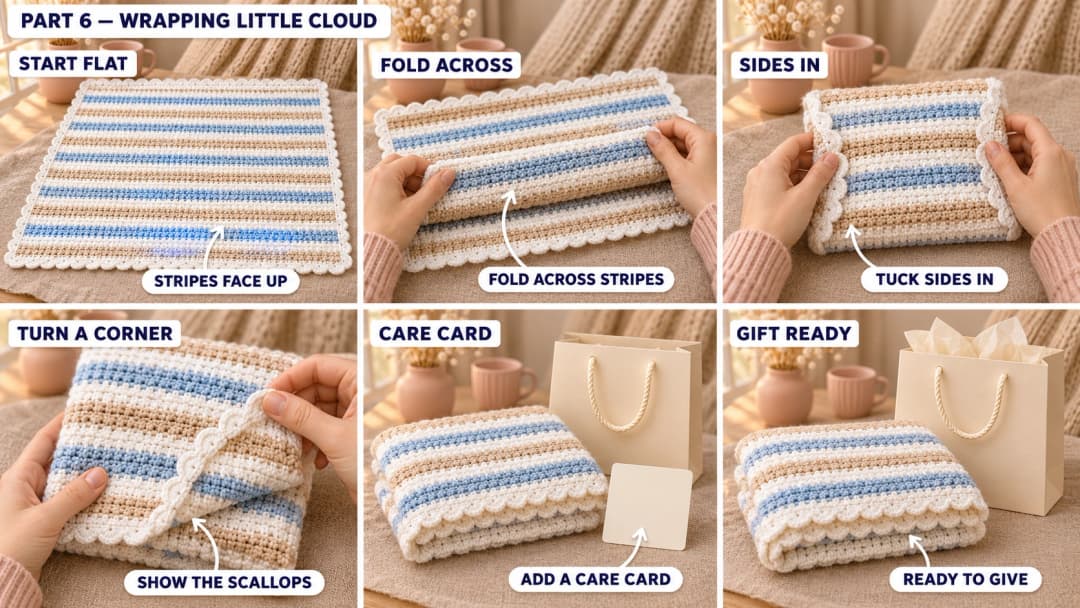
I like to fold the blanket so a blue stripe and a row of white scallops sit at the front. Fold across the stripes first, then bring the sides inward into a soft stack. A turned-back corner shows the little bumps without hiding the color changes.
Tuck a care card into a cream paper gift bag with the yarn names, colors and washing instructions. Keep any wrapping ribbon on the bag. The blanket is lovely on its own; those pale stripes give it enough color to feel special when the tissue paper opens.
Made your own Little Cloud Stripes? Tag #wavodecrochet on Pinterest so I can see your colors.