Crochet Dragonfly Keychain

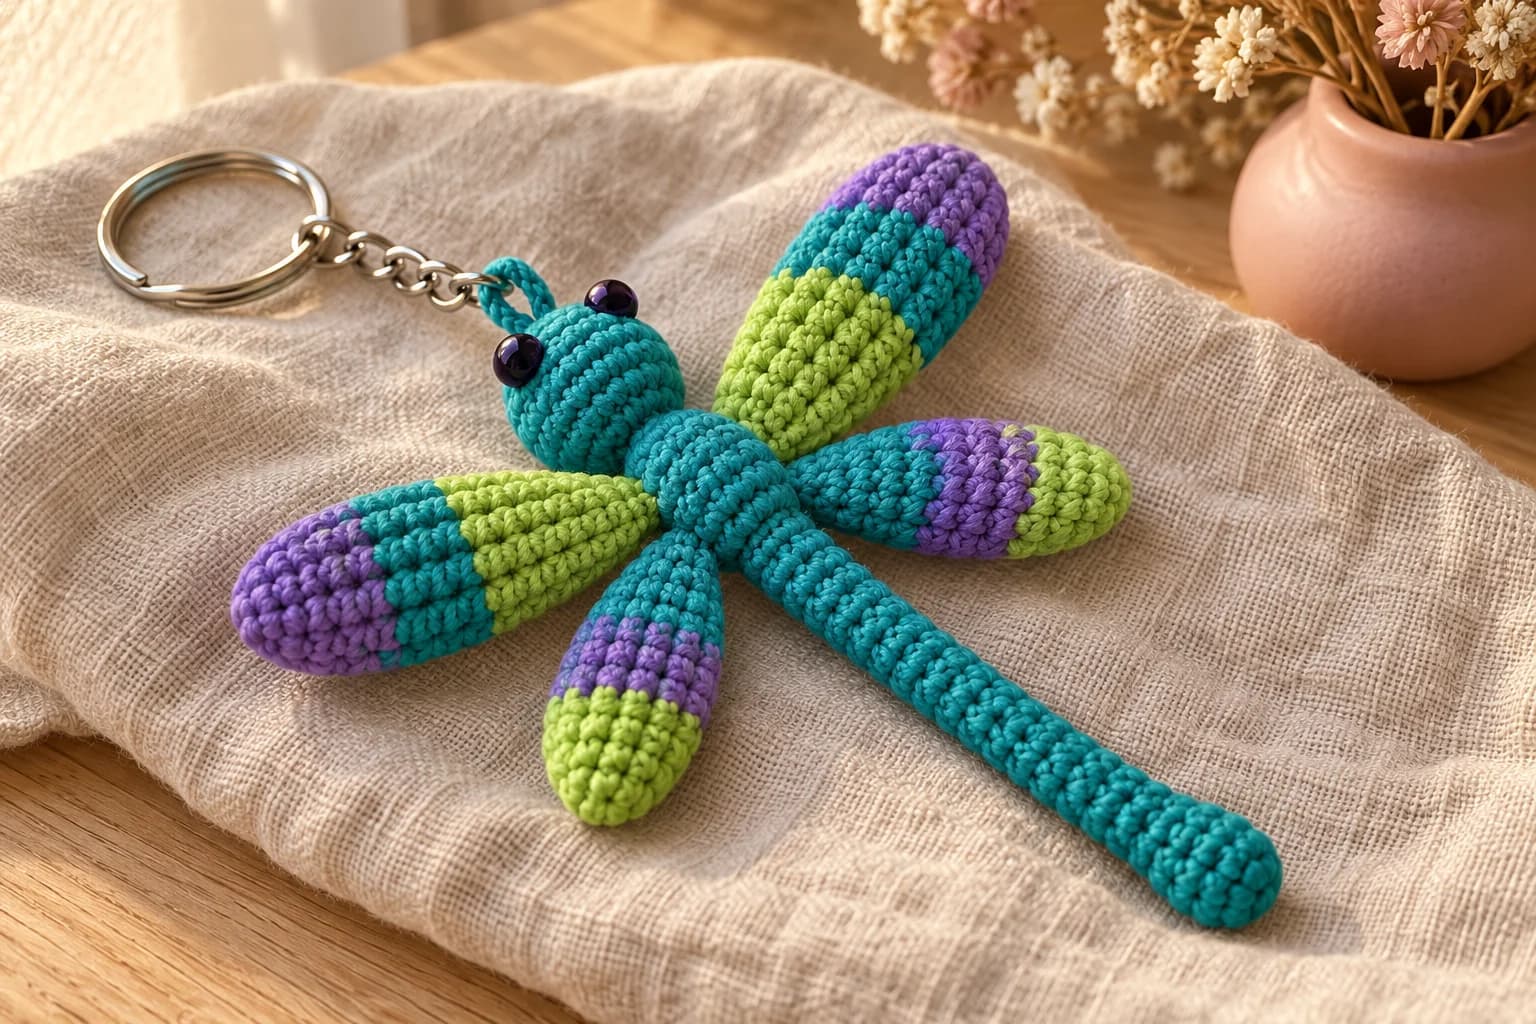
This crochet dragonfly keychain has a teal body, two little eyes and four plump wings banded in green, teal and purple. The body is worked in one piece, from the front of the head to the tip of the tail, so there's nothing to sew there. Each wing is a small, lightly stuffed tube worked from tip to base, with the colors in bands. You'll need DK cotton in three colors, a 2.5 mm hook and about 2 hours.
Key Takeaways
- One-piece body: head, thorax and tail are worked in continuous rounds, from the head forward.
- Banded wings: the upper wings go green, teal, purple from the base to the tip, and the lower wings go teal, purple, green.
- Only basic stitches: ch, sc, inc and sc2tog.
- Small amounts: about 17 yd of teal and 7 yd each of purple and green.
Why I love this keychain
Why a dragonfly? Because it's all about the wings, and wings are the most satisfying thing to crochet: ten quick rounds and three bands of color, and each band changes the whole look. Swapping the color order between the upper and lower wings is what makes them shimmer like the real thing.
It's also a great scrap project. The wings take only a few yards of each color, so it's a good use for the ends of your cotton balls. Hang it on your keys, a backpack zipper or a project bag.
Skill level. Easy. You need a magic ring, sc, inc and sc2tog, plus a clean color change for the banded wings. I explain that part step by step.
Love small flying things? My crochet hummingbird keychain is another quick one.
What you'll need
Yarn (DK #3 cotton)
| Color | Used for | Amount |
|---|---|---|
| Teal | Body, loop, middle band of the upper wings, base of the lower wings | about 17 yd |
| Purple | Tip of the upper wings, middle band of the lower wings | about 7 yd |
| Green | Base of the upper wings, tip of the lower wings | about 7 yd |
- I like Paintbox Yarns Cotton DK. It's smooth, the colors are bright, and the stitches stay crisp at this size.
- I've worked these amounts out from the stitch count, with generous tails for sewing. They're estimates.
Hook
- 2.5 mm (US B/1 or C/2). It's a small hook for DK on purpose: the body comes out firm and the stuffing doesn't show.
Notions
- 2 black or dark purple safety eyes, 6 to 8 mm. Or two beads of the same size sewn on, for the same look.
- A little fiberfill, a stitch marker, a tapestry needle and scissors.
- A split key ring with a short chain (most keychain rings come with one), or a 25 mm (1 in) split ring on its own.
Gauge
Gauge isn't critical. Crochet tightly enough that the stuffing doesn't show between the stitches. With DK cotton and a 2.5 mm hook, that's about 6 sc per inch. At that tension, the dragonfly should come out about 4¼ in (11 cm) long and 3¾ in (9.5 cm) across the wings. Those sizes are worked out from the stitch counts, so measure yours. With a different yarn or tension, it will come out a little bigger or smaller, and that's fine.
Abbreviations (US crochet terms)
- MR: magic ring
- ch: chain
- sc: single crochet
- inc: 2 sc in the same st
- sc2tog: single crochet 2 together (a decrease)
- R: round
- st(s): stitch(es)
How the dragonfly is built
Here's the whole thing in one sentence. The body starts with a magic ring at the front of the head and ends at the tip of the tail, and the four wings are sewn flat to the sides of the thorax. So the magic ring is the front of the head, where the key ring loop goes, and the last round closes the tip of the tail.
The top of the dragonfly is the side with the eyes. The wings are sewn on the sides, level with the eyes, so the dragonfly lies flat when you put it down.
The pattern, step by step
Part 1: The body (teal)
Work in continuous spiral rounds. Don't join, and move your marker up at the start of each round.
Head.
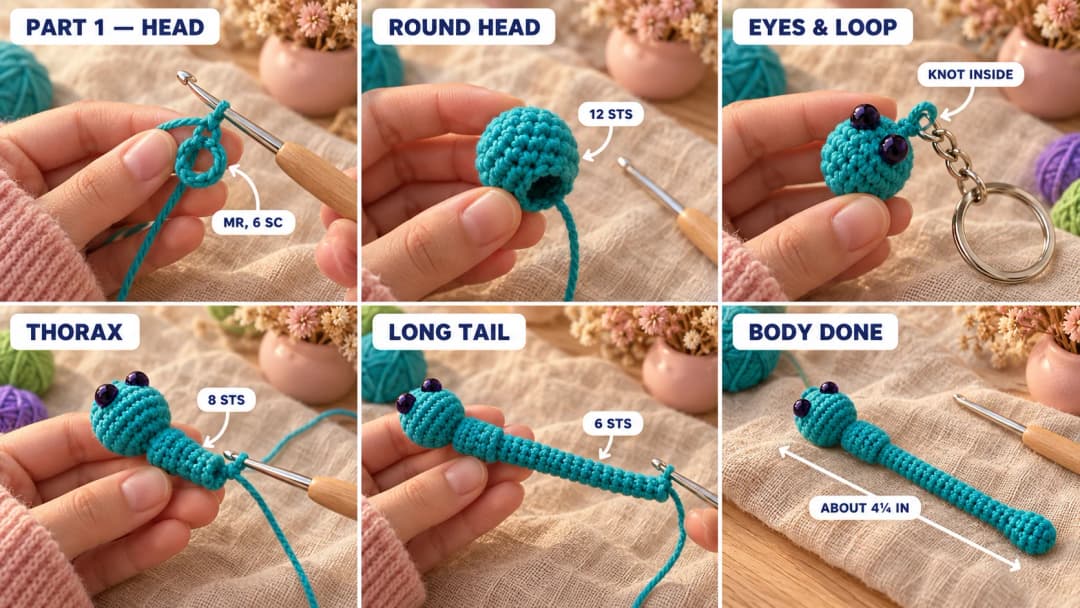
- R1: MR, 6 sc in the ring. (6) Pull the ring closed. This is the very front of the head.
- R2: inc × 6. (12)
- R3–R4: sc around. (12)
Eyes. Insert the safety eyes between R2 and R3, with 3 sts between them, on the side you choose as the top. Fix the backs now, while the head is still open.
Key ring loop. Add it now too, while you can still reach inside the head. That way the knot sits inside, behind the magic ring, and you don't need to thread anything through stuffing later.
- With teal, leave a 6 in (15 cm) tail, ch 6, and fasten off leaving a second 6 in tail. You have a short chain with a tail at each end.
- Slide the chain through the end link of the keychain's short chain (or onto the split ring) and fold it in half. Both tails hang together.
- Thread one tail onto the tapestry needle and take it from the outside into the center hole of the magic ring, then out through the open back of the head. Take the other tail in between 2 sc of R1, right next to the center, the same way.
- Inside the head, pull until the folded chain sits snugly against the front. Tie the two tails together in a tight double knot around 2 sts of R2, then knot again. Trim the tails to ½ in (1.3 cm), so they can stay inside the head.
- R5: (sc, sc2tog) × 4. (8) This is the narrow neck between the head and the thorax.
Stuff the head firmly through the opening.
Thorax. This is where the wings go.
- R6–R10: sc around. (8) Stuff as you go.
- R11: (sc 2, sc2tog) × 2. (6)
Tail.
- R12–R27: sc around. (6) That's 16 rounds. Push a little stuffing in with the back of the hook every 4 or 5 rounds, just enough to keep the tail round. Once a section is closed off further along, you can't reach it any more.
- R28: (inc, sc 2) × 2. (8) The tip swells a little.
- R29: sc around. (8)
- R30: sc2tog × 4. (4) Add a pinch of stuffing.
Fasten off. Thread the tail through the front loops of the last 4 sts, pull tight to close the tip, and bury the end inside the tail.
The body is about 4¼ in (11 cm) long.
Part 2: The wings
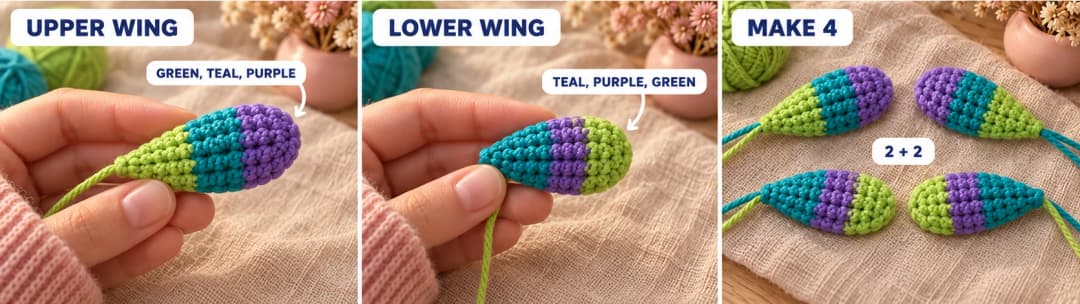
Each wing is a small, lightly stuffed tube worked in continuous rounds, from its round tip to its narrow base. The colors make bands across the wing. The base stays open and is sewn to the body.
Changing color. Work the last sc of the round until 2 loops are left on the hook, then finish it with the new color. Cut the old color, leaving a 3 in (7.5 cm) tail, and tie the two tails together loosely on the inside of the tube. All the color changes line up in one place: you'll turn that side to the underside when you sew the wing on.
Upper wing (make 2): purple tip, teal middle, green base.
- R1 (purple): MR, 6 sc in the ring. (6) Pull the ring closed. This is the round tip.
- R2: inc × 6. (12)
- R3: sc around. (12) Change to teal in the last st.
- R4–R6 (teal): sc around. (12) Change to green in the last st of R6.
- R7 (green): sc around. (12)
- R8: (sc 2, sc2tog) × 3. (9)
Stuff the wing lightly, with just a small tuft, then press it between your fingers so it's a plump, slightly flat oval rather than a ball.
- R9: (sc, sc2tog) × 3. (6)
- R10: sc around. (6)
Fasten off, leaving a 10 in (25 cm) tail for sewing. The base stays open, with 6 sts.
Lower wing (make 2): green tip, purple middle, teal base. It's two rounds shorter.
- R1 (green): MR, 6 sc in the ring. (6)
- R2: inc × 6. (12)
- R3: sc around. (12) Change to purple in the last st.
- R4–R5 (purple): sc around. (12) Change to teal in the last st of R5.
- R6 (teal): sc around. (12)
- R7: (sc 2, sc2tog) × 3. (9) Stuff lightly and flatten a little, as for the upper wings.
- R8: (sc, sc2tog) × 3. (6)
Fasten off, leaving a 10 in (25 cm) tail.
The upper wings are about 1½ in (4 cm) long and the lower ones about 1¼ in (3 cm), each about as wide as the head.
Part 3: Assembly and the key ring
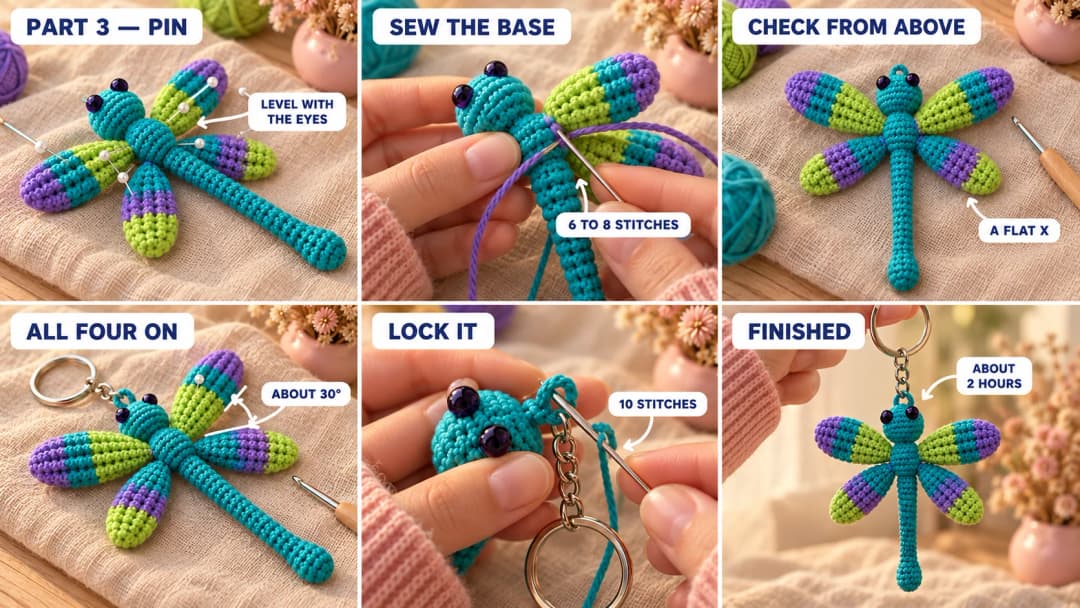
Sew on the wings. Lay the body on the table, eyes up. The thorax has 8 sts around. Looking from the head toward the tail, the 2 sts in line with the eyes are the top, the 2 opposite them are the underside, and the 2 sts at each side are where the wings go. That's the line level with the eyes, at about 3 and 9 o'clock.
- Upper wings: place the base of each upper wing on that side line at R6–R7. Angle it about 30° toward the head, measured from a line straight out to the side.
- Lower wings: place the base of each lower wing on the same side line, just behind, at R8–R9. Angle it about 30° toward the tail.
- Pin all four, then check from above: the wings should make a flat X, with each pair mirroring the other and all four bases on the same line. Turn it over to check that no base has crept onto the top or the underside.
- Flatten each wing's open base so its 6 sts lie in two layers of 3, with the color-change line underneath. With the wing's long tail, sew the base to the thorax with 6 to 8 stitches, going through both layers of the base and 2 or 3 sts of the body. Hide the tail inside the body and trim.
Lock the key ring loop. The loop is already knotted inside the head (Part 1). With a short length of teal, sew 10 or more small stitches through the base of the folded chain and the front of the head, going deep each time. Hide the end inside the body. A keychain gets pulled every day, so be generous here.
Give the loop a few firm tugs. It shouldn't move at all.
Safety. This keychain has safety eyes and a metal key ring, so it isn't a toy for children under 3. For a little one, leave off the ring and loop, and embroider the eyes with a few stacked straight stitches in black yarn.
Make it yours — quick variations
| Variation | Change from base pattern |
|---|---|
| Ridged tail | Work every 3rd tail round (R14, R17, R20, R23, R26) in the back loops only for little ridges like a real dragonfly's segments. |
| Sunset dragonfly | Orange body, wings in yellow, orange and pink. |
| Bag charm | Swap the key ring for a lobster clasp so it clips onto a bag handle. |
| Magnet or brooch | Leave off the loop and glue a magnet or sew a pin back under the thorax. |
| Single-color wings | Work each wing in one color for a quicker, softer look. |
Troubleshooting the three things that go wrong
The wings look like balls, not ovals
They're over-stuffed. Use only a small tuft and press the wing flat between your fingers before closing it down to 6 sts. If one is already closed, squeeze it flat and hold it for a minute, or pull a little stuffing back out through the base.
The tail bends or flops
It's under-stuffed. Push small bits of stuffing in with the back of the hook every few rounds as you go. Once the tip is closed, you can't add more.
The wings sit at different heights
Check from above before sewing: all four bases should touch the body along the same line, level with the eyes. Pin first, then sew.
Frequently asked questions
How long does this keychain take? About 2 hours. The body takes about an hour, and each wing about 10 to 15 minutes.
Can I use worsted yarn? Yes, with a 3.5 mm hook. The dragonfly comes out about a third bigger, closer to 5½ in long, which makes a nice bag charm.
Do I have to use three colors for the wings? No. One color works, or two bands instead of three. The three-color wings are what make it look so lively, though.
Can I sell keychains made from this pattern? Yes, you're welcome to sell finished keychains made from this free pattern at markets, on Etsy or as gifts. Please credit "Pattern by Wavode" in your listing and link back to this page. What you can't do is republish this write-up or my photos as your own pattern.
Related patterns on Wavode
- Crochet hummingbird keychain: a tiny bird with bright wings.
- Crochet owl keychain: a round little owl for your keys.
- Sea turtle keychain: a turtle with a patterned shell.
- Crochet mushroom keychain: a red-capped kawaii amanita.
Made a dragonfly? Tag #wavodecrochet on Pinterest. I re-pin every finished make and credit the maker.
Pattern by Clara Hartwell for Wavode. Questions? Email me at support@wavode.com.