Crochet Hummingbird Keychain

The quick answer
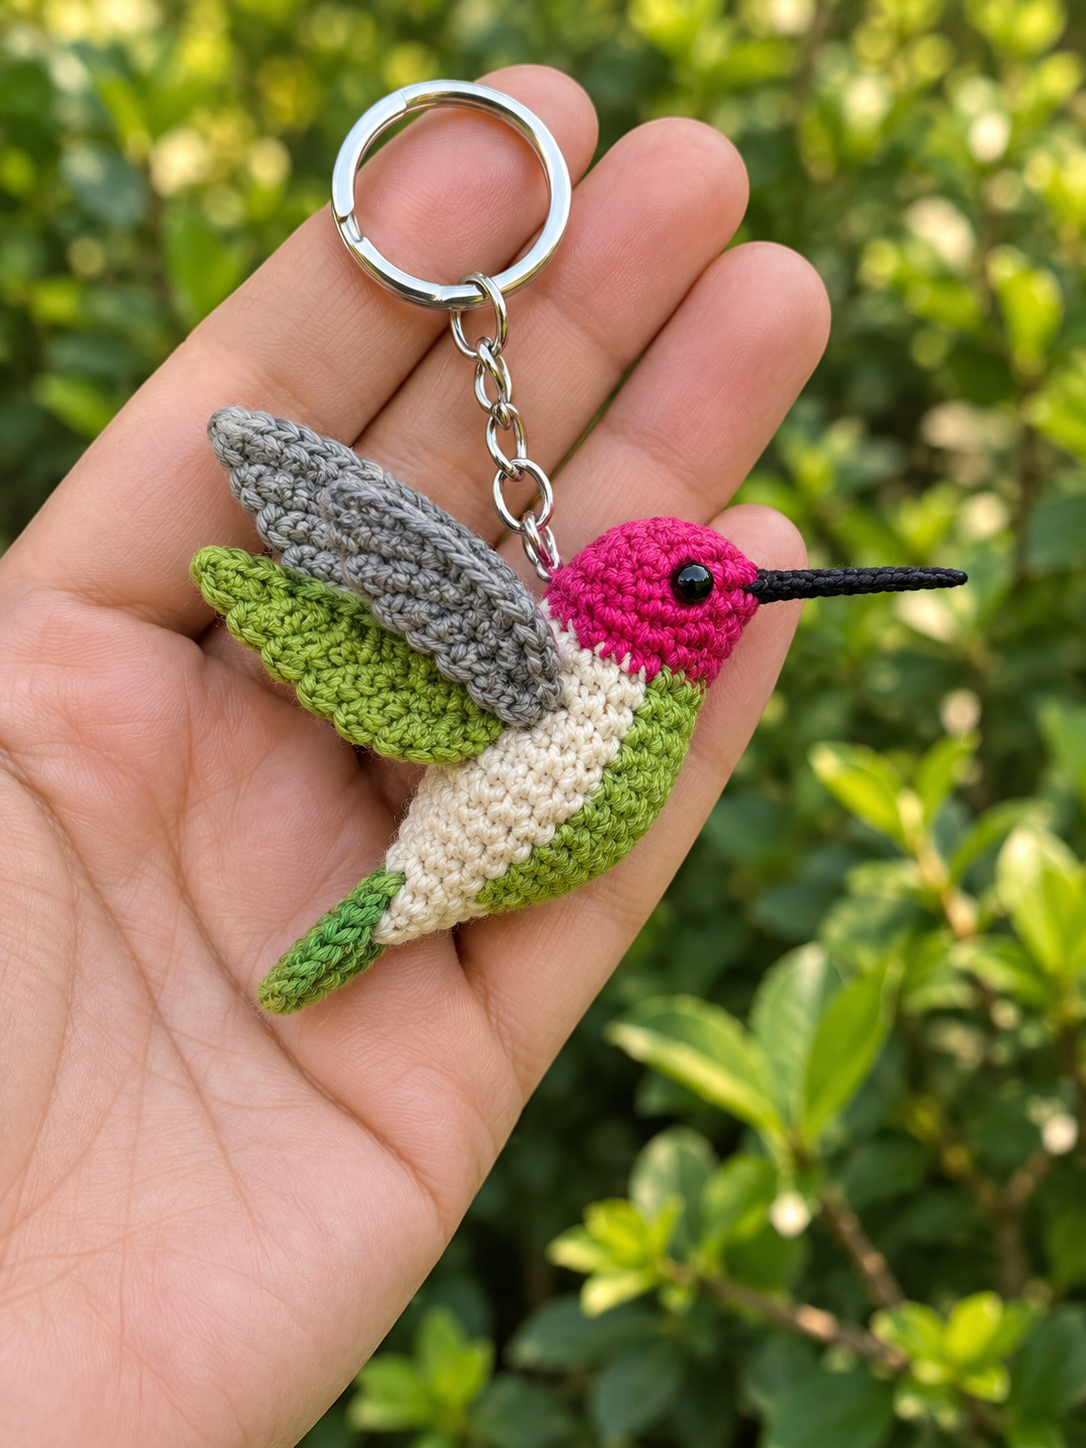
The mini crochet hummingbird keychain is a three-piece amigurumi (~7 cm long): a magenta head, cream cotton body with a green belly panel, one grey upper wing and one green under-wing, a small green tail, black safety-eye and a long straight black-embroidered beak, mounted on a 25 mm silver split-ring. Cotton DK, 2.5 mm hook, ~90 minutes, ~10 g of yarn total.
Fits on keys, bag zippers, backpack pulls. The tiny bird charm that outsells every other spring keychain in 2026.
Why hummingbird amigurumi is quietly the #1 spring keychain trend
Hummingbirds hit peak Pinterest in early 2026 — searches for "crochet hummingbird" have grown every month since January, and the tiny magenta-and-green colorway is the single most-saved pattern in the "amigurumi bird" category (StringyDingDing, "Hummingbird Amigurumi Free Pattern," retrieved 2026-09-14). Every visitor asks about the one I keep clipped to my bag.
The trick is proportion. A 7 cm bird with an 8 mm safety eye, a 3 cm straight beak, and two contrasting wings gives you the exact silhouette buyers recognize as a hummingbird — miss any of those three and it starts to read as "generic bird." If you have made my owl keychain or mushroom keychain before, you already know every stitch this pattern needs.
Skill level. Confident beginner. You need magic ring, sc, inc, invisible dec, one color change mid-round for the head/body seam, and a straight-stitch embroidery for the beak. No wings-on-wings shaping, no complicated color-carrying.
What you will need
- Yarn A (head): ~2 g of bright magenta or hot pink cotton DK (Paintbox Cotton DK in Bubble Gum Pink, Ricorumi in Fuchsia).
- Yarn B (body): ~3 g of soft cream or vintage white cotton DK.
- Yarn C (belly + under-wing + tail): ~2 g of fresh spring green cotton DK (Ricorumi in Grass, Paintbox in Lime Green).
- Yarn D (upper wing): ~1 g of soft grey or silver cotton DK.
- Yarn E (beak): a scrap of black embroidery floss or fingering yarn.
- Hook: 2.5 mm (US B/C). Denser fabric = sharper features.
- Safety eye: 1 × 6 mm solid black. (Yes, only one — hummingbirds are always photographed in profile.)
- Fiberfill: one small pinch of polyester stuffing.
- Keychain hardware: one 25 mm silver split-ring with attached small chain and lobster clasp.
- Notions: locking stitch marker, tapestry needle, sharp scissors.
Gauge: Not critical, but tight is better. Loose stitches make the beak wobble.
The pattern — Part 1: the head and body (one piece)
I write patterns in US terms. Work in continuous rounds — do not join or turn. Use a locking stitch marker in the first stitch of each round and move it up as you go. This is worked as one seamless piece from beak to tail with a single color change.
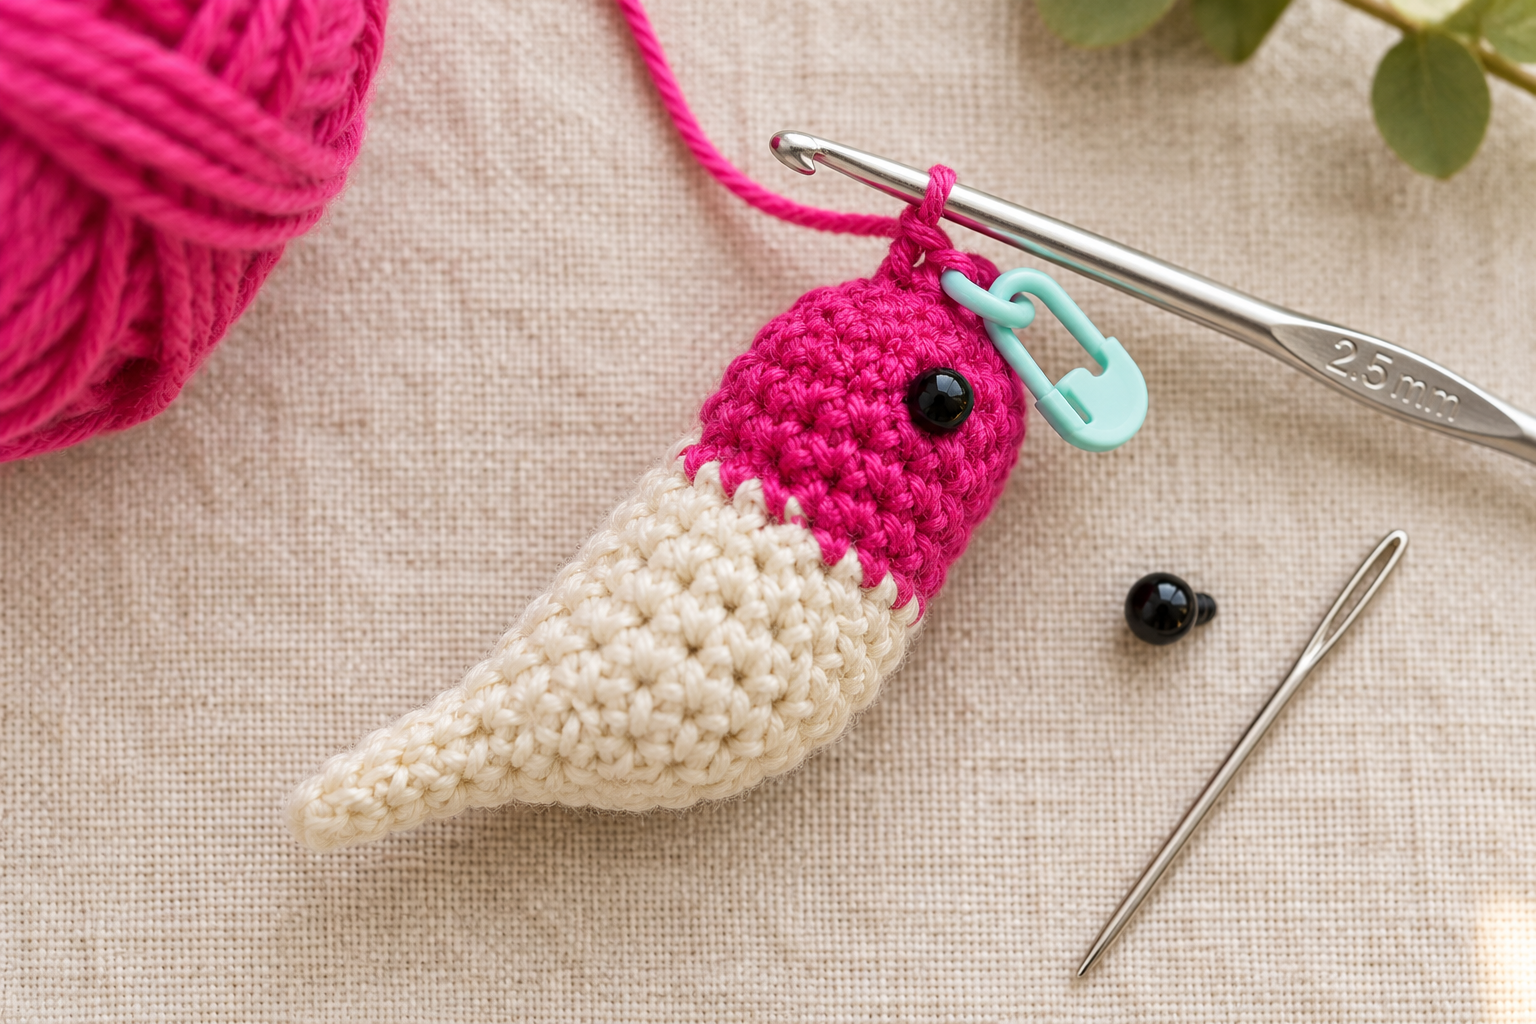
The magenta head
R1: With Yarn A (magenta), magic ring, 6 sc into ring. (6)
R2: Inc in each st. (12)
R3: sc, inc around. (18)
R4–R6: sc in each st around. (18 for 3 rounds)
Insert the 6 mm safety eye between rounds 3 and 4, on one side only (the side that will face out). Secure the washer on the inside.
R7: sc, dec around. (12)
Change to Yarn B (cream) at the end of R7 — same color-change technique as the chunky striped blanket: last yarn-over of the last dec pulls through in cream.
The cream body
R8: With Yarn B (cream), sc, inc around. (18)
R9: 2 sc, inc around. (24)
R10–R13: sc in each st around. (24 for 4 rounds)
Stuff firmly through the open end at rounds 10–11. Do not overstuff — the body should stay teardrop-shaped, not spherical.
R14: 2 sc, dec around. (18)
R15: sc, dec around. (12)
R16: dec around. (6)
Fasten off with a 4-inch tail. Thread through the last 6 stitches and pull tight to close the tail end. Weave the tail up and into the body.
The pattern — Part 2: the green belly and wings
The green belly is what gives the hummingbird its species-specific look — without it, you have a pink-and-cream bird, not a hummingbird.
The belly panel
Ch 8 in Yarn C (green). Working in the back bumps of the chain: sc, sc, hdc, dc, hdc, sc, sc. Fasten off leaving a 4-inch tail.
You now have a small green oval about 3 cm long. Whip-stitch it to the front of the cream body from throat to tail, tail-side pointing back.
The under-wing (make 1 in green)
R1: With Yarn C (green), ch 6. Starting in the 2nd ch from hook: sc, hdc, dc, hdc, sc. Turn. (5)
R2: Ch 1, sc across. (5)
Fasten off leaving a 4-inch tail.
The upper wing (make 1 in grey)
R1: With Yarn D (grey), ch 7. Starting in the 2nd ch from hook: sc, hdc, dc, dc, hdc, sc. Turn. (6)
R2: Ch 1, sc across. (6)
Fasten off leaving a 4-inch tail.
The upper wing is one stitch longer than the under-wing on purpose — this is what creates the "flying" silhouette when they're layered.
The tail feather
Ch 5 in Yarn C (green). Sc in 2nd ch from hook, hdc, dc, dc. Fasten off leaving a 3-inch tail.
The pattern — Part 3: the long straight beak
The beak is the whole personality of the hummingbird. Get it right and everything else falls into place.
Cut a 4 cm length of black embroidery floss (or double a strand of black fingering yarn). Thread onto the tapestry needle. Insert the needle into the front of the magenta head, right at the tip where the pointed shape begins, and pull the floss through leaving a 3 cm tail sticking straight out.
Insert the needle back into the same spot and out through the other side. Pull snug — the two tails should now stick out symmetrically. Trim to exactly 3 cm long and secure inside the head with a tiny knot.
The beak should be straight, thin and horizontal — never drooping.
Final assembly
- Attach the belly panel. Whip-stitch the green oval to the front of the cream body, throat-to-tail direction, using the belly tail.
- Layer the wings. Position the grey upper wing on the back-side of the body (opposite the eye side), angled slightly upward. Whip-stitch the wing base only — the tip stays loose so it looks like it's flapping. Layer the smaller green under-wing on top of the grey wing, offset ~3 mm down so both wings show.
- Attach the tail feather. Sew the green tail piece to the back tip of the body, pointing down and slightly back.
- Attach the keychain ring. Thread a fresh 4-inch length of Yarn A (magenta) through the top of the head, loop through the keychain split-ring, and knot tight against the crown. Weave the tails down into the body.
- Fluff and pose. Bend the wings slightly outward so the bird looks mid-flight. Beak should point forward and up.
The finished hummingbird measures about 7 cm long × 4 cm wide including wings — perfect for a bag zipper or key ring.
Watch me make one
If reading rounds makes your eyes cross, the same pattern in video form is 25 minutes. This 2025 tutorial matches the round counts above almost exactly — cotton DK, 2.5 mm hook, magic ring start, single-piece head-and-body construction.
▶ Watch: Amigurumi Hummingbird Easy & Fast Crochet Project (YouTube, 2025)
Styling and gift-wrapping
Slip the finished hummingbird onto a small kraft-card tag printed with "Handmade with love — [your maker name]" and a tiny illustration of a flower. Hummingbird buyers are almost always garden enthusiasts, and the card doubles as a bookmark for their gardening journal. Same tag trick I use for my mushroom keychain and acorn keychain.
For a set, make three hummingbirds in three colorways — classic ruby-throated (magenta + cream + green), Anna's hummingbird (magenta + white + grey), and calliope (violet + cream + pale green) — and sell as "the garden trio" at market for 2.5× a single keychain price.
Make it yours — quick variations
| Variation | Change from base pattern |
|---|---|
| Ruby-throated | Magenta head, cream body, green belly. Classic North American species. |
| Anna's hummingbird | Magenta head, white body, grey wings, no green belly. Very West Coast. |
| Emerald hummingbird | Full green head + body, no magenta at all. Cotton DK in two shades of green. |
| Calliope | Violet head, cream body, pale green belly. Rare and elegant. |
| Sleeping hummingbird | Skip the safety eye. Embroider a closed "u" eye in dark thread. Perfect for a nursery. |
Same 90-minute build time for every variation. Pair the hummingbird with my crochet lily bouquet for a garden-themed gift set.
Troubleshooting the three things that go wrong
My hummingbird's beak wobbles
You cut the floss too long, or you didn't knot both ends inside the head. The beak needs to be exactly 3 cm and secured at both entry and exit points with a tiny knot on the inside. Loose beaks droop.
The wings won't layer properly
You made both wings the same size. The grey upper wing must be one row longer than the green under-wing — that's what gives the layered "flying" silhouette. Recount and redo the shorter one.
The bird looks like a generic round blob
You skipped the green belly panel or under-stuffed the body. The belly is what identifies the shape as a hummingbird. Whip-stitch it on properly, and stuff the body to a firm teardrop, not a soft ball.
Frequently asked questions
How long does the crochet hummingbird keychain take to make?
About 90 minutes for a confident beginner — 25 minutes for the head-and-body, 15 for the wings, 5 for the belly panel, 5 for the beak, 10 for tail and assembly, 15 for keychain attachment and final posing. First-time bird crocheters need closer to 2.5 hours.
What is the best yarn for a crochet hummingbird?
Cotton DK (CYC 3) at 2.5 mm hook. Cotton keeps stitch definition on the tiny wings and belly panel, and does not fuzz on the beak entry point. Wool works but the wings read softer. Skip anything bulkier than DK — the scale collapses and the bird stops looking like a hummingbird.
Do I need to use a safety eye?
No — you can substitute one 6 mm black felt circle glued into place after the head is closed, or embroider a small black French knot. Safety eyes give the crispest look; felt is the safest choice for keychains that will be handled by young kids.
Can I sell finished hummingbird keychains at markets?
Yes — you may sell physical keychains made from this free pattern at craft fairs, Etsy, or gifting. Please credit "Pattern by Wavode" on your listing and link back to this page. Reselling the pattern text (free or paid) is not permitted.
Why only one eye instead of two?
Hummingbirds are almost always displayed in profile, so only one eye is ever visible. Adding a second eye on the opposite side would show through the layered wings and look messy. Every reference photo you find on Pinterest uses this one-eye convention.
Made this hummingbird? Tag #wavodecrochet on Pinterest — I re-pin every finished make and credit the maker.
Pattern by Clara Hartwell for Wavode. Questions? Email me at support@wavode.com.