Crochet Teddy Bear with a Bunny-Ear Robe

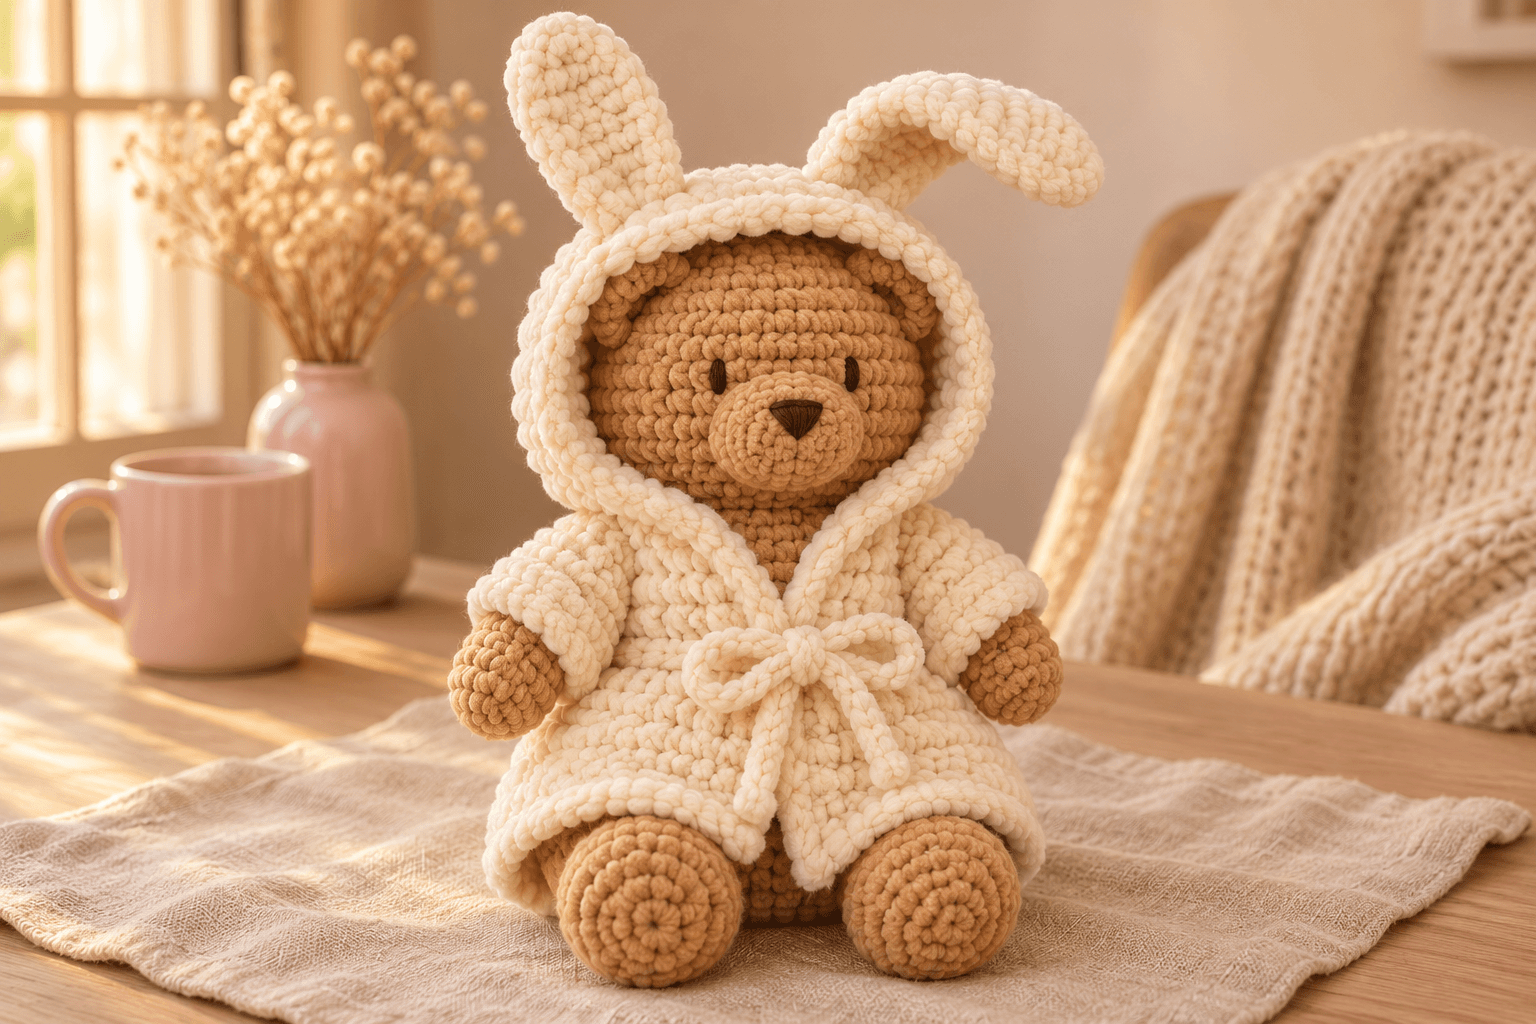
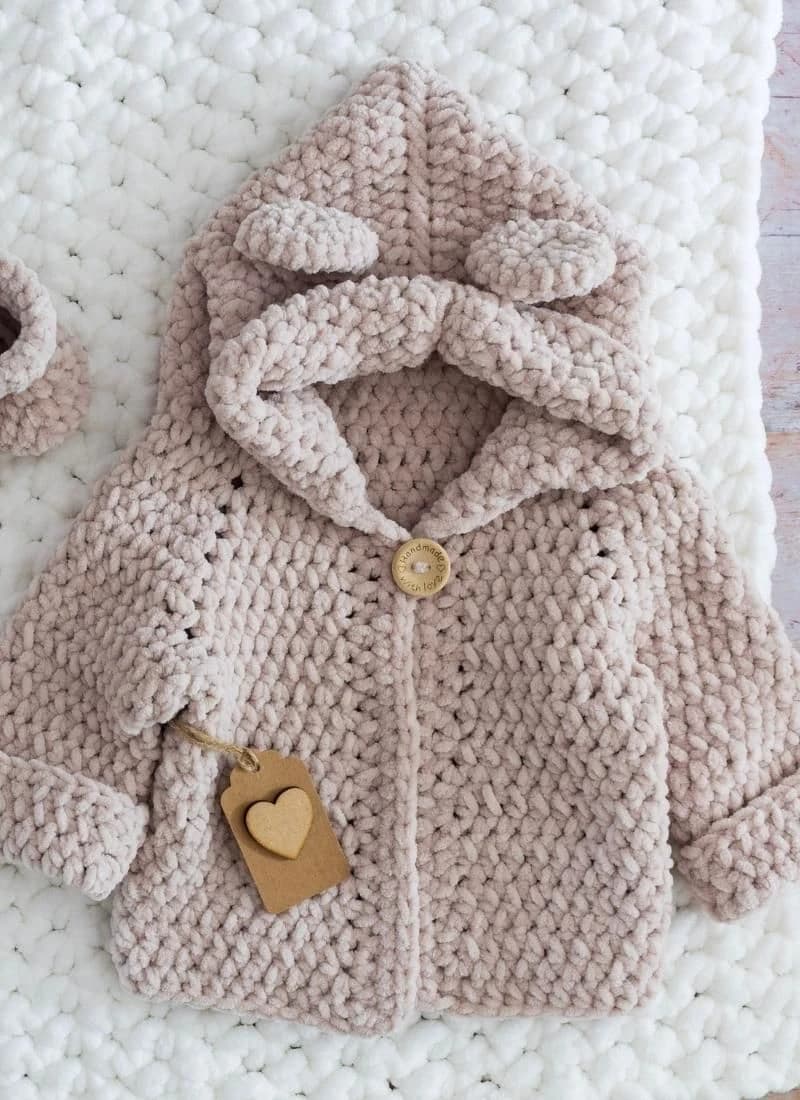
I have a soft spot for a teddy dressed for a quiet evening. A little robe, a loose bow at the waist, those tall ears leaning above the hood. Biscuit is a camel crochet teddy bear with a removable cream bunny-ear robe, with an estimated crown-to-body-base length of about 12 in (30 cm).
His paws curve forward, and the lightly filled arms hang softly below his chin. The robe opens fully at the front, so you can slip it over his arms before pulling up the hood. I keep the bunny ears empty; a small pinch at their bases gives them that gentle fold.
This written version adapts the teddy bear and robe video tutorial, with corrected arm decreases and a five-stitch arm closure. The numbered face and seam placements, wider sleeves, front shaping and larger hood are additions to the written instructions.
| At a glance | |
|---|---|
| Finished size | estimated 12 in (30 cm) from crown to body base; body about 5 in (13 cm) wide |
| Yarn | super bulky #6 micropolyester velvet in camel and cream |
| Hook | 5 mm for the bear and robe |
| Components | 18 worked components, including fronts and sleeves worked onto the robe |
| Time | allow a weekend, with time for sewing and fitting |
| Skill | intermediate: shaping, paired closure, row-edge pickups and fitting |
Yarn and supplies for your teddy bear
I like camel against warm cream here: the face stays easy to see when the hood is up. Use the same velvet yarn thickness for Biscuit and his robe, so the sleeves and neckline keep their proportions.
- Camel velvet: about 150 yd (137 m) of Velluto, color 429 Camel, 100% micropolyester, super bulky #6. The supplied listing gives 75 yd (69 m) per item and an item weight of 105 g. Have an extra item available if you crochet loosely.
- Cream velvet: about 145 yd (133 m) of matching super bulky #6 micropolyester velvet. Match its thickness to the camel yarn.
- Smooth seaming yarn: about 8 yd (7 m), split between camel and cream, for sewn joins.
- Face yarn: about 2 yd (1.8 m) of smooth dark brown or black yarn for embroidered eyes and nose.
- Hook: 5 mm.
- Small things: fiberfill, a large-eye tapestry needle, scissors, sewing pins, two stitch markers and contrast scrap yarn.
Tension: about 2.5 sc per inch (2.5 cm), with about 2.5 rounds or rows per inch in single crochet. The fabric should be snug enough that the stuffing stays hidden. At this tension, the head is about 4 in (10 cm) across and the body about 5 in (13 cm) across. The size and yarn amounts are estimates from the stitch counts.
This miniature robe uses firm, close costume fabric, worked at the amigurumi tension above with the same small hook. Check its fabric separately before starting the back. Fit each stage to the stuffed bear before fastening off.
Tip. Velvet can fray when you pull a long strand through a seam repeatedly. I use matching smooth yarn for the head and limb seams; it sinks into the pile.
Stitches for the bear and its little robe
US terms: MR = magic ring; ch = chain; sc = single crochet; sl st = slip stitch; inc = 2 sc in one stitch; dec = invisible single crochet decrease over two stitches; sc3tog = single crochet three stitches together; st = stitch. R means round. Rows are written as Row.
Work the bear in a continuous spiral. Put the marker in the first stitch and move it up each round. The number in parentheses is the finished stitch count. For flat rows, ch 1 and turn; that chain does not count as a stitch. Sleeve joining slip stitches also stay outside the count.
Invisible decrease: put the hook through the front loops of the next two stitches, yarn over and pull through both front loops, then yarn over and pull through the two remaining loops.
For face placement, keep a contrast strand running up the front of the head above the gap between stitches 16 and 17 of R5. Keep the beginning-of-round marker at the back. On the body, mark the front above the gap between stitches 20 and 21 of R5. Carry these front markers upward as you work, without counting them as stitches.
Making the teddy bear's head
Camel, 5 mm hook. Make 1. The magic ring is Biscuit's crown. The last round tucks underneath his chin.
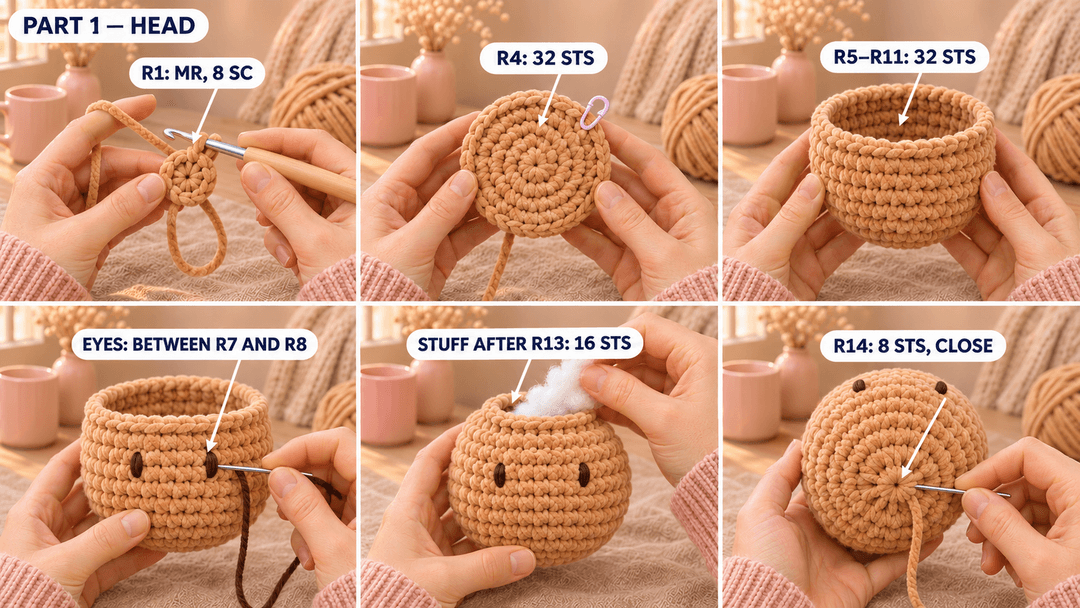
- R1: MR, 8 sc in the ring. (8)
- R2: inc × 8. (16)
- R3: (sc, inc) × 8. (24)
- R4: (sc 2, inc) × 8. (32)
- R5–R11: sc around. (32) 7 rounds.
Leave the working loop on a marker. Embroider the eyes while you can reach inside the head. Place them between R7 and R8, three stitch-widths to either side of the front strand, leaving six stitch-widths between their centers. Make four short vertical stitches over one round at each position. Secure the ends inside.
Put the loop back on the hook.
- R12: (sc 2, dec) × 8. (24)
- R13: (sc, dec) × 8. (16)
Stuff the head firmly now, spreading the filling into both cheeks. Keep the front strand visible.
- R14: dec × 8. (8)
Sl st in the next stitch and fasten off, leaving an 8 in (20 cm) tail underneath. Thread it through the front loops of the eight remaining stitches and draw the opening closed. Secure the end inside. The muzzle goes on next.
Tip. Pull the magic ring closed slowly. If the velvet begins to shed, stop pulling and close the center with a strand of matching smooth yarn instead.
The oval muzzle and embroidered nose
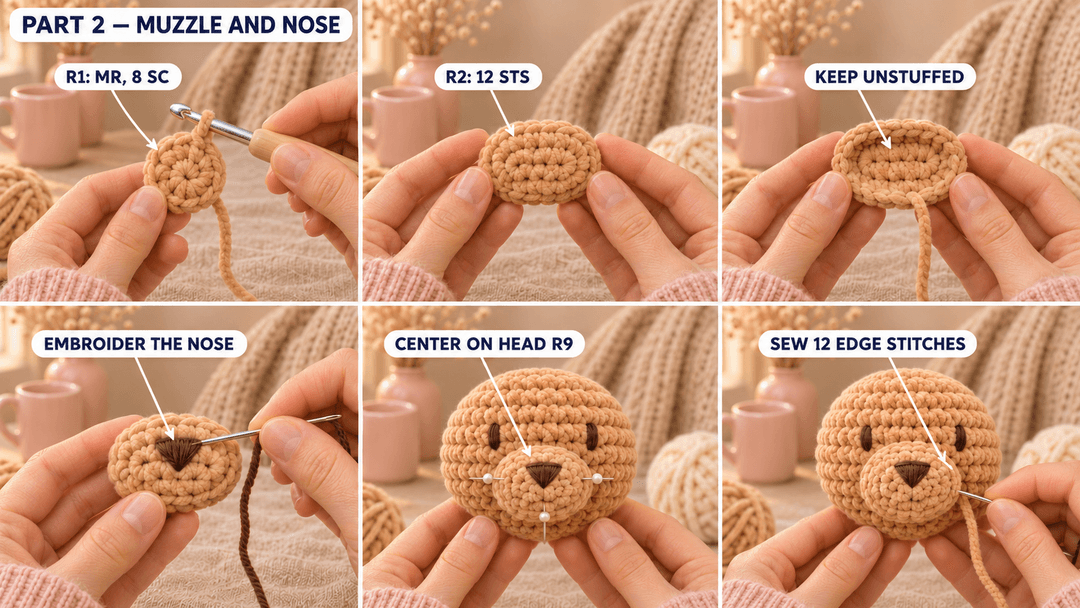
Camel, 5 mm hook. Make 1. The magic ring sits in the middle of the muzzle; the last round is its sewing edge.
- R1: MR, 8 sc in the ring. (8)
- R2: sc 2, inc × 2, sc 2, inc × 2. (12)
Sl st in the next stitch and fasten off, leaving a 12 in (30 cm) tail. Keep the muzzle unstuffed.
Turn it so the oval is wider from side to side. With dark smooth yarn, stitch a small triangular nose in the upper middle: place its upper corners one stitch-width to either side of the magic ring and its lower point one round below the ring. Fill the triangle with close stitches, then lay one straight stitch across the top. Secure both ends on the back.
Pin the muzzle below the eyes, its magic ring over the head's front strand on R9 and its upper edge just below the eye line. Sew each of its 12 edge stitches to the head with matching smooth yarn. Let it rest flat against his face, then hide the ends inside the head.
Two little bear ears
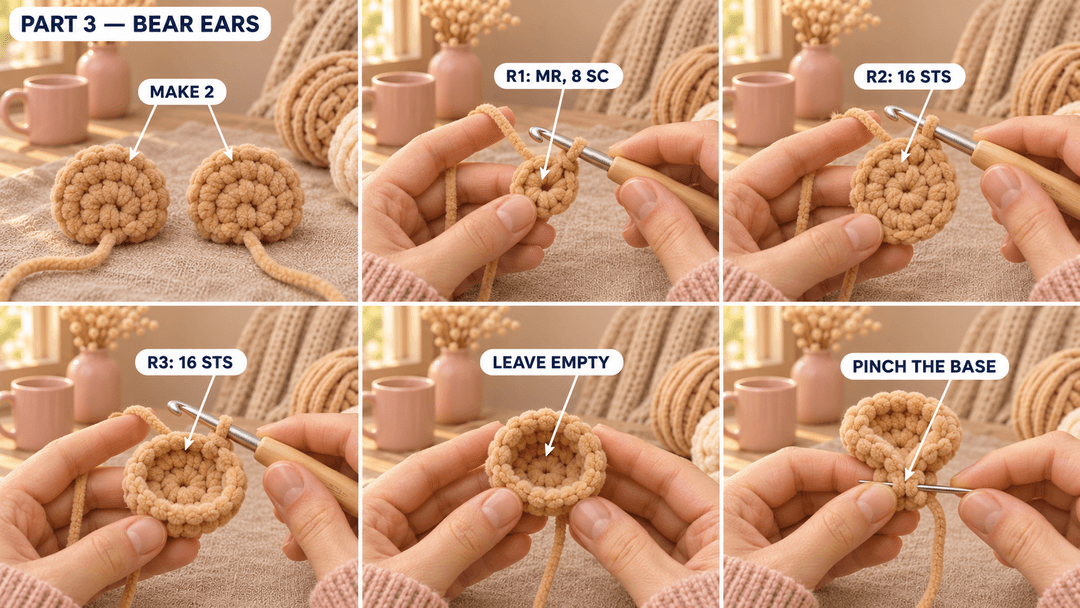
Camel, 5 mm hook. Make 2. The magic ring is the rounded outer tip; the open edge becomes the pinched attachment edge.
- R1: MR, 8 sc in the ring. (8)
- R2: inc × 8. (16)
- R3: sc around. (16)
Sl st in the next stitch and fasten off, leaving a 12 in (30 cm) tail. Leave the ears empty. Bring the sides of each opening inward and pinch them into a shallow cup. Hold that shape with a couple of small stitches through the pinched edge. Keep the sewing tail at the bottom for assembly.
The teddy's rounded body
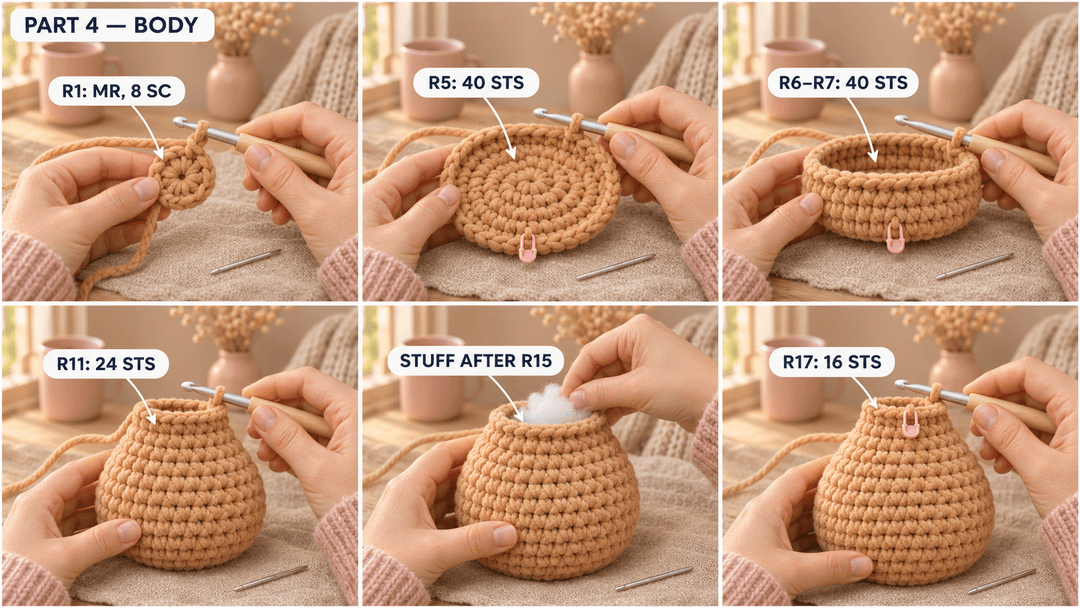
Camel, 5 mm hook. Make 1. The magic ring is the bottom of the tummy. The last round stays open at the neck.
- R1: MR, 8 sc in the ring. (8)
- R2: inc × 8. (16)
- R3: (sc, inc) × 8. (24)
- R4: (sc 2, inc) × 8. (32)
- R5: (sc 3, inc) × 8. (40)
- R6–R7: sc around. (40) 2 rounds.
- R8: (sc 3, dec) × 8. (32)
- R9–R10: sc around. (32) 2 rounds.
- R11: (sc 2, dec) × 8. (24)
- R12–R15: sc around. (24) 4 rounds.
Start filling after R15. Push the stuffing down into the tummy and keep the upper opening clear.
- R16: (sc, dec) × 8. (16)
- R17: sc around. (16)
Sl st in the next stitch and fasten off, leaving a 16 in (40 cm) tail at the neck. Top up the filling until the body holds its shape, with enough room to tuck a little more into the neck while sewing.
Shaping the feet
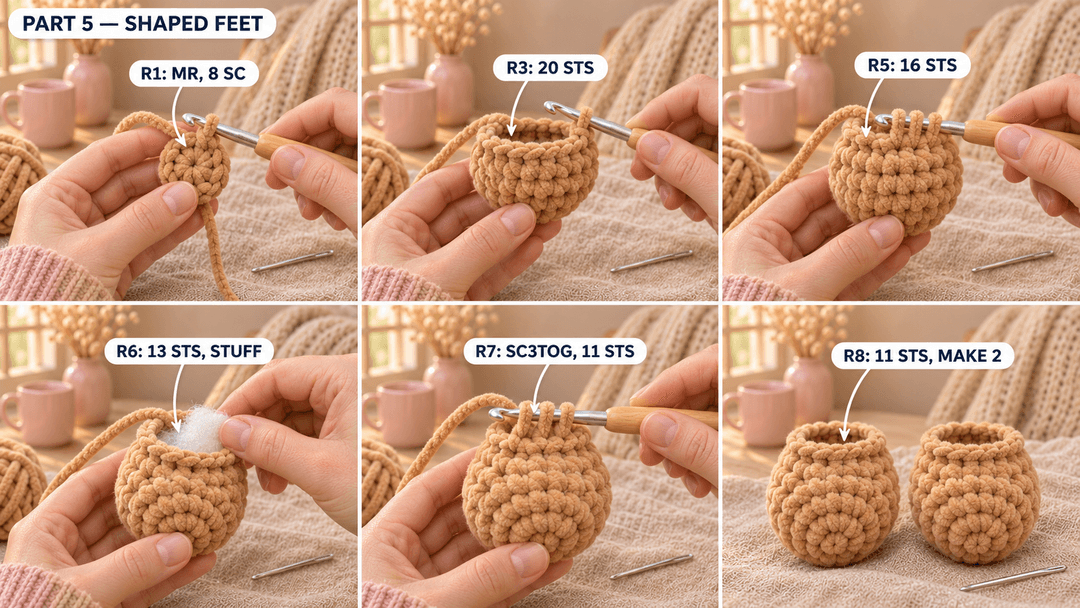
Camel, 5 mm hook. Make 2. The magic ring is the foot end. The last round becomes the open upper edge that sits against the tummy.
- R1: MR, 8 sc in the ring. (8)
- R2: inc × 8. (16)
- R3: (sc 3, inc) × 4. (20)
- R4: sc around. (20)
- R5: sc 4, dec, sc, dec × 2, sc, dec, sc 6. (16)
- R6: sc 5, dec × 3, sc 5. (13)
Fill the rounded foot firmly after R6, before the opening narrows further.
- R7: sc 5, sc3tog, sc 5. (11)
- R8: sc around. (11)
Here is the sc3tog slowly: pick up the front loop of each of the next three stitches. Yarn over and pull through those three front loops. Yarn over again and pull through the two loops left on the hook.
Sl st in the next stitch and fasten off, leaving a 16 in (40 cm) tail at the top opening. Add a little filling through that opening, keeping the upper edge soft enough to sew against the body. That little bend brings Biscuit's toes forward.
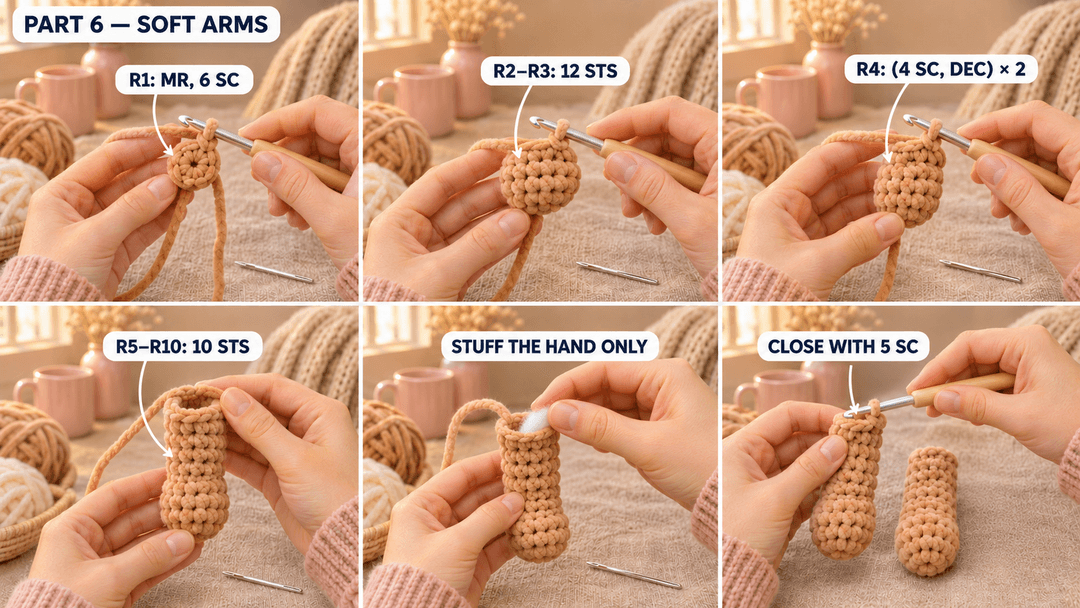
Soft arms with flattened tops
Camel, 5 mm hook. Make 2. The magic ring is the hand, and the final opening is the shoulder.
- R1: MR, 6 sc in the ring. (6)
- R2: inc × 6. (12)
- R3: sc around. (12)
- R4: (sc 4, dec) × 2. (10)
- R5–R10: sc around. (10) 6 rounds.
After R10, fill the hand lightly up to about R4. Leave the upper arm empty. Flatten the opening into two layers of five stitches, then work 5 sc through both layers, pairing one stitch from each side each time. Ch 1 and fasten off, leaving a 12 in (30 cm) tail at the shoulder.
Putting your teddy bear together
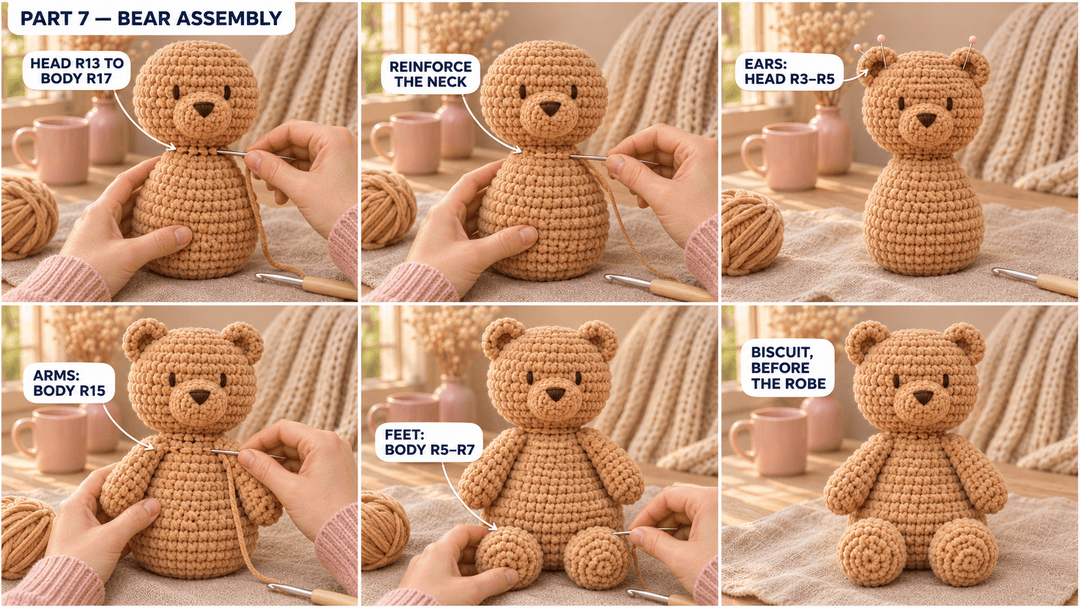
Sit Biscuit's body upright, with the front strand facing you. Use matching smooth camel yarn for the seams. Pin everything first and look at him from the front and both sides before sewing.
- Head: set the closed underside on the body's neck, with the face above the tummy marker. Pin the 16 neck stitches to the 16 stitches of the head's R13, one body stitch to one head stitch. The closed R14 tucks inside the neck opening. Sew around once, add filling into the neck before closing the last gap, then reinforce the same seam once more.
- Ears: on the head's 32-stitch R5, count eight stitch-widths left and right from the front strand. Center one ear's pinched base at each spot, with its attachment spanning R3–R5. Sew the whole shaped base down, keeping the rounded rim upright.
- Arms: on the body's 24-stitch R15, count six stitch-widths to either side of the front strand. Center each five-stitch shoulder edge at that position and sew it across five adjacent stitches of R15. Let the hands hang toward the feet.
- Feet: on the body's 40-stitch R5, count five stitch-widths left and right from the front strand. Place the lower edge of each foot opening at its mark, spreading the rest of the opening upward across R6–R7. Point both toes forward. Sew around all 11 stitches of each opening.
Remove the front strands after the seams are secure. Biscuit should sit with his feet in front and his arms loose at his sides.
The fabric cheek patches shown in the video are separate styling accessories. Biscuit's face here uses the embroidered eyes and nose described above.
Safety. The face here is embroidered. If you substitute plastic safety eyes, the bear is not for children under three. A removable robe and long waist tie belong on a display or older-child version; leave off the tie for a young child's bear and check every seam carefully.
The robe's back and front panels
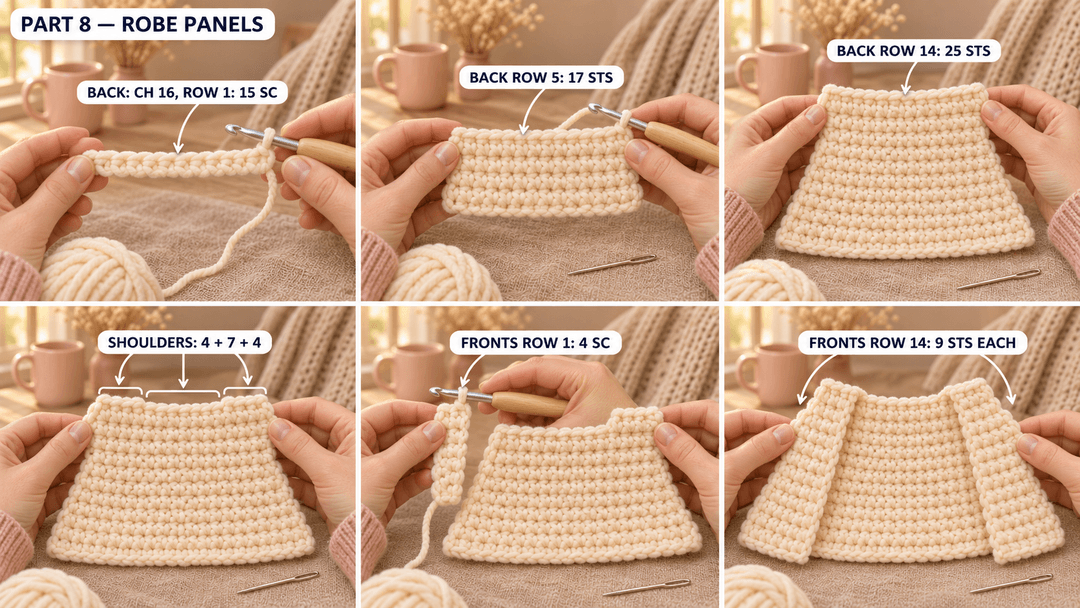
The robe starts at the shoulders and grows toward the hem. I fit the back across Biscuit before making the fronts: it should reach from one side of his body to the other without stretching. The numbered version below uses the same 2.5-stitch and 2.5-row tension as the bear.
Cream robe back
Cream, 5 mm hook. Make 1. Ch 16. The starting edge is the shoulders; Row 14 is the hem.
- Row 1: sc in the 2nd ch from the hook and in each ch across. (15)
- Rows 2–4: ch 1, turn, sc 15. (15) 3 rows.
- Row 5: ch 1, turn, inc, sc 13, inc. (17)
- Row 6: ch 1, turn, sc 17. (17)
- Row 7: ch 1, turn, inc, sc 15, inc. (19)
- Row 8: ch 1, turn, sc 19. (19)
- Row 9: ch 1, turn, inc, sc 17, inc. (21)
- Row 10: ch 1, turn, sc 21. (21)
- Row 11: ch 1, turn, inc, sc 19, inc. (23)
- Row 12: ch 1, turn, sc 23. (23)
- Row 13: ch 1, turn, inc, sc 21, inc. (25)
- Row 14: ch 1, turn, sc 25. (25)
Fasten off and leave a 6 in (15 cm) end at the hem. Lay the panel flat, shoulder edge above the hem. Mark the first four and last four stitches of the shoulder edge. The seven stitches between those groups become the back neckline.
Cream robe fronts
Cream, 5 mm hook. Make 2. Work each front directly onto a marked group of four shoulder stitches, then downward. Row 1 of each front meets Row 1 of the back. Keep a marker on the inner edge, next to the seven-stitch back neckline.
Join at the first marked shoulder group with the hook positioned to work four stitches. Mirror the starting position for the second group. The inside edge must face the opening of the robe on both fronts.
- Row 1: ch 1, sc 4 along the marked shoulder group. (4)
- Rows 2–3: ch 1, turn, sc 4. (4) 2 rows.
- Row 4: ch 1, turn, sc across with an inc in the inner-edge stitch. (5)
- Row 5: ch 1, turn, sc across with an inc in the inner-edge stitch. (6)
- Row 6: ch 1, turn, sc 6. (6)
- Row 7: ch 1, turn, sc across with an inc in the inner-edge stitch. (7)
- Row 8: ch 1, turn, sc across with an inc in the inner-edge stitch. (8)
- Row 9: ch 1, turn, sc across with an inc in the inner-edge stitch. (9)
- Rows 10–14: ch 1, turn, sc 9. (9) 5 rows.
At an inner-edge increase, work two sc into that edge stitch and one sc into every other stitch. The increase is at the beginning or end of the row depending on which way you are facing. Fasten off each front with a 6 in (15 cm) end at the hem.
Tip. Keep the outer edges straight. If a front flares at the side seam, an increase has landed on the wrong edge; move it to the marked opening edge before continuing.
Joining the robe and crocheting the sleeves
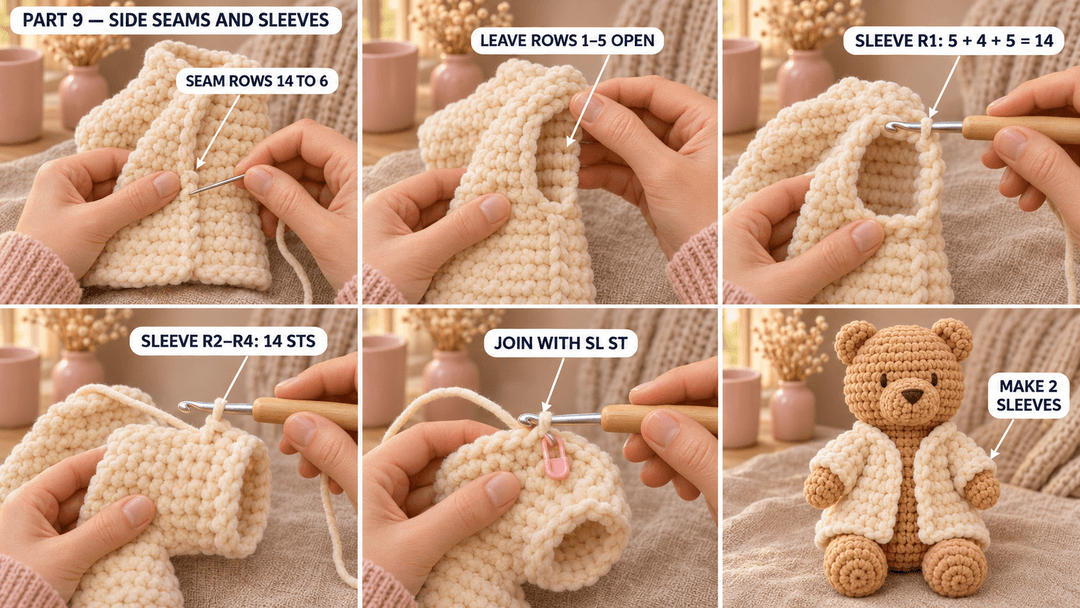
Fold the fronts down over the back, shoulder folds at the top and hems together. With the smooth cream yarn, sew the outer row ends of front and back together from Row 14 through Row 6, one seam bite per matching row-end pair. Leave Rows 1–5 open on each side for the armholes.
Cream sleeves
Cream, 5 mm hook. Make 2. Join velvet yarn at the bottom of an armhole. The first round is the underarm opening; the last round is the cuff.
- R1: sc 5 up the five front row ends, sc 4 at the shoulder fold, sc 5 down the five back row ends. (14)
- R2–R4: sc around. (14) 3 rounds.
Join each round with a sl st in its first sc. Ch 1 to start the next round and work its first sc in the same stitch. At the shoulder fold, work two pickup stitches into each of the two adjacent shoulder stitches nearest the armhole, taking care to catch the fabric securely.
After R4, sl st in the first sc and fasten off with a 6 in (15 cm) tail at the cuff. Weave it in along the inside. Turn the seams to the inside and slip the robe over Biscuit's arms. The sleeves should slide over his hands without pulling on their seams.
Shaping the hood around the bear's ears
Cream, 5 mm hook. Make 1. The magic ring becomes the center back of the hood. The last circular round becomes its outside edge. This hood back is enlarged from the video version to leave room around the bear's ears.
- R1: MR, 8 sc in the ring. (8)
- R2: inc × 8. (16)
- R3: (sc, inc) × 8. (24)
- R4: (sc 2, inc) × 8. (32)
- R5: (sc 3, inc) × 8. (40)
- R6: (sc 4, inc) × 8. (48)
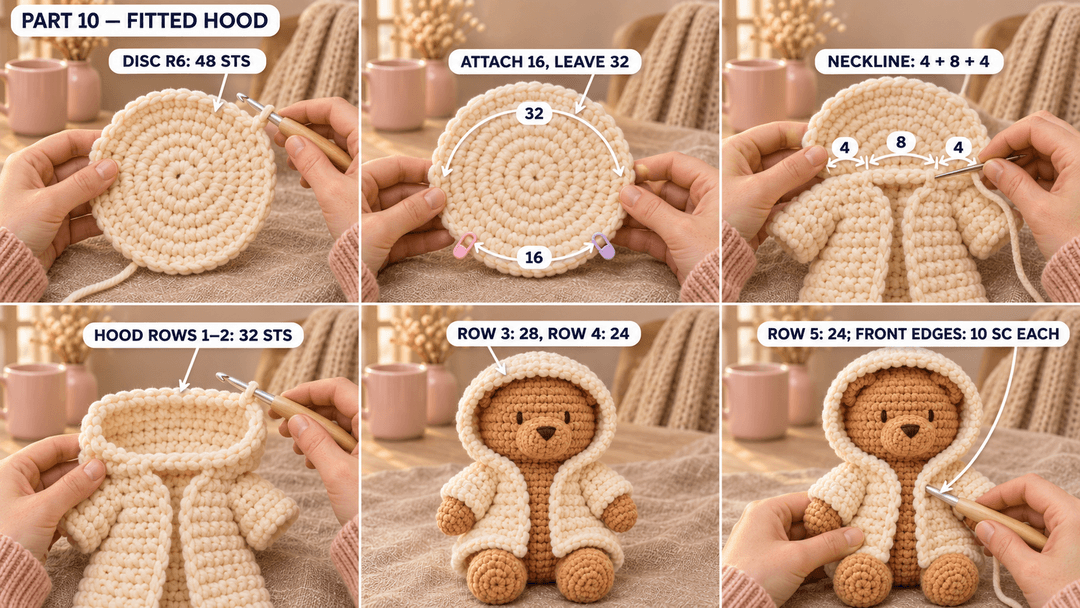
Sl st in the next stitch and fasten off, leaving a 16 in (40 cm) tail at the rim. Keep the disc unstuffed. Mark a run of 16 consecutive rim stitches as the lower attachment arc. The other 32 stitches curve around the back and top of the head.
Joining the lower hood arc
Lay the robe open, inside facing up. The attachment follows the inner edge of one front from Row 4 up to Row 1, across the seven back-neck stitches, then down the opposite front from Row 1 to Row 4.
With smooth cream yarn, sew the first four marked hood stitches to those four first-front row ends. Sew the next eight hood stitches across the seven back-neck stitches, placing two sewing bites into the center back-neck stitch. Sew the last four marked hood stitches to the four opposite-front row ends. Secure and hide the ends inside.
Bringing the hood forward
Join cream velvet in the first free rim stitch next to the attachment arc. Work back and forth across the 32 free stitches, leaving the sewn lower arc alone. Ch 1 and turn between rows; keep the chain outside the count.
- Row 1: sc 32 along the free arc. (32)
- Row 2: ch 1, turn, sc 32. (32)
- Row 3: ch 1, turn, (sc 6, dec) × 4. (28)
- Row 4: ch 1, turn, (sc 5, dec) × 4. (24)
- Row 5: ch 1, turn, sc 24. (24)
Fasten off with a 6 in (15 cm) end at the lower side of the opening and weave it inside. This last row frames Biscuit's face from one cheek to the other, passing over his crown.
Try the hood on after each row. Its front edge should frame the face with room over the bear ears. If the actual fabric pulls across the ears, stop before fastening off and check the hood and bear gauges against the stated tension.
Finishing the robe opening
With cream velvet, join at the inner edge of Front Row 5, immediately below the hood attachment. Ch 1 and work one sc into each inner row end from Row 5 down through Row 14: 10 sc. Fasten off with a 6 in (15 cm) end at the hem. Repeat on the other front, then weave in the ends. Leave the hood's already finished face edge as it is.
Bunny ears and a tie for the robe
The bunny ears sit on top of the hood, slightly outside the bear's own ears. Keep them softly folded, with their tips free to lean.
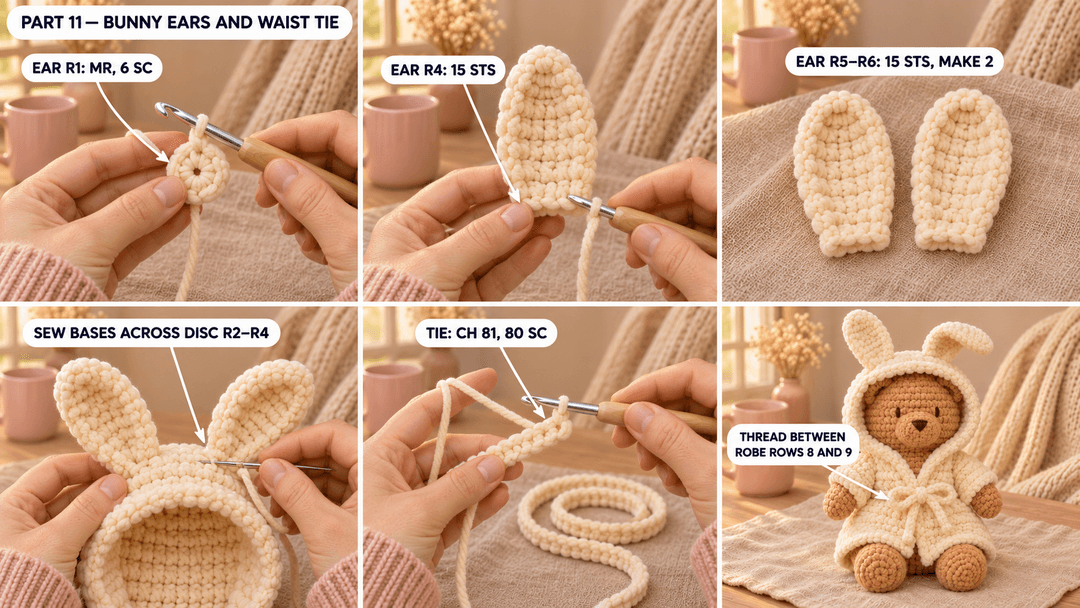
Cream bunny ears
Cream, 5 mm hook. Make 2. The magic ring is the narrow tip; the final opening is the base sewn to the hood.
- R1: MR, 6 sc in the ring. (6)
- R2: (sc, inc) × 3. (9)
- R3: (sc 2, inc) × 3. (12)
- R4: (sc 3, inc) × 3. (15)
- R5–R6: sc around. (15) 2 rounds.
Sl st in the next stitch and fasten off, leaving a 12 in (30 cm) tail at the base. Leave each ear empty. Pinch the open edge inward into a cup and secure that pinch with a few stitches, then keep the tail for sewing.
Find the top of the hood disc, directly opposite the middle of the sewn lower arc. On disc R3, count three stitch-widths left and right from that top line. Center an ear base at each mark, spanning disc R2–R4. Sew around the entire pinched base with smooth cream yarn, catching the hood fabric only.
Cream waist tie
Cream, 5 mm hook. Make 1. Ch 81, keeping the chain loose enough to work into.
- Row 1: sc in the 2nd ch from the hook and in each ch across. (80)
Fasten off, leaving a 6 in (15 cm) end, and weave both ends along the tie. It should be about 32 in (81 cm) long at the stated tension. Thread it through a side-seam space between Robe Rows 8 and 9 on each side. Bring the ends around the front and tie a loose bow.
A teddy ready for a quiet evening
Pull the hood up gently, tuck the sleeve cuffs over Biscuit's wrists and loosen the bow so the fronts overlap comfortably. I like him sitting beside a folded blanket, with one bunny ear leaning farther than the other.
The robe comes off for dressing and washing. Follow the actual yarn labels for care; support the stuffed bear while drying and let the filling dry completely before dressing him again.
UK terms: US sc = UK dc; sl st is the same in both.
Made your own Biscuit? Tag #wavodecrochet on Pinterest so I can see him.