The Snuggle Bear Kids Hoodie

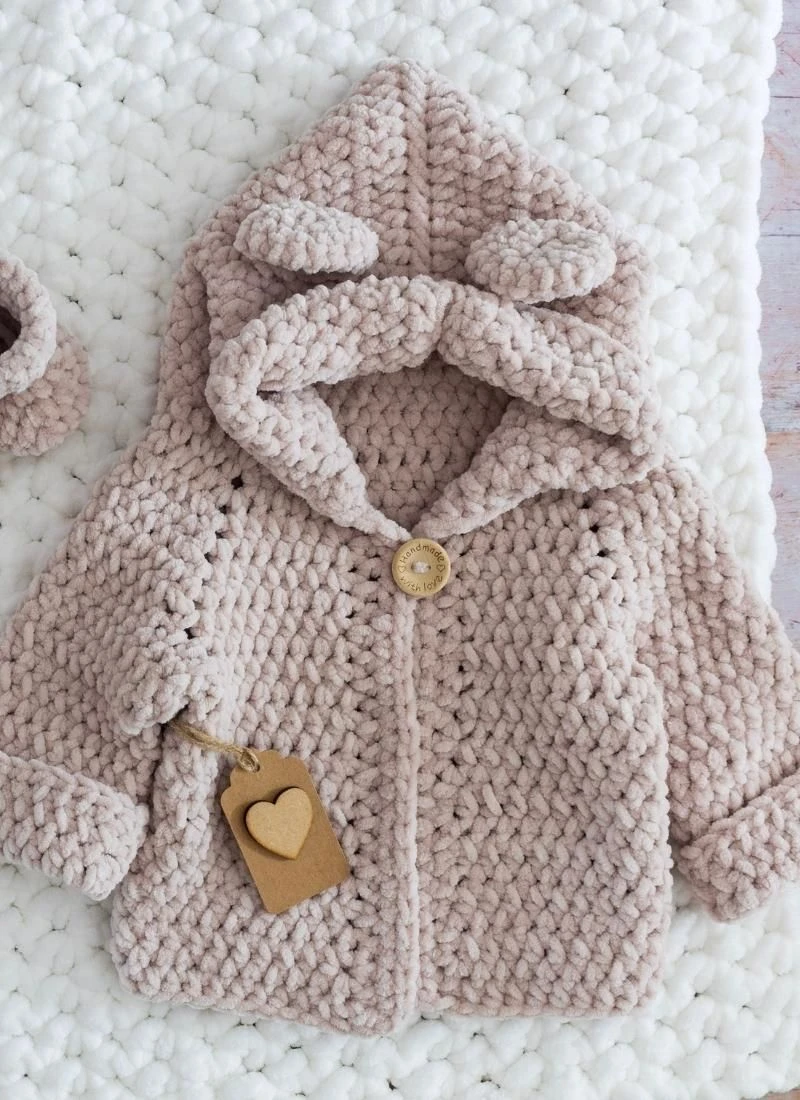
The Snuggle Bear Kids Hoodie is a free crochet bear hoodie pattern made in plush chenille yarn on a 6.5 mm hook. It's a hooded cardigan with two round bear ears, a hood brim that folds back, roomy turn-up cuffs and one wooden button at the neck. You work it top-down in one piece with a raglan yoke, so the only sewing is the top of the hood and the ears. It comes in 3 sizes, from 6 months to 4 years, and takes about 210 to 340 yards and 5 to 7 hours.
Key Takeaways
- Top-down, one piece. The yoke, body and sleeves are all one piece. You never sew in a sleeve.
- One stitch. Nearly all of it is half double crochet (hdc), with a single crochet front edge.
- Plush #6 chenille yarn, such as Bernat Baby Blanket. Two 300 g balls cover every size.
- No drawstring, on purpose. One button at the neck is the only closure.
About this bear hoodie
Plush chenille is the yarn for a kids' hoodie. It feels like a stuffed animal, it works up very fast, and every little mistake disappears into the pile. The downside is that you can hardly see your stitches. That's why this pattern keeps the shaping simple, and you can find every increase by feel.
The hoodie starts at the neck. You work a raglan yoke back and forth, adding 8 stitches every row at four corners. Those corners are ch-1 spaces, and they leave the row of little eyelets you can see running from the neck down to the underarm in the photo. When the yoke is deep enough, you set the sleeve stitches aside, work the body straight down, then go back and work each sleeve in the round.
The hood grows up from the neckline. You fold it in half and close the top. Then a band of four rows around the face opening turns back to make that soft brim. Last come two little ears, each one a circle folded in half so it's padded and holds its shape.
Skill level. Advanced beginner. You need chain, half double crochet, single crochet, a hdc decrease and a magic ring. If you've made my color block cardigan, this is the same idea, only smaller, plus a top-down yoke.
A safety note for kids' hoodies
This hoodie has no drawstring, and please don't add one. The US Consumer Product Safety Commission treats drawstrings at the hood and neck of children's outerwear as a substantial product hazard, because they can catch on playground slides and car doors.
The button needs to be sewn on hard. Use doubled thread, go through the button 8 to 10 times, and knot it on the wrong side. Check it before every wear. For babies under a year, or if you'd rather not worry about it, use a large sew-on snap instead.
Hoods and sleep don't mix. Take the hoodie off before naps and bedtime.
What you'll need
Yarn (super bulky #6 plush chenille)
- About 210 (270, 340) yd / 192 (247, 311) m.
- I used Bernat Baby Blanket (300 g / 220 yd per ball). Two balls are enough for every size. One ball is almost enough for the smallest size, but running out 10 yards from the end is no fun.
- Any #6 baby-blanket chenille works, as long as it matches the gauge below. Pick a soft, warm neutral like the dusty rose in the photo, or go with oatmeal, honey or grey for a more classic teddy look.
Hook and notions
- 6.5 mm (US K-10½) hook.
- One 1 in (25 mm) wooden button, or a large sew-on snap.
- 6 stitch markers. You'll use 4 of them on the yoke corners, and you'll be glad you did.
- Tapestry needle, sewing needle and thread for the button.
Gauge and sizes
Gauge: 10 hdc × 8 rows = 4 in (10 cm) on a 6.5 mm hook.
Measure your swatch gently. Chenille compresses when you press it flat, so lay a ruler on top of it and don't squash it down.
| Size | Fits chest | Finished chest | Length (neck to hem) | Sleeve (underarm to edge, cuff unfolded) |
|---|---|---|---|---|
| 6–12 mo | 18 in | 21.5 in | 10.5 in | 8 in |
| 1–2 yr | 20 in | 23 in | 12.5 in | 9 in |
| 3–4 yr | 22 in | 25.5 in | 14.5 in | 10.5 in |
The instructions are written 6–12 mo (1–2 yr, 3–4 yr). If you only see one number, it's for all sizes. The fit is roomy on purpose, with about 3 in of ease, so it goes over a long-sleeve top and still fits next winter.
Abbreviations (US crochet terms)
- ch = chain
- sc = single crochet
- hdc = half double crochet
- hdc2tog = half double crochet 2 together (decrease)
- sl st = slip stitch
- sk = skip
- sp = space
- st(s) = stitch(es)
- RS / WS = right side / wrong side
UK crocheters: hdc (US) = htr (UK), and sc (US) = dc (UK).
Turning chains: The ch 1 at the start of each row doesn't count as a stitch. Work your first hdc into the first stitch.
The pattern — step by step
Part 1 — Raglan yoke
Foundation: Ch 33 (33, 35).
Row 1 (RS, setup): Hdc in the 2nd ch from the hook and in the next 3 ch (front), ch 1, sk 1 ch, hdc in the next 4 ch (sleeve), ch 1, sk 1 ch, hdc in the next 12 (12, 14) ch (back), ch 1, sk 1 ch, hdc in the next 4 ch (sleeve), ch 1, sk 1 ch, hdc in the last 4 ch (front). Turn. (28 (28, 30) hdc + 4 ch-1 sps)
Put a stitch marker in each ch-1 space. Move the markers up as you go. With chenille, the corners are the only thing you really have to find, and markers mean you never have to count across in fluffy yarn.
Row 2 (increase row): Ch 1. *Hdc in each st to the next ch-1 sp, (hdc, ch 1, hdc) in the ch-1 sp; repeat from * 3 more times, hdc in each st to the end. Turn. (36 (36, 38) hdc)
Every increase row adds 8 sts: 1 to each front, 2 to each sleeve and 2 to the back.
Rows 3–7 (3–8, 3–9): Repeat Row 2. You've worked 6 (7, 8) increase rows in all. (76 (84, 94) hdc)
Check your sections before moving on:
- Each front: 10 (11, 12) sts
- Each sleeve: 16 (18, 20) sts
- Back: 24 (26, 30) sts
The yoke should measure about 3.5 (4, 4.5) in deep at the center back.
Part 2 — Divide for body and sleeves
Divide row: Ch 1. Hdc across the front to the ch-1 sp, hdc in the ch-1 sp, ch 3, sk all the sleeve sts, hdc in the next ch-1 sp, hdc across the back, hdc in the next ch-1 sp, ch 3, sk all the sleeve sts, hdc in the next ch-1 sp, hdc across the other front. Turn. (54 (58, 64) sts, counting each underarm ch as a st)
The sleeve stitches just sit there, live. You'll come back for them in Part 4.
Part 3 — Body
Next row: Ch 1, hdc in each st and in each underarm ch across. Turn. (54 (58, 64) hdc)
Keep going: Ch 1, hdc in each st across. Turn. Work even until the body measures 7 (8.5, 10) in from the underarm, which is about 14 (17, 20) rows. Fasten off.
My finding: In plush yarn, the underarm ch-3 is the weakest spot of the whole hoodie. If your chains are loose, the gap stretches after a few wears. Make them the same size as your hdc, not bigger, and when you work the sleeves, put 1 hdc into each side of the gap (that's in Part 4). Those two extra stitches are what stop the hole.
Part 4 — Sleeves (make 2)
The sleeves are worked in joined rounds, and you turn after every round. That gives the sleeve the same texture as the body, which is worked in rows.
Rnd 1: With the RS facing, join yarn in the center ch of one underarm. Ch 1, hdc in the same ch and in the next ch, hdc in the side of the gap, hdc in each of the 16 (18, 20) sleeve sts, hdc in the side of the other gap, hdc in the remaining underarm ch. Join with a sl st to the first hdc. Turn. (21 (23, 25) hdc)
Rnds 2–3: Ch 1, hdc in each st around. Join. Turn.
Rnd 4 (decrease): Ch 1, hdc2tog, hdc in each st to the last 2 sts, hdc2tog. Join. Turn. (19 (21, 23) hdc)
Rnds 5–7: Ch 1, hdc in each st around. Join. Turn.
Rnd 8: Repeat Rnd 4. (17 (19, 21) hdc)
3–4 yr only: Work 3 more even rounds, then repeat Rnd 4 once more. (19 hdc)
All sizes: Work even until the sleeve measures 7.5 (8.5, 10) in from the underarm.
Last rnd: Ch 1, sc in each st around. Join and fasten off. The sleeve is now 8 (9, 10.5) in. Fold the bottom 1.5 in up into a cuff, so the sleeve can grow with the kid.
Repeat for the second sleeve.
Part 5 — Hood
Row 1: With the RS facing, join yarn at the right front neck corner. Working into the underside of the foundation chain, ch 1 and hdc in every ch, including the ones under the ch-1 corners. Turn. (32 (32, 34) hdc)
Row 2 (increase):
- 6–12 mo: Ch 1, [hdc in the next 7 sts, 2 hdc in the next st] 4 times. Turn. (36 hdc)
- 1–2 yr: Ch 1, [hdc in the next 3 sts, 2 hdc in the next st] 8 times. Turn. (40 hdc)
- 3–4 yr: Ch 1, [hdc in the next 3 sts, 2 hdc in the next st] 8 times, hdc in the last 2 sts. Turn. (42 hdc)
Next rows: Ch 1, hdc in each st across. Turn. Work even until the hood measures 8 (8.5, 9.5) in from the neck. Don't fasten off.
Close the top: Fold the hood in half with the RS together, so the last row folds onto itself. Ch 1 and sl st through both layers across the top. Fasten off and turn the hood RS out.
Part 6 — The fold-back brim
Row 1: With the RS facing, join yarn at the bottom of the face opening, where the hood meets the right front. Ch 1, hdc evenly along the face opening to the other side. Work about 3 hdc for every 2 row-ends, which is about 48 (52, 58) hdc. Turn.
Rows 2–4 (2–4, 2–5): Ch 1, hdc in each st across. Turn.
Fasten off. Fold the brim back to the outside and tack each end down at the neck with a few stitches.
The fold means the brim's wrong side is the side people see. In hdc and plush yarn, the two sides look almost the same, so nobody will ever know.
Part 7 — Front edges and buttonhole
Right front (worn on the right): With the RS facing, join yarn at the bottom corner. Ch 1 and sc evenly up the front edge, about 1 sc per row-end, plus 1 extra every 4th row-end so the edge lies flat. When you're 1 row-end away from the neck, ch 3 (this is the buttonhole), sk 1 row-end and sc in the last row-end. Fasten off.
Left front: Work the same way, but don't make a buttonhole. Fasten off.
Sew the button on the left front, lined up with the buttonhole. Follow the safety note above. With chenille, anchor the thread through the solid core of a stitch, not only the fluffy pile, or the button will slowly pull through.
Part 8 — Bear ears (make 2)
Rnd 1: Make a magic ring. Ch 1, 6 hdc in the ring. Pull the ring tight and join. (6 hdc)
Rnd 2: Ch 1, 2 hdc in each st around. Join. (12 hdc)
3–4 yr only — Rnd 3: Ch 1, [hdc in the next st, 2 hdc in the next st] 6 times. Join. (18 hdc)
Fasten off, leaving a 12-inch tail. Fold the circle in half into a padded half-moon and whipstitch the straight edge closed.
Attach the ears. Put them on the top of the hood, about 1.5 (1.5, 2) in behind the fold of the brim, with 2.5 (2.5, 3) in between them. Pinch the base of each ear a little as you sew. That's what makes them cup forward like the ones in the photo.
Finishing: weaving in chenille ends
Chenille ends don't stay woven in like wool does. The pile is slippery, so a tail you weave the usual way can pop back out after a wash or two. Here's what works:
- Knot first. Tie the tail to a nearby strand with a small overhand knot on the WS.
- Weave in 3 directions for at least 2 in each way. The turns hold the tail better than one long pass does.
- Don't trim right against the fabric. Leave about ¼ in so the pile hides it.
No blocking needed. Steam or heat will flatten the pile and can melt polyester, so skip the iron. Give the hoodie a shake and it's done.
Make it yours — quick variations
- Pullover hoodie: Before Part 5, lay one front over the other at the neck and join them. For the body rows, work into both layers where they overlap for the first 3 in, then keep going as normal. Skip the buttonhole.
- Other animals: Swap the ears. Make a bunny with two long ovals (ch 8, hdc in rounds around the chain), or a kitty with two small triangles.
- Full zip: Skip the button, work 2 rows of sc up each front, and hand-sew a separating zipper behind the sc edge.
- Matching set: The little bootie you can just see in the corner of the photo is the perfect partner. My rosebud baby booties work well in the same chenille. Go up a hook size and skip the bow.
Troubleshooting
Loops are popping out of the fabric ("worming")
This is the most common complaint about chenille. It happens when the stitches are loose and the yarn can twist inside them. Go down to a 6 mm hook and pull each loop snug. Loops that have already popped out can be worked back in from the WS with a crochet hook.
The yoke is too tight at the neck
Your foundation chain is tighter than your hdc. Rework the foundation with a hook one size up (7 mm), then switch back to 6.5 mm for Row 1.
The fronts don't meet at the button
Chenille relaxes, so the fronts stretch sideways once you've worked the body. Try the button before sewing it on. If there's a gap, work a second row of sc up the right front before making the buttonhole.
The hood falls back off the head
The hood is too deep for your kid. Take out 2 rows at the top before you close it, or sew the ears a little further forward to add weight at the front.
Frequently asked questions
What size should I make? Go by chest measurement: 18 in for 6–12 months, 20 in for 1–2 years and 22 in for 3–4 years. If they're between sizes, size up. The hoodie has about 3 in of ease, and with the cuffs folded up, a bigger size will fit this year and next.
How much yarn do I need for the bear hoodie? About 210 (270, 340) yd of #6 plush chenille. With Bernat Baby Blanket (300 g / 220 yd), that's 2 balls for any size. If you're using 100 g balls with around 72 yd each, get 3 (4, 5).
Can I use regular worsted yarn? Yes, if you hold two strands of worsted together, or use one strand of chunky #5. Match the gauge of 10 hdc × 8 rows to 4 in. The hoodie won't have the teddy-bear fluff, but the fit and the pattern work exactly the same.
How do I wash a chenille crochet hoodie? Always check your ball band. Most polyester baby-blanket chenilles can go in the machine on gentle with cold water, and some can tumble dry low. Turn the hoodie inside out, and lay it flat to dry if you're not sure. Never iron it.
Is this hoodie safe for babies? Yes, with a few rules. There's no drawstring, the button must be sewn on very securely (or swapped for a snap), and the hoodie comes off for sleep. Check the ears and the button before each wear, especially once they've been washed a few times.
Related patterns on Wavode
- Hooded crochet baby romper: another hooded piece, in DK cotton for warmer days.
- Chunky lamb plush: the same cream chenille, if you want to practice plush yarn on something small first.
- Barnaby the teddy bear lovey: a bear lovey to gift with the hoodie.
- Rosebud baby booties: an easy matching bootie.
Made this hoodie? Tag #wavodecrochet on Pinterest. I re-pin every finished make and credit the maker.
Pattern by Clara Hartwell for Wavode. Questions? Email me at support@wavode.com.