Crochet Ribbed Chunky Cardigan

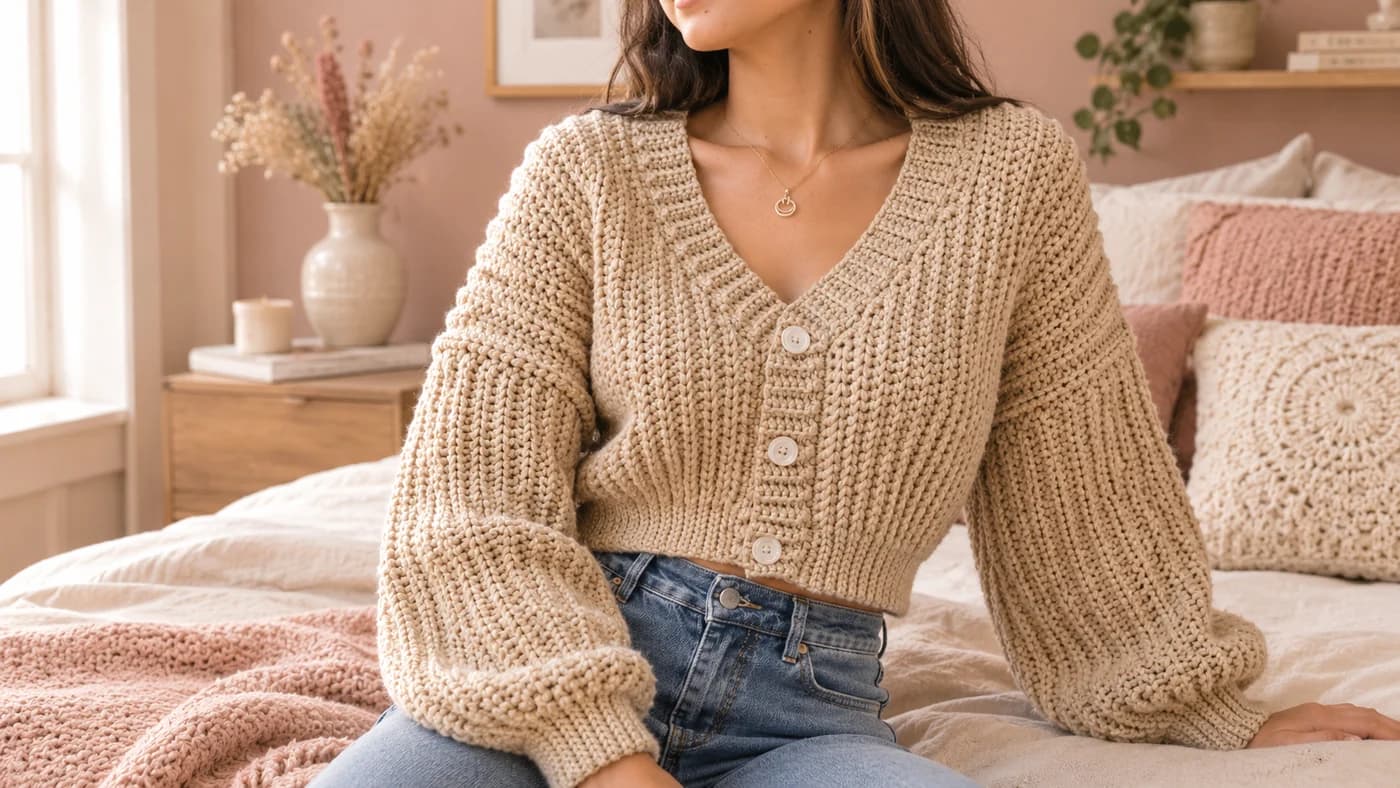
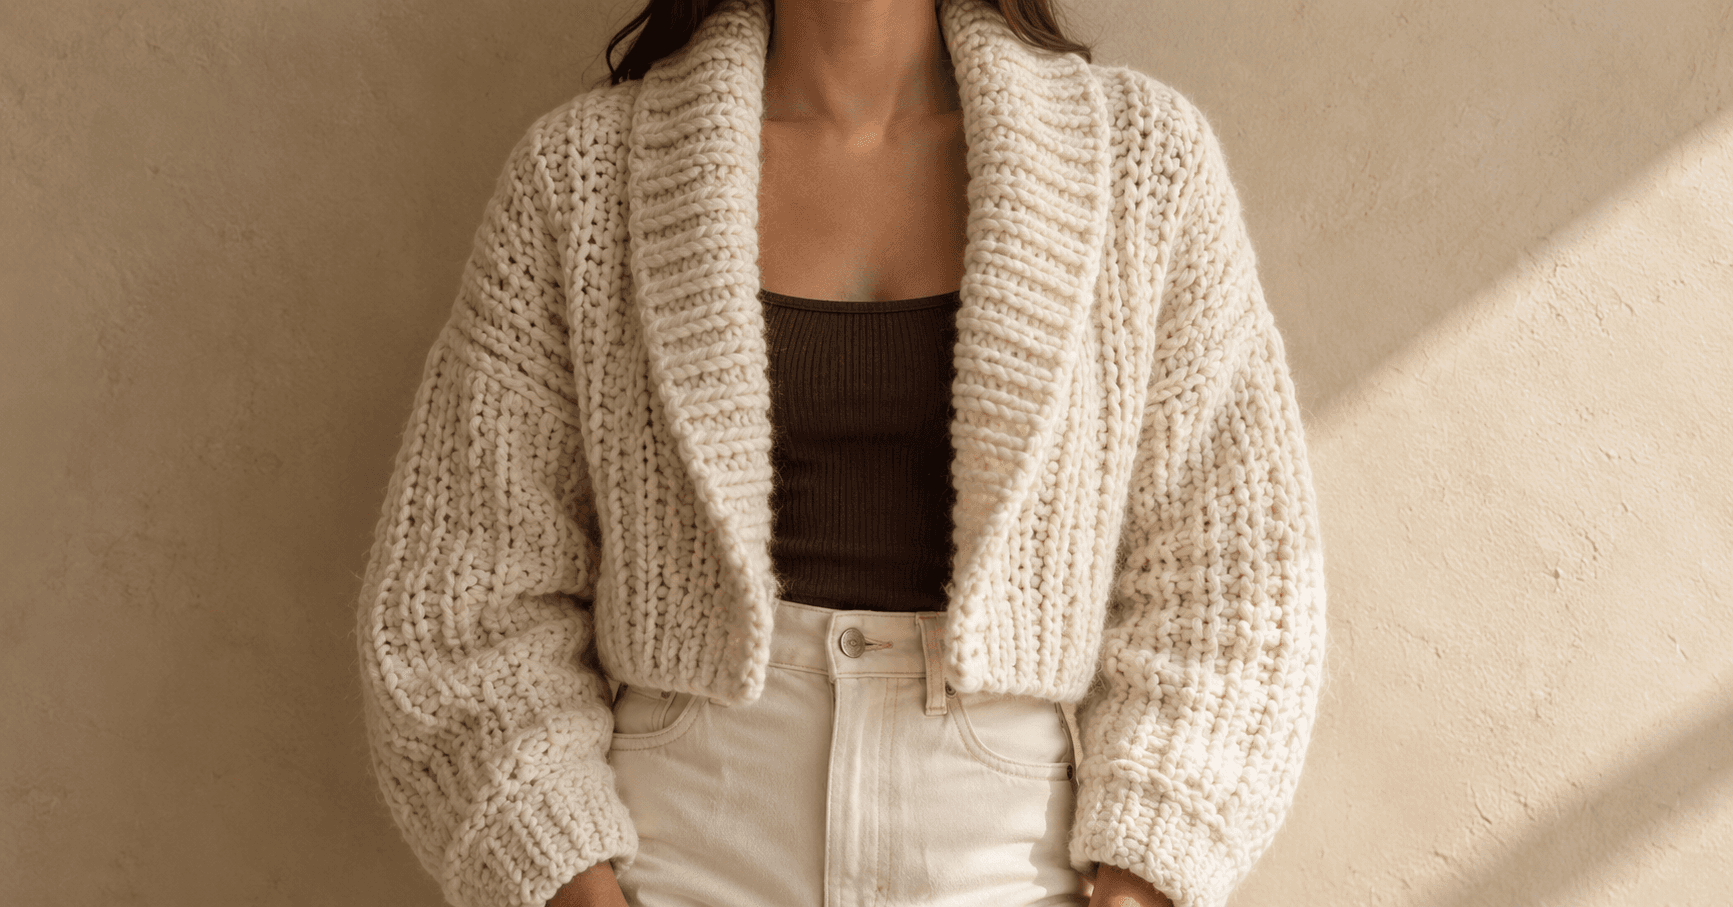
This free crochet ribbed chunky cardigan pattern makes a cropped V-neck cardigan with roomy balloon sleeves, a snug ribbed waist and three big buttons. Every piece is worked sideways in half double crochet through the back loop, so the ribs run straight up and down the body like a knit. The waistband and cuffs aren't added later: they're the last 8 stitches of every row, worked in single crochet, which pulls them in on their own. You'll need chunky #5 yarn, a 6 mm hook and about 995 yards for size S. It comes in 5 sizes, XS to XL.
Key Takeaways
- Six pieces: a back, two identical fronts, two sleeves and one long button band.
- One stitch does almost everything: hdc in the back loop, worked in turned rows.
- Budget 915–1,275 yd (835–1,165 m) of chunky #5 yarn, depending on size.
- No separate ribbing: the waist and cuffs grow with each row and gather themselves in.
Why I love this ribbed chunky cardigan
I wanted the kind of cardigan you throw on over a tank top in October and forget you're wearing. It had to be warm and cropped, so it sits at the waist of high-waisted jeans. And the sleeves had to be big enough to push up to the elbow.
Working sideways is what makes it simple. Each row runs from the shoulder down to the hem, so the ribs come out vertical without a single post stitch. The waistband is built into the same rows: the last 8 stitches of every row are single crochet instead of half double. Single crochet rows are shorter, so the bottom of each piece draws in by about a quarter. That's the soft blouson shape you get at the waist and the cuffs, with no counting of decreases.
The V-neck is just as easy. On the fronts, each row near the center gets 3 stitches shorter at the top. After 8 to 10 rows, you have a clean diagonal neckline.
Skill level. Advanced beginner. You need chain, slip stitch, single crochet, half double crochet, working in the back loop only and a whipstitch seam. There are no post stitches and no increases anywhere in the body.
What you'll need
Yarn (chunky weight #5, about 915 (995, 1095, 1180, 1275) yd / 835 (910, 1000, 1080, 1165) m)
- Paintbox Yarns Simply Chunky (149 yd / 136 m per 100 g): 7 (8, 9, 9, 10) balls.
- Lion Brand Hue + Me works too. Any smooth chunky yarn with good stitch definition shows the ribs well. A fuzzy or very loosely spun yarn hides them.
- I worked these totals out from the stitch count, seams included. The ball counts add a margin of about 10% for the swatch. Buy all the balls from one dye lot.
Hook
- 6 mm (US J/10) for every piece. The waist and cuffs don't need a smaller hook, because the single crochet already does the tightening.
Notions
- 3 buttons, 1 in (25 mm) across. Flat two-hole buttons sit best on a chunky band.
- Tapestry needle and sewing thread to match, for the buttons.
- 8 locking stitch markers.
- Measuring tape and scissors.
Gauge
- Hdc in the back loop on a 6 mm hook: 11 sts × 9 rows = 4 in (10 cm).
- Sc in the back loop, same hook: 11 sts × 12 rows = 4 in (10 cm).
Since the pieces are worked sideways, stitches give you the length of the cardigan and rows give you the width. Check the gauge before you start. One extra row per 4 in changes the bust by about 4 in. If you have too many stitches or rows, go up a hook size. If you have too few, go down one.
Abbreviations (US crochet terms)
- ch: chain
- sl st: slip stitch
- sc: single crochet
- hdc: half double crochet
- BLO: back loop only
- sk: skip
- st(s): stitch(es)
- RS / WS: right side / wrong side
The rib stitch (swatch first)
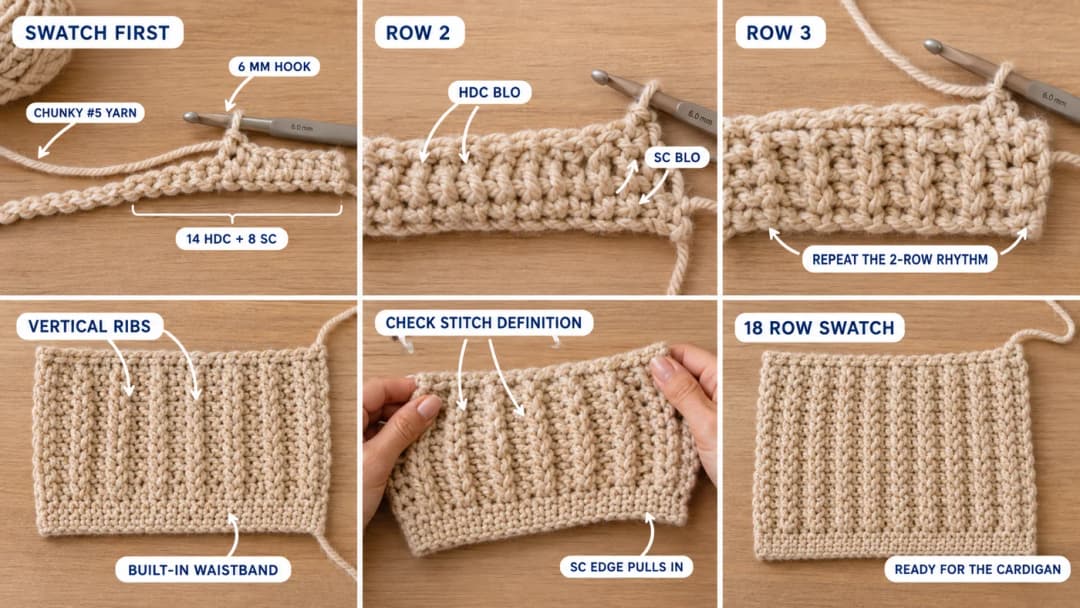
This swatch is a little slice of the cardigan: 14 hdc for the body and 8 sc for the waistband, in the same row.
Foundation: Ch 24.
Row 1: Hdc in the 3rd ch from the hook and in each of the next 13 ch. Sc in each of the last 8 ch. Turn. (14 hdc, 8 sc)
Row 2: Ch 1 (doesn't count as a st). Sc BLO in each of the 8 sc. Hdc BLO in each of the 14 hdc. Turn.
Row 3: Ch 2 (doesn't count as a st). Hdc BLO in each of the 14 hdc. Sc BLO in each of the 8 sc. Turn.
Repeat Rows 2 and 3. Work 18 rows in total. The back loops roll forward and make one raised ridge every 2 rows, on both faces. The fabric looks the same on both sides, which matters later for the fronts.
Measure the hdc section across the rows: 18 rows should be about 8 in. You'll see the sc edge is clearly narrower. That's the waistband pulling in, and it's what you want.
Size chart
| Size | To fit bust | Finished bust | Length | Hem, relaxed | Upper arm | Cuff, relaxed | Yarn |
|---|---|---|---|---|---|---|---|
| XS | 30–32 in | 38¾ in / 98 cm | 16 in / 41 cm | 29½ in | 16 in | 12 in | 915 yd |
| S | 34–36 in | 42¼ in / 107 cm | 16½ in / 42 cm | 32 in | 17 in | 12¾ in | 995 yd |
| M | 38–40 in | 46 in / 117 cm | 17 in / 43 cm | 34¾ in | 17¾ in | 13¼ in | 1,095 yd |
| L | 42–44 in | 49½ in / 126 cm | 17½ in / 44 cm | 37½ in | 18¾ in | 14 in | 1,180 yd |
| XL | 46–48 in | 53 in / 135 cm | 17¾ in / 45 cm | 40 in | 19½ in | 14¾ in | 1,275 yd |
The cardigan is meant to be roomy, with about 6 to 8 in of ease at the bust. The ribbed waist and cuffs stretch, so the relaxed numbers are smaller than what they'll comfortably go around. Choose your size by bust. If you want a closer fit, make the size below.
Instructions are written XS (S, M, L, XL). When only one number is given, it applies to every size.
The pattern, step by step
How the rows work
Every piece in this cardigan follows the same 2-row rhythm as the swatch.
- Odd rows start at the top edge (the shoulder, or the top of the sleeve): ch 2, hdc BLO across the body sts, then sc BLO in the last 8 sts.
- Even rows start at the bottom edge (the waist, or the cuff): ch 1, sc BLO in the 8 sc, then hdc BLO across the body sts.
The top and bottom edges of each piece are made of row ends. The two side edges are the foundation chain and the last row. Keep that in mind for the seams.
Part 1: The back
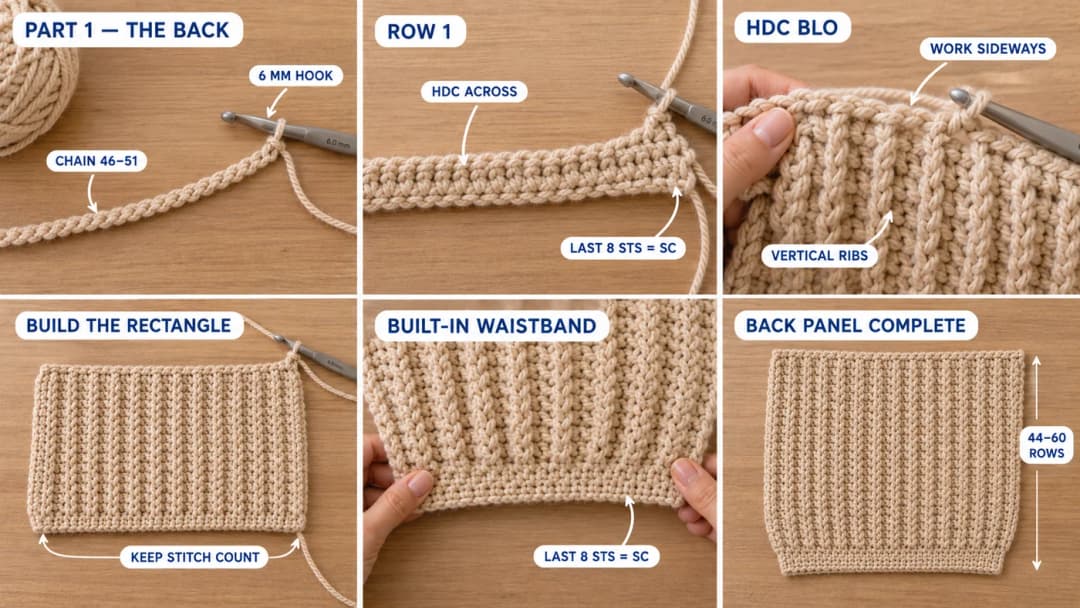
Ch 46 (47, 49, 50, 51).
Row 1: Hdc in the 3rd ch from the hook and in each of the next 35 (36, 38, 39, 40) ch. Sc in each of the last 8 ch. Turn. (36 (37, 39, 40, 41) hdc, 8 sc, 44 (45, 47, 48, 49) sts)
Row 2 onward: Work Rows 2 and 3 of the rib stitch, keeping the same stitch count.
Work 44 (48, 52, 56, 60) rows in total. The back measures about 19½ (21¼, 23, 25, 26¾) in wide across the hdc section, and 16 (16½, 17, 17½, 17¾) in long. Fasten off and weave in the tail.
The back is a plain rectangle. The neck is shaped by the band, not by the back.
Part 2: The fronts (make 2 the same)
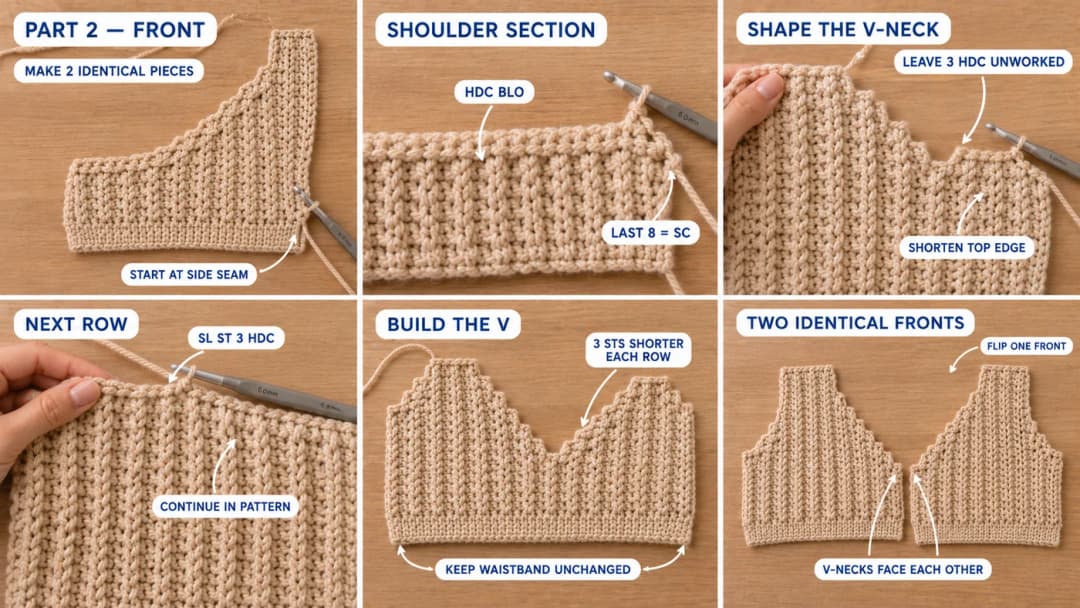
You'll start each front at the side seam and work toward the center. The rows near the center get shorter at the top, which forms the V-neck.
Ch 46 (47, 49, 50, 51). Work Row 1 exactly as for the back. (44 (45, 47, 48, 49) sts)
Shoulder section. Work in pattern until you've worked 12 (14, 15, 17, 18) rows in total. This is the shoulder. Each of these rows is full length.
Neck section. Work 8 (8, 9, 9, 10) more rows, making each row 3 sts shorter at the top edge than the one before:
- A row that ends at the top (an even row): work in pattern until 3 hdc remain. Leave those 3 hdc unworked, and any sl sts beyond them. Turn.
- A row that starts at the top (an odd row): ch 1, sl st in each of the first 3 hdc. Then hdc BLO in the next st and carry on in pattern to the end of the row. Turn. The sl sts don't count, and you never work into them again.
The waistband sc stay the same on every row. Only the hdc get fewer.
After the last neck row you have 20 (21, 20, 21, 19) sts: 8 sc and 12 (13, 12, 13, 11) hdc. That last row is the center-front edge. Below the V, it's about 7¼ (7½, 7¼, 7½, 7) in long. Fasten off and weave in the tail. You'll sew the shoulders with fresh lengths of yarn.
Make the second front exactly the same. Then lay both fronts side by side, and flip one over. Because hdc and sc in the back loop look the same on both faces, the flipped piece is a perfect mirror. One is now the right front, the other the left.
My finding: Flipping one front instead of writing a mirrored version saves a lot of confusion. The only thing that changes is which side faces out, and in this stitch you genuinely can't tell. I always check that the V-necks face each other before I sew anything.
Part 3: The sleeves (make 2)
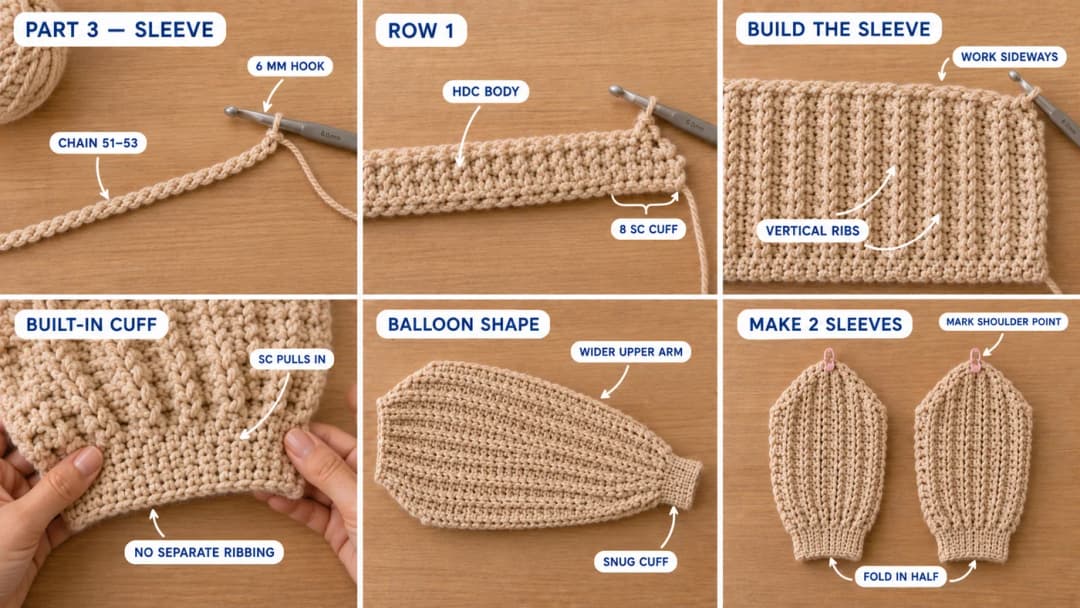
The sleeves are rectangles too. The cuff is built into the rows, just like the waist, and that's what makes them balloon out above the wrist.
Ch 51 (51, 52, 52, 53).
Row 1: Hdc in the 3rd ch from the hook and in each of the next 40 (40, 41, 41, 42) ch. Sc in each of the last 8 ch. Turn. (41 (41, 42, 42, 43) hdc, 8 sc, 49 (49, 50, 50, 51) sts)
Work in pattern for 36 (38, 40, 42, 44) rows in total. The sleeve is about 16 (17, 17¾, 18¾, 19½) in wide at the top and 17¾ (17¾, 18¼, 18¼, 18½) in long. Fasten off, leaving a 30-inch tail at the top edge to sew the sleeve in.
Fold each sleeve in half across its width, matching the foundation chain to the last row. Place a marker at the top fold. That marker meets the shoulder seam later.
Part 4: Assembly
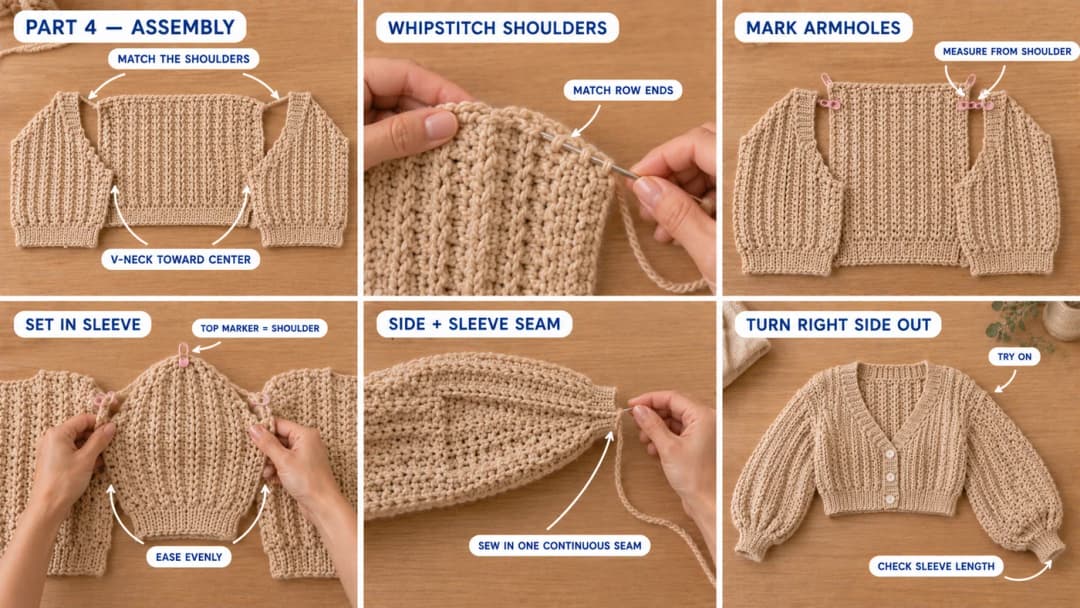
Lay the pieces flat and match them before you sew. All seams are whipstitched through the outer loop of each edge, so they stay flat. Use the sleeve tails where they reach, and a fresh 20-inch length of yarn for every other seam.
- Shoulders. Place the fronts on the back, with the side-seam edges (the foundation chains) lined up with the back's side edges and the V-necks toward the middle. Whipstitch the top row ends of the 12 (14, 15, 17, 18) shoulder rows of each front to the matching row ends of the back. The center 20 (20, 22, 22, 24) rows of the back stay open for the neck. That's about 9 (9, 9¾, 9¾, 10¾) in.
- Mark the armholes. Open the cardigan out flat. On each side edge, measure 8 (8½, 9, 9¼, 9¾) in down from the shoulder seam, on the front and on the back, and place a marker.
- Sew in the sleeves. Match the top marker of each sleeve to the shoulder seam, with the cuff pointing away from the body. Spread the top edge of the sleeve between the two armhole markers and pin it. You're sewing row ends to stitches here, so ease it in evenly. Whipstitch it in place.
- Side and sleeve seams. Fold the cardigan RS together. Sew each side in one seam: start at the cuff, sew the sleeve's foundation chain to its last row along the underarm, then carry on down the body's side edge to the bottom of the waistband.
- Turn it right side out and try it on. This is the moment to check the length of the sleeves before the band goes on.
Part 5: The button band
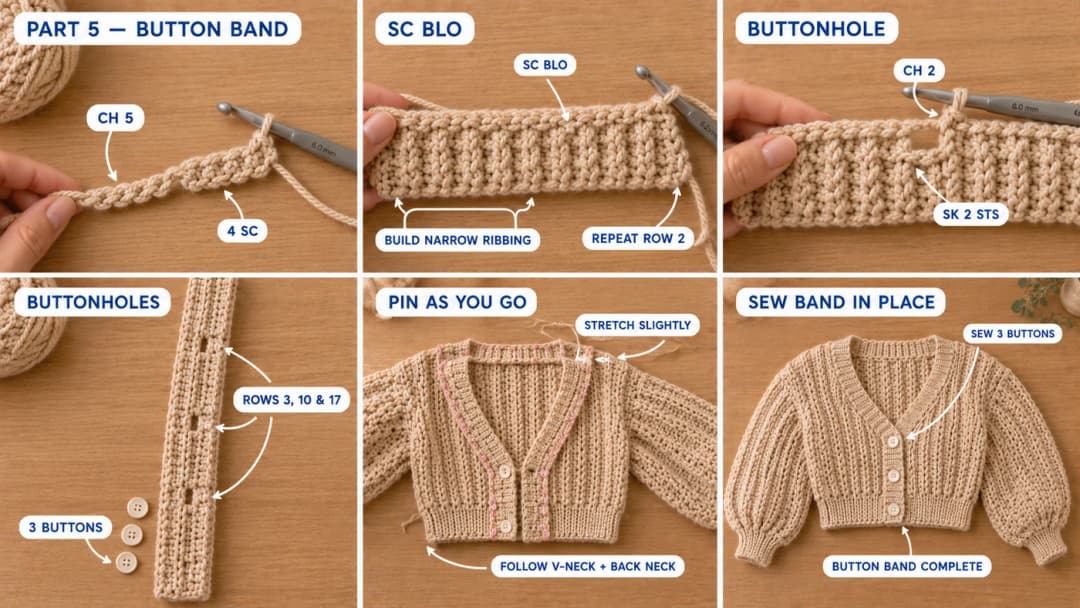
The band is a long, narrow strip of ribbing that runs up the right front, around the back of the neck and down the left front. You crochet it separately, then sew it on.
Buttonholes go on the right front (as you wear it), so the strip starts at the bottom of the right front.
Ch 5.
Row 1: Sc in the 2nd ch from the hook and in each ch across. Turn. (4 sc)
Row 2: Ch 1, sc BLO in each st across. Turn.
Buttonhole rows: On Rows 3, 10 and 17, make a buttonhole: ch 1, sc BLO in the first st, ch 2, sk 2 sts, sc BLO in the last st. Turn. On the next row, work ch 1, sc BLO in the first sc, 2 sc in the ch-2 space, sc BLO in the last sc.
Keep repeating Row 2 for all the other rows. The top buttonhole should sit a little below the point where the V starts. Hold the strip against the right front after Row 17 to check.
Pin as you go. Lay the strip along the edge as it grows, slightly stretched: up the straight front edge, up the V, across the back neck and down the other side. Stop when it reaches the bottom of the left front. That's about 40 (41, 43¼, 44, 45½) in, or roughly 121 (123, 130, 132, 137) rows. Fasten off, leaving a long tail.
Sew on the band. With the RS of the cardigan facing, whipstitch one long edge of the strip to the front edges and the back neck. Keep it slightly stretched on the V and the back neck, so the neckline hugs and doesn't gape.
Buttons. Sew the 3 buttons to the left front band, opposite the buttonholes, with matching thread.
Finishing and blocking
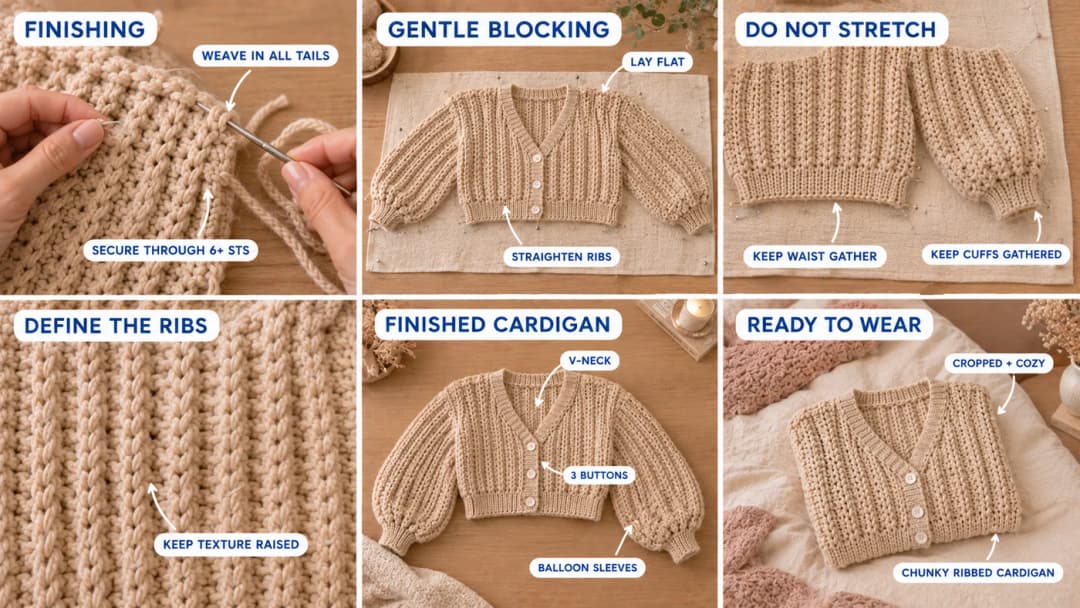
- Weave in every tail through at least 6 sts, then back the other way. Chunky yarn is thick, so split the tail into two plies if it shows.
- Block it gently. For a wool or wool-blend yarn, wet block: soak, roll in a towel and lay flat to dry, patting the ribs straight. For acrylic like Simply Chunky, lay it flat on a blocking mat, pin it to the size chart measurements, mist it with water and let it dry. If you steam acrylic, hold the iron well above the fabric and never press it. Heat flattens the ribs for good.
- Don't stretch the waist or cuffs while blocking. Their gather is part of the design.
Care
Follow the yarn label. Most chunky acrylics can go in a cold delicate cycle inside a laundry bag. Wool blends are safer hand washed. Lay the cardigan flat to dry and reshape it while it's damp. Store it folded: a heavy chunky cardigan on a hanger stretches at the shoulders.
Frequently asked questions
How much yarn do I need for this ribbed chunky cardigan? About 915 (995, 1095, 1180, 1275) yd of chunky #5 yarn for sizes XS to XL. In Paintbox Simply Chunky that's 7 (8, 9, 9, 10) balls of 100 g, with a little extra for the swatch. Buy them all from one dye lot.
Can I make it longer, or not cropped? Yes. Every 3 hdc you add to the row adds about 1 in of length. Add them to the foundation chain of the back and both fronts, and put the extra hdc into every row count. The neck shaping stays the same. Allow about 30–40 yd more per extra inch, depending on size.
Can I make the sleeves less puffy? Yes. Use fewer rows on the sleeves, for example 4 rows fewer for a slimmer upper arm. The armhole gets shallower too, so place the armhole markers at half the new sleeve width.
Can I use bulky #6 yarn instead of chunky? Not with these numbers. A super bulky yarn makes much bigger stitches, so the whole cardigan grows by several sizes. Make a swatch, then pick the size whose numbers at your gauge give you about 6 to 8 in of ease.
Can I sell cardigans made from this pattern? Yes, you can sell finished cardigans you've made yourself. Please credit "Pattern by Wavode" and link back to this page. Please don't republish the written pattern or my photos.
Related patterns on Wavode
- Color block crochet cardigan: another chunky cardigan, made from flat rectangles with no shaping at all.
- Balloon sleeve crochet sweater: if you love these sleeves, here's a pullover built around them.
- Crochet ribbed beanie: the same back-loop ribbing, worked sideways into a hat to match.
- Chunky striped crochet scarf: a quick chunky-yarn project for the leftover balls.
Made this cardigan? Tag #wavodecrochet on Pinterest. I re-pin every finished make and credit the maker.
Pattern by Clara Hartwell for Wavode. Questions? Email me at support@wavode.com.