Sunflower Crochet Cardigan

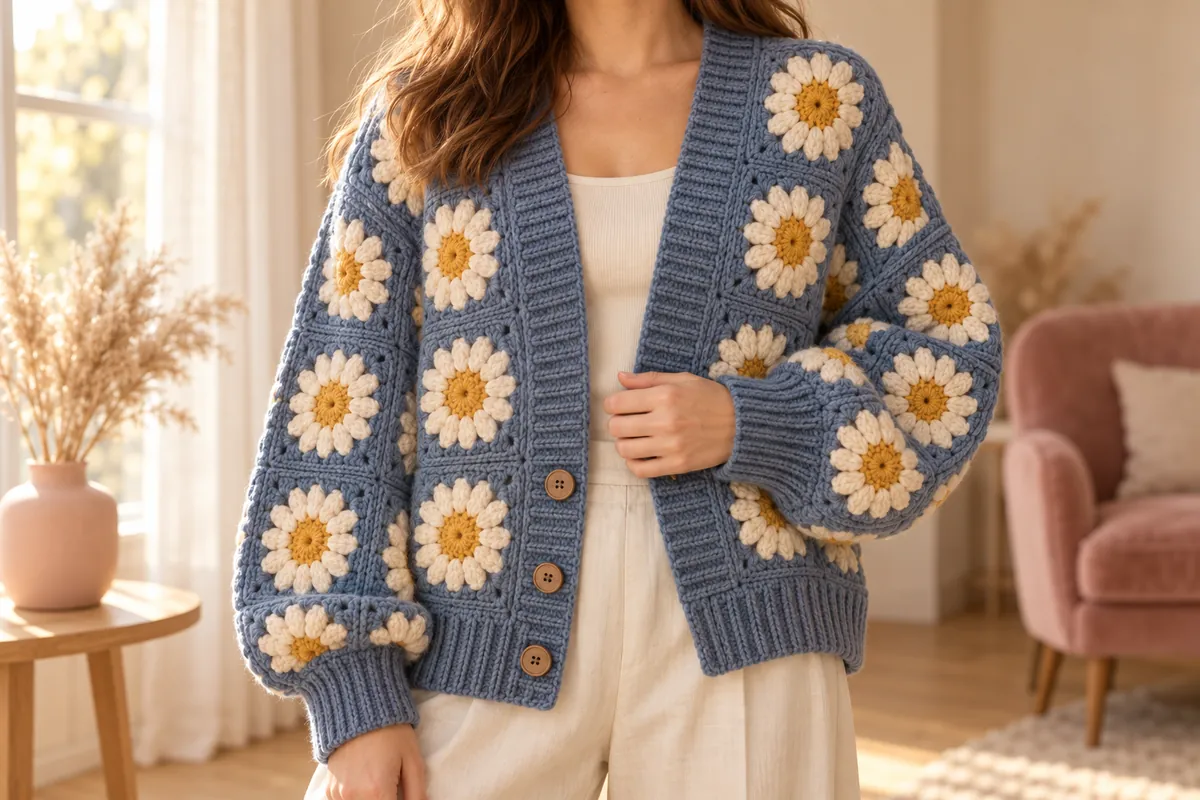
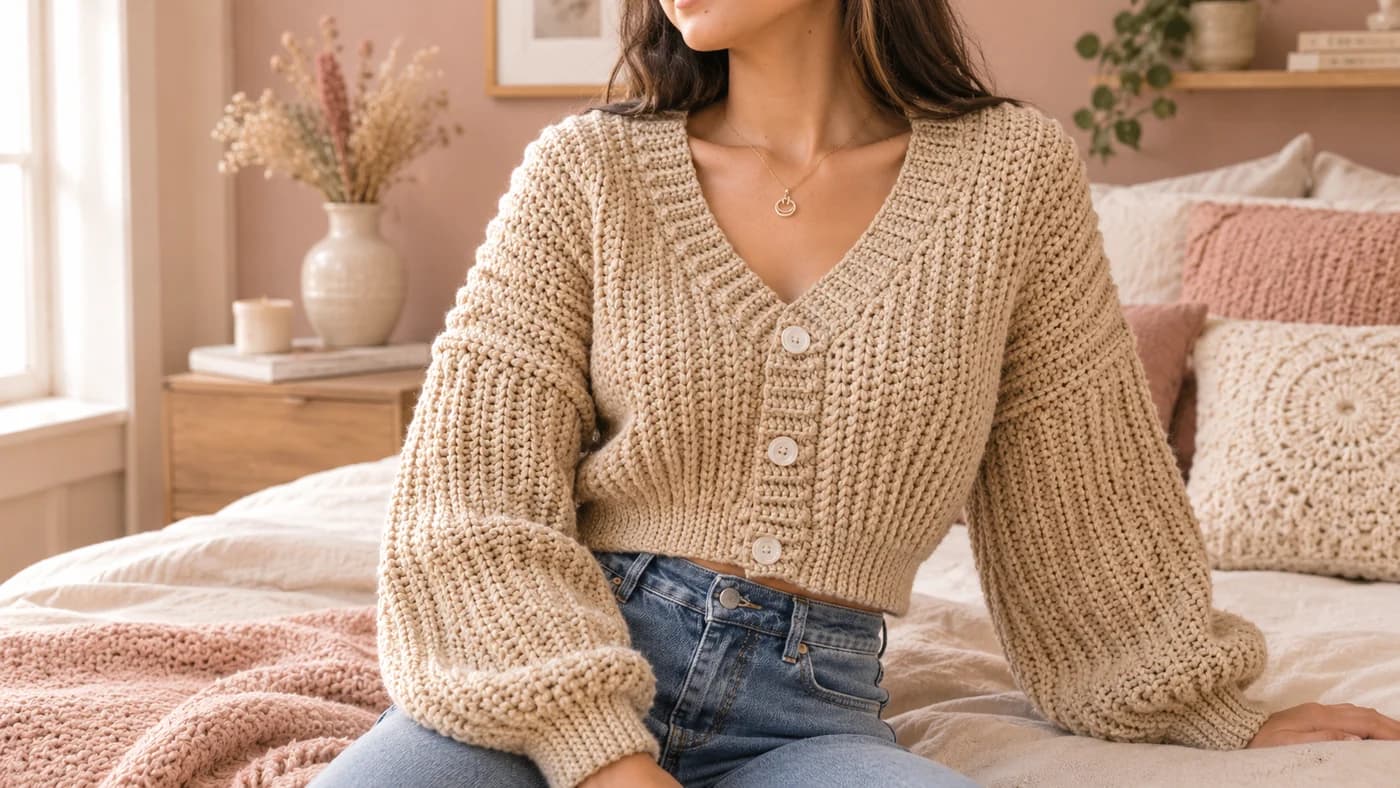
This sunflower crochet cardigan is an oversized granny square cardigan in dusty blue, covered in cream sunflowers with mustard centers. It's made of 23 identical squares, joined into a simple drop-shoulder shape, then finished with ribbed cuffs, a hem band and a buttoned front band. You'll need worsted yarn in three colors, a 5 mm hook and about 25 to 30 hours. The pattern comes in 3 sizes.
Key Takeaways
- One square, 23 times: 15 for the body and 8 for the sleeves. Sizes change with 0, 1 or 2 extra rounds on each square.
- No shaping at all. The body is a row of 5 squares, 3 squares tall, with the armholes left open at the top.
- Ribbed bands through the back loop: the cuffs, hem and front band are all worked sideways and joined as you go, so the ribs run across each band.
- About 1,170 (1,485, 1,830) yd of worsted yarn in all, most of it in blue.
Why I love this sunflower cardigan
I've wanted a flower granny square cardigan for years. What sold me on this one is the color: a soft dusty blue that makes the cream petals glow, with a little mustard sun in the middle of each square. It's the cardigan I reach for on cool mornings, over a white tee and jeans.
It looks complicated, but it's really one square repeated. Once you've made three or four, your hands know it. That makes it a great carry-along project: a square fits in a small bag, and each one takes well under an hour.
The cardigan itself is the simplest shape there is. There's no increasing, no decreasing and no armhole shaping. The squares do all the work, and the ribbed bands make it look polished.
Skill level. Intermediate. You need a magic ring, sc, hdc, dc and tr, working into chains, joining with a whipstitch, and working in the back loop. Nothing is hard, but there's a lot of it, and the joining takes patience.
If you like the granny square look, my daisy granny square baby dress uses a similar flower square in a tiny size.
What you'll need
Yarn: worsted #4 yarn in an acrylic or cotton blend, such as Red Heart Soft or WeCrochet Brava Worsted. A soft acrylic keeps the cardigan light and easy to wash.
| Color | Used for | Size 1 | Size 2 | Size 3 |
|---|---|---|---|---|
| Dusty blue | Squares, joining, all bands | about 920 yd | about 1,235 yd | about 1,580 yd |
| Cream | Petals | about 200 yd | about 200 yd | about 200 yd |
| Mustard | Flower centers | about 50 yd | about 50 yd | about 50 yd |
I worked those amounts out from the stitch counts, and added about 10% for the blue, because joining and bands always eat a little more than you think. The cream and mustard stay the same in every size: only the blue rounds change.
Hook and notions
- 5 mm (US H-8) hook.
- Three ¾-in (20 mm) buttons. Wooden buttons look lovely with the blue.
- A tapestry needle, stitch markers, scissors and a tape measure.
- Rust-proof pins and a towel, for blocking the squares.
Gauge, sizes and fit
Gauge: 16 sc and 18 rows to 4 in (10 cm). More important: a finished square measures about 7 (8, 9) in (18, 20, 23 cm) across after blocking. Check your first square before you make the others. If it's smaller, go up half a hook size. If it's bigger, go down.
| Size 1 | Size 2 | Size 3 | |
|---|---|---|---|
| Fits bust | 30–34 in (76–86 cm) | 35–39 in (89–99 cm) | 40–44 in (102–112 cm) |
| Square size | 7 in (18 cm) | 8 in (20 cm) | 9 in (23 cm) |
| Finished chest, buttoned | about 37 in (94 cm) | about 42 in (107 cm) | about 47 in (119 cm) |
| Length, with hem band | about 23 in (58 cm) | about 26 in (66 cm) | about 29 in (74 cm) |
| Sleeve, below the armhole | about 17 in (43 cm) | about 19 in (48 cm) | about 21 in (53 cm) |
How the chest is worked out: the body is 5 squares around, so 35 (40, 45) in (89, 102, 114 cm). Buttoned, the two front bands lie one on top of the other, which adds one band width, about 2¼ in (5.5 cm). That gives about 37 (42, 47) in (94, 107, 119 cm). The length is 3 squares, 21 (24, 27) in, plus the 2-in hem band.
The fit is relaxed and a little oversized, with dropped shoulders, so the sleeves start partway down the arm. The sleeves are long and slouchy, meant to be pushed up. Hold the sleeve against your arm before the cuff, and make the cuff narrower (fewer sc wide) if you want it shorter.
Numbers for the sizes are written Size 1 (Size 2, Size 3). When only one number is given, it's the same for every size.
Abbreviations (US crochet terms)
- MR = magic ring
- ch = chain
- sl st = slip stitch
- sc = single crochet
- hdc = half double crochet
- dc = double crochet
- tr = treble crochet
- BLO = back loop only
- sp(s) = space(s)
- st(s) = stitch(es)
- rnd(s) = round(s)
- RS = right side
UK crocheters: this pattern uses US terms. US single crochet = UK double crochet.
The pattern — step by step
Part 1 — The sunflower square (make 23)
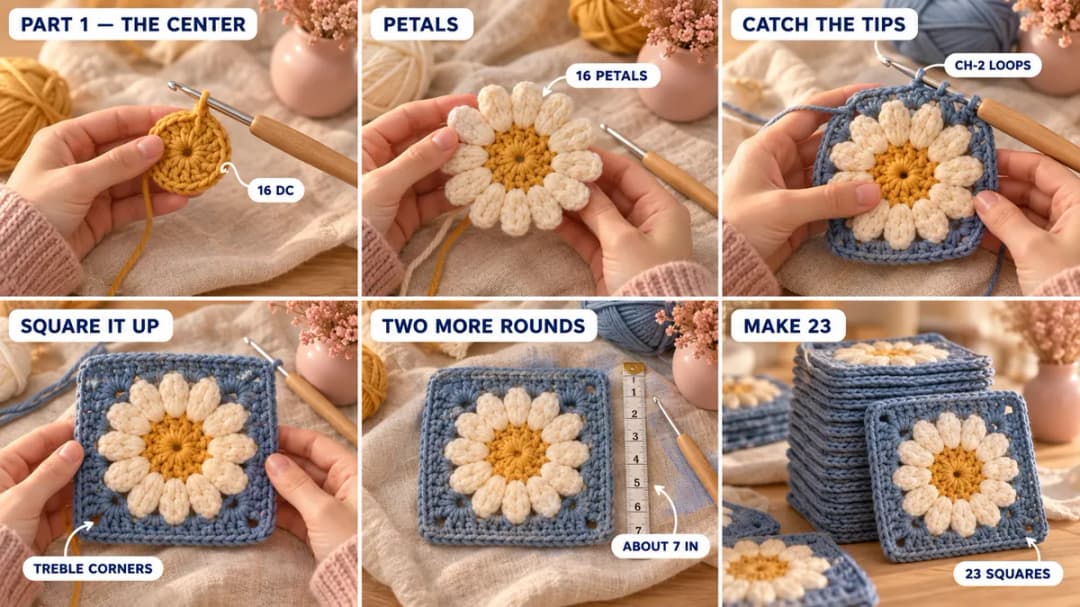
Rnd 1 (mustard): MR, ch 3 (counts as a dc), 15 dc in the ring. Pull the ring closed and join with a sl st to the top of the ch-3. Fasten off. (16 dc)
Rnd 2 (cream petals): Join cream with a sl st in any st of Rnd 1. Each petal starts from the st you're in and is anchored in the next one:
- Ch 5, hdc in the 3rd ch from the hook, dc in each of the last 2 ch, sl st in the next st of Rnd 1. That's one petal.
- Repeat from * 15 more times. The 16th petal is anchored with a sl st in the st where you joined.
Fasten off. You have 16 rounded petals, one between each pair of mustard sts, each with a ch-2 at its tip. (16 petals)
Rnd 3 (blue): Join blue with a sc in the ch-2 at the tip of any petal. Ch 2, sc in the ch-2 at the tip of the next petal. Repeat from * around, ending with ch 2. Join with a sl st to the first sc. (16 sc, 16 ch-2 sps)
Check that the petals lie flat in a ring. If they cup, your ch-2s are too tight; if they ruffle, too loose.
Rnd 4 (blue, square up): Sl st into the next ch-2 sp. Ch 4 (counts as a tr), (2 tr, ch 2, 3 tr) in the same sp: that's the first corner. 3 dc in the next sp, 3 hdc in the next sp, 3 dc in the next sp, (3 tr, ch 2, 3 tr) in the next sp. Repeat from * twice more. 3 dc in the next sp, 3 hdc in the next sp, 3 dc in the last sp. Join to the top of the ch-4. (15 sts per side, 4 corner sps)
The tall trebles push out the corners and the short hdc sit at the middle of each side. That's what turns the circle into a square.
How the counts work from here. A side is everything between two corner ch-2 sps: the dc on each side of the corners count, the ch-2 doesn't. After Rnd 4, each side has 15 sts. Rnd 4 started with the ch-4 and 2 tr before the ch-2 of the first corner, so those 3 sts are the last 3 sts of a side, and you joined into the first of them. Every round below starts in that same join st, with the ch-3 standing in for a dc worked into it, so no stitch is skipped or worked twice.
Rnd 5 (blue): Ch 3 (counts as a dc in the join st, the top of the ch-4), dc in the next 2 sts (the 2 tr). (2 dc, ch 2, 2 dc) in the corner sp, dc in each of the next 15 sts. Repeat from * twice more. (2 dc, ch 2, 2 dc) in the last corner sp, dc in each of the last 12 sts. Join to the top of the ch-3. (19 sts per side)
Rnd 6 (blue): Ch 3 (counts as a dc in the join st), dc in the next 4 sts. (2 dc, ch 2, 2 dc) in the corner sp, dc in each of the next 19 sts. Repeat from * twice more. (2 dc, ch 2, 2 dc) in the last corner sp, dc in each of the last 14 sts. Join to the top of the ch-3. (23 sts per side)
Size 1: fasten off.
Sizes 2 and 3, Rnd 7 (blue): Ch 3, dc in the next 6 sts. (2 dc, ch 2, 2 dc) in the corner sp, dc in each of the next 23 sts. Repeat from * twice more. (2 dc, ch 2, 2 dc) in the last corner sp, dc in each of the last 16 sts. Join. (27 sts per side) Size 2: fasten off.
Size 3, Rnd 8 (blue): Ch 3, dc in the next 8 sts. (2 dc, ch 2, 2 dc) in the corner sp, dc in each of the next 27 sts. Repeat from * twice more. (2 dc, ch 2, 2 dc) in the last corner sp, dc in each of the last 18 sts. Join. (31 sts per side) Fasten off.
So every square has 23 (27, 31) sts per side. Weave in the tails, then pin each square to 7 (8, 9) in on a towel, spray it damp and let it dry. Blocked squares are much easier to join.
Part 2 — Joining the body
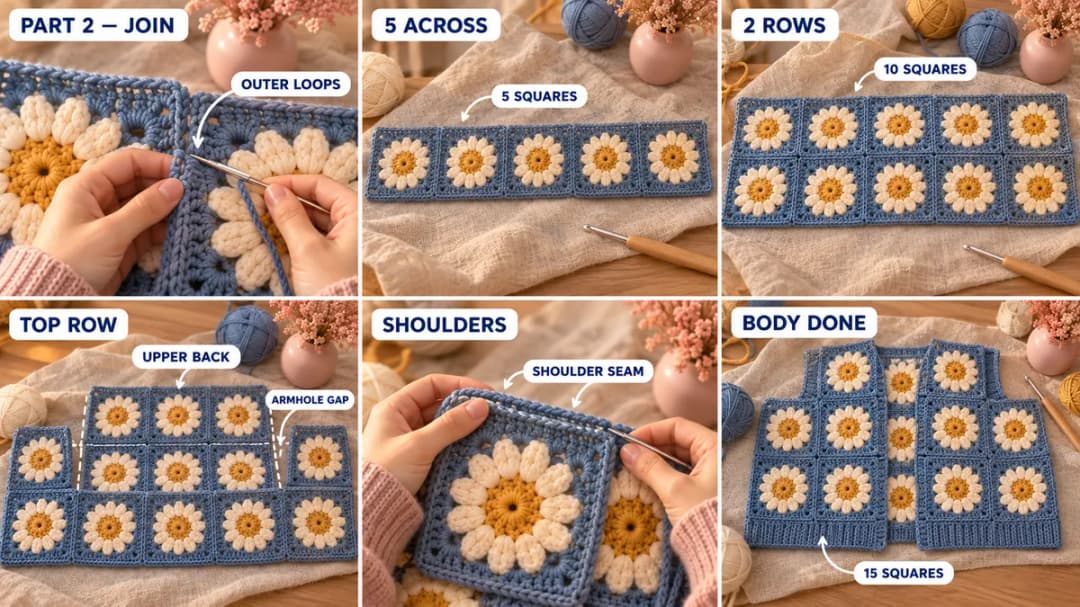
Join squares with RS facing up, side by side, using a long length of blue: whipstitch through the outer loops only of the two edges, 1 stitch in each pair of sts, from corner sp to corner sp. The inner loops stay on the RS as a neat flat line.
You'll use 15 squares for the body. Lay them out flat, RS up, and number them like this:
| Front | Back | Back | Back | Front | |
|---|---|---|---|---|---|
| Top row | 11 | 12 | 13 | 14 | 15 |
| Middle row | 6 | 7 | 8 | 9 | 10 |
| Bottom row | 1 | 2 | 3 | 4 | 5 |
- Join: every square to its neighbors in the bottom and middle rows, every square of the top row to the square below it, and 12 to 13 to 14.
- Don't join: 11 to 12, and 14 to 15. These two gaps are the armholes.
- Shoulders: the top of 11 to the top of 12, and the top of 15 to the top of 14.
- Back neck: the top of 13 stays free.
The same steps, in order:
- Bottom two rows. Join squares 1–5 in a line, and 6–10 in a line. Then join the two lines along their long edge. That's a wide panel, 5 squares across and 2 tall.
- Top row. Join 12, 13 and 14 in a line for the upper back, and join them to 7, 8 and 9. Then join 11 on top of 6, and 15 on top of 10: these are the upper fronts.
- Leave the armholes open. 11 is not joined to 12, and 15 is not joined to 14. Each gap is an armhole, 2 square edges around: the side of the upper front and the side of the upper back.
- Shoulders. Fold the two front columns (1-6-11 and 5-10-15) toward the middle, RS out, so they lie over the back. Join the top of 11 to the top of 12, and the top of 15 to the top of 14. The top of 13 stays free: that's the back neck.
Lay it flat: you have a cardigan shape with a straight front opening, two armholes, each 2 square edges around, and a back neck the width of one square.
How it sits on the body. Picture the piece from the outside, with the RS facing you as if you were looking at the wearer's back. Columns 2–4 (squares 2, 3, 4, 7, 8, 9, 12, 13, 14) lie across the back. Column 1 (squares 1, 6, 11) wraps around the wearer's left side to become the left front, and column 5 (squares 5, 10, 15) wraps around the right side to become the right front. The joins between columns 1 and 2, and between 4 and 5, run down each side of the body, and the armhole opens at the top of each of those lines. The front opening edges are the outer edges of columns 1 and 5.
Part 3 — Sleeves and cuffs
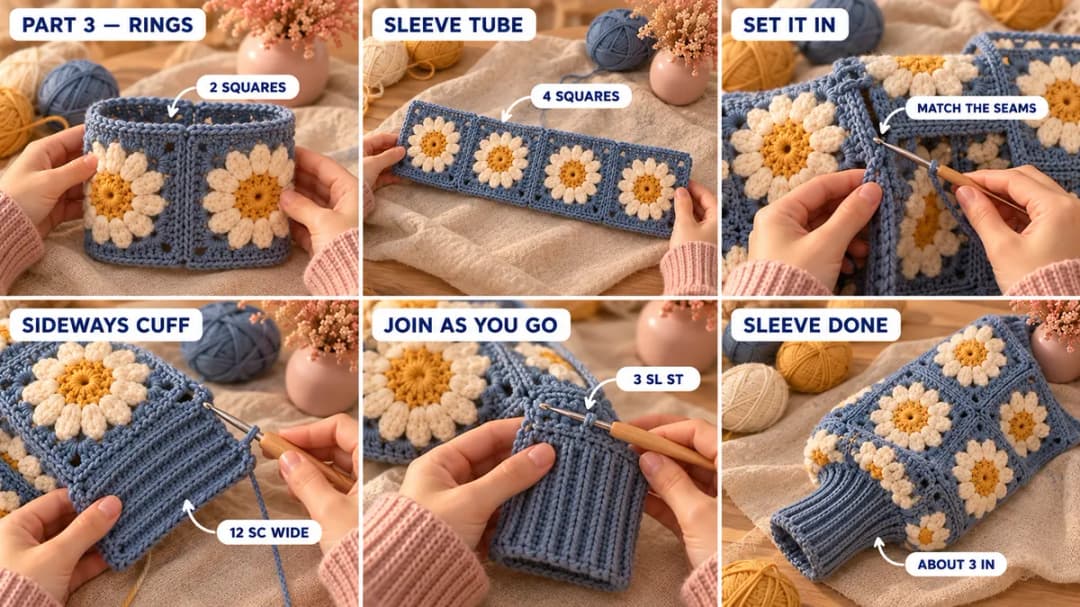
Each sleeve uses 4 squares, in 2 rings of 2.
- Rings. Join 2 squares along both side edges, so they form a tube. Make 2 tubes per sleeve.
- Stack them. Join the 2 tubes end to end, matching the seams. You have a sleeve 2 squares long.
- Set it in. With RS out, put the top of the sleeve into the armhole. Match one sleeve seam to the shoulder seam and the other to the bottom of the armhole. Whipstitch all the way around.
Cuff (blue). The cuff is a narrow band worked sideways in rows of sc through the back loop, and joined to the sleeve as you go. The rows run up the arm, so the ribs are vertical, and the joining gathers the wide sleeve into the wrist.
The bottom edge of the sleeve has 48 (56, 64) sts: the 23 (27, 31) sts along each square, plus 1 for each seam.
- Start. With RS facing, join blue with a sl st at a sleeve seam. Ch 13.
- Row 1: Sc in the 2nd ch from the hook and in each ch across, back toward the sleeve. (12 sc) Sl st in each of the next 3 sts of the sleeve edge. Turn.
- Row 2: Skip the sl sts. Sc in the BLO of each of the 12 sc. Ch 1, turn.
- Row 3: Sc in the BLO of each of the 12 sc. Sl st in each of the next 3 sts of the sleeve edge. Turn.
- Repeat Rows 2 and 3. The odd rows (1, 3, 5 …) are the joining rows. Stop after Row 31 (37, 43), which is joining row number 16 (19, 22). Every joining row uses 3 sts, except the last one in sizes 2 and 3, which uses the last 2 (1) sts: 16 × 3 = 48, 18 × 3 + 2 = 56, 21 × 3 + 1 = 64.
- Close (Row 32 (38, 44)). Turn. Hold the foundation chain behind the last row, and sl st through each sc of the last row and the matching ch together, all the way across. Fasten off. This is a seam, not an extra rib row.
Rib gauge: the cuff rows follow the sc gauge, about 18 rows to 4 in (10 cm). So the 31 (37, 43) worked rows make a cuff about 7 (8¼, 9½) in (17.5, 21, 24 cm) around and 3 in (7.5 cm) deep. If you want a snugger wrist, join 4 sts on some of the rows instead of 3. Make the second sleeve the same way.
Part 4 — Front band, hem band and buttons
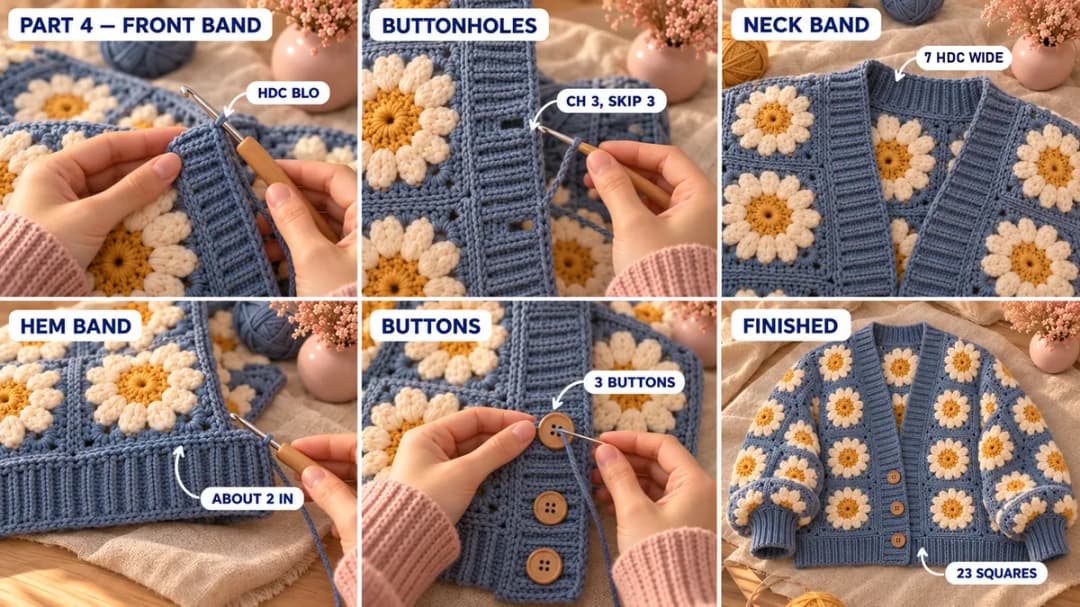
Front and neck band (blue). One long band, worked sideways in rows of hdc through the back loop and joined to the edge as you go, from the bottom of the right front, up and around the back neck, and down the left front. The rows run across the band, so its ribs match the cuffs and the hem.
The edge it joins to is the outer edge of squares 5, 10 and 15, the top of 13 (the back neck), and the outer edge of 11, 6 and 1. Count 1 st for each st of the squares and 1 for each corner sp and seam: about 171 (199, 227) sts.
Mark the buttonholes first. On the right front edge, counting up from the bottom corner of square 5, put a marker in the 4th (5th, 6th) st, then in every 21st (24th, 27th) st after it, for 3 markers in all. The band stitches follow the stitches of the squares, so lay the cardigan flat or try it on, and move a marker by 2 or 3 sts if a button would fall somewhere odd.
- Start. With RS facing, join blue with a sl st at the outer bottom corner of square 5. Ch 9.
- Row 1: Hdc in the 3rd ch from the hook and in each ch across, back toward the body. (7 hdc) Sl st in each of the next 2 sts of the edge. Turn.
- Row 2: Skip the sl sts. Hdc in the BLO of each of the 7 hdc. Ch 2 (doesn't count as a st), turn.
- Row 3: Hdc in the BLO of each of the 7 hdc. Sl st in each of the next 3 sts of the edge. Turn.
- Row 4: Repeat Row 2.
- Row 5: Hdc in the BLO of each of the 7 hdc. Sl st in each of the next 2 sts of the edge. Turn.
- Repeat Rows 2–5 all the way along the edge, alternating 2 and 3 sl sts on the joining rows.
Buttonholes. When a joining row reaches a marker, work the next row as a buttonhole row instead of Row 2 or 4: skip the sl sts, hdc in the BLO of the next 2 hdc, ch 3, skip 3 hdc, hdc in the BLO of the last 2 hdc, ch 2, turn. On the following joining row, work hdc in the BLO of 2, 3 hdc in the ch-3 sp, hdc in the BLO of the last 2, then join as usual.
Neck corners. Where the band turns from the front edge to the back neck, and again from the back neck to the left front, join 2 joining rows in a row into the same corner st. The band turns the corner without pulling.
Why 4 rows for 5 sts: 4 hdc rows are about 1½ in (3.8 cm) wide, and 5 sts of the squares, at about 3½ sts to the inch, are about the same. Check after the first 4 in: if the band ruffles, join 3 sts more often; if it pulls the front up, join 2 sts more often.
When you reach the outer bottom corner of square 1, fasten off. With the markers placed as above, the holes land roughly 1¼ (1½, 1¾) in (3, 4, 4.5 cm) above the bottom edge of the body, then every 6½ (7, 7¾) in (16.5, 18, 19.5 cm), all below the V of the neckline. The hem band, added next, adds about 2¼ in (5.5 cm) below them, so on the finished cardigan the first button sits about 3½ (3¾, 4) in (9, 9.5, 10 cm) above the hem. The band is about 2¼ in (5.5 cm) wide.
Hem band (blue). Like the cuffs, it's worked sideways and joined as you go, so its ribs are vertical. First you need a base row to join into.
- Base row (RS): Join blue at the bottom of the left front band. Ch 1, work 7 sc across the end of the band, sc in each st across the bottom of the body with 1 sc in each seam, then 7 sc across the end of the right front band. (133, 153, 173) Don't turn. Ch 9.
- Row 1: Sc in the 2nd ch from the hook and in each ch across, back toward the base row. (8 sc) Sl st in the next st of the base row. Turn.
- Row 2: Skip the sl st. Sc in the BLO of each of the 8 sc. Ch 1, turn.
- Row 3: Sc in the BLO of each of the 8 sc. Sl st in each of the next 2 sts of the base row. Turn.
- Row 4: Skip the sl sts. Sc in the BLO of each of the 8 sc. Ch 1, turn.
- Row 5: Sc in the BLO of each of the 8 sc. Sl st in the next st of the base row. Turn.
Repeat Rows 2–5 across, alternating 1 and 2 sl sts at the end of each joining row, until you reach the last st of the base row. Fasten off. The band is about 2 in (5 cm) deep.
Why 4 rows for 3 sts: at the sc gauge, 4 band rows are about ⅞ in (2.2 cm) wide, and 3 base sts, worked one per dc of the squares, are about the same. Check after the first 4 in: if the band ruffles, join 2 sts more often; if it pulls the hem in, join 1 st more often.
Buttons. Lay the cardigan flat with the fronts overlapping. Mark the left front band under each buttonhole and sew a button there with blue yarn.
Finish. Weave in every tail, then steam the bands lightly (hold the iron above the fabric, never on it) or spray them damp and let them dry flat.
Care. Hand wash in cool water, or machine wash on a gentle wool cycle in a laundry bag if your yarn label allows it. Press out the water in a towel and dry it flat. Never hang a granny square cardigan to dry: the weight of the wet squares stretches it.
Make it yours — quick variations
| Variation | Change from base pattern |
|---|---|
| Cropped cardigan | Make the body 2 rows tall instead of 3 (10 squares), and make the hem band 12 sc wide (ch 13) for a deeper rib. |
| Sunflower yellow | Swap cream for golden yellow petals and mustard for brown centers, for a true sunflower look. |
| Open cardigan | Skip the buttonhole rows and work them like Row 2. |
| Short sleeves | Use 1 ring of 2 squares per sleeve, and make the cuff 6 sc wide (ch 7). |
| Framed squares | Work the last round of every square in cream, so each sunflower sits in a thin cream frame. |
Troubleshooting the three things that go wrong
The squares come out different sizes
Tension changes as you relax into a project. Measure every square against your first one, and block them all to the same size before joining. A square that's more than ½ in off is worth remaking.
The petals cup or ruffle
That's Rnd 3. If the petals cup up, loosen your ch-2s or make them ch 3. If they ruffle, make the chains a little tighter. Rnd 4 hides a small difference.
The front band flips or waves
The joining rate is off for your tension. If it waves, join 3 sts more often; if it pulls and flips, join 2 sts more often. Rip back to the last place it lay flat and carry on from there.
Frequently asked questions
How long does this sunflower cardigan take? About 25 to 30 hours. Each square takes 40 to 50 minutes, so the 23 squares are most of it. The joining takes 3 to 4 hours, and the bands another 3 or 4.
How much yarn do I need? About 920 (1,235, 1,580) yd of blue, 200 yd of cream and 50 yd of mustard. Buy one extra ball of blue: dye lots vary, and running out on the front band is no fun.
Can I make it in cotton? Yes, in a worsted cotton blend. A 100% cotton cardigan is heavy, so it will grow longer as you wear it. Make your squares a little smaller, or make the hem band 6 sc wide (ch 7).
Can I make a bigger or smaller size? Yes. Each extra blue round adds about 1 in to every square, so about 5 in to the chest. For a bigger size than Size 3, add one more round. For a smaller size, stop after Rnd 5: 6-in squares give a chest of about 32 in.
Can I sell cardigans made from this pattern? Yes, you're welcome to sell finished cardigans made from this free pattern at markets, on Etsy or as gifts. Please credit "Pattern by Wavode" in your listing and link back to this page. What you can't do is republish this write-up or my photos as your own pattern.
Related patterns on Wavode
- Crochet ribbed chunky cardigan: a cozy ribbed cardigan in chunky yarn.
- Oversized chunky cream cardigan: an easy oversized layer.
- Daisy granny square baby dress: a flower square dress for little ones.
- Granny square beach tote: a bag to match your squares.
Made a sunflower cardigan? Tag #wavodecrochet on Pinterest. I re-pin every finished make and credit the maker.
Pattern by Clara Hartwell for Wavode. Questions? Email me at support@wavode.com.