Crochet Striped Beanie

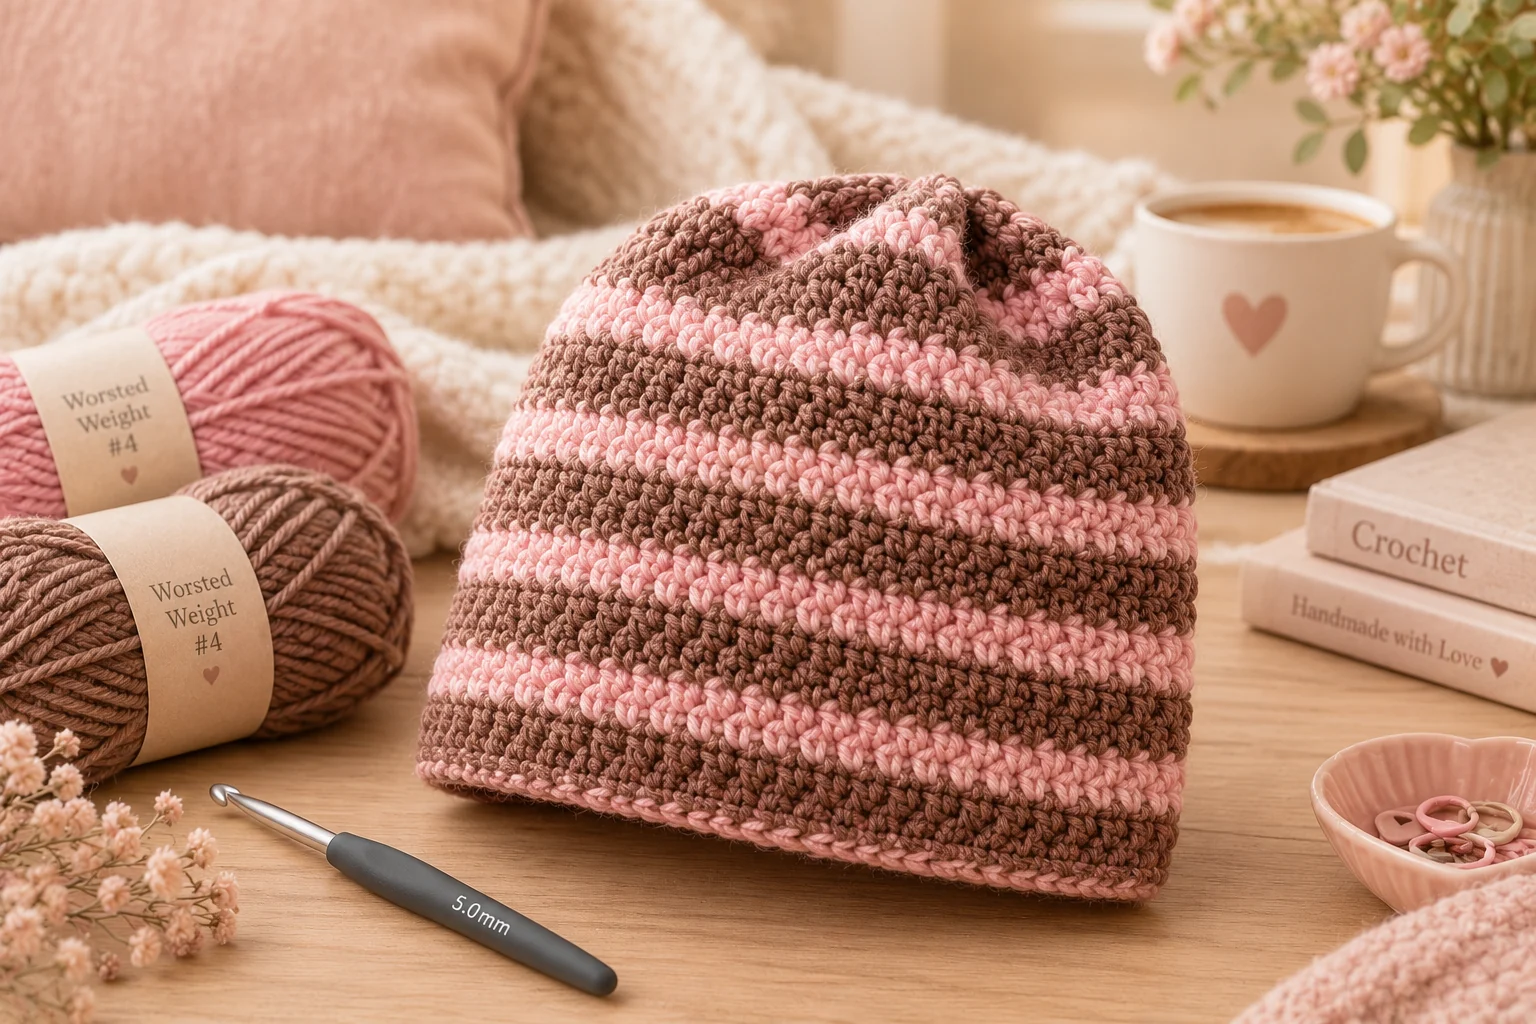
This free crochet striped beanie pattern makes a relaxed, slightly slouchy hat with a small solid circle at the top and thin stripes all the way down, in three adult sizes. It's worked top-down in joined rounds of half double crochet, so there are no seams and no sewing. You carry the yarn up inside the hat instead of cutting it at every stripe. You'll need about 125 yards of worsted #4 yarn in 2 or 3 colors, a 5 mm hook and 3 to 4 hours.
Key Takeaways
- One stitch, one hat, nine looks. Every combo uses the same rounds; only the colors change.
- No cutting at every stripe. The spare colors wait inside the hat until you need them.
- Budget ~115–140 yd (105–130 m) of worsted #4 in total, depending on size.
- Joined rounds keep the stripes level, with no step where each round ends.
Why I keep making striped beanies
I started with one hat in cocoa and blush. Then I made a black and cream one for a friend, and a cherry red one for me, and now there's a whole pile of them by my door. Once you've made one, the next one is just a new color pick.
That's what I love about this pattern. The rounds never change. You pick two or three colors, follow a short stripe recipe, and the hat takes care of itself. It's also the best scrap-buster I know. A leftover half skein is plenty for one color.
The fit is easy, too. The hat is about an inch smaller than your head, so it hugs without squeezing, and the extra height gives it a soft slouch at the back.
Skill level. Easy. You need a magic ring, half double crochet and a simple color change. If you've made a flat circle before, you're ready. If you haven't, the crown is the only part that needs counting.
Want a hat without color changes first? My crochet ribbed beanie is worked flat and uses only one color. And if stripes are your thing, my chunky striped crochet scarf pairs well with any of the combos below.
What you'll need
Yarn
- About 125 yd (115 m) of worsted #4 yarn in total, split across 2 or 3 colors. A smooth wool blend shows the stripes best. Lion Brand Wool-Ease (197 yd / 180 m per 85 g skein) is a good match.
- By size, plan on about 115 yd (S), 125 yd (M) and 140 yd (L) in total.
- One skein of each color is enough for any size, with leftovers for a second hat.
- Fuzzy or mohair-type yarns blur thin stripes. Save them for a solid hat.
Hook and notions
- 5 mm (US H-8) hook.
- 1 locking stitch marker.
- A tapestry needle and scissors.
Gauge
In hdc, worked in joined rounds: 13 sts × 10 rnds = 4 in (10 cm).
The crown is your gauge swatch. After Rnd 8, the flat circle should measure about 6.25 in (16 cm) across. For sizes M and L, check after Rnd 9: about 6.75 (7) in (17, 18 cm).
If your circle is bigger, go down to a 4.5 mm hook. If it's smaller, go up to 5.5 mm. Check before you start the body, because it's only a few minutes to redo 8 rounds.
Abbreviations (US crochet terms)
- MR = magic ring
- ch = chain
- sl st = slip stitch
- sc = single crochet
- hdc = half double crochet
- inc = 2 hdc in the same stitch
- st(s) = stitch(es)
- rnd(s) = round(s)
- rep = repeat
UK crocheters: this pattern uses US terms. US half double crochet = UK half treble. US single crochet = UK double crochet.
Sizes and finished measurements
Numbers are for S (M, L). If only one number is given, it's the same for all sizes.
| S | M | L | |
|---|---|---|---|
| Fits head | 20–21 in (51–53 cm) | 21.5–22.5 in (55–57 cm) | 23–24 in (58–61 cm) |
| Hat around, unstretched | 19.75 in (50 cm) | 21 in (53 cm) | 22.25 in (56 cm) |
| Height, crown to edge | about 9 in (23 cm) | about 9.5 in (24 cm) | about 10 in (25 cm) |
| Stitches per round (body) | 64 | 68 | 72 |
| Total rounds (with edge) | 23 | 24 | 25 |
The 9 stripe combos
Every round is one stripe. Here's how each hat is laid out:
- Rnds 1–4 (the crown center) are worked in one color, listed in the table. Those first rounds are tiny, and a small solid circle at the top looks neater than four fiddly stripes.
- From Rnd 5 on, follow the repeat, one letter per round, down to the last hdc round.
- The edge round is always in color A.
| # | Combo | Colors | Crown center (Rnds 1–4) | Repeat from Rnd 5 |
|---|---|---|---|---|
| 1 | Black & Cream | A black, B cream | A | A, A, B |
| 2 | Blush & Cocoa | A blush, B cocoa | B | A, B |
| 3 | Cherry & Blush | A cherry red, B blush | A | A, A, B |
| 4 | Olive & Cocoa | A olive, B cocoa | B | A, B |
| 5 | Slate & Navy | A slate blue, B navy | B | A, A, B |
| 6 | Straw & Cocoa | A straw yellow, B cocoa | B | A, B |
| 7 | Sky, Butter & Cocoa | A cocoa, B sky blue, C butter yellow | A | A, B, C |
| 8 | Forest, Navy & Brown | A forest green, B navy, C brown | B | A, B, C |
| 9 | Rust, Olive & Chocolate | A rust, B olive, C chocolate | C | A, B, A, C |
All the step photos below show combo 2: a cocoa center, then blush and cocoa, one round each, and a blush edge.
How much of each color (size M):
| Repeat type | Color A | Color B | Color C |
|---|---|---|---|
| A, B | ~65 yd | ~60 yd | — |
| A, A, B | ~90 yd | ~40 yd | — |
| A, B, C | ~45 yd | ~40 yd | ~40 yd |
| A, B, A, C | ~65 yd | ~35 yd | ~35 yd |
Take off about 10 yd in total for size S, and add about 15 yd in total for size L.
How I pick stripe colors
Contrast in lightness matters more than contrast in color. Olive and cocoa look different in the skein, but they're almost the same darkness, so the stripes read soft and tweedy. Black and cream are far apart, so every stripe pops.
Here's a quick test. Line the skeins up and take a phone photo in black and white. If you can barely tell them apart, you'll get a subtle, blended hat. If they're clearly different grays, you'll get bold, graphic stripes. Both look good, so pick on purpose.
How the hat is built
- You start at the top of the crown with a magic ring, in your crown center color.
- You increase 8 stitches every round until the flat circle is big enough to go around your head.
- Then you stop increasing and work even rounds straight down to the edge.
- A final round of single crochet in color A gives a neat, firm edge.
Every round is joined with a slip stitch. That's what keeps the stripes level. In a spiral, each stripe would end one row higher than it started and leave a step. Joined rounds leave only a faint line where the rounds meet, and that's the back of the hat.
The pattern — step by step
Every round starts the same way: ch 1 (it doesn't count as a stitch), then work the first hdc into the same stitch as the join. Place the marker in that first hdc so you can find it at the end of the round.
Every round ends the same way: sl st into the first hdc to join. If the next round is a new color, make that sl st with the new color (see Part 2).
Part 1 — The crown
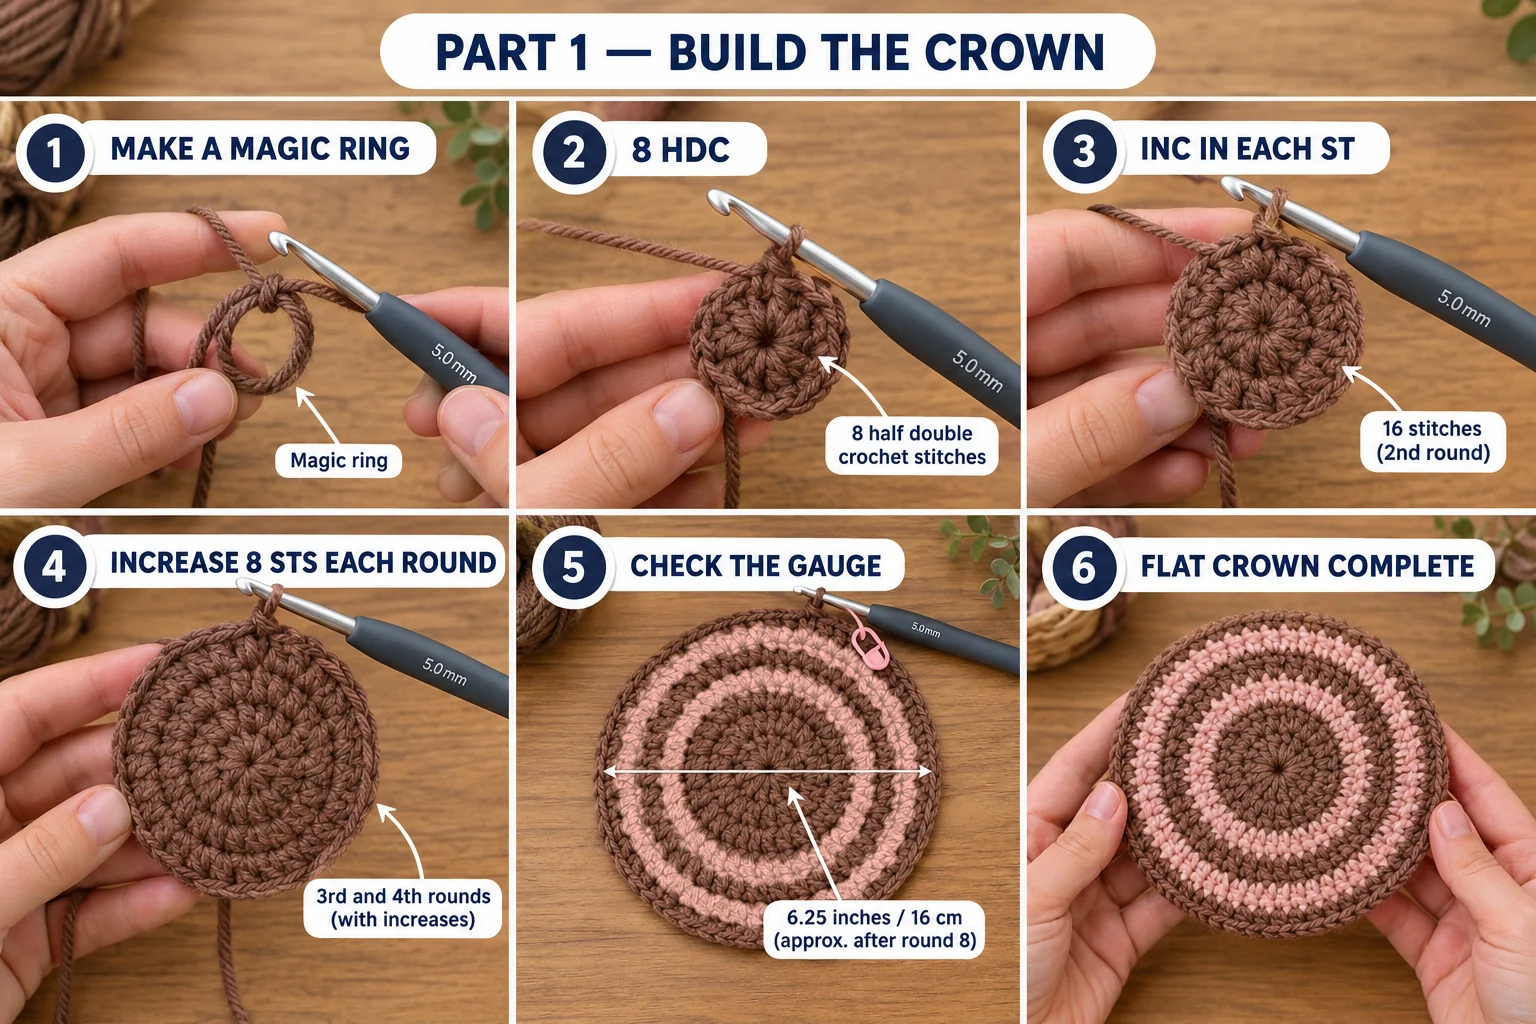
Work Rnds 1–4 in your crown center color. From Rnd 5, follow your repeat. For combo 2, that's cocoa for Rnds 1–4, then blush for Rnd 5, cocoa for Rnd 6, and so on.
Rnd 1: MR, ch 1, 8 hdc into the ring. Pull the ring closed and join. (8 hdc)
Rnd 2: Inc in each st around. Join. (16 hdc)
Rnd 3: *Hdc in the next st, inc in the next st; rep from * around. Join. (24 hdc)
Rnd 4: *Hdc in the next 2 sts, inc; rep from * around. Join. (32 hdc)
Rnd 5: *Hdc in the next 3 sts, inc; rep from * around. Join. (40 hdc)
Rnd 6: *Hdc in the next 4 sts, inc; rep from * around. Join. (48 hdc)
Rnd 7: *Hdc in the next 5 sts, inc; rep from * around. Join. (56 hdc)
Rnd 8: *Hdc in the next 6 sts, inc; rep from * around. Join. (64 hdc)
Size S: the crown is done. Go to Part 3.
Size M only, Rnd 9: *Hdc in the next 15 sts, inc; rep from * around. Join. (68 hdc)
Size L only, Rnd 9: *Hdc in the next 7 sts, inc; rep from * around. Join. (72 hdc)
Lay the circle flat and check the gauge now (see above). It should lie flat, not ruffle and not cup. In combo 2, the finished crown has a cocoa center, two blush rings and a cocoa outer round.
Part 2 — Changing color at the join (and not cutting)
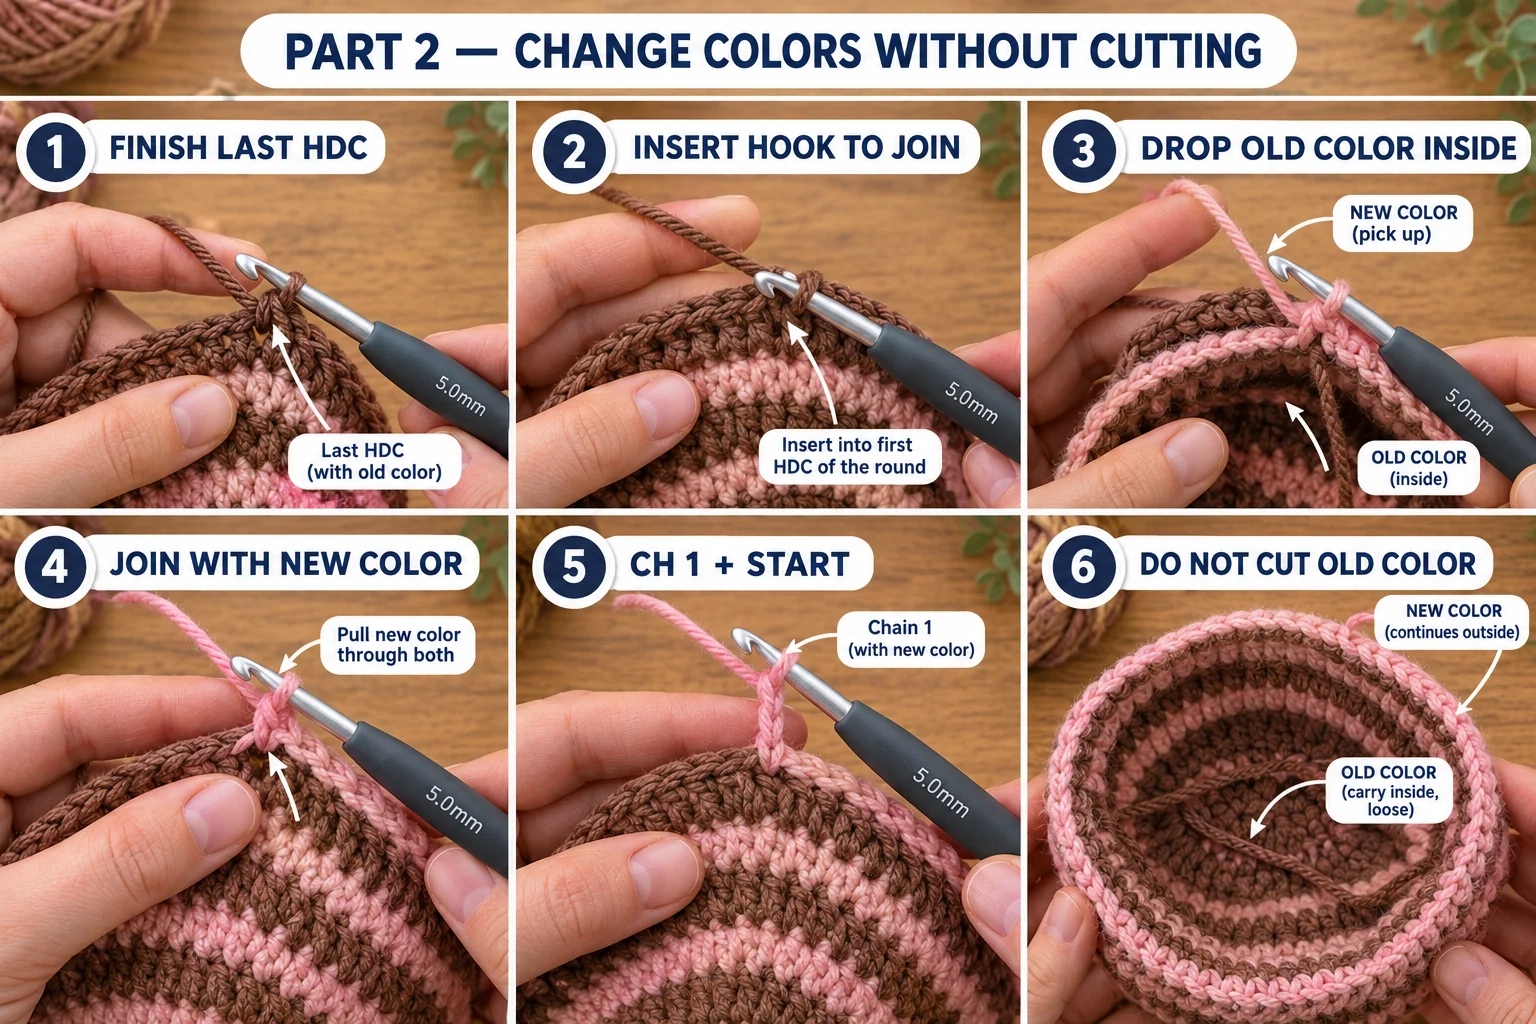
You'll do this at the end of almost every round, so it's worth getting smooth.
- Finish the last hdc of the round in the old color.
- Insert the hook into the first hdc of the round, as if to join.
- Drop the old color to the back (the inside of the hat). Pick up the new color, yarn over with it and pull it through both the stitch and the loop on your hook. That's your sl st join, made in the new color.
- Ch 1 with the new color and start the next round as usual.
The first time you bring in a color, leave a 6-in (15 cm) tail. Hold it along the top of the next few stitches and work over it, then trim it later.
Don't cut the old color. Leave it hanging inside the hat. Part 4 shows how to carry it.
Part 3 — The body
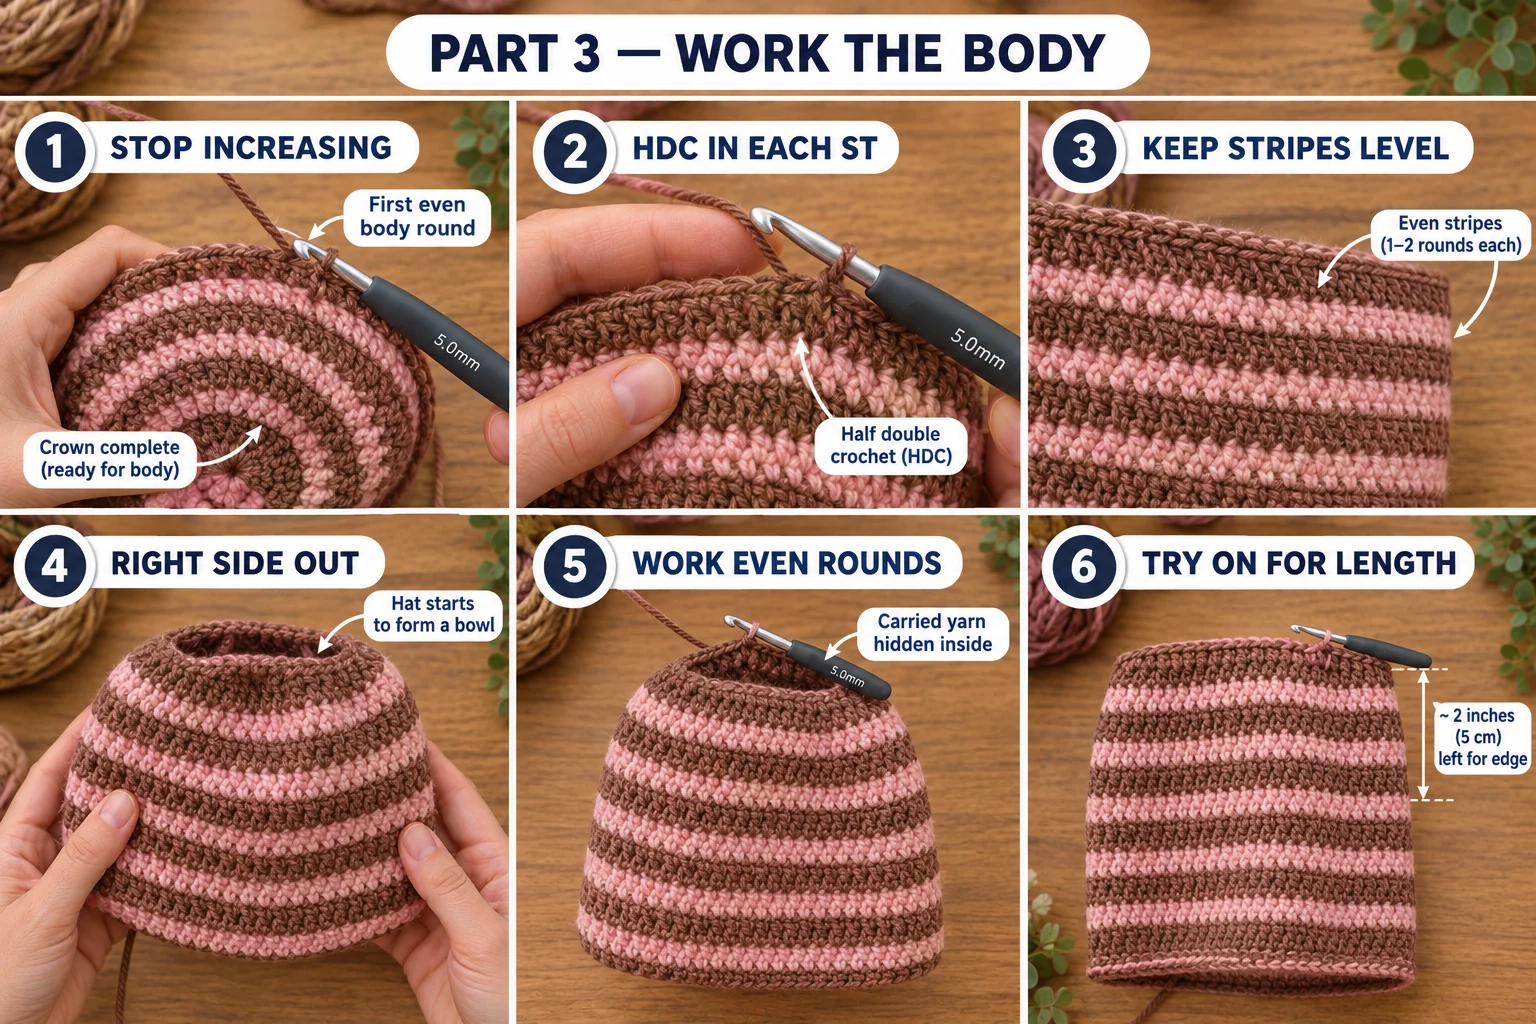
Rnds 9 (10, 10) to 22 (23, 24): Hdc in each st around. Join. (64 (68, 72) hdc)
That's 14 (14, 15) even rounds, following your stripe repeat all the way.
Keep the right side out. Around the first few body rounds, the sides start to go straight down and the crown turns into a bowl. It should cup away from you, with the smooth side of the stitches on the outside and the carried strands on the inside. If it cups toward you, push the crown through so it flips.
Try it on after Rnd 18 (19, 20). The edge should sit about 2 in (5 cm) above where you want the hat to end. Want more slouch? Add 2 rounds. Want it snugger to the ears? Leave out 2 rounds. Each round adds or removes about 0.4 in (1 cm).
Part 4 — Carry the yarn inside
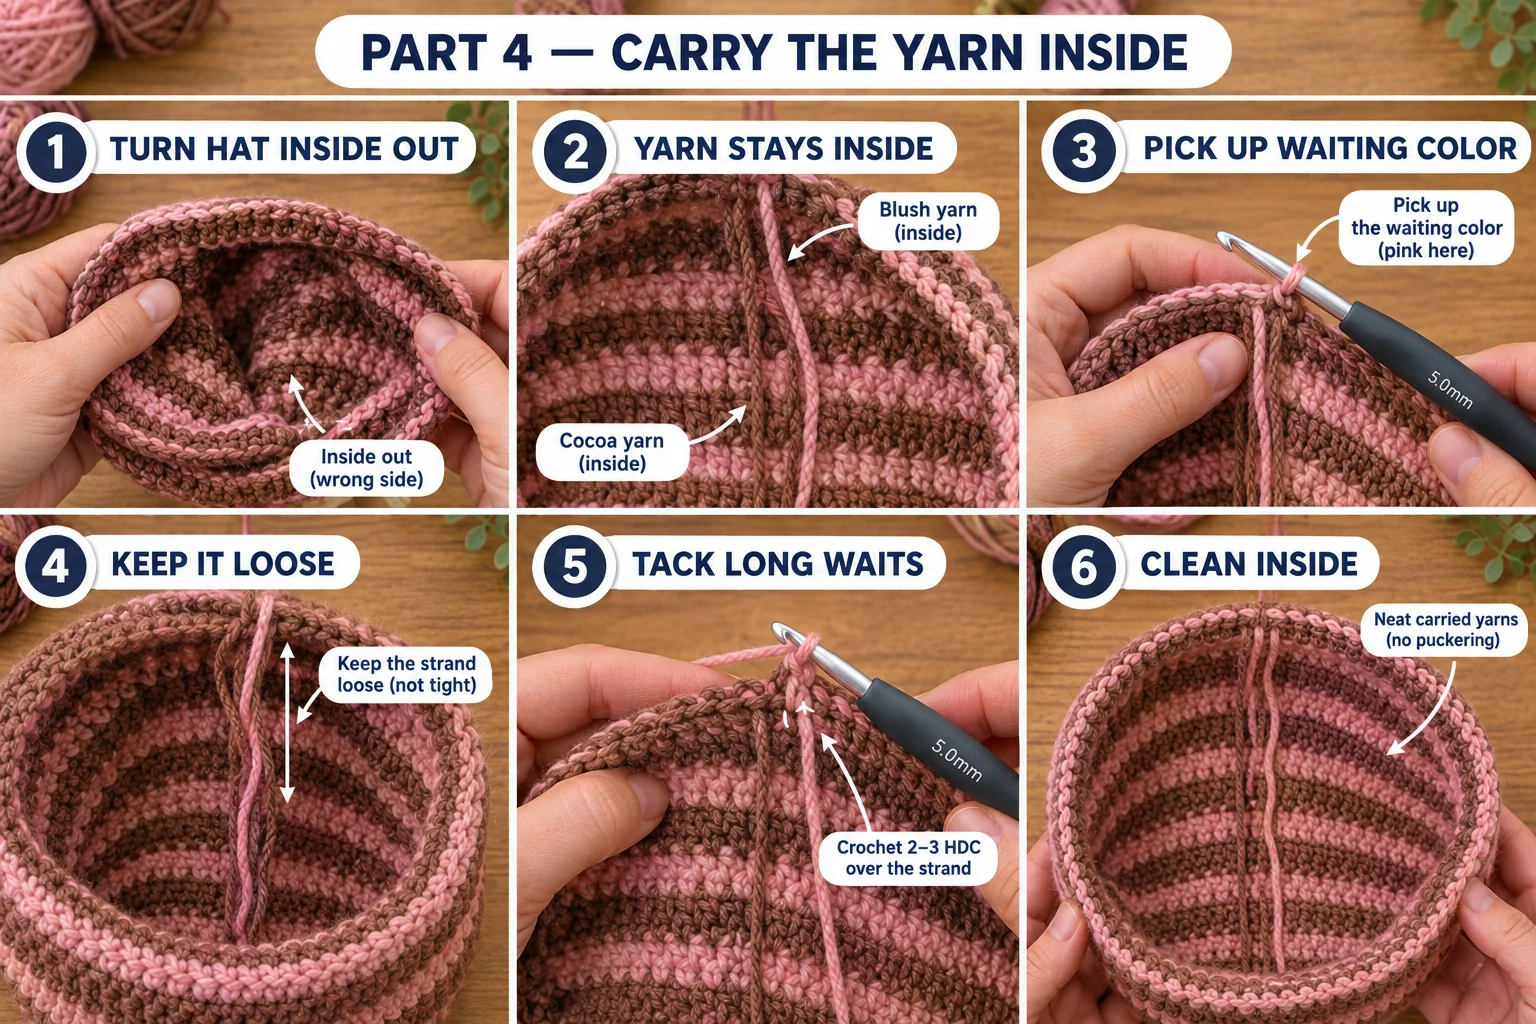
Turn the hat inside out now and then to check the carried strands. They should run up one neat line at the join, with the blush and cocoa sitting side by side.
Every color waits inside. When you need it again, reach for it at the join, bring it up loosely along the inside, and use it for the sl st. Give it a little slack, about as much as the height of the rounds it skipped. A tight strand puckers the join.
Waiting three rounds or more? In combo 9, colors B and C each wait 3 rounds. Halfway through the wait, lay the waiting strand along the top of the round and work 2 or 3 hdc over it. That tacks it in place on the inside so it can't snag.
Part 5 — Edge and finishing
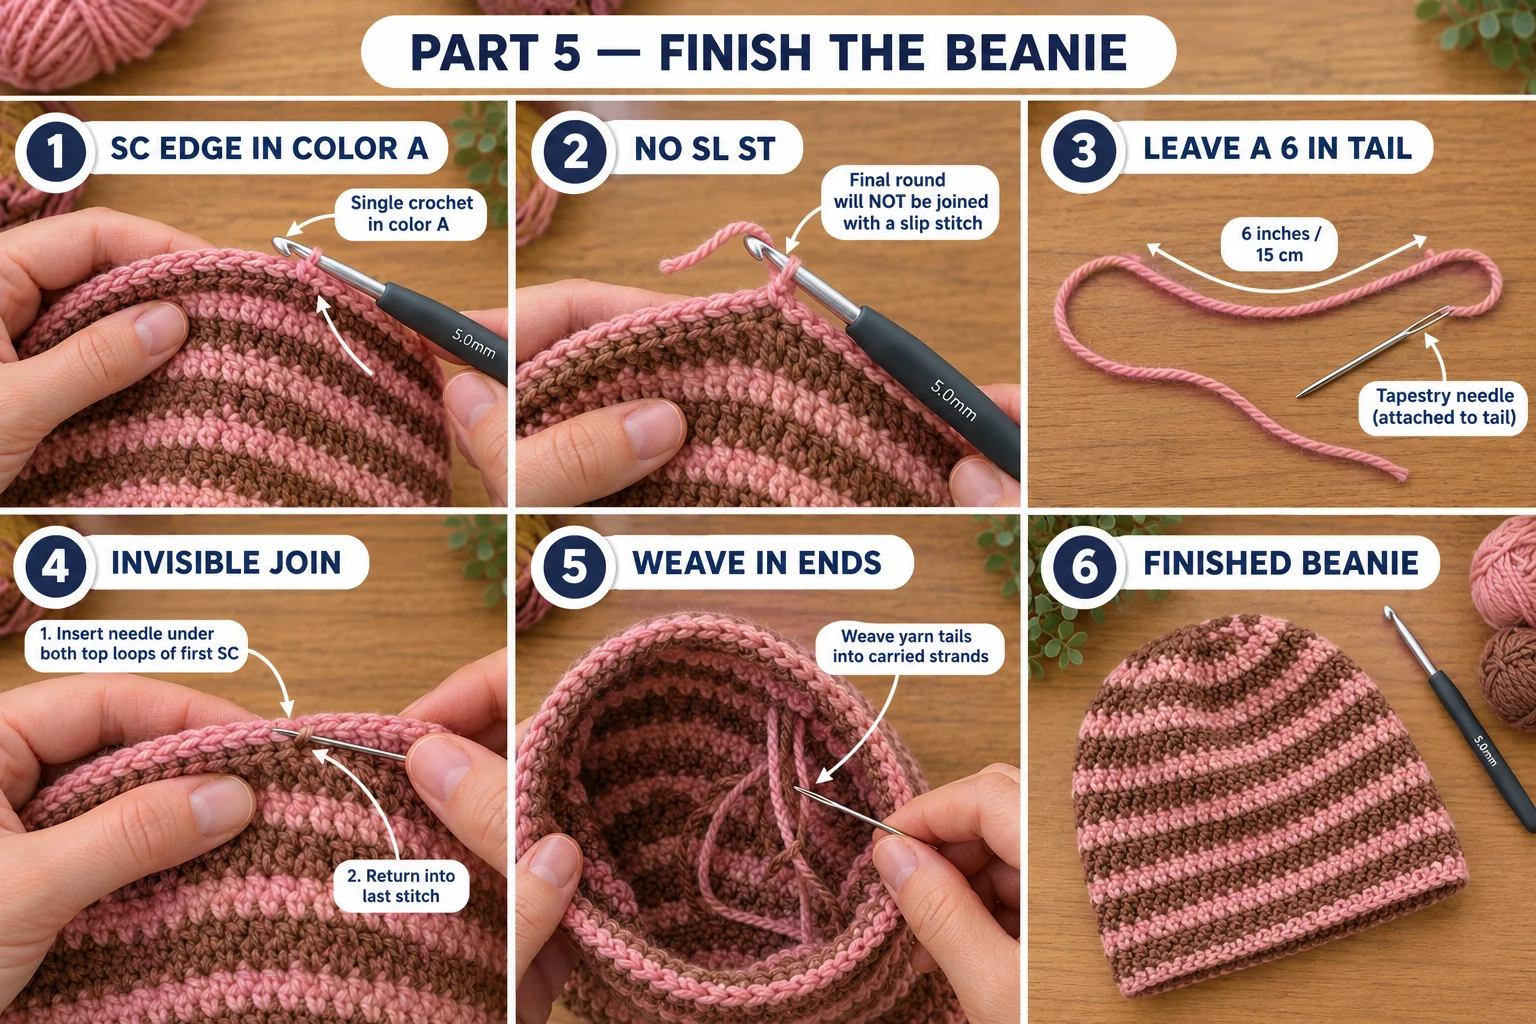
Rnd 23 (24, 25), in color A: Ch 1, sc in each st around. (64 (68, 72) sc)
Don't join with a sl st this time. Finish with an invisible join instead:
- Cut the yarn, leaving a 6-in (15 cm) tail, and pull it up through the last sc.
- Thread the tail onto your tapestry needle. Skip the ch 1 and slide the needle under both top loops of the first sc of the round, from front to back.
- Go back down into the last sc, right where the tail came out. Pull gently until the new loop is the size of a stitch.
The edge now looks like one unbroken chain of stitches.
- Cut the other colors, leaving 6-in (15 cm) tails, and weave each one into the line of carried strands on the inside. They hide there perfectly.
- Weave in the magic ring tail on the inside of the crown, going through the ring once more to close any gap.
- Optional: block it lightly. Mist the hat and let it dry over a small bowl or a balloon. Don't iron it. Worsted hdc relaxes a little with steam, and the stripes lose their crispness.
Make it yours — quick variations
| Variation | Change from base pattern |
|---|---|
| More slouch | Add 4 body rounds (about 1.5 in / 4 cm). Add about 20 yd, split between colors. |
| Snug skater fit | Work 2 fewer body rounds. The hat sits just over the ears. |
| Ribbed band | Replace the last 4 hdc rounds with ribbing in color A: ch 2, *front post hdc around the next st, back post hdc around the next st; rep from * around, join. Then work the sc edge. Add about 15 yd of A. |
| Scrap stripes | Use 4–6 leftover colors in any order, 1 round each. Cut and weave in instead of carrying, since each color waits too long. |
| Pom-pom | Make a 3-in pom-pom in color B and tie it through the magic ring. Add about 25 yd. |
| Matching set | Pair it with my chunky striped crochet scarf in the same two colors. |
Troubleshooting the four things that go wrong
The crown ruffles
Your circle has too many stitches for your tension. Count each round: a lost or extra increase is the usual cause. If the counts are right, go down half a hook size and redo the crown.
The crown cups too early
Your tension is tight, so each round is shorter than it should be. Go up half a hook size. A crown that cups gently in the last 1 or 2 rounds is fine, but before Rnd 6 it's too early.
The joins pucker
The carried strands are too tight. Pull a little slack into each one from inside the hat and stretch the hat sideways. For the next hat, lay the waiting yarn loosely against the fabric before you pick it up.
The join line leans to one side
That's normal for joined rounds, because each round starts one stitch over. It makes a gentle slant at the back. Wear the hat with that line at the back of your head and nobody will see it.
Frequently asked questions
How long does a striped beanie take to crochet? About 3 to 4 hours for size M. The crown takes about half an hour, and each body round goes quickly. The color changes add a few seconds per round once you're used to them. Size S is closer to 3 hours, and size L closer to 4.
How much yarn do I need? About 125 yd (115 m) of worsted #4 in total for size M: roughly 115 yd for S and 140 yd for L. How that splits depends on your combo. One 197 yd skein of each color covers any size, and the leftovers are enough to start a second hat.
Do I have to cut the yarn at every stripe? No. Every color waits inside the hat and gets carried up at the join, because no color ever waits more than 3 rounds. You only cut each color once, at the very end. That means just a few ends to weave in, not one per stripe.
Why joined rounds and not a spiral? In a spiral, the end of each round sits one row higher than its start. With stripes, that makes a visible step. Joined rounds keep every stripe level, and the only trade-off is a faint, slightly slanted join line at the back of the hat.
Can I use DK or bulky yarn instead? Yes, but match your gauge first. Make the crown in your yarn and measure after Rnd 8. For DK, you'll often need 1 or 2 more increase rounds (8 more stitches each) and 3 or 4 more body rounds. For bulky, you'll need fewer of each. Keep the stitch count a multiple of 8 while you increase.
Can I sell hats made from this pattern? Yes, you're welcome to sell finished hats made from this free pattern at markets, on Etsy or as gifts. Please credit "Pattern by Wavode" in your listing and link back to this page. What you can't do is republish this write-up or my photos as your own pattern.
Related patterns on Wavode
- Crochet ribbed beanie: a knit-look cream hat with a fold-up brim, worked flat.
- Chunky striped crochet scarf: two colors, one stitch, about two hours.
- Navy and cream striped crochet sweater: a half double crochet pullover in 5 sizes.
- Color block crochet cardigan: three wide stripes in chunky yarn.
- Chunky striped crochet blanket: a four-color throw for the couch.
Made a striped beanie? Tag #wavodecrochet on Pinterest. I re-pin every finished make and credit the maker.
Pattern by Clara Hartwell for Wavode. Questions? Email me at support@wavode.com.