Winter White Rose Crochet Headband

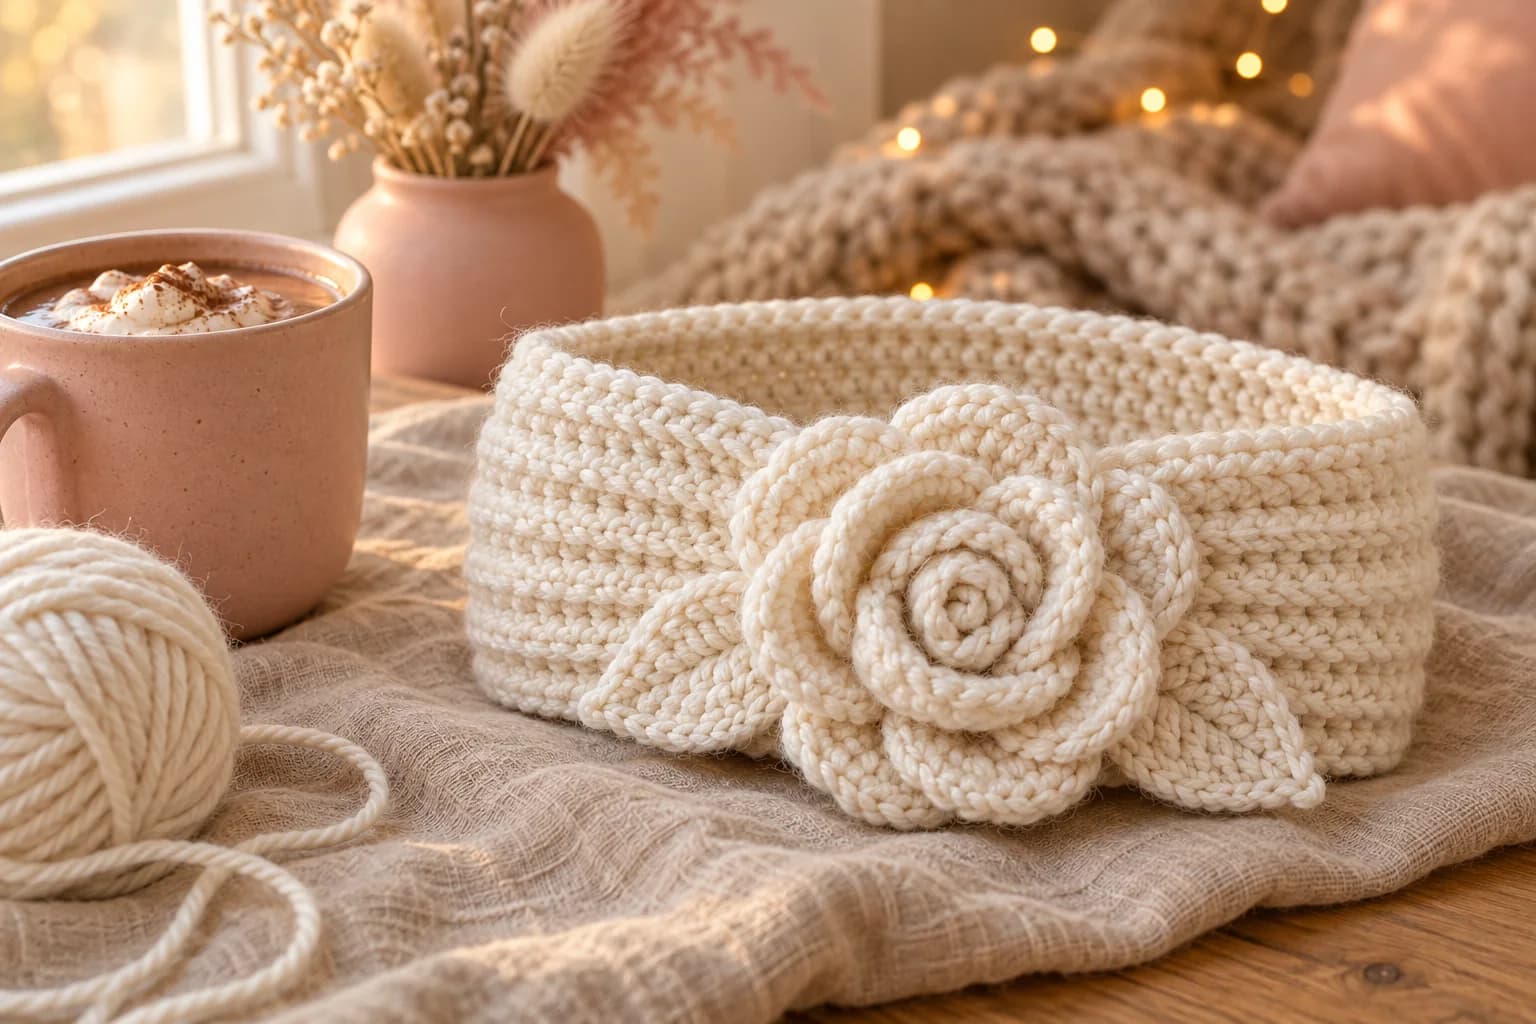
This free winter white rose crochet headband is a soft ribbed ear warmer with a big rolled rose at the front. The band is single crochet in the back loops, so it looks like knit ribbing and stretches to fit. The seam is cinched into a little gather, and the rose sits right on top of it. You need about 95 yards of worsted yarn for an adult size, a 5 mm hook and 2.5 to 3.5 hours.
Key Takeaways
- The band is one rectangle of single crochet in the back loops, worked short side to short side.
- A few wraps of yarn cinch the seam into a gather at the front.
- The rose is one strip of petals that you roll up and sew.
- 3 sizes: child, adult S–M and adult L, with about 75 to 100 yd of worsted #4.
Why I love this rose headband
Winter white is my favorite color for cold days. It looks soft and clean with any coat, and a white rose on white yarn feels elegant without being fussy. The ribbing keeps your ears warm, and the gather at the front gives the band a pretty shape.
The band is very relaxing to make. Every row is the same: single crochet in the back loops. It grows quickly, and you can try it on as you go.
The rose is the fun part. You crochet a straight strip of petals, small ones first, then bigger ones. Then you roll it up like a cinnamon roll, and it opens into a full rose. Isn't it nice when the hardest-looking part is the quickest?
Skill level. Easy. You need chain, single crochet, the back loop, double and treble crochet for the rose, and some simple sewing.
What you'll need
Yarn: about 75 (95, 100) yd (69, 87, 91 m) of worsted #4 yarn in winter white or soft ivory. A soft wool blend such as Lion Brand Wool-Ease keeps your ears warm and holds the rose's shape. A soft acrylic works too, and it's easy to wash. One ball is enough for any size.
I worked those amounts out from the stitch counts, plus the tails for sewing. The band uses most of it. The rose and leaves take about 17 yd.
Hook and notions
- 5 mm (US H-8) hook.
- A tapestry needle, a few pins and scissors.
- A measuring tape.
Gauge and sizes
Gauge: in single crochet in the back loops, 14 sts × 16 rows = 4 in (10 cm). Each pair of rows makes one rib.
| Size | Head | Band width | Band length (unstretched) | Rows | Yarn |
|---|---|---|---|---|---|
| Child | 19–20 in | 3½ in (12 sts) | 17½ in | 70 | 75 yd |
| Adult S–M | 21–22 in | 4 in (14 sts) | 19½ in | 78 | 95 yd |
| Adult L | 22½–23½ in | 4 in (14 sts) | 21 in | 84 | 100 yd |
The band is about 2 in smaller than the head, so it stretches and stays put. Instructions are written Child (Adult S–M, Adult L).
Abbreviations (US crochet terms)
- ch = chain
- sl st = slip stitch
- sc = single crochet
- hdc = half double crochet
- dc = double crochet
- tr = treble crochet
- BLO = back loop only
- V-st = (dc, ch 1, dc) in the same st
- sk = skip
- sp = space
- st(s) = stitch(es)
UK crocheters: this pattern uses US terms. US single crochet = UK double crochet, US dc = UK treble, and US tr = UK double treble.
The pattern — step by step
Part 1 — The ribbed band
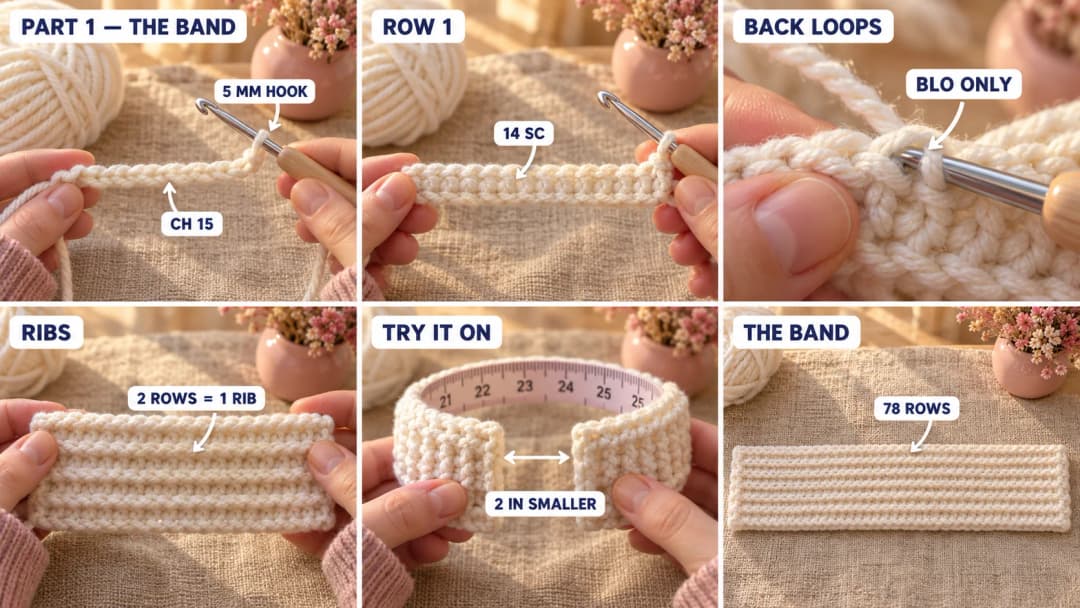
The band is worked flat, across its width. Each row runs from one edge of the band to the other, so the ribs stand up and down when you wear it, like knit ribbing.
Leave an 8-in starting tail.
- Ch 13 (15, 15).
- Row 1: Sc in the 2nd ch from the hook and in each ch across. (12 (14, 14) sc)
- Row 2: Ch 1, turn. Sc in the back loop of each st across. (12 (14, 14) sc)
- Rows 3–70 (78, 84): Repeat Row 2.
Keep the edges straight: always work the last sc into the last st, and don't work into the turning ch.
Check the length. Wrap the band around your head where you'll wear it, without stretching it. The two ends should be about 2 in apart. Add or remove a few rows if you need to, ending with an even number of rows so both ends match.
Fasten off, leaving a 16-in tail.
Part 2 — The rolled rose
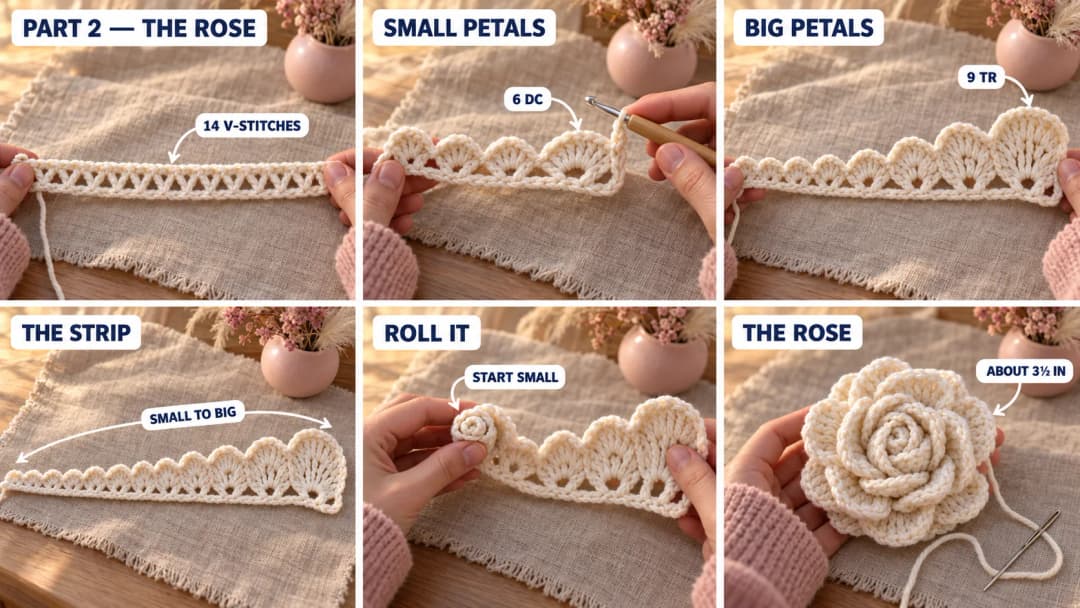
The rose is one strip: a row of V-stitches, then a row of petals that grow bigger as you go.
Leave a 10-in starting tail.
- Ch 44.
- Row 1: (Dc, ch 1, dc) in the 5th ch from the hook. Sk 2 ch, (dc, ch 1, dc) in the next ch. Repeat from * across. (14 V-sts)
- Row 2 (petals): Ch 3, turn. Work each petal in the ch-1 sp of the next V-st, and sc in the gap between two V-sts after each petal:
- Petals 1–4 (small): 6 dc in the ch-1 sp, sc between the V-sts.
- Petals 5–9 (medium): 8 dc in the ch-1 sp, sc between the V-sts.
- Petals 10–14 (large): 9 tr in the ch-1 sp, sc between the V-sts. After petal 14 there's no gap left, so sl st in the top of the turning ch instead.
Fasten off, leaving an 18-in tail. You have a wavy strip with 14 petals, small at one end and big at the other.
Roll the rose. Start at the small end, where the starting tail is. Roll the strip tightly for the first two petals to make the bud. Then roll more loosely, letting the bigger petals open around it. Keep the bottom edge (the V-st row) flat and level.
Sew it. Thread the 18-in tail on the needle. Sew back and forth through all the layers at the base of the rose, from one side to the other, turning the rose a little after each stitch. Then use the starting tail to tack the center bud in place. Don't cut the long tail yet: you'll use it to sew the rose to the band.
The rose is about 3½ in (9 cm) across.
Part 3 — The leaves, the cinch and assembly
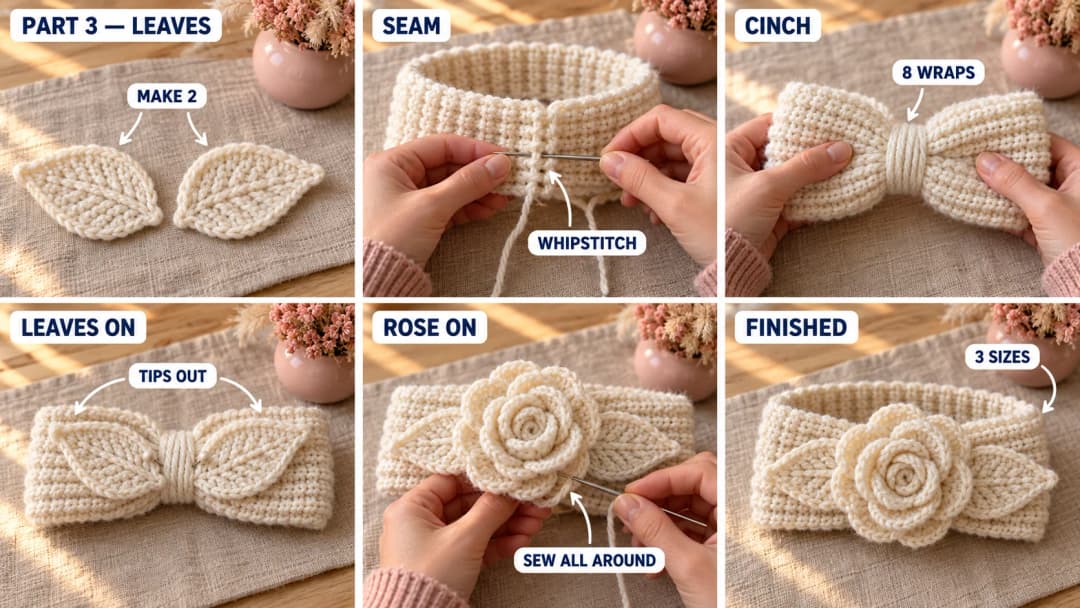
Leaf (make 2). Leave an 8-in starting tail.
- Ch 10.
- Side 1: Sc in the 2nd ch from the hook, hdc in the next ch, dc in each of the next 2 ch, tr in each of the next 2 ch, dc in the next ch, hdc in the next ch, sc in the last ch. (9 sts)
- Tip: Ch 2.
- Side 2: Turn the leaf and work along the other side of the chain, in the free loops: sc in the first loop, hdc in the next, dc in the next, tr in each of the next 2, dc in each of the next 2, hdc in the next, sc in the last. Sl st in the first sc of side 1.
Fasten off. Each leaf is about 3 in (7.5 cm) long.
Seam the band. Bring the two short ends of the band together, with the ribs lined up and the band not twisted. Use the 16-in tail to whipstitch the ends together through both loops of each st. Turn the band so the seam is on the inside.
Cinch the front. The seam is now the center front. Cut a 24-in length of yarn. Wrap it tightly around the band, right over the seam, 8 times. The band gathers into a soft pinch. Tie the two ends in a double knot on the inside and weave them in.
Add the leaves. Pin the two leaves over the cinch, with their wide ends touching at the center and their tips pointing out to each side, slightly down. Sew each leaf down along its center line with its tail, through the band.
Add the rose. Pin the rose on top, right over the cinch and the base of the leaves. Use the rose's long tail to sew all around its base, through the band, with small stitches. Go through the cinch a few times too, so the rose can't tip forward.
Weave in all the ends on the inside of the band.
Care. Hand wash in cool water and lay flat to dry. Fluff the petals with your fingers while it's damp so the rose keeps its shape.
Make it yours — quick variations
| Variation | Change from base pattern |
|---|---|
| Sage leaves | Make the two leaves in sage green for a soft touch of color. |
| Blush rose | Make the rose in blush pink on a white band. |
| Pearl center | Sew 3 small pearl beads into the center bud. Skip them for small children: beads are a choking hazard. |
| Wider band | Ch 17 for 16 sts, about 4½ in wide. You'll need about 10 yd more. |
| Rose hair clip | Sew the rose and leaves to a felt circle and glue it onto a hair clip instead. |
Troubleshooting the three things that go wrong
The band gets narrower or wider
You're missing or adding a stitch at the edges. Count your stitches every 10 rows. Always work into the last st of the row, and never into the ch 1 at the start.
The rose looks flat
It's rolled too loosely in the center. Unpick the base stitches and roll the first two petals tightly into a bud. Only let the big petals open up.
The front doesn't gather
The wraps are too loose. Undo the cinch and wrap it again, pulling hard on every wrap. Eight tight wraps make a neat pinch.
Frequently asked questions
How long does this headband take? About 2.5 to 3.5 hours. The band takes most of that, since it's 70 to 84 rows. The rose takes about 30 minutes, and the leaves and sewing about 20 minutes.
How much yarn do I need? About 75 (95, 100) yd of worsted #4 yarn for the child, adult S–M and adult L sizes. The rose and leaves use about 17 yd of that. One ball of most worsted yarns is enough.
How do I choose the size? Measure around your head, across the forehead and above the ears. Pick the size whose head range fits you. If you're between sizes, choose the smaller one: the ribbing stretches.
Will it stay on? Yes. The band is about 2 in smaller than the head, and the back-loop ribbing grips gently without pressing. If it slides, remove 4 rows before you seam it.
Can I sell headbands made from this pattern? Yes, you're welcome to sell finished headbands made from this free pattern at markets, on Etsy or as gifts. Please credit "Pattern by Wavode" in your listing and link back to this page. What you can't do is republish this write-up or my photos as your own pattern.
Related patterns on Wavode
- Crochet ribbed beanie: a knit-look hat with a fold-up brim to match.
- Crochet striped beanie: a cozy striped hat for winter.
- Crochet mini rose: a tiny rose to practice on.
- Snowflake crochet pattern: a puff stitch snowflake ornament.
Made a rose headband? Tag #wavodecrochet on Pinterest. I re-pin every finished make and credit the maker.
Pattern by Clara Hartwell for Wavode. Questions? Email me at support@wavode.com.