Free Crochet Little Cat Bag Charm Pattern

title: "Free Crochet Little Cat Bag Charm Pattern — Meet Lemon" slug: little-cat-bag-charm-crochet-pattern description: "Make Lemon, a little yellow crochet cat bag charm with oversized white eyes, pointed ears and a curved tail. Free DK cotton pattern with a reinforced loop." category: amigurumi subcategory: keychains pillar: Amigurumi skill_level: intermediate finished_size: "about 3½–4 in (9–10 cm) tall excluding the metal rings; head about 2–2¼ in (5–5.7 cm) wide" time_estimate: "about 3–4 hours" yarn_amount_yd: "about 30 yellow + 5 white" yarn_weight_cyc: "DK #3 (100% cotton)" hook_mm: 2.5 author: "Clara Hartwell" publish_date: "2026-11-05" updated_date: "2026-11-05" etsy_pdf_url: "" keyword: "little cat bag charm crochet pattern" pinterest_pin_title: "Little Cat Bag Charm Crochet Pattern · Lemon and His Wide White Eyes" og_image: "https://yio04ues9ucppnbk.public.blob.vercel-storage.com/little-cat-bag-charm-crochet-pattern/hero.png" canonical: "https://www.wavode.com/amigurumi/little-cat-bag-charm-crochet-pattern" schema: type: HowTo yields: "1 yellow cat bag charm called Lemon, about 3½–4 in tall excluding the metal rings, assembled from 8 crocheted pieces: 1 head, 2 white eye ovals, 1 reinforced hanging strip, 2 ears, 1 body and 1 tail" tags: [little cat bag charm crochet pattern, crochet cat keychain, yellow cat amigurumi, crochet bag charm, small cat crochet pattern, DK cotton amigurumi]
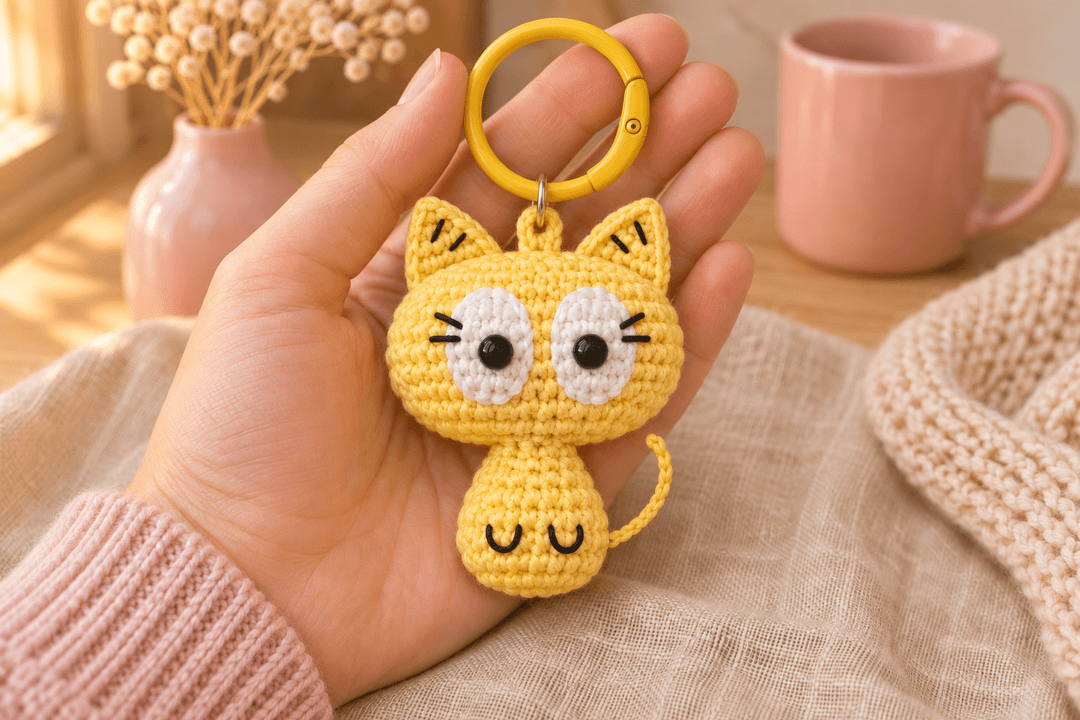
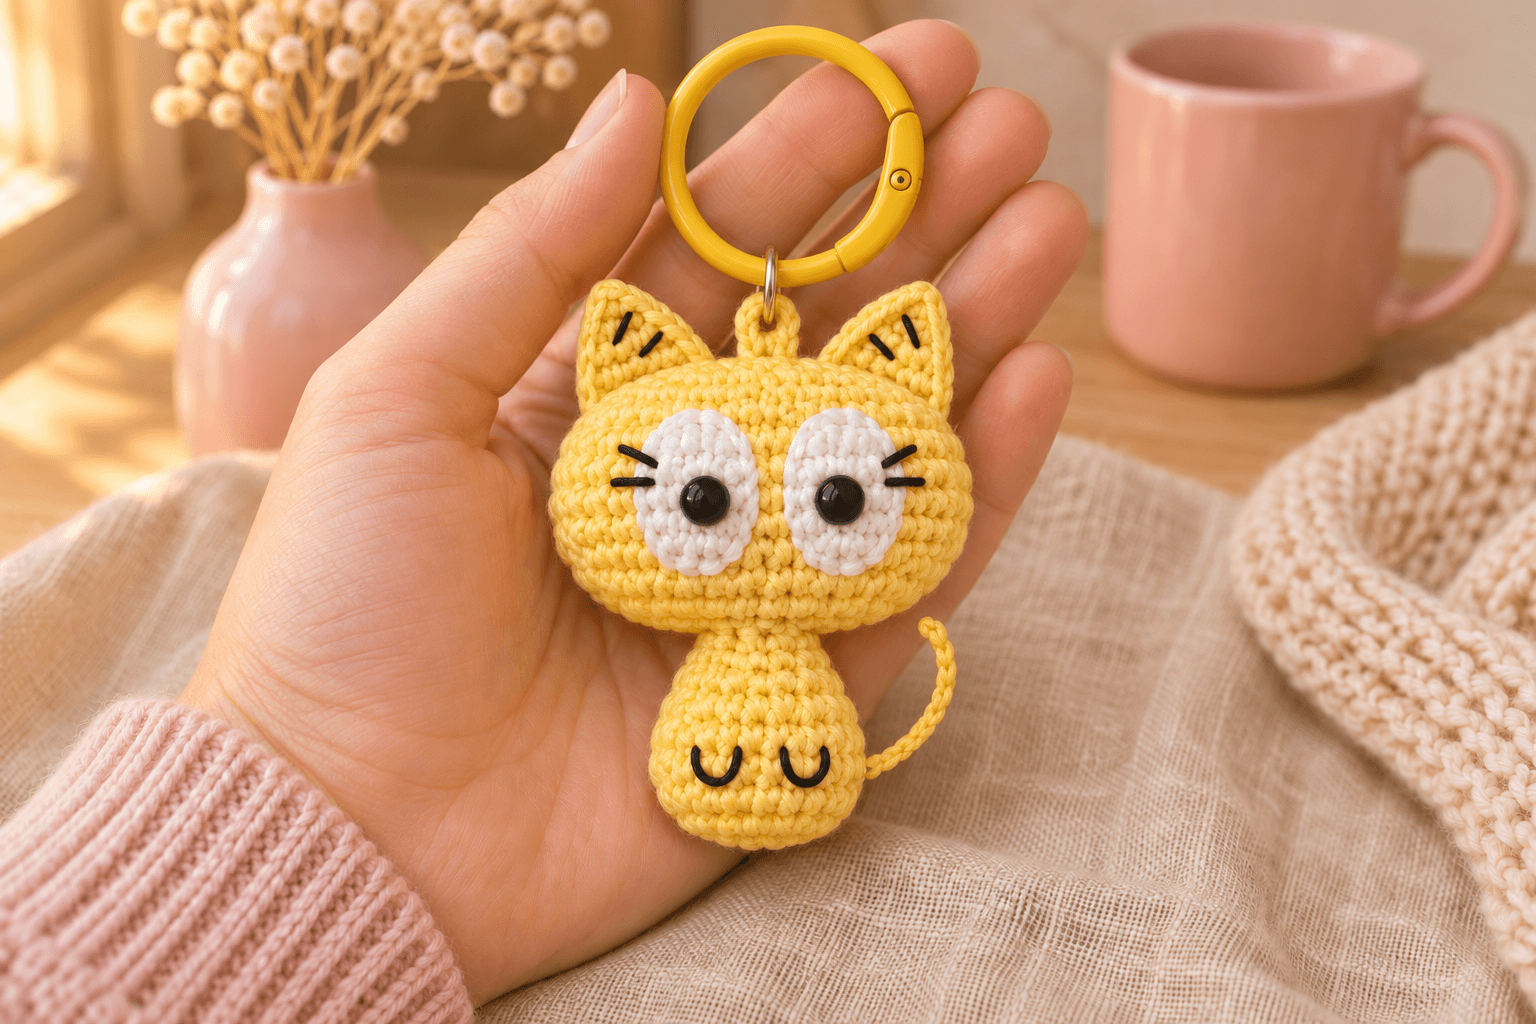
I have a soft spot for a little cat who looks surprised to be coming along. Lemon is a yellow crochet cat bag charm about 3½–4 in (9–10 cm) tall, with an oversized head, big white eyes and a thin tail that curls up beside his body. A yellow ring finishes the top.
His head starts around a short chain to give it a broad shape. The white ovals go on while the head is open, so the black eye washers are easy to reach. I sew the hanging strip inside while I can still reach it. Its little loop sits between Lemon's ears.
| At a glance | |
|---|---|
| Finished size | about 3½–4 in (9–10 cm) tall, excluding the metal rings |
| Head width | about 2–2¼ in (5–5.7 cm) |
| Yarn | DK #3 cotton; about 30 yd yellow and 5 yd white, plus black embroidery floss |
| Hook | 2.5 mm throughout |
| Pieces | 8 |
| Time | about 3–4 hours |
| Skill | intermediate: oval starts, small parts, eye placement and reinforced sewing |
The collages illustrate the main stages; follow the written instructions for stitch counts.
Cotton and supplies for Lemon the little cat
Smooth cotton makes Lemon's eyes and ear stitches stand out. I like a soft lemon yellow with plain white and fine black embroidery. Choose the yellow and white from the same yarn range so the eye ovals sit neatly against the head.
- Yarn: DK #3, 100% cotton, such as Paintbox Yarns Cotton DK, about 137 yd (125 m) per 50 g. Allow 30 yd yellow and 5 yd white, including the sewing tails.
- Black details: about 1 yd of six-strand black embroidery floss, separated into two-strand working lengths.
- Hook: 2.5 mm for every crocheted piece.
- Eyes: two 6 mm black safety eyes, with their matching washers. Check that the posts pass through both the white oval and yellow head fabric.
- Hardware: one 30 mm yellow-coated hinged metal ring, one 8 mm jump ring and two pairs of small jewelry pliers.
- Small things: polyester fiberfill, tapestry needle, embroidery needle, stitch markers, pins, scissors and contrasting scrap yarn.
Tension. Work at about 6 sc per inch (2.5 cm), with approximately 6 rounds per inch, snug enough that the stuffing stays hidden. At that tension Lemon's expected height is about 3½–4 in (9–10 cm). These dimensions and yarn amounts are estimates; measure him after stuffing.
Stitches, in US terms: MR = magic ring; ch = chain; sc = single crochet; inc = 2 sc in one stitch; dec = sc 2 together; sl st = slip stitch; st = stitch. R means round. For a dec, insert through the front loop of each of the next two stitches, draw up a loop through both front loops, then yarn over and finish the sc.
The head and body use continuous spiral rounds. Mark the first stitch and move that marker up each round. The eye ovals have joined rounds, and the flat pieces turn as written. Counts exclude joining slip stitches and turning chains.
Safety. Lemon has plastic eyes and metal rings, so he is a bag accessory for ages 3 and up. Keep him away from babies and young children.
Making the oversized cat head and wide white eyes
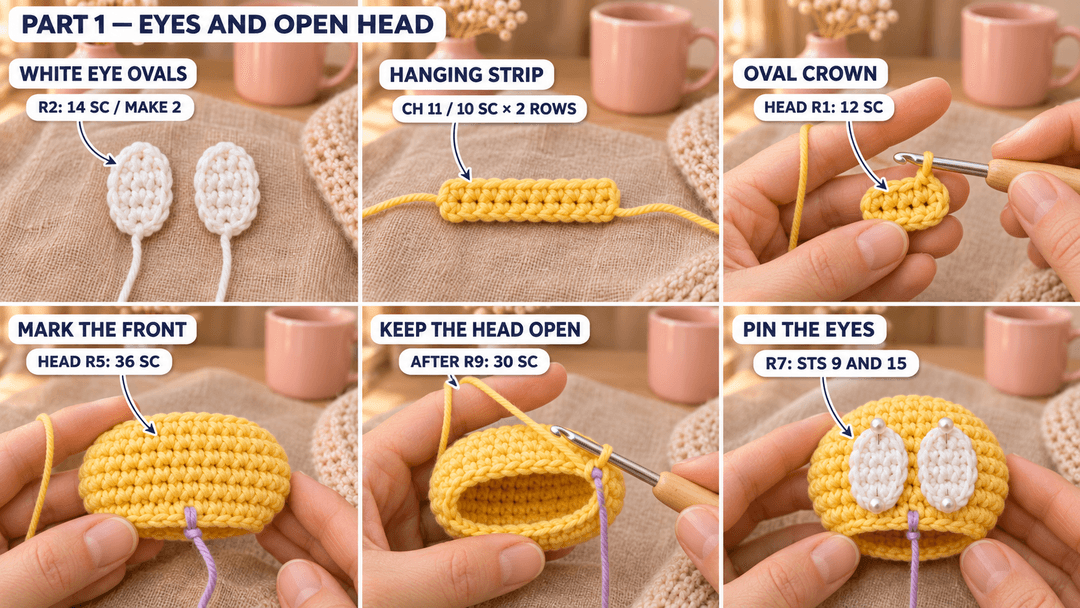
The white eye ovals
White cotton, 2.5 mm hook. Make 2. The foundation chain runs vertically through each eye when it is attached. Ch 4, leaving a 6 in (15 cm) starting tail.
- R1: 2 sc in the 2nd ch from the hook, sc in the next ch, 3 sc in the last ch; along the opposite side, sc in the next ch, sc in the same foundation ch as the first 2 sc. Sl st to the first sc. (8)
- R2: ch 1, inc × 2, sc, inc × 3, sc, inc. Sl st to the first sc. (14)
Fasten off with a 12 in (30 cm) sewing tail at the outer edge. Weave the starting tail into the back. Lay each oval flat, with its starting chain running from top to bottom. Each is about ⅞ in (2.2 cm) tall and ½ in (1.3 cm) wide.
The reinforced hanging strip
Yellow cotton, 2.5 mm hook. Make 1. Leave a 12 in (30 cm) starting tail.
- Row 1: ch 11, sc in the 2nd ch from the hook and in each ch across. (10)
- Row 2: ch 1, turn, 10 sc. (10)
Fasten off with a 12 in (30 cm) tail at the opposite end. Keep both tails. The strip is about 1⅔ in (4.2 cm) long; it will fold into a little U at the crown.
Lemon's broad yellow head
Yellow cotton, 2.5 mm hook. Make 1. The foundation chain is the crown. The final opening is the neck. Ch 6, leaving a 6 in (15 cm) starting tail.
- R1: 2 sc in the 2nd ch from the hook, sc in the next 3 ch, 3 sc in the last ch; along the opposite side, sc in the next 3 ch, sc in the same foundation ch as the first 2 sc. (12)
- R2: inc × 2, 3 sc, inc × 3, 3 sc, inc. (18)
- R3: (sc, inc) × 2, 3 sc, (sc, inc) × 3, 3 sc, sc, inc. (24)
- R4: (2 sc, inc) × 2, 3 sc, (2 sc, inc) × 3, 3 sc, 2 sc, inc. (30)
- R5: (3 sc, inc) × 2, 3 sc, (3 sc, inc) × 3, 3 sc, 3 sc, inc. (36)
Before continuing, put a contrast marker into stitch 12 of R5. It is the middle of the first long side of the oval: Lemon's center front. Carry a scrap strand straight down from this marker through the following rounds, between the stitches, so you can keep his face centered.
- R6–R8: sc around. (36) 3 rounds.
- R9: (4 sc, dec) × 6. (30)
Pause after R9 and leave the live loop on a marker. Keep the head empty while you set the face and anchor the hanging strip. The center-front stitch on R9 is stitch 10.
Set the eyes while the head is open
Hold the head with the starting chain across the top and the front strand facing you. Number face positions along R7, starting at that round's first stitch.
- Pin the white ovals. Place their long axes vertically. Their top edges sit around R4 and their lower edges around R9. Center one over stitch 9 of R7 and the other over stitch 15, leaving the yellow front strand between them.
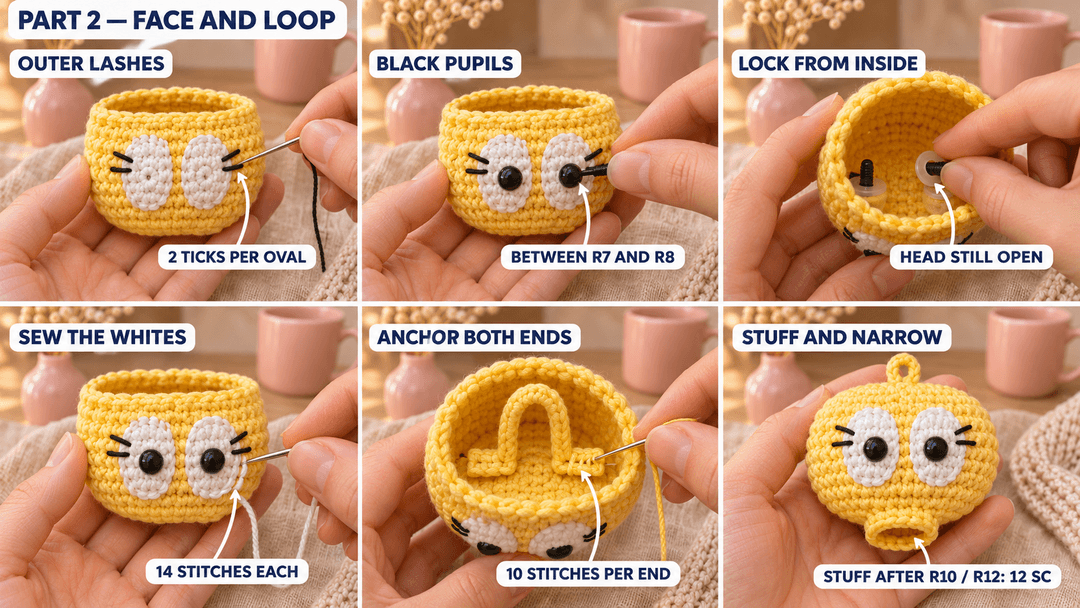
- Embroider the outer lashes. Before sewing the ovals down, make two short parallel black ticks on the outer edge of each oval, one level with head R6 and the other with R7. Each tick is about one white sc wide. Knot the floss against the back of the white piece and weave it in there.
- Insert the pupils. Push each black eye post through a small gap beside the middle of its white foundation chain, then through the yellow head between R7 and R8, at the position above stitch 9 or 15. Hold both eyes in place and look at Lemon from the front before fitting the washers from inside.
- Sew the whites. With each white tail, take 14 small stitches around its edge, one per white R2 sc, catching yellow fabric underneath. Let the ovals sit smoothly. Weave the tails into the inside of the head.
Tip. Check both eyes before locking either washer. The white ovals should stand upright, with the black pupils level and the two pairs of little lashes facing outward.
Anchor the loop inside the crown
With the head still open after R9, fold the yellow strip into a U. The bend sits above the crown; both ends go inside.
- Find stitches 6 and 15 of head R2, on opposite sides of the starting chain. Gently open a gap beside each stitch with the blunt needle, without cutting a strand.
- Feed one short end of the strip through each gap. Leave about ¼ in (6 mm) of the fold standing above the crown, with the end sections lying flat inside.
- Use each end's own tail to sew it to the inside of the head with 10 small stitches per end, catching the two row ends of the strip and several nearby head stitches around the opening. Spread the stitches rather than pulling them into one hole.
- Weave both tails into the inside fabric. Pull gently on the folded loop. It should stay in place without drawing the crown into a point.
Stuff and narrow the head to the neck
Return to the live loop.
- R10: (3 sc, dec) × 6. (24)
Stuff the head after R10. Fill it evenly, keeping the eye washers covered by stuffing on the inside. Press it gently flatter from front to back while keeping the sides rounded. The face should look broad, not tightly stretched.
- R11: (2 sc, dec) × 6. (18)
- R12: (sc, dec) × 6. (12)
Keep the front strand aligned as you decrease: its stitches are 8 on R10, 6 on R11 and 4 on R12. Mark that final front stitch. Top up the stuffing through the neck, then sl st in the next stitch and fasten off with an 18 in (45 cm) tail at the neck opening. Weave in the crown's starting tail. Keep the neck open for the body.
Lemon’s pointed ears, little body and curved tail
Two flat pointed ears
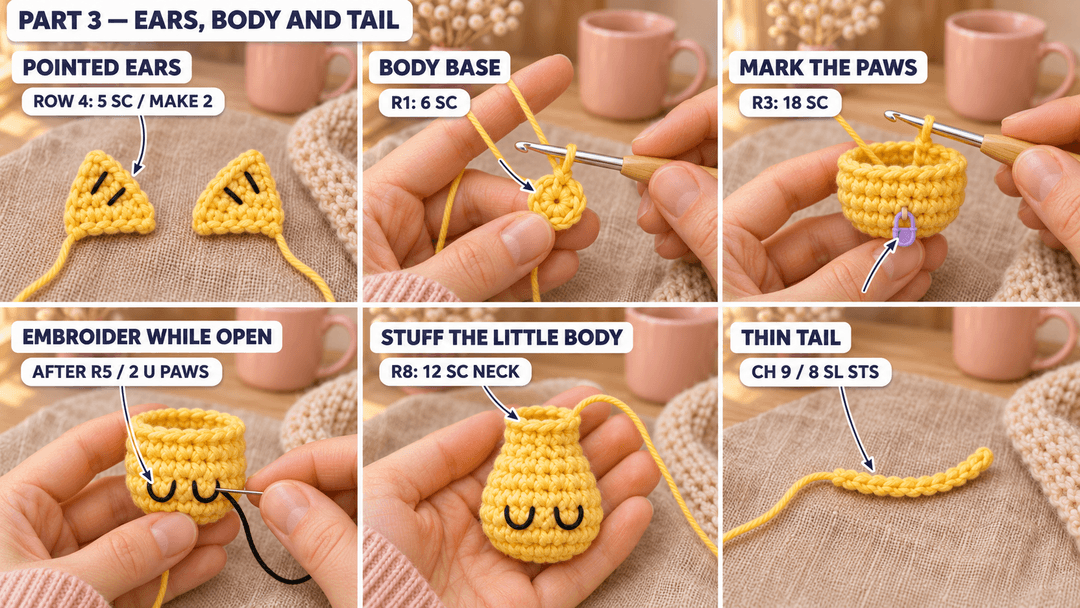
Yellow cotton, 2.5 mm hook. Make 2. Start at the tip with a 6 in (15 cm) tail.
- Row 1: ch 2, sc in the 2nd ch from the hook. (1)
- Row 2: ch 1, turn, inc. (2)
- Row 3: ch 1, turn, sc, inc. (3)
- Row 4: ch 1, turn, inc, sc, inc. (5)
Fasten off with an 8 in (20 cm) tail along the five-stitch base. Keep the ears flat. On the face of each ear, embroider two short slanted black stitches, each about one sc wide: one across the middle between Rows 2 and 3, the other just below it between Rows 3 and 4. Weave the black ends into the back and weave in the yellow starting tail.
The pear-shaped body
Yellow cotton, 2.5 mm hook. Make 1. The magic ring is the bottom under the paws; the final opening is the neck. Leave a 6 in (15 cm) starting tail.
- R1: MR, 6 sc in the ring. (6)
- R2: inc × 6. (12)
- R3: (sc, inc) × 6. (18)
Mark stitch 9 of R3 as center front and carry a scrap strand up the body from that mark.
- R4–R5: sc around. (18) 2 rounds.
Pause after R5 and embroider the paws while the inside is easy to reach. With two strands of black floss, make two little U shapes:
- First paw: come up at R3 stitch 6, go down at R3 stitch 8, leaving a small slack strand. Catch its middle down at R2, directly below R3 stitch 7, with one tiny holding stitch.
- Second paw: repeat between R3 stitches 10 and 12, catching the middle down at R2 below stitch 11.
Secure the floss inside. Put a small amount of fiberfill into the bottom, then continue.
- R6: (sc, dec) × 6. (12)
- R7–R8: sc around. (12) 2 rounds.
The front strand ends at stitch 6 of R8. Mark that stitch. Add stuffing through the neck until the body holds its pear shape; keep the neck firm enough to support the head. Sl st in the next stitch and fasten off with a 12 in (30 cm) tail at the neck. Weave in the starting tail and keep the neck open.
The thin tail
Yellow cotton, 2.5 mm hook. Make 1. Leave a 6 in (15 cm) starting tail.
- Row 1: ch 9, sl st in the 2nd ch from the hook and in each ch across. (8)
Fasten off with an 8 in (20 cm) tail at the base, beside the foundation's starting tail. Weave the starting tail into the cord. The opposite end is the free tip. The cord is about 1⅓ in (3.4 cm) long before shaping; the curve is held by sewing in the next section.
Sewing the cat together and embroidering the paws
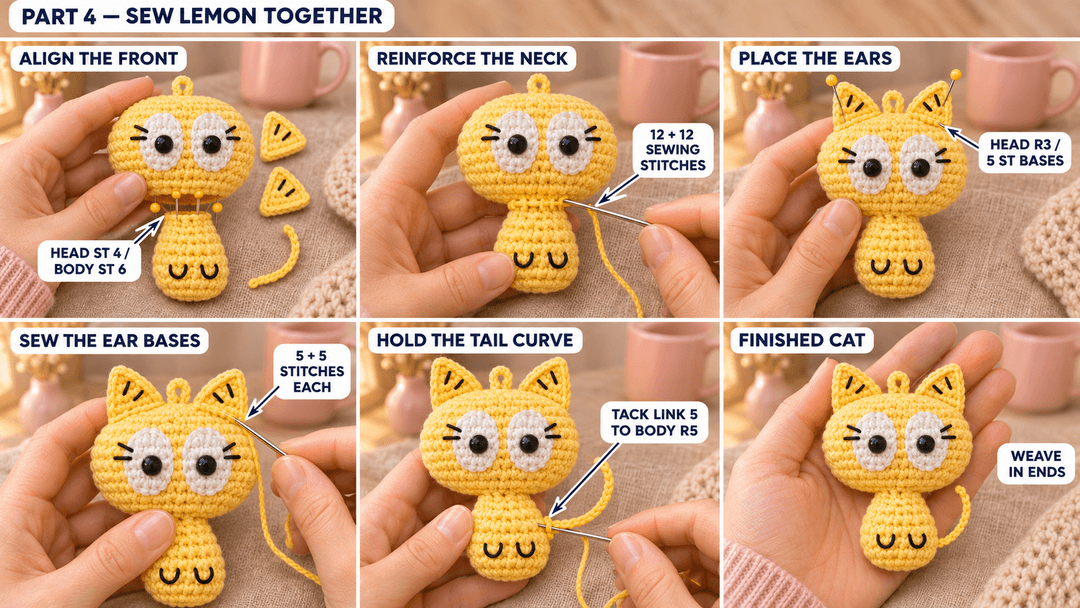
The paws are embroidered during the body section, while the inside is open. Keep those little U shapes facing you as you position Lemon's head.
- Join the neck. Set the head on the body with its front strand above the paws. Match head R12 stitch 4 to body R8 stitch 6. With the head's long yellow tail, whipstitch the two openings together, 12 stitches around, matching one head stitch to one body stitch. Add a little stuffing before the last few stitches if the neck feels soft. Then sew the same seam a second time, another 12 stitches, and weave both neck tails into the back of the neck.
- Pin the ears. Put one at each end of the crown, tips pointing upward and the black stitches facing the eyes. The ear bases sit along head R3. One five-stitch base meets head stitches 24, 1, 2, 3 and 4; the other meets stitches 12–16. Keep the hanging loop between them.
- Sew the ears. Use each base tail for five small stitches, one per ear-base sc into the marked head stitches, then return along the same seam with five more. Weave the tails into the head.
- Curve the tail. Pin its base onto the side of the body at R3 stitches 14–15. Sew through its first two chain links at the base with four small stitches. Bend the free length outward and upward into a gentle C. Tack the fifth link counted from the sewn base to body R5 stitch 14 with two small stitches, keeping the tip pointing up. Weave the tail into the body.
Turn Lemon toward you and take out the scrap strands and pins. Support him under the body when smoothing the head, so the neck seam stays snug.
Adding a reinforced loop for the bag charm
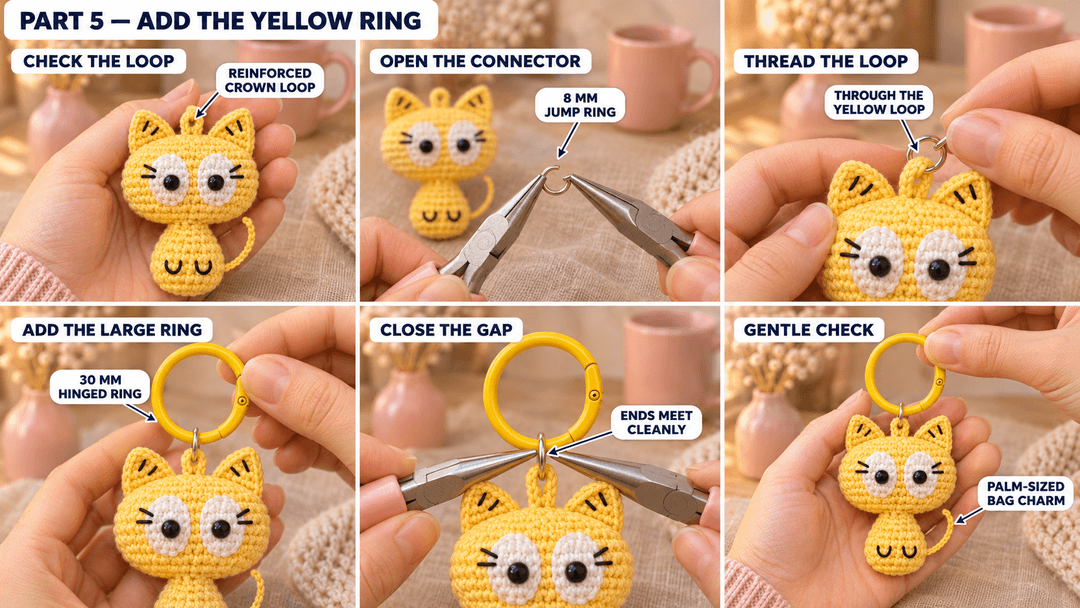
Hold the small jump ring with one pair of pliers on each side of its opening. Twist one end toward you and the other away, then slip it through the yellow loop at the crown and around the yellow hinged ring. Twist the ends back together until they meet cleanly.
Lift Lemon gently by the large ring and check the crown, neck and tail stitches. If a stitch shifts, reinforce it before using him on a bag. Cotton stretches with use, so check the loop again after carrying him for a while.
I would clip Lemon to a plain canvas tote, where that yellow head and his wide eyes are easy to spot. Keep the charm away from zippers that could catch his tail. To clean a small mark, dab the cotton with a damp cloth and let him dry with the ring supported.
UK terms: US sc = UK dc; US sl st = UK slip stitch.
Made your own Lemon? Tag #wavodecrochet on Pinterest so I can see which bag he is riding on.
Pattern by Clara Hartwell for Wavode. Questions? Email me at support@wavode.com.