Free Crochet Potion Bottle Pattern

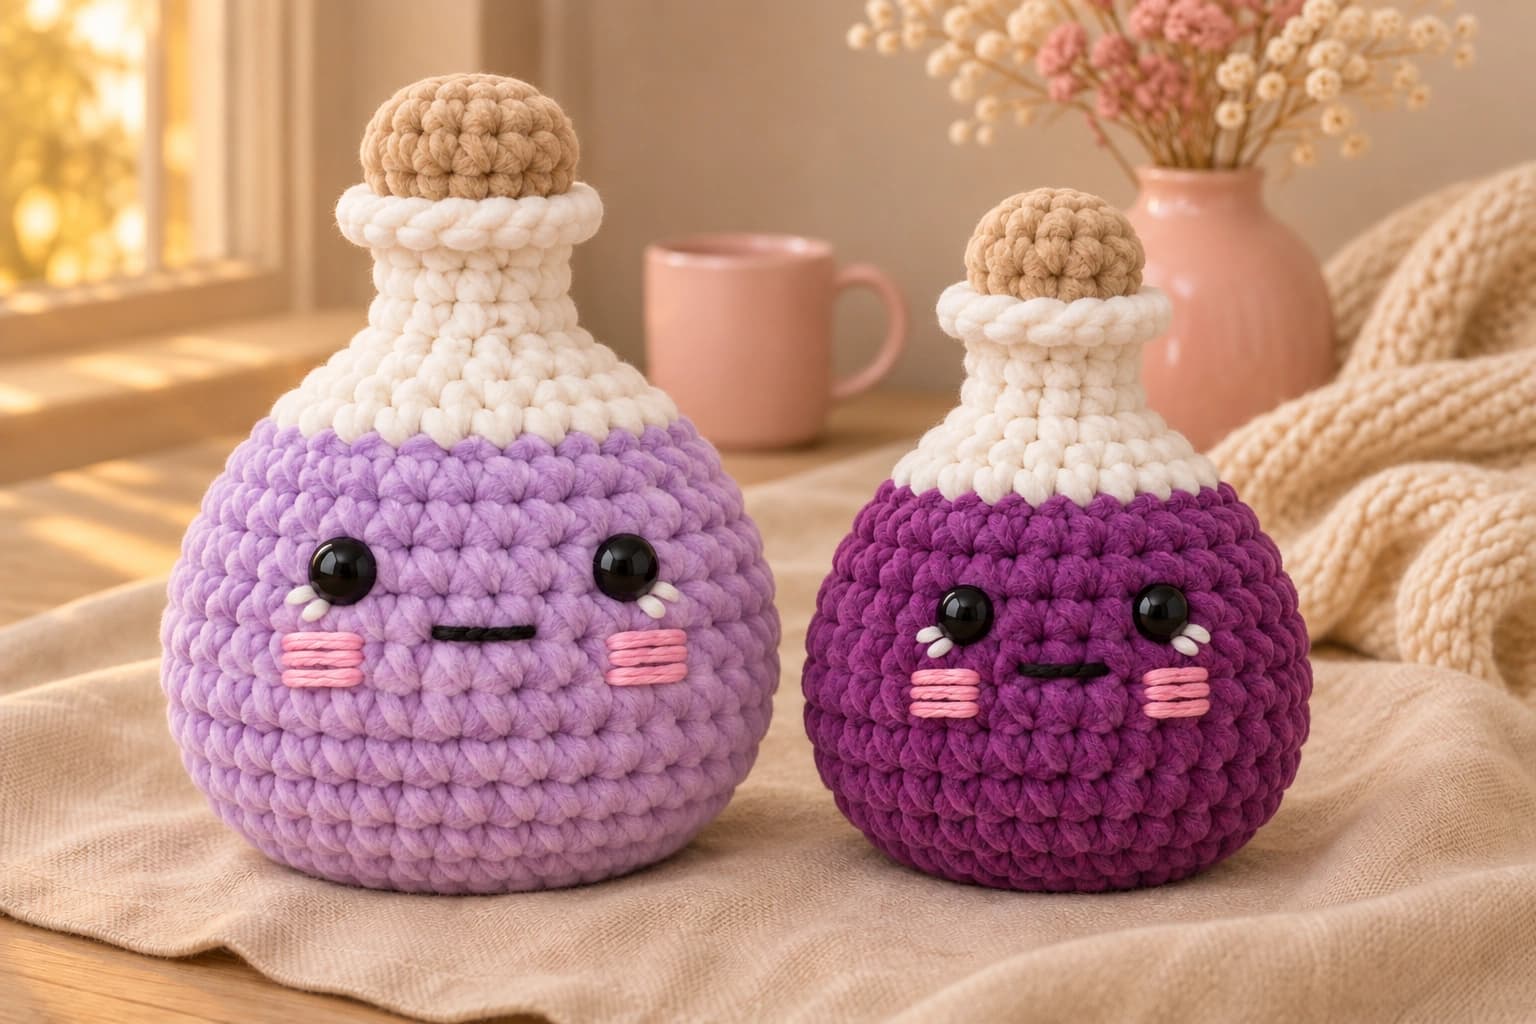
I have a soft spot for tiny bottles lined up on a shelf, especially when they look as though they're keeping a secret. Lavender and Plum are crochet potion bottle plushes, about 7¼ in (18.5 cm) and 6½ in (16.5 cm) tall, with squishy purple bellies and little beige stoppers. Their pink cheeks make them look rather pleased with themselves.
This crochet potion bottle pattern gives Lavender a wider belly and Plum a smaller, rounder shape. The white yarn narrows into a neck, then curls outward into a raised rim. I sew each stopper into the neck with smooth yarn, which slips through the chenille without pulling the fluffy pile away.
| At a glance | |
|---|---|
| Finished size | Lavender: about 7¼ in (18.5 cm) tall × 5⅓ in (13.5 cm) wide; Plum: about 6½ in (16.5 cm) tall × 4½ in (11.5 cm) wide |
| Yarn | Super bulky #6 polyester chenille in lavender, deep purple, white and beige; smooth yarn for faces and seams |
| Hook | 5 mm (H/8), throughout |
| Pieces | 4 crocheted pieces for 2 bottles |
| Time | About 3–4 hours for the pair |
| Skill | Easy: magic ring, sc, increases, decreases, front and back loops, embroidery and a short seam |
Yarn, hooks and little details for Lavender & Plum
- Chenille: super bulky #6 polyester, 100 g / 120 m (131 yd) per ball. Use about 28 yd lavender, 21 yd deep purple, 37 yd white and 12 yd beige. Choose all four colors from the same yarn range so the stoppers fit the necks.
- Smooth yarn: worsted #4 acrylic or cotton, about 3 yd beige for sewing, 3 yd pink for cheeks, 2 yd black for mouths or embroidered eyes, and 1 yd white for eye accents.
- Hook: 5 mm (H/8) for the bottles, rims and stoppers.
- Eyes: four 12 mm black safety eyes, each with its washer, or the embroidered version below.
- Small things: polyester fiberfill, a blunt tapestry needle, sewing pins, scissors, a round-start marker, a contrasting marker and a scrap strand for the face line.
Tension: about 2½ sc per inch (2.5 cm) and 2½ rounds per inch in single crochet, measured unstretched. Keep the fabric tight enough that the stuffing doesn't show. These sizes and yarn amounts are estimates from the stitch counts. Chenille varies between brands, so check your tension before making the pair.
Safety. With plastic safety eyes, Lavender and Plum aren't toys for children under 3. For a little one, embroider the eyes and secure every embroidery end inside before stuffing.
Stitches for the potion bottles
US terms: MR = magic ring; sc = single crochet; inc = 2 sc in one stitch; dec = invisible decrease over 2 stitches; sl st = slip stitch; FLO = front loop only; BLO = back loop only; st = stitch; R = round.
Work in a continuous spiral, keeping a marker in the first stitch of each round. Move it up as you go. The number in parentheses is the finished stitch count. For an invisible decrease, pick up the front loop of each of the next two stitches, yarn over and pull through both front loops, then finish the sc.
Changing from purple to white
On the last stitch of the last purple round, insert the hook, yarn over and pull up a loop with purple. Finish that stitch with white. Cut purple, leaving a 6 in (15 cm) tail. Secure and weave both color-change ends into the inside of the fabric while the bottle is open. Continue the next round in white.
Part 1 — Making Lavender's round potion bottle
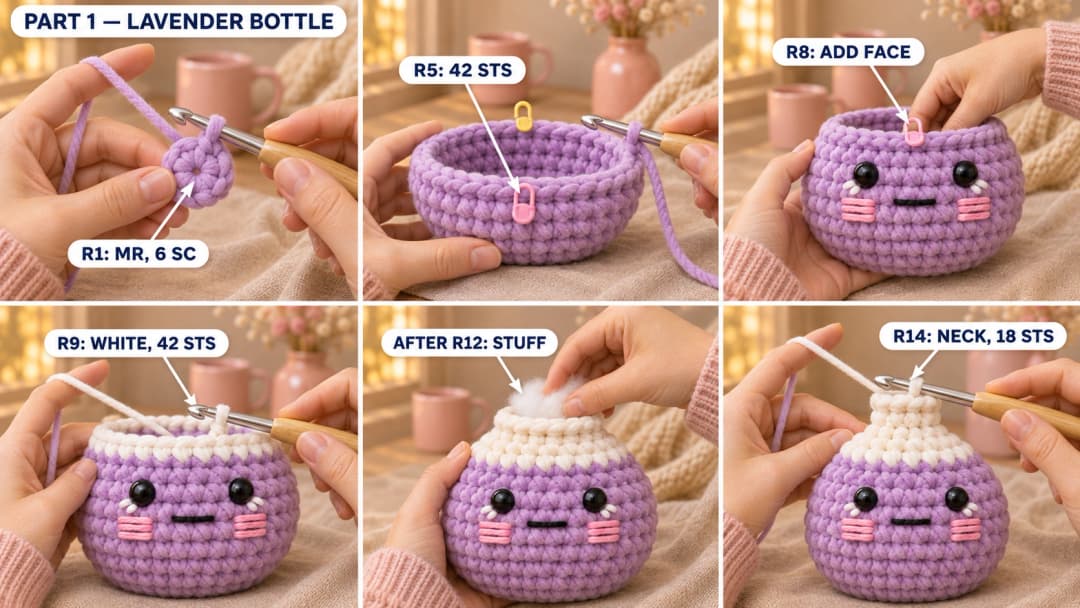
Lavender bottle (lavender, then white; 5 mm hook; Make 1). The magic ring is the bottom of the bottle. The last round becomes the white lip around the top opening.
- R1: MR, 6 sc in the ring. (6)
- R2: inc × 6. (12)
- R3: inc × 12. (24)
- R4: (sc, inc) × 12. (36)
- R5: (sc 5, inc) × 6. (42)
- R6–R8: sc around. (42) 3 rounds.
After R5, place the contrast marker in st 22, opposite the round-start marker. Lay the scrap strand upward from this stitch and keep it on the outside as a face guide. Keep the round-start marker at the back when you look at Lavender.
Pause after R8. Put the live loop on a marker. Place the eyes between R6 and R7, 4 stitch spaces each side of the front guide, giving 8 stitch spaces between the posts along the front. Pin them first, then lock the washers from inside. Complete the mouth, white eye accents and cheeks using the face section below now, while the belly is empty. Return here when the ends are secured inside.
Put the loop back on the hook. Undo the final sc of R8 and work it again, finishing that stitch with white as described above.
- R9: sc around. (42)
- R10: (sc 5, dec) × 6. (36)
- R11: (sc 4, dec) × 6. (30)
- R12: (sc 3, dec) × 6. (24)
Stuff after R12. Fill the belly firmly enough to hold its rounded sides, keeping the underside slightly flattened against your palm. Push small tufts toward the edges instead of one large lump in the middle.
- R13: (sc 2, dec) × 6. (18)
- R14: sc around. (18)
Top up the neck lightly after R14. Leave the stitches easy to pick up with your needle when the stopper goes on. Keep the live loop on the hook and follow Lavender's rim below before starting Plum.
Tip. Chenille can snap if you yank the magic ring shut. Ease it closed while holding the first stitches. If the strand starts to strip, run a matching smooth strand through the stitch bases and draw that closed instead.
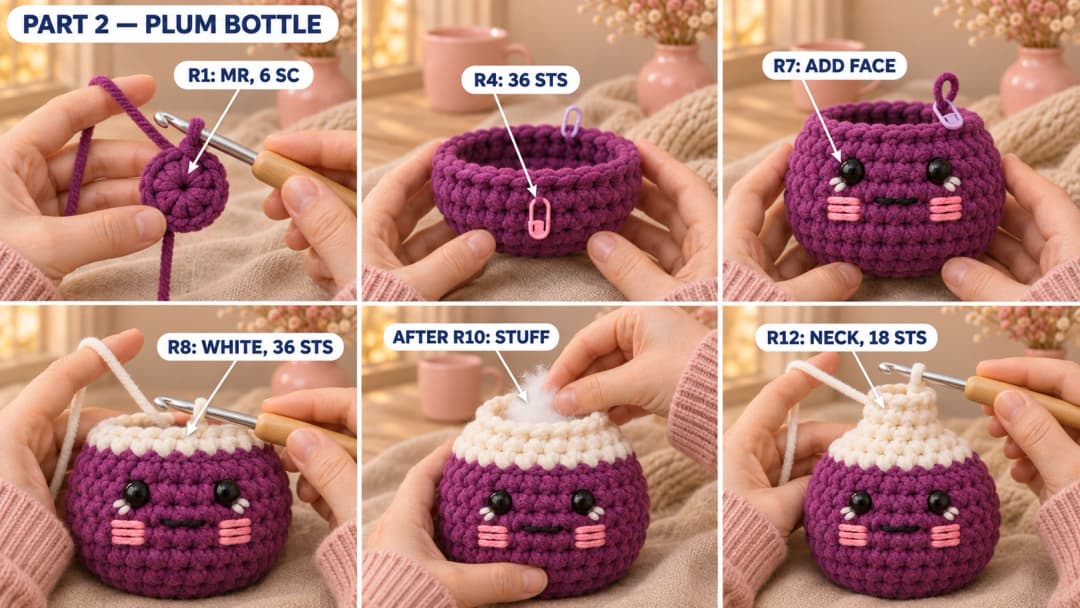
Part 2 — Making Plum's smaller potion bottle
Plum bottle (deep purple, then white; 5 mm hook; Make 1). The magic ring sits underneath Plum's belly; the last round forms the lip of the neck opening.
- R1: MR, 6 sc in the ring. (6)
- R2: inc × 6. (12)
- R3: inc × 12. (24)
- R4: (sc, inc) × 12. (36)
- R5–R7: sc around. (36) 3 rounds.
After R4, mark st 19 with the contrast marker. Lay the scrap strand upward from it to mark Plum's face. Keep the round-start marker at the back.
Pause after R7. Park the live loop on a marker. Set the eyes between R5 and R6, 3 stitch spaces each side of the guide, leaving 6 stitch spaces between the posts along the front. Lock the washers from inside. Work Plum's mouth, white accents and cheeks from the face section below before stuffing, securing the ends inside. Then return here.
Put the loop back on the hook. Undo the final sc of R7 and work it again, finishing that stitch with white.
- R8: sc around. (36)
- R9: (sc 4, dec) × 6. (30)
- R10: (sc 3, dec) × 6. (24)
Stuff after R10, keeping the belly firm and the bottom gently flattened.
- R11: (sc 2, dec) × 6. (18)
- R12: sc around. (18)
Add a little stuffing to the neck after R12. Keep the live loop ready for Plum's rim below. I keep the neck softer than the belly so it stays narrow under the stopper.
Shaping the white neck and raised bottle rim
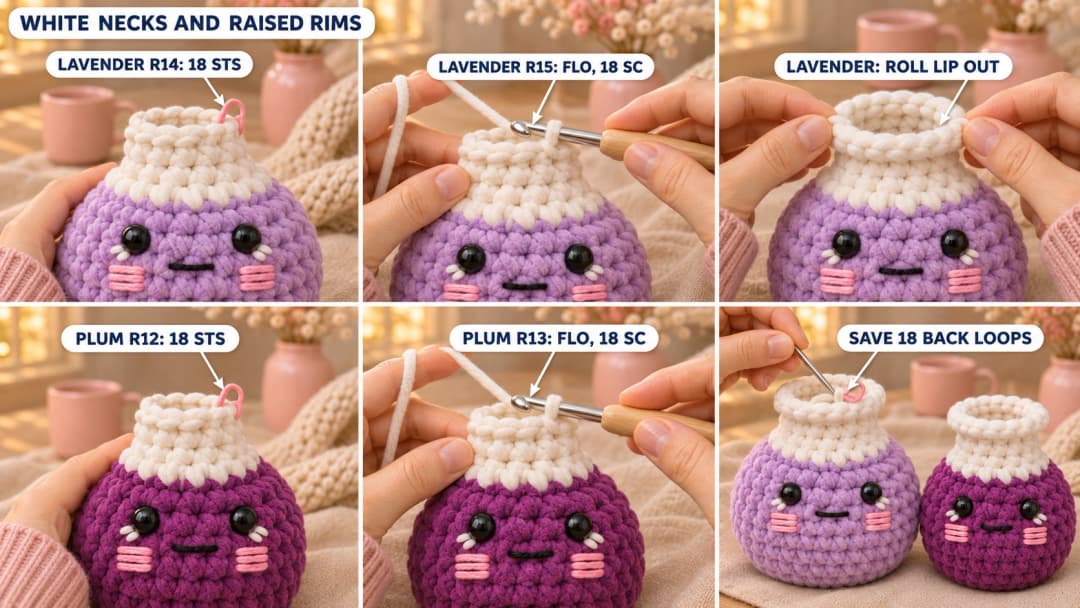
Work the rim as soon as you reach the end of each bottle's neck. The front loops make the little white lip; the back loops stay free for sewing the stopper.
Lavender's rim — continue the Lavender bottle
Before starting, put a spare marker in the back loop of st 1 of R14.
- R15: in FLO, sc around. (18)
Sl st in the first sc of R15 and fasten off, leaving a 6 in (15 cm) tail at the lip. Weave it into the inside of the white neck. Gently roll the lip outward with your thumb. Keep all 18 back loops of R14 free, including the marked one.
Plum's rim — continue the Plum bottle
Mark the back loop of st 1 of R12 before starting.
- R13: in FLO, sc around. (18)
Sl st in the first sc of R13 and fasten off, leaving a 6 in (15 cm) tail at the lip. Weave it inside the neck, roll the lip outward, and keep the 18 back loops of R12 free.
Tip. Slide the blunt needle under each saved back loop before sewing. If a loop is hidden under the fluffy rim, bend the lip outward gently until you can see it.
Closing each potion with a beige crochet stopper
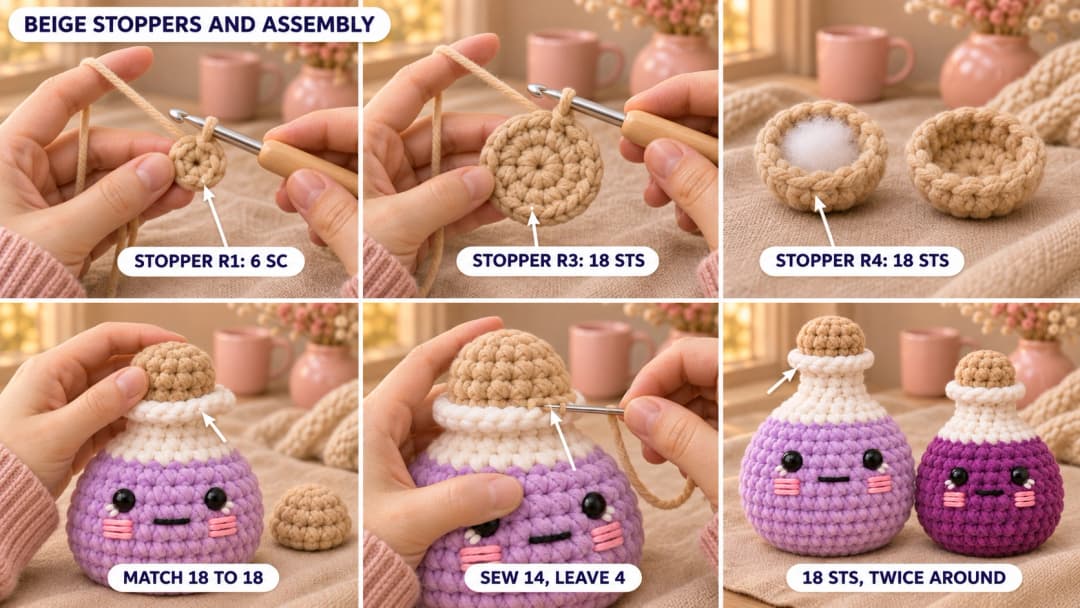
Stoppers (beige; 5 mm hook; Make 2). Work each stopper from its top down. The magic ring is the middle of its rounded top; the last round is the open lower edge that meets the white neck.
- R1: MR, 6 sc in the ring. (6)
- R2: inc × 6. (12)
- R3: (sc, inc) × 6. (18)
- R4: sc around. (18)
Sl st in the next st and fasten off, leaving a 6 in (15 cm) tail at the lower edge. Weave that tail inside the stopper. Leave the lower edge open. After R4, tuck a small pinch of filling under the top, just enough to round it like the end of a cork.
Sewing the stoppers into the necks
Hold the stopper like a little hat, beige dome up and open edge down. Set it on the white neck, with its lower edge just inside the rolled lip. The beige dome should show above the white.
- Thread 1½ yd (1.4 m) of smooth beige yarn onto the needle. Secure it inside the neck with three small backstitches, leaving a short end inside.
- Match st 1 of stopper R4 to the marked saved back loop: Lavender R14 or Plum R12. Pin there, then place two more pins about a third of the way around.
- Whipstitch through both loops of each stopper stitch and the matching saved white back loop, 18 stitches around. Keep the white lip outside the seam. Tilt the bottle toward you as you sew around the far side.
- After 14 seam stitches, check the filling through the remaining gap. Tuck in a small tuft if the neck dents, keeping fiberfill clear of the needle.
- Finish the last 4 seam stitches, then go around once more through the same 18 pairs. Secure with three small backstitches beside the seam. Bury the end through the stuffing and trim it close.
Cup Lavender's belly in your hands and give the sides a gentle squeeze to settle the filling. Do the same for Plum, then take out the face guides and markers.
Embroidering the potion faces and pink cheeks
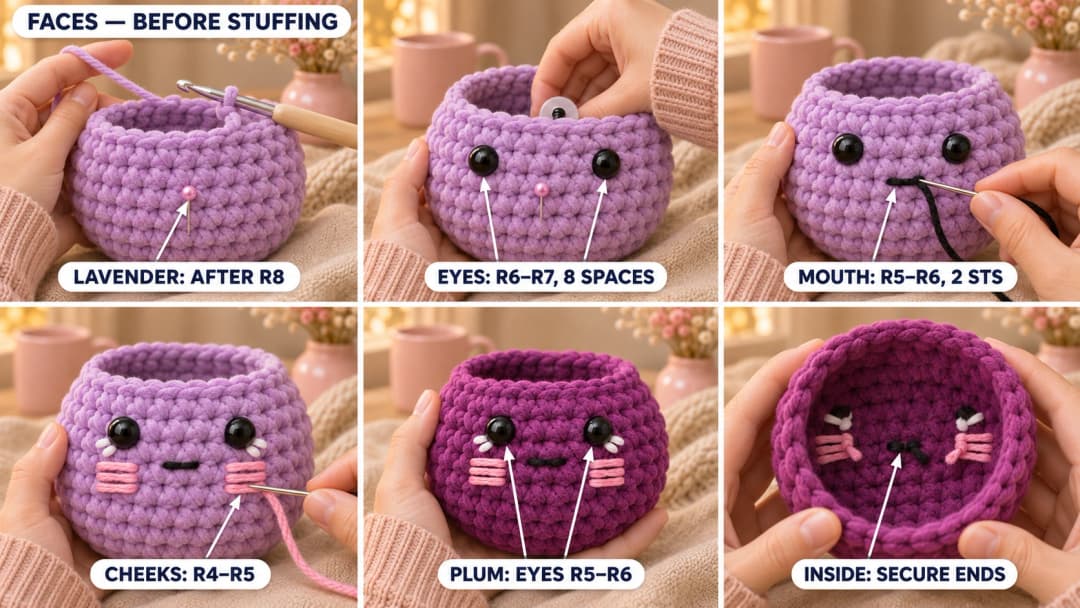
Work this section at the pause in each purple belly, before changing to white or adding stuffing. Rest the open bottle in your palm with the front guide facing you. Keep the backs of all embroidery stitches accessible through the top opening.
Lavender's little face
The eyes sit between R6 and R7, four stitch spaces to either side of the guide. With smooth white yarn, make two short stitches beside the lower outer edge of each eye, from the eye's outer edge at the R6/R7 gap down to the R5/R6 gap. Keep each accent within one stitch width.
With black yarn, make one horizontal mouth 2 stitches wide, centered on the guide, in the gap between R5 and R6. The mouth is a small dash. With pink, make three parallel horizontal stitches between R4 and R5, each 2 stitches wide, directly beneath each eye. Let them sit softly on the pile.
Plum's little face
Plum's eyes sit between R5 and R6, three stitch spaces to either side of the guide. Add the same two white accent stitches at each lower outer eye edge, ending at the gap between R4 and R5.
Make the black mouth 2 stitches wide, centered on the guide between R4 and R5. Embroider three pink stitches per cheek between R3 and R4, each 2 stitches wide, centered beneath an eye.
Embroidered eyes instead of plastic
At the same eye positions, cover one stitch width and one round height with 5 short black stitches side by side. Add one tiny white stitch at the upper outer corner of each eye, then the lower white accents above. Pin the positions first so both eyes sit level.
For every embroidery strand, secure the starting and finishing ends with three small backstitches on the inside, run the tail under several neighboring stitch backs and trim. Slip your fingers inside the belly to keep the needle away from its back. Once the face is finished, return to the bottle instructions and continue in white.
Caring for your little potion pair
I like Lavender and Plum side by side on a shelf, with Plum tipped slightly toward her taller friend. A shallow gift box with pale pink tissue makes a cozy home for the pair.
For cleaning, follow the yarn label. Spot-clean with a damp cloth first, pat away the moisture and let the bottles dry fully in the air. Keep hot irons away from the chenille pile. Give the stoppers and embroidered ends a gentle tug check before gifting.
UK terms: US sc = UK dc; US sl st = UK ss.
Made Lavender or Plum? Tag #wavodecrochet on Pinterest so I can see your little potion shelf.