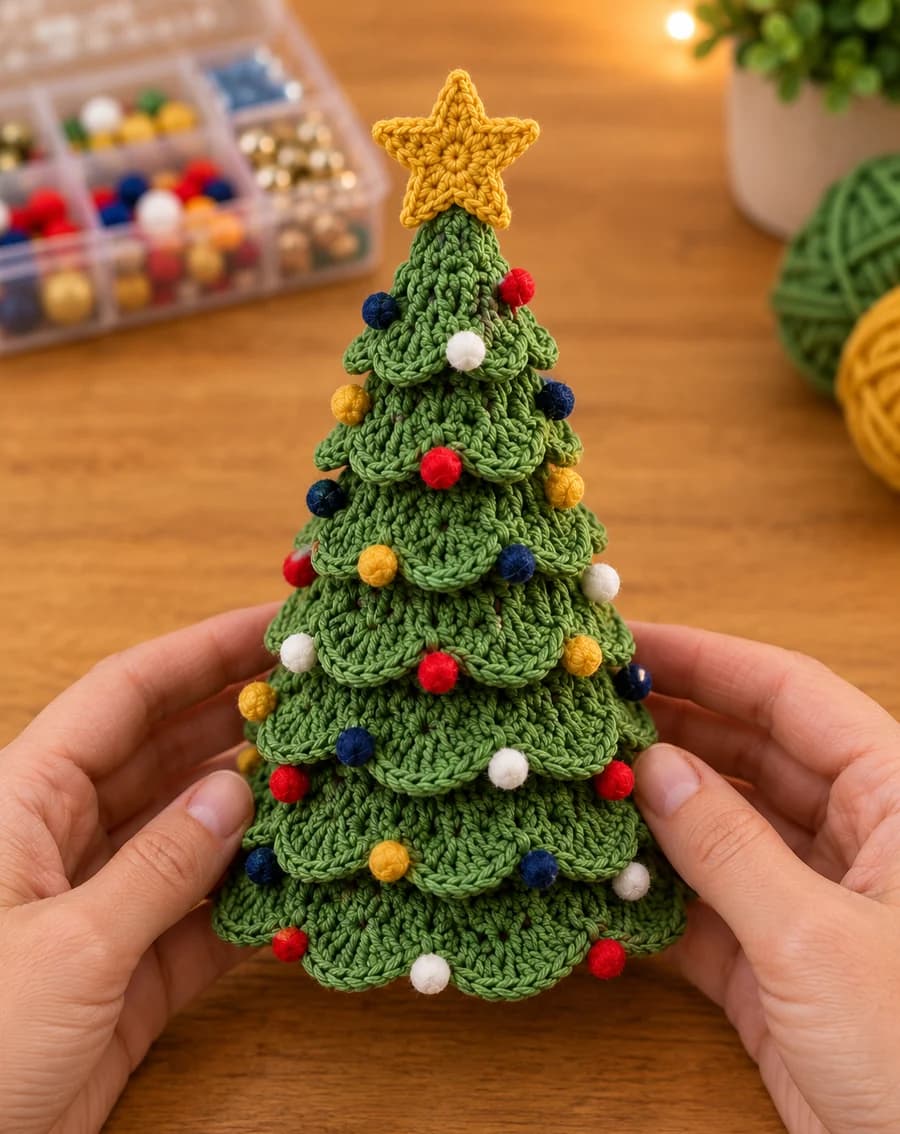
Alpine Spiral Crochet Christmas Tree

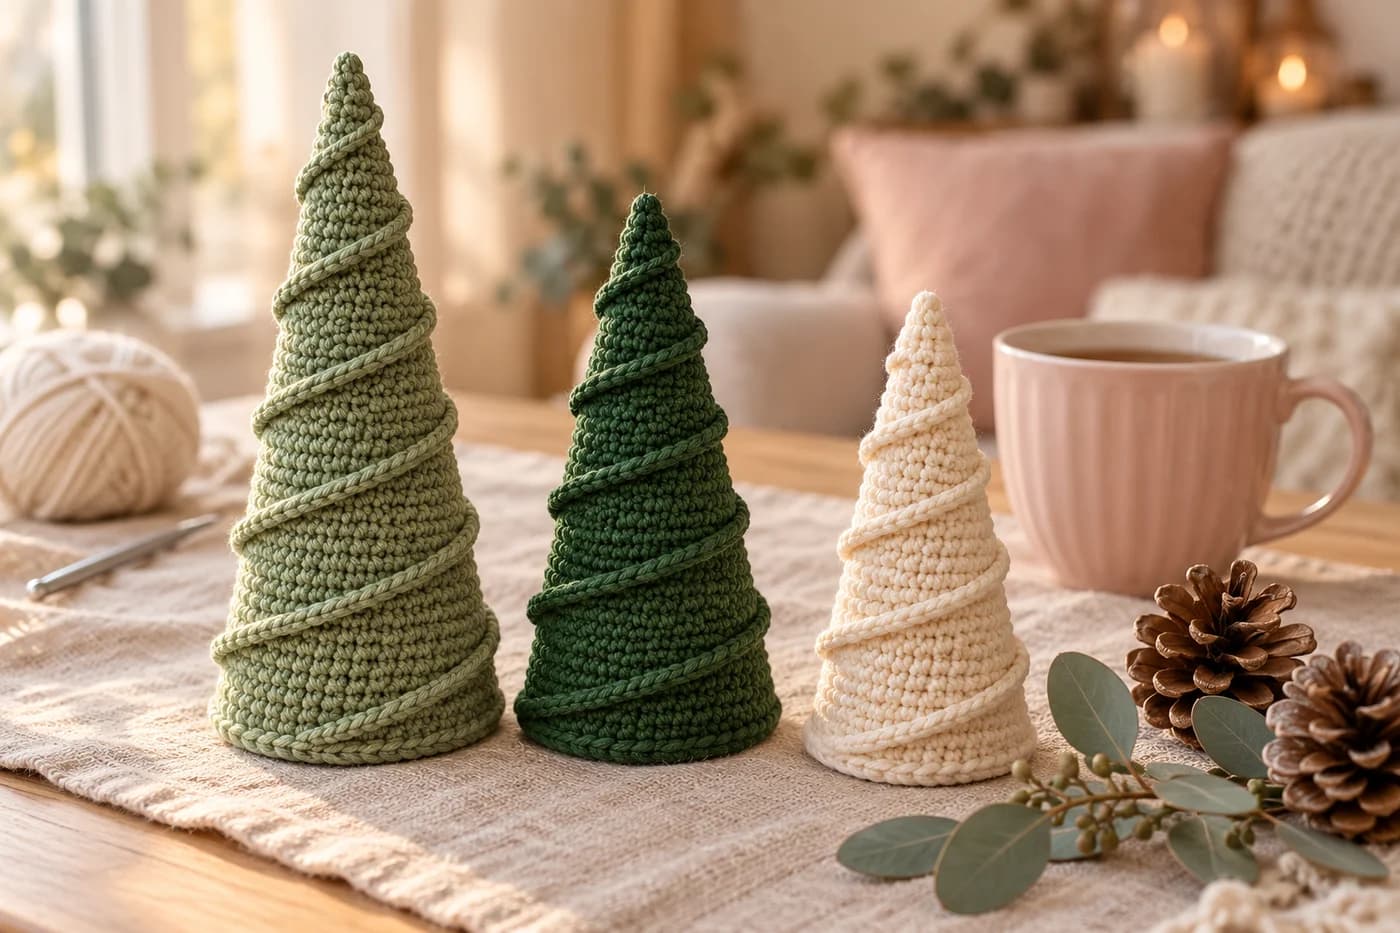
Every December I want something on the mantel that looks like a snowy mountain forest and not like plastic. This free crochet Christmas tree cone pattern makes standing trees with a raised ridge that winds around them like a mountain path, from the base to the tip. I make them in a trio: sage, deep forest green and cream, in three heights. You'll need worsted yarn, a 4.5 mm hook and 2 to 4 hours per tree, depending on the size.
Key Takeaways
- The cone is plain single crochet, worked in a spiral from the tip down, growing by 4 stitches every 3 rounds.
- The spiral comes from a short stretch of back-loop stitches in every round, which moves a quarter of the way around each time.
- A ridge of half double crochet is worked into the loops that stretch leaves free, so the spiral stands out.
- Three heights from the same rounds: stop at Round 30, 36 or 42.
| At a glance | |
|---|---|
| Finished size | about 6, 7¼ or 8½ in (15, 18 or 21 cm) tall |
| Yarn | worsted #4, about 65, 90 or 125 yd per tree |
| Hook | 4.5 mm (US 7) |
| Stitches | MR, sc, inc, sc in BLO, hdc, sl st |
| Pieces | 1 cone, 1 base disc, 1 cardboard circle |
| Time | about 2–4 hours per tree |
Where the spiral on each tree comes from
When you work a stitch through the back loop only, the front loop of the stitch below stays free and shows as a little V. Work a whole round that way and you get a ring of V's. Work just a quarter of the round that way, and start the next quarter where the last one ended, and the V's climb down the cone a quarter turn per round. After 4 rounds, the line has gone all the way around once.
That line is the path for the ridge. Once the cone is done, you work a half double crochet into every free loop, from the tip to the base, and the spiral stands out like a plump braided cord. I love that the shaping and the spiral never fight each other. The cone only knows about its increases, and the spiral only knows about its marker.
If you'd rather make a tree to hang on a branch, my crochet spiral Christmas tree ornament is one long cord looped into tiers on a jute string. This one stands up by itself, so it's made for shelves, mantels and the middle of the table.
Materials for a trio of alpine trees
Yarn, worsted #4. A soft acrylic such as Red Heart Super Saver or Lion Brand Vanna's Choice holds the cone shape well and gives the ridge a plump, matte look. One skein of each colour is plenty for one tree. The amounts below are estimates worked out from the stitch counts, with extra for the tails.
| Tree | Height | Base | Yarn |
|---|---|---|---|
| Small | about 6 in (15 cm) | about 2¾ in (7 cm) across | about 65 yd (60 m) |
| Medium | about 7¼ in (18 cm) | about 3½ in (9 cm) across | about 90 yd (82 m) |
| Large | about 8½ in (21 cm) | about 4 in (10 cm) across | about 125 yd (114 m) |
I make the small one in cream, the medium in deep forest green and the large in sage, but any mix works.
Hook and notions
- 4.5 mm (US 7) hook. Go down a size if your stitches look open: the stuffing shouldn't show through.
- Two stitch markers in different colours: one for the start of the round, one for the spiral.
- Polyester fiberfill, about 1 oz (30 g) for the large tree.
- A circle of stiff cardboard for the base: 2½ in (6 cm) for the small tree, 3 in (7.5 cm) for the medium, 3½ in (9 cm) for the large.
- Optional: a tablespoon of poly pellets in a small zip bag, for weight.
- A tapestry needle and scissors.
Tension. Tight single crochet, about 9 sc and 10 rounds to 2 in (5 cm). The exact gauge only changes the size of the tree a little, but tight stitches keep the cone smooth.
Stitches (US terms): MR = magic ring, sc = single crochet, inc = 2 sc in the same st, hdc = half double crochet, sl st = slip stitch, BLO = back loop only, st = stitch. The cone is worked in a continuous spiral: don't join the rounds, and move the round marker up at the start of each round.
UK crocheters: US sc = UK double crochet, and US hdc = UK half treble.
The pattern: the cone, from the tip down
The cone starts at the tip with a magic ring and grows by 4 stitches every third round. It's the same for all three sizes. You just stop sooner for the smaller trees.
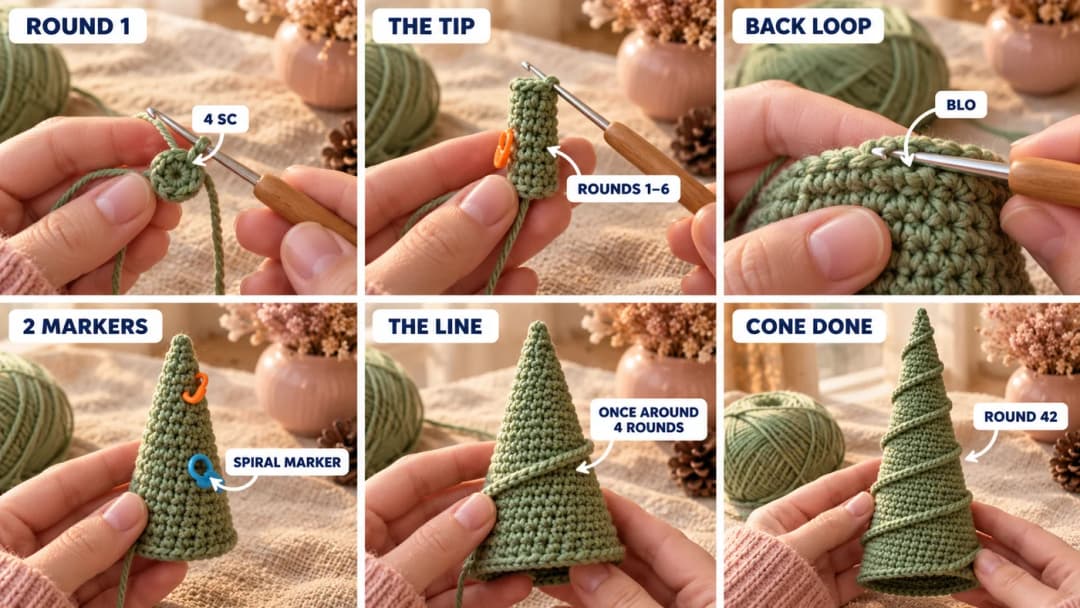
Rounds 1–6, the tip
- Round 1: MR, 4 sc in the ring. Pull the ring tight. (4 sc)
- Rounds 2–3: Sc in each st. (4 sc)
- Round 4: Inc in each st. (8 sc)
- Rounds 5–6: Sc in each st. (8 sc)
The tip is a narrow little tube for now. It turns into a neat point once it's stuffed.
The spiral marker
From Round 7, every round has a short stretch worked through the back loop only. The table tells you how many stitches to work into that way: that's q, a quarter of the stitches of the round below.
- Round 7: work the round as the table says, but work into the first 2 sts through the back loop only. The first of them is an increase: work both sc into the same back loop. Put the spiral marker in the last st you made.
- From Round 8 on: work each round as the table says. When you reach the st holding the spiral marker, work into it as usual, through both loops, and take the marker out. Then work into the next q sts through the back loop only, and put the spiral marker in the last st you made. Carry on around.
- If an increase falls inside the back-loop stretch, work both sc into the same back loop.
The back-loop stretch doesn't line up with the round marker. It moves a quarter of the way around every round, and that's exactly what draws the spiral.
Check after Round 15. Look at the outside of the cone. You should see a line of little V's, the free front loops, slanting down and around. They sit slightly raised, like a fine chain on the surface. It should go around once every 4 rounds, with no gaps or jumps. If the line skips, you've started a stretch too early or too late: count again from the spiral marker.
Rounds 7–42, the cone with its spiral
| Round | What to do | Sts | Back-loop sts (q) |
|---|---|---|---|
| 7 | (inc, sc in the next st) 4 times | 12 | 2 |
| 8–9 | sc in each st | 12 | 3 |
| 10 | (inc, sc in each of the next 2 sts) 4 times | 16 | 3 |
| 11–12 | sc in each st | 16 | 4 |
| 13 | (inc, sc in each of the next 3 sts) 4 times | 20 | 4 |
| 14–15 | sc in each st | 20 | 5 |
| 16 | (inc, sc in each of the next 4 sts) 4 times | 24 | 5 |
| 17–18 | sc in each st | 24 | 6 |
| 19 | (inc, sc in each of the next 5 sts) 4 times | 28 | 6 |
| 20–21 | sc in each st | 28 | 7 |
| 22 | (inc, sc in each of the next 6 sts) 4 times | 32 | 7 |
| 23–24 | sc in each st | 32 | 8 |
| 25 | (inc, sc in each of the next 7 sts) 4 times | 36 | 8 |
| 26–27 | sc in each st | 36 | 9 |
| 28 | (inc, sc in each of the next 8 sts) 4 times | 40 | 9 |
| 29–30 | sc in each st | 40 | 10 |
| 31 | (inc, sc in each of the next 9 sts) 4 times | 44 | 10 |
| 32–33 | sc in each st | 44 | 11 |
| 34 | (inc, sc in each of the next 10 sts) 4 times | 48 | 11 |
| 35–36 | sc in each st | 48 | 12 |
| 37 | (inc, sc in each of the next 11 sts) 4 times | 52 | 12 |
| 38–39 | sc in each st | 52 | 13 |
| 40 | (inc, sc in each of the next 12 sts) 4 times | 56 | 13 |
| 41–42 | sc in each st | 56 | 14 |
Where to stop:
- Small tree: stop after Round 30. (40 sts)
- Medium tree: stop after Round 36. (48 sts)
- Large tree: stop after Round 42. (56 sts)
Sl st into the next st, fasten off and leave a 6-in (15 cm) tail. Don't stuff yet: the ridge is easier to work while the cone is soft.
The raised ridge that winds down the tree
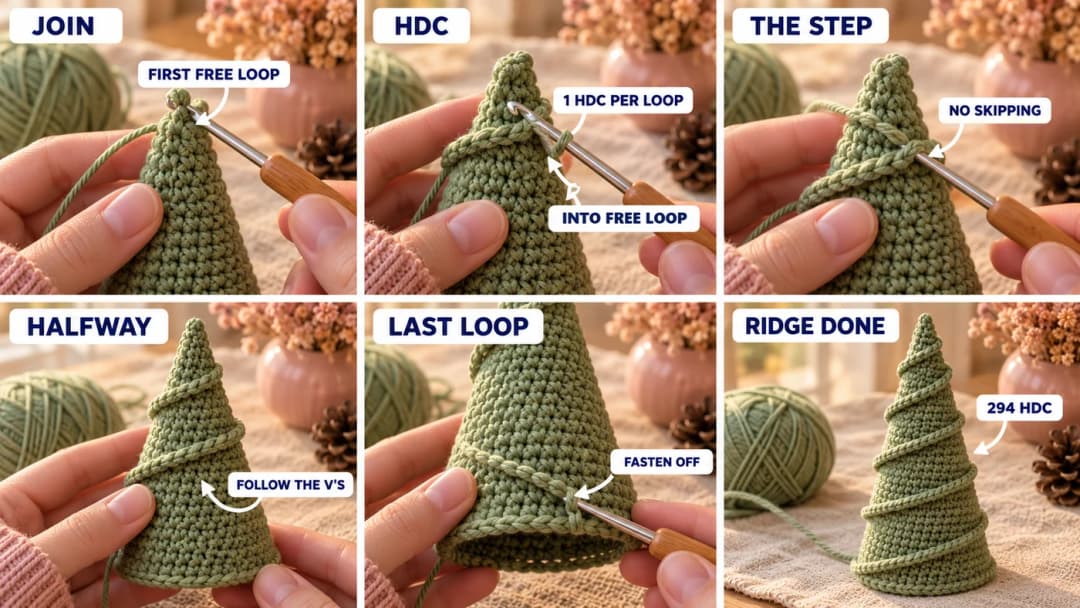
Now the free loops become a ridge. You'll follow them from the tip to the base, in the same direction you made them.
- Ridge: Hold the cone tip up, RS facing. Join yarn with a sl st in the first free front loop, near the tip (it's in Round 6). Ch 1, hdc in the same loop. Hdc in each free front loop, following the line of V's down and around the cone. Fasten off at the last free loop, near the base, and weave in both tails. (148 hdc on the small tree, 215 on the medium, 294 on the large)
The hdc sit snugly along the line and their tops form a neat braided cord that winds around the tree. If you want a bigger, ledge-like ridge, work dc instead of hdc. You'll need about 10% more yarn.
Tip: where the line steps from one round to the next, the two loops sit diagonally from each other. Go straight from one to the other: no skipping, no extra stitch. Every loop gets exactly one hdc.
A flat base so the tree stands straight
The base is a flat circle with the same number of stitches as the bottom of the cone. A cardboard circle inside keeps the bottom flat, and that's what keeps the tree from wobbling.
The base disc
Work in a continuous spiral, like the cone.
- Round 1: MR, 6 sc in the ring. (6 sc)
- Round 2: Inc in each st. (12 sc)
- Round 3: (Inc, sc in the next st) 6 times. (18 sc)
- Round 4: (Inc, sc in each of the next 2 sts) 6 times. (24 sc)
- Round 5: (Inc, sc in each of the next 3 sts) 6 times. (30 sc)
- Round 6: (Inc, sc in each of the next 4 sts) 6 times. (36 sc)
Then finish for your size:
- Small tree, Round 7: (Inc, sc in each of the next 8 sts) 4 times. (40 sc)
- Medium tree, Round 7: (Inc, sc in each of the next 5 sts) 6 times. (42 sc) Round 8: (Inc, sc in each of the next 6 sts) 6 times. (48 sc)
- Large tree, Rounds 7–9: Continue the 6 increases per round: (inc, sc in each of the next 5 sts) 6 times (42 sc), (inc, sc in each of the next 6 sts) 6 times (48 sc), (inc, sc in each of the next 7 sts) 6 times (54 sc). Round 10: (Inc, sc in each of the next 26 sts) 2 times. (56 sc)
Sl st into the next st. Don't fasten off: this yarn joins the base to the cone.
Stuffing and closing
- Stuff the cone firmly, a little at a time. Push the first bits right into the tip with a chopstick or the end of your hook, so the point is firm and straight. Stop about 1 in (2.5 cm) below the edge.
- Lay the cardboard circle on top of the stuffing, then add the bag of pellets on top of it if you're using one.
- Hold the base disc against the bottom of the cone, wrong sides together, with the last rounds lined up. They have the same number of stitches: 40, 48 or 56.
- Sc through both pieces together, inserting the hook through both loops of the cone's last round and both loops of the disc's last round, all the way around. Push in a little more stuffing around the edge of the cardboard before you close the last few stitches. (40, 48 or 56 sc)
Sl st into the first sc, fasten off and hide the tail inside the tree. The sc seam makes a neat little rim around the base, the same as the bottom edge in the photos.
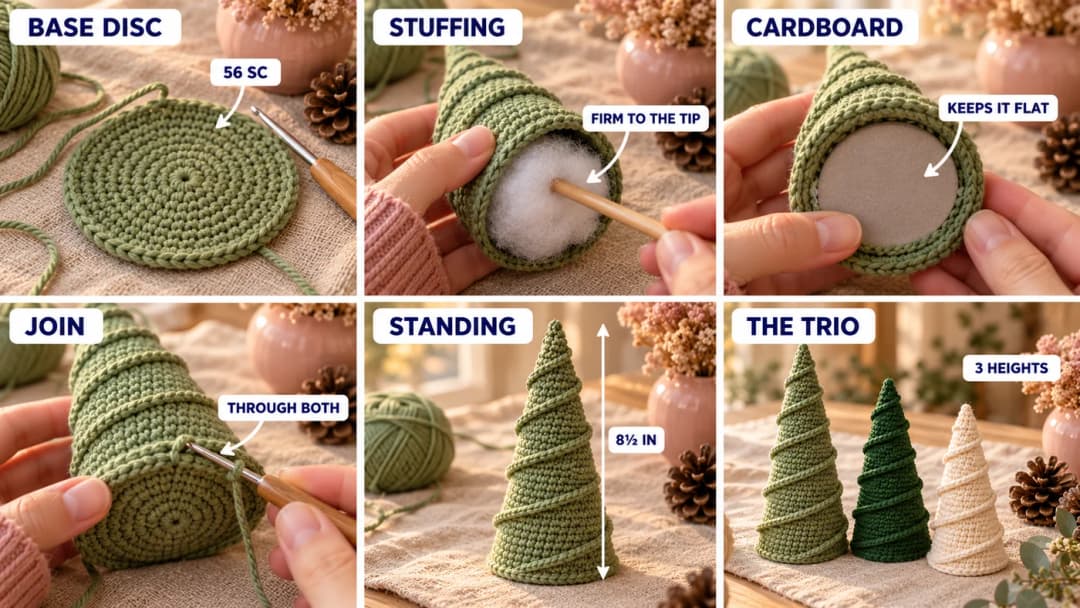
Setting up a little alpine forest
Three trees in three heights look best slightly staggered: the tallest at the back or on one side, the smallest in front. On a mantel, I tuck a few pine cones and a sprig of eucalyptus between them. On a table, they sit nicely on a wooden board with a candle in a jar, well away from the yarn.
If you want a snowy look, pick cream for the smallest tree, or work only the ridge in cream on a green cone. Change colour for the ridge pass and the spiral turns into a snowy path winding up the mountain. A single tree also makes a lovely gift: it fits in a small kraft box with tissue paper.
They're decorations, not toys. Keep them away from babies and toddlers, especially if you've used pellets, and spot-clean them with a damp cloth. For more makes for the season, browse my free crochet Christmas patterns, or add my crochet Christmas gnome to the forest.
Alpine tree questions
Can I make the tree without the cardboard? Yes, but the base will round out and the tree will lean. Plastic canvas or a lid from a takeaway container work too. Cut it a little smaller than the disc, so the seam closes easily.
Why does my line of V's have a gap or a bump? A back-loop stretch started one stitch off. Each stretch starts right after the stitch holding the spiral marker: one stitch late leaves a gap in the line, one stitch early makes two stretches overlap. Also check that q comes from the round below, the stitches you're working into, not the ones you're making.
Can I sell the trees I make? Yes, you're welcome to sell finished trees made from this free pattern. Please credit Wavode and link back to this page. Please don't republish the pattern text or my photos.
Made a little forest? Tag #wavodecrochet on Pinterest: I'd love to see your colours.