Crochet Christmas Tree Decorations

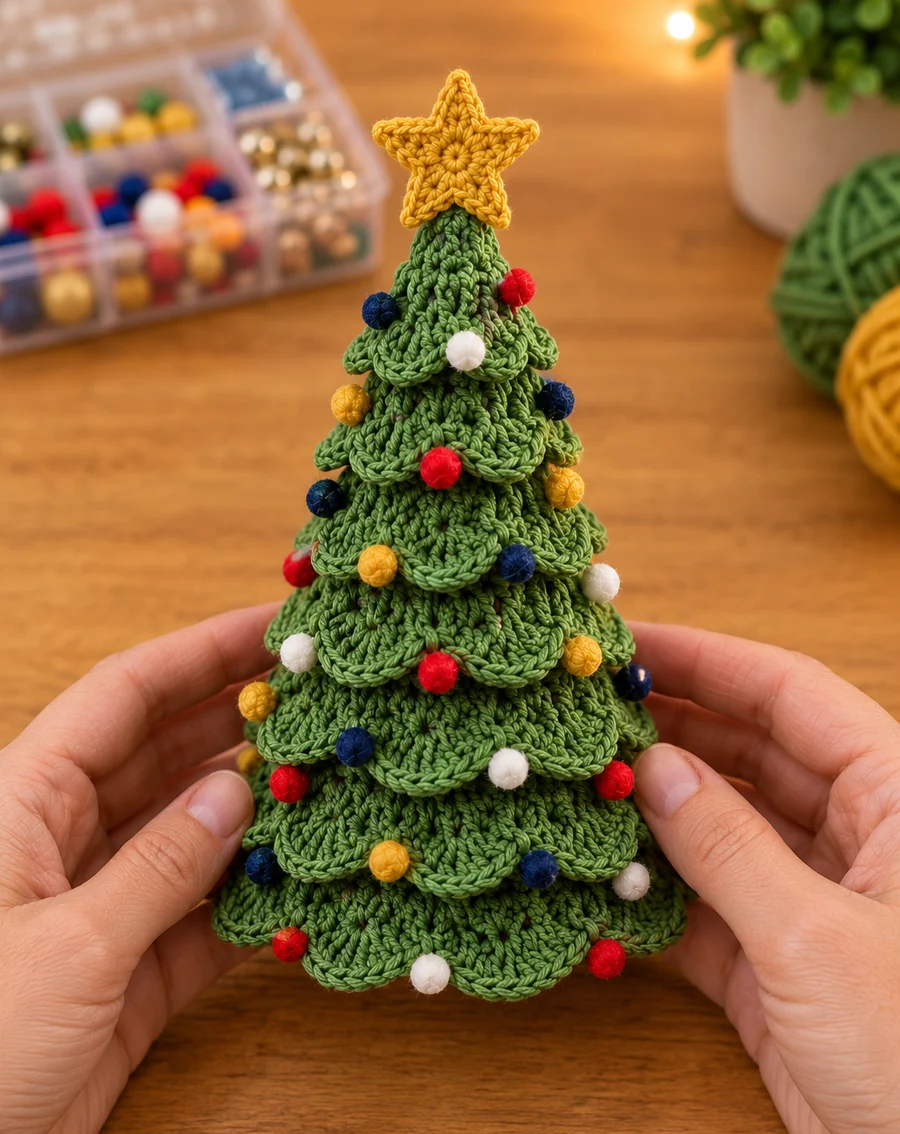
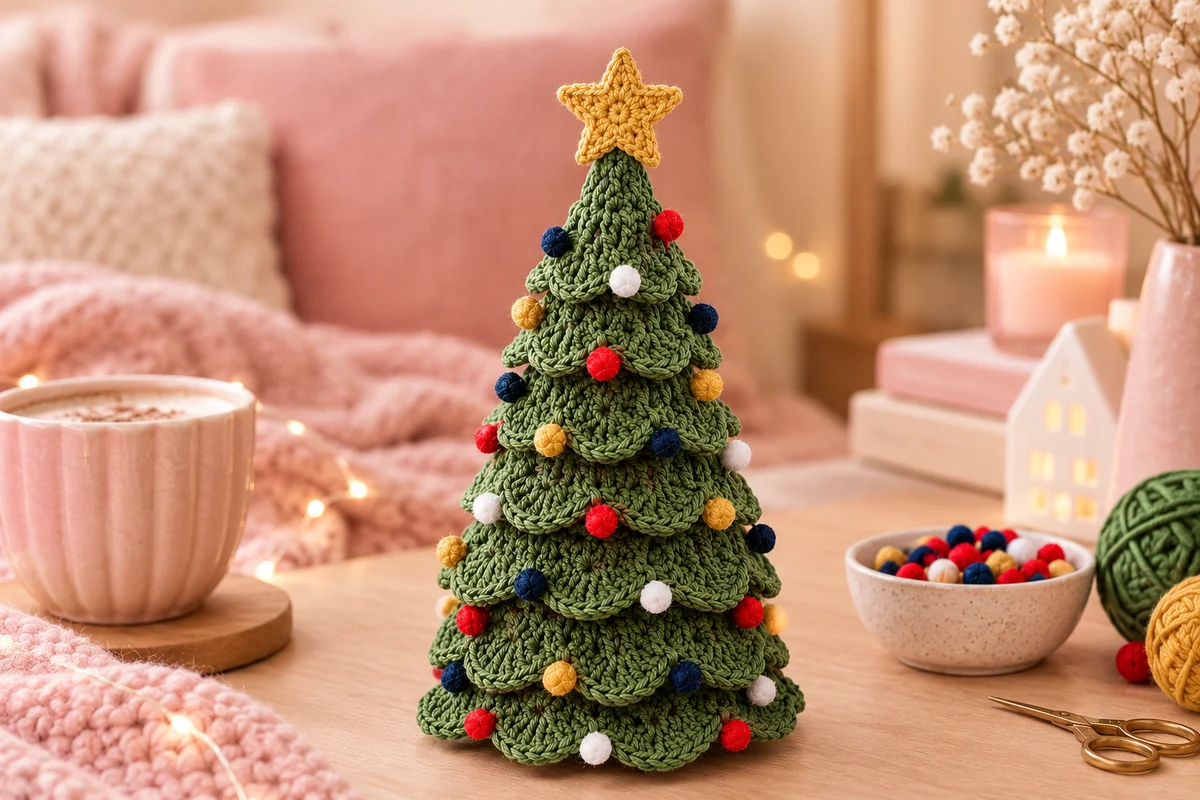
This free crochet Christmas tree pattern makes a 7-inch tabletop tree from six scalloped tiers that slide over a paper cone, finished with a yellow star and little pom-pom baubles. Each tier is a small ring worked in three rounds of double crochet, so there's no shaping to count beyond the first chain. It takes about 75 yards of green DK cotton, a 3.5 mm hook and 4 to 5 hours. A 3.5-inch mini version, perfect as a hanging ornament, uses only the three smallest tiers.
Key Takeaways
- Six rings, one recipe. Every tier uses the same three rounds. Only the starting chain changes: 48, 40, 32, 24, 16 and 8.
- The cone does the shaping. Each ring slides down until it fits, so the tiers space themselves about 1 in apart.
- Two sizes from one pattern. A 7-in tabletop tree, or a 3.5-in mini ornament from tiers 4 to 6.
- About 75 yd (69 m) of green DK cotton for the big tree and about 25 yd for the mini.
Why I love this little tree
Every December I make a handful of these for the mantel, the kitchen windowsill and the corner of my desk. They're the decoration people pick up and turn around in their hands. The scallops ruffle and overlap like real branches, and the cone inside keeps the tree standing straight, with no stuffing and no wire.
It's also the easiest holiday pattern I know that still looks special. You make six small rings, and each one takes about half an hour. There's no counting of increases around a cone, because the paper cone does the shaping for you. Isn't that the best kind of pattern? The repetitive part, and a satisfying assembly at the end.
The mini version makes a lovely ornament for the real tree, a gift-topper or a place-card holder at the Christmas table.
Skill level. Easy. You'll need chains, slip stitch, single crochet and double crochet, plus a magic ring for the star and the tip. If you've made a granny square, you can make this tree.
Want more for the holidays? My Christmas gnome wall hanging is a one-evening make, and my mini gnome trio would look sweet at the foot of this tree.
What you'll need
Yarn (DK #3 cotton)
- Grass green, about 75 yd (69 m) for the big tree (about 25 yd / 23 m for the mini). One 50 g ball is plenty.
- Mustard yellow, about 6 yd (5.5 m) for the star.
- Paintbox Yarns Cotton DK or Rico Essentials Cotton DK are good choices. Cotton holds the scallops crisp. Acrylic works too, but its scallops droop a little more.
Hook and notions
- 3.5 mm (US E-4) hook.
- A sheet of white cardstock (letter or A4), a pencil, a ruler and scissors. Or a ready-made craft foam cone about 7 in tall and 3.5 in across the base.
- Tacky craft glue (or a low-temperature glue gun).
- About 20 mini pom-poms (7 mm) in red, white, gold and navy, for the baubles. See the safety note below for a no-glue option.
- A tapestry needle and a stitch marker.
Safety note. This tree is a decoration, not a toy. The glued pom-poms and the paper cone are not safe for children under 3. For a home with little ones, embroider the baubles as French knots in red, white and gold yarn instead of gluing pom-poms.
Gauge and finished size
Gauge only needs to be close. Aim for about 5 dc to 1 in (2.5 cm) with the 3.5 mm hook. If your tiers come out much bigger or smaller, the cone check in Part 4 tells you what to adjust.
Finished size:
- Big tree: about 8 in (20 cm) tall with the star, and about 4.5 in (11.5 cm) across the bottom tier.
- Mini tree: about 4.5 in (11.5 cm) tall with the star, and about 2.5 in (6.5 cm) across.
Abbreviations (US crochet terms)
- ch = chain
- sl st = slip stitch
- sc = single crochet
- dc = double crochet
- inc = 2 sc in the same st
- MR = magic ring
- sk = skip
- st(s) = stitch(es)
UK crocheters: this pattern uses US terms. US single crochet = UK double crochet, and US double crochet = UK treble.
The pattern — step by step
Part 1 — Make the paper cone
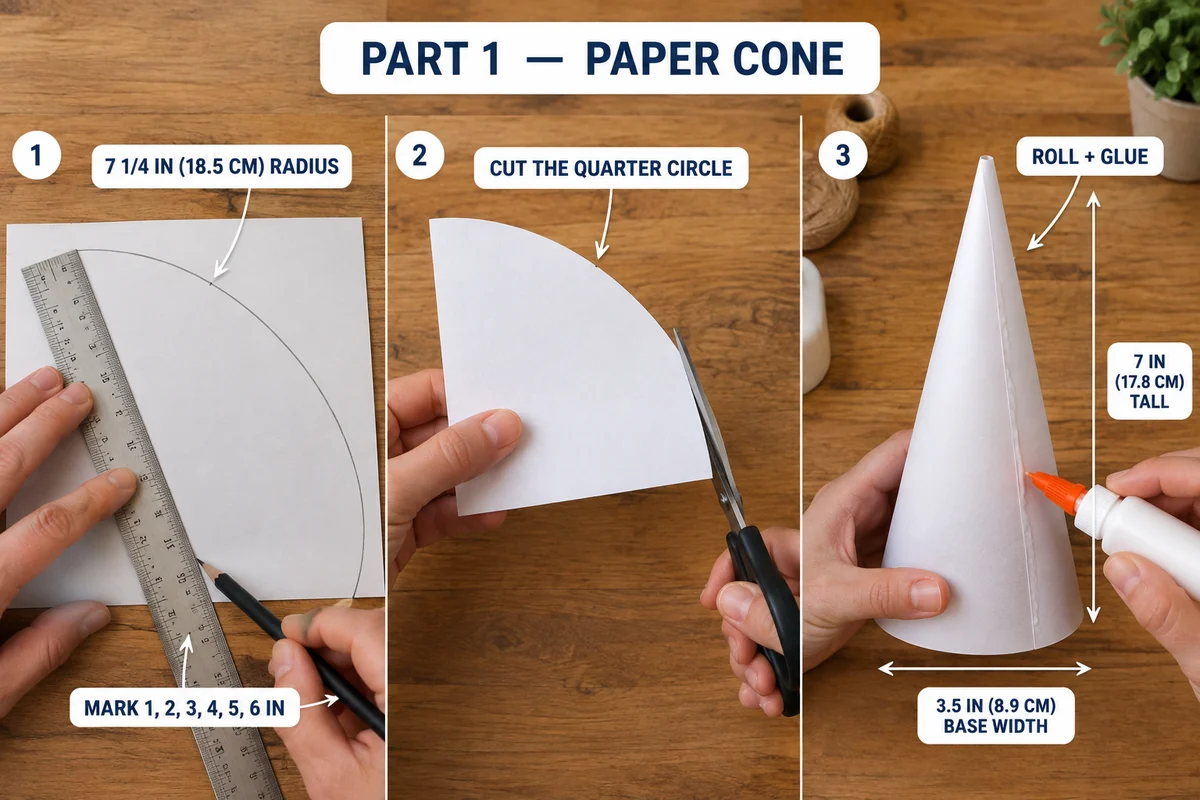
- Draw a quarter circle. Put the ruler at one corner of the cardstock. Mark points 7¼ in (18.5 cm) from that corner all the way across, then join them into a smooth curve. Cut out the quarter circle.
- Roll it into a cone. Bring the two straight edges together and overlap them by about ⅜ in (1 cm). The point is the corner you measured from. Glue the overlap and hold it with a clip until it's dry.
- Mark the tiers. Stand the cone on the table. Measuring up along the glued seam from the bottom edge, make a small pencil mark at 1, 2, 3, 4, 5 and 6 in. Those are the six lines where the tiers will sit.
You now have a cone about 7 in (18 cm) tall and 3.5 in (9 cm) across the base.
Mini tree cone. Use a 3⅝ in (9.2 cm) radius instead, with the same overlap. Mark at ½, 1½ and 2½ in. The cone is about 3.5 in tall and 1.75 in across.
Part 2 — The tier recipe (make 6)
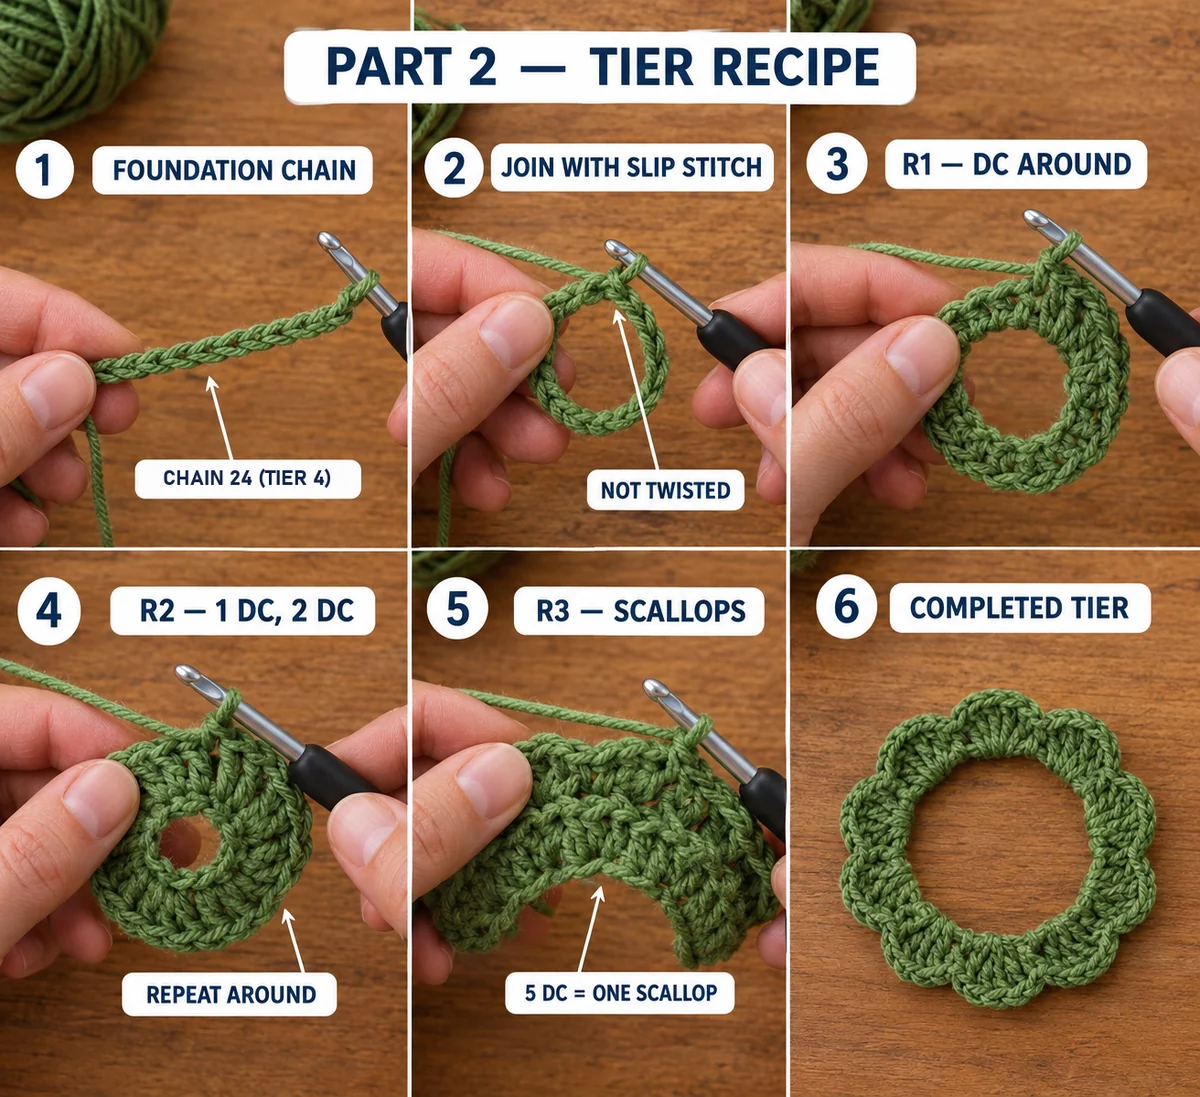
Every tier is made the same way. The only thing that changes is the length of the starting chain, which is listed in Part 3. The foundation-chain edge is the top of the tier. It hugs the cone, and the scallops hang down below it like a little skirt.
Foundation: with green, ch the number for your tier. Sl st into the first ch to form a ring. Be careful not to twist the chain.
Rnd 1: ch 3 (counts as the first dc), then dc in each ch around. Sl st into the top of the ch-3 to join. [same number as your chain]
Rnd 2: ch 3 (counts as the first dc), 2 dc in the next st. *Dc in the next st, 2 dc in the next st.* Repeat from * around. Sl st into the top of the ch-3 to join. [1½ times your chain]
Rnd 3 (scallops): ch 1, sc in the same st as the join. *Sk 1 st, 5 dc in the next st, sk 1 st, sc in the next st.* Repeat from * around, but on the last repeat, stop after "sk 1 st" and sl st into the first sc to join. Fasten off and weave in the tails.
In the photos I'm making Tier 4, so the chain is 24 and the finished ring has 9 scallops.
The scallops ruffle as you go. That's exactly right. They open into the rippled branches when the tier sits on the cone.
Part 3 — Chain counts for the six tiers
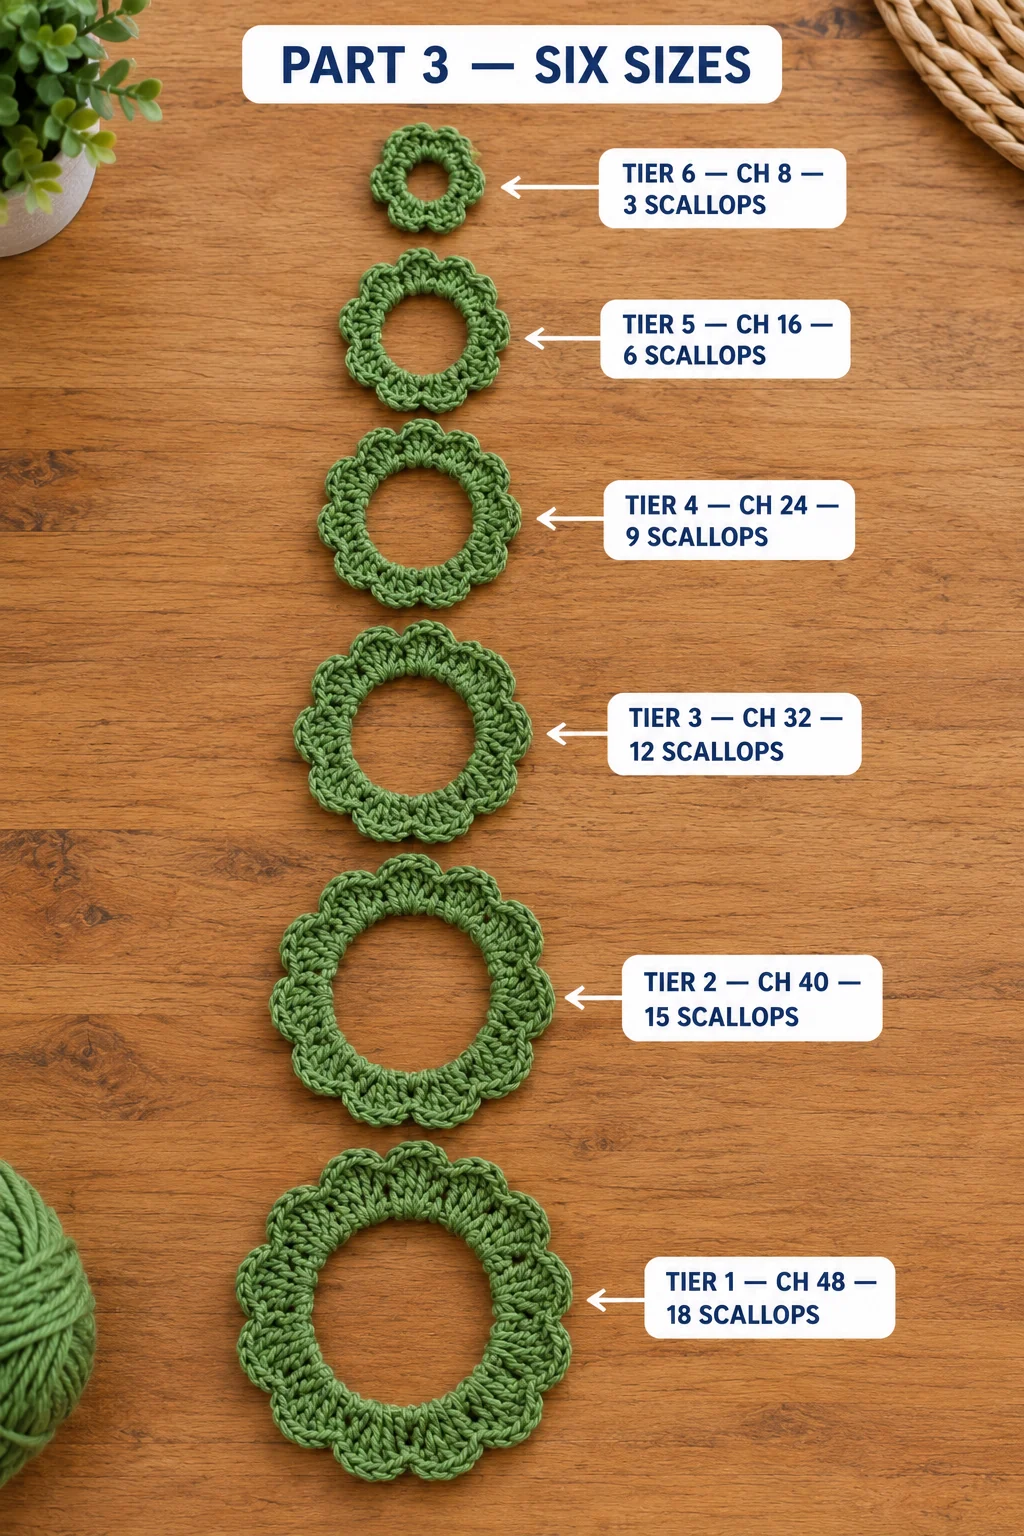
| Tier | Starting chain | After Rnd 1 | After Rnd 2 | Scallops in Rnd 3 |
|---|---|---|---|---|
| Tier 1 (bottom) | ch 48 | 48 dc | 72 dc | 18 |
| Tier 2 | ch 40 | 40 dc | 60 dc | 15 |
| Tier 3 | ch 32 | 32 dc | 48 dc | 12 |
| Tier 4 | ch 24 | 24 dc | 36 dc | 9 |
| Tier 5 | ch 16 | 16 dc | 24 dc | 6 |
| Tier 6 (top) | ch 8 | 8 dc | 12 dc | 3 |
Each tier is 8 chains smaller than the one below. For the mini tree, make only Tiers 4, 5 and 6.
Tier 6 is tiny, and working 7 dc into an 8-chain ring feels crowded. Push the stitches along the ring as you go, and they'll fit.
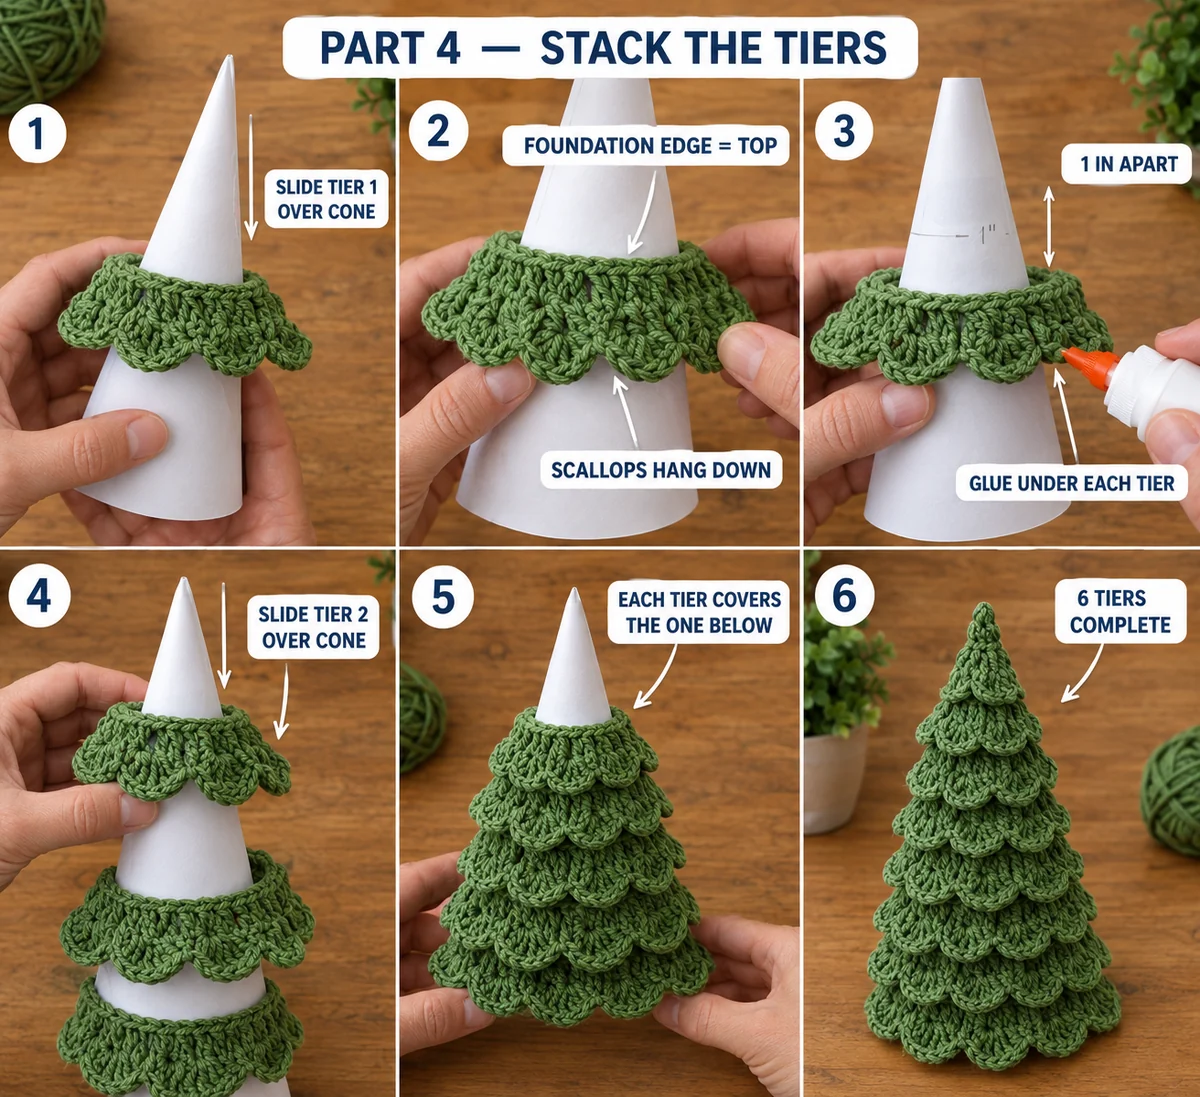
Part 4 — Stack the tiers on the cone
Start with the biggest tier and work up.
- Check the fit. Slide Tier 1 over the point of the cone, foundation edge on top and scallops hanging down, and let it slip down until it stops. Its top edge should land close to the 1-in mark.
- Glue it. Lift the tier a little, run a thin line of tacky glue around the cone just under the mark, and press the top edge of the tier into it.
- Repeat with Tiers 2 to 6, each at its own mark. Each tier's scallops should cover the top edge of the tier below.
Cone check. If a tier slides well below its mark, your chain is looser than mine. Remake that tier's foundation with a 3 mm hook. If it stops a little above its mark, stretch it gently down. Crochet has plenty of give.
Part 5 — The tip cap
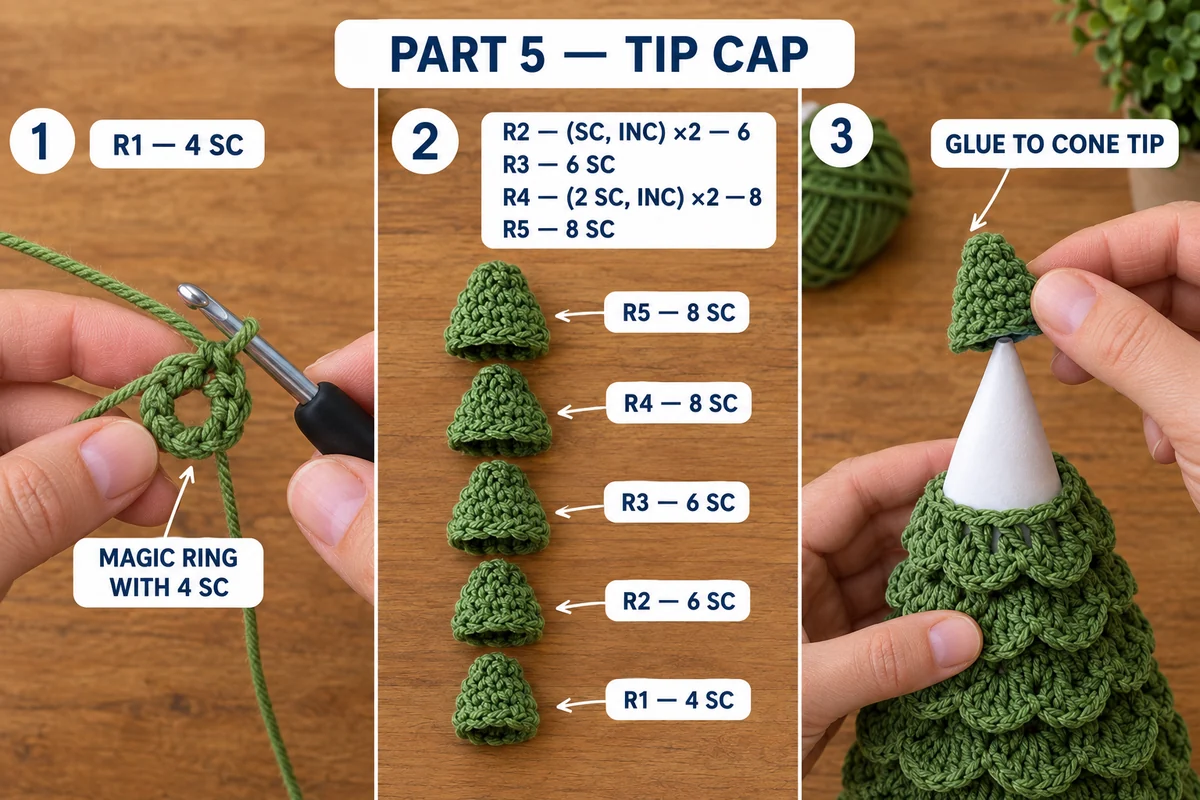
The cap covers the last bit of bare cone above Tier 6. It's worked from the point down, so the magic ring becomes the very tip of the tree and the last round is the open bottom edge.
With green:
Rnd 1: 4 sc in a MR. Pull the ring tight. [4]
Rnd 2: (sc, inc) twice. [6]
Rnd 3: sc in each st around. [6]
Rnd 4: (2 sc, inc) twice. [8]
Rnd 5: sc in each st around. [8]
Sl st into the next st and fasten off. Weave in both tails on the inside. Put a dab of glue on the tip of the cone and push the cap down over it until it covers the top edge of Tier 6.
Part 6 — The star (make 2)
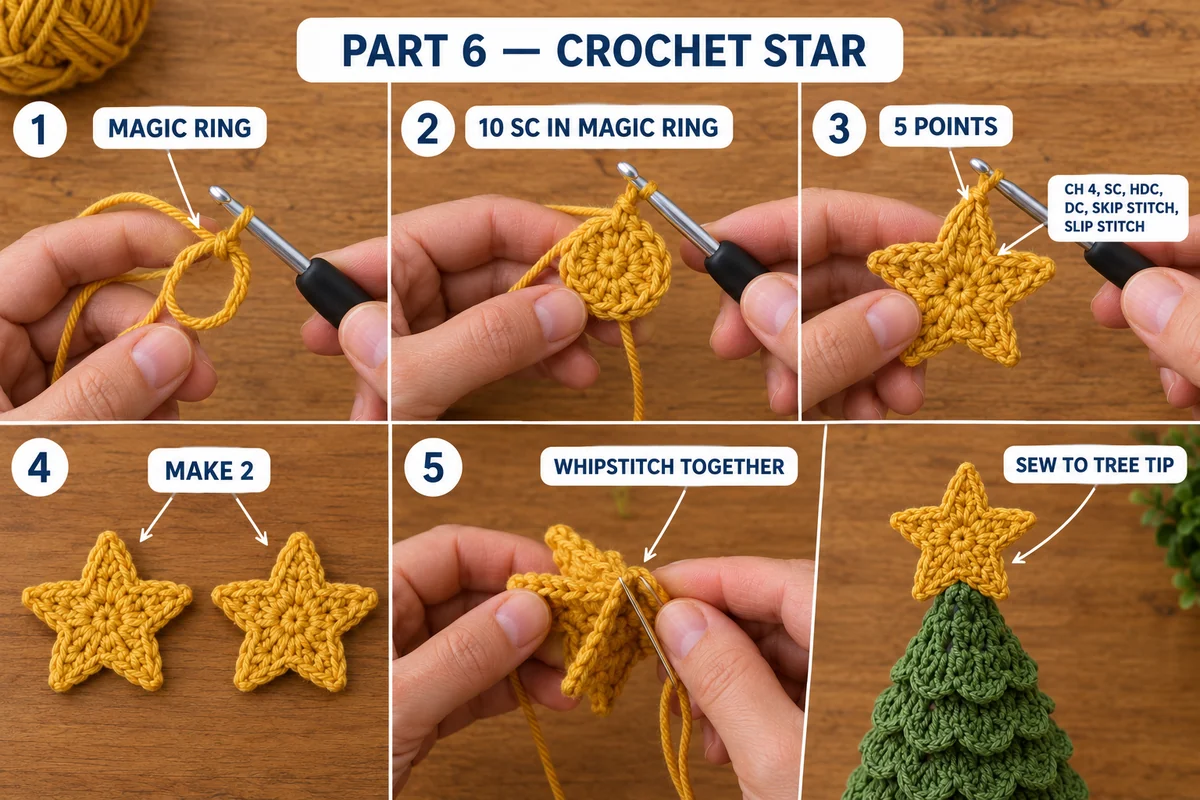
With mustard yellow:
Rnd 1: ch 1, 10 sc in a MR. Pull the ring tight and sl st into the first sc to join. [10]
Points: *ch 4, sc in the 2nd ch from the hook, hdc in the next ch, dc in the next ch, sk the next st on the ring, sl st in the next st.* Repeat from * 4 more times. The last sl st lands in the join. [5 points]
Fasten off the first star and weave in its tails. Fasten off the second star leaving an 8-in (20 cm) tail.
Assemble the star: hold the two stars back to back, points matching. With the long tail, whipstitch around the edges to join them. When you reach the bottom point, don't cut the yarn. Sew that point firmly to the tip of the cap with 5 or 6 stitches, going through the cap. Fasten off inside the cap.
Part 7 — Add the baubles
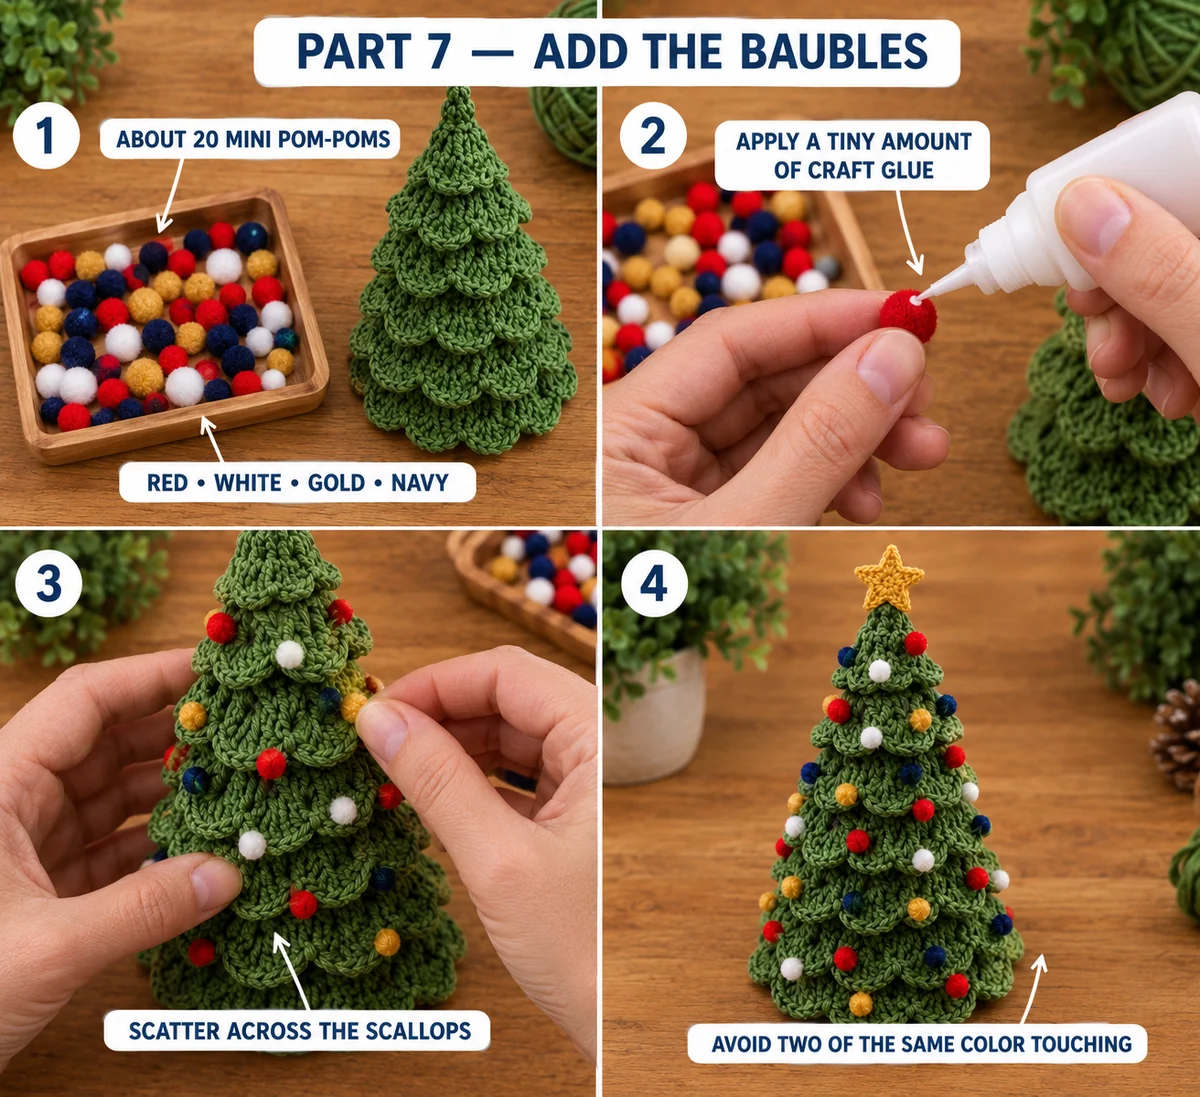
Glue about 20 mini pom-poms onto the tree, scattered so no two of the same color touch. Put them on the scallops' outer edges, where they catch the light. I place about 5 on Tier 1, 4 on Tier 2, 4 on Tier 3, 3 on Tier 4, 2 on Tier 5 and 2 on Tier 6.
For the no-glue version, embroider French knots with a tapestry needle instead, and wrap the yarn 3 times around the needle for each knot.
That's it! Find a spot on the mantel and start the next one.
Turn the mini tree into an ornament
Before you sew the star to the cap, thread an 8-in (20 cm) piece of gold thread through the top point of the star. Tie the two ends together in a tight double knot and trim them. The tree now hangs from that loop. The mini weighs almost nothing, so it won't drag a branch down.
Make it yours — quick variations
| Variation | Change from base pattern |
|---|---|
| Snowy tree | Work Rnd 3 of every tier in white, for scallops tipped with snow. |
| Ombré forest | Make three trees: one in dark green, one in grass green and one in sage. Group them on a tray. |
| Frosted winter tree | Make the whole tree in white or cream, with silver pom-poms and a silver star. |
| Taller tree (9 in) | Cut the cone from a 12 × 12 in sheet with a 9¼ in radius, and mark it every inch from 1 to 8 in. Add two tiers below Tier 1: ch 64 (96 dc after Rnd 2, 24 scallops) and ch 56 (84 dc, 21 scallops). Add about 45 yd of green. |
| Gift topper | Make the mini tree without the gold loop and tie it onto a wrapped gift with the ribbon. |
| Table setting | Make one mini tree per guest and tuck a name card into the star. |
Troubleshooting the three things that go wrong
The scallops curl up instead of hanging down
Your tier is sitting upside down. The foundation-chain edge (the smallest ring) always goes on top, with the scallops below. Take it off, turn it over and slide it back on.
A tier slides past its mark
Your foundation chain is loose. Remake that tier with a 3 mm hook for the chain and Rnd 1, then switch back to 3.5 mm for Rnds 2 and 3. That's often enough to bring it up to its line.
The cone shows between the tiers
Your tiers are sitting too far apart, usually because one of them is too small and stopped high. Push the tier down gently, or move its glue line a little lower so its scallops cover the tier below.
Frequently asked questions
How long does this crochet Christmas tree take? About 4 to 5 hours for the big tree. The six tiers take roughly 3.5 hours together, since Tier 1 is the longest at about 50 minutes and Tier 6 only takes 5. The cap, star and assembly add about an hour. The mini tree takes about 1.5 hours.
How much yarn do I need? About 75 yd (69 m) of green DK cotton and 6 yd (5.5 m) of yellow for the big tree. The mini uses about 25 yd (23 m) of green. One 50 g ball of green makes the big tree and a mini, with yarn to spare.
Can I make it without a paper cone? Yes. A craft foam cone about 7 in tall and 3.5 in across the base works the same way, and you can pin the tiers instead of gluing them. The tiers need something inside to hold their shape, so the tree won't stand on its own without a cone.
Is this a good project for beginners? Yes. There are only three rounds per tier, and they're the same three rounds every time. If you can chain, single crochet and double crochet, you can make it. The six-tier table shows the stitch count after every round, so you can check your work.
Can I sell trees made from this pattern? Yes, you're welcome to sell finished trees made from this free pattern at holiday markets, on Etsy or as gifts. Please credit "Pattern by Wavode" in your listing and link back to this page. What you can't do is republish this write-up or my photos as your own pattern.
Related patterns on Wavode
- Christmas gnome wall hanging: a bobble-stitch gnome with poinsettia trim.
- Mini gnome trio: three tiny gnomes in 90 minutes.
- Cherry blossom bonsai tree: another little crochet tree, with a wired trunk.
- Crochet floral wreath: a flower wreath for the front door.
- Crochet amigurumi acorns: scrap-yarn acorns for a seasonal table.
Made a tree? Tag #wavodecrochet on Pinterest. I re-pin every finished make and credit the maker.
Pattern by Clara Hartwell for Wavode. Questions? Email me at support@wavode.com.