Sun and Moon Granny Square

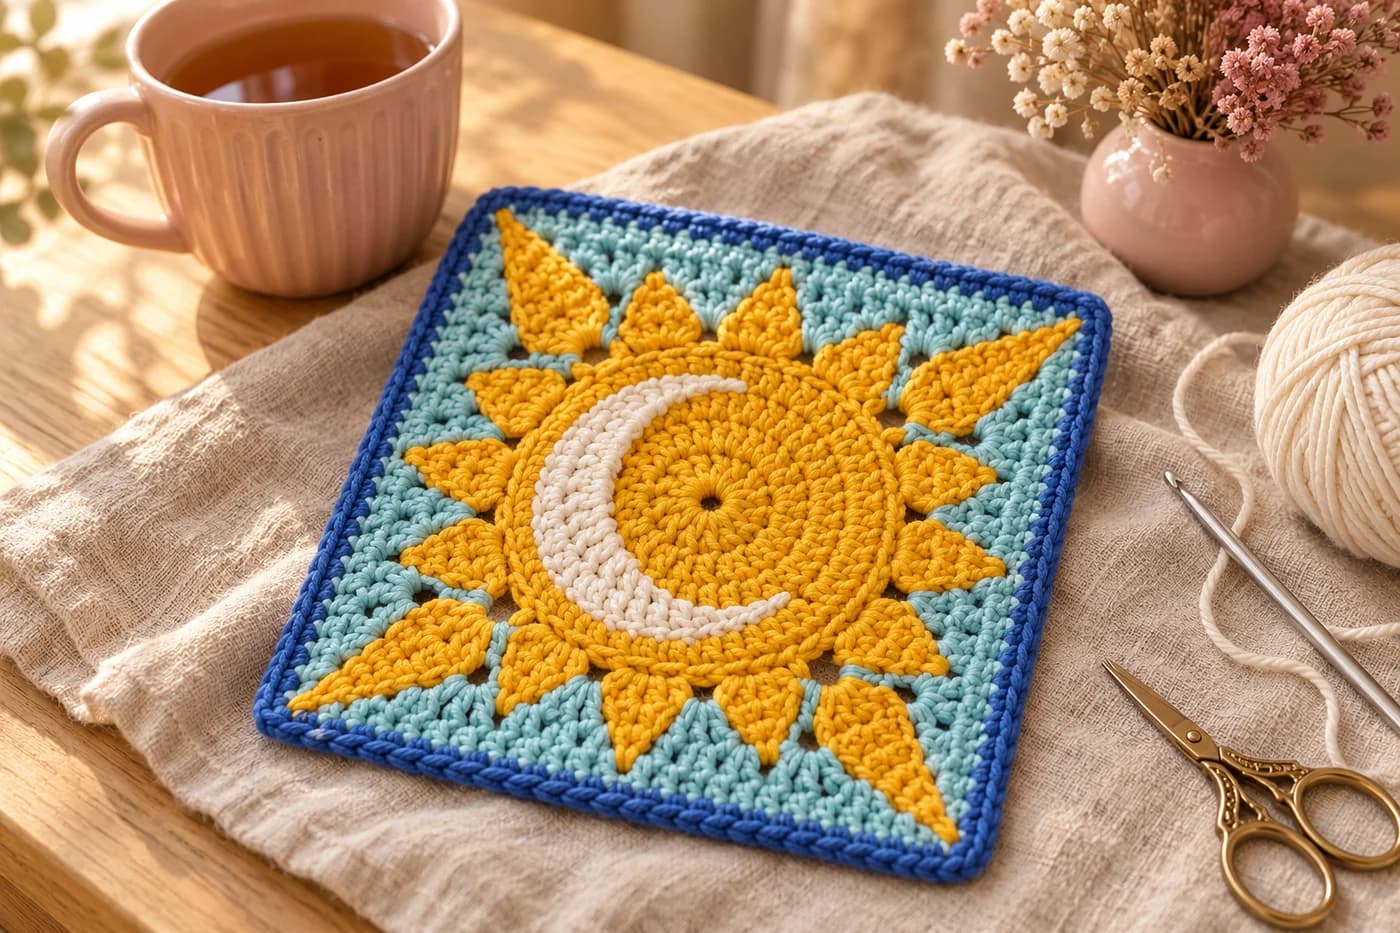
A sun with a moon tucked inside it is one of those motifs I keep coming back to, on mugs, on tarot cards, on the little enamel pin on my project bag. This free sun and moon granny square crochet pattern puts a white crescent moon inside a yellow sun, with sixteen pointed rays, a light aqua sky and a royal blue border. The moon is worked into the sun itself, two rounds of simple colour changes, so there's nothing to sew on. You'll need DK yarn in four colours, a 4 mm hook and 2 to 3 hours.
Key Takeaways
- The crescent is worked into the sun: white on a third of Round 3, then on two thirds of Round 4, centred on the same point.
- Sixteen pointed rays are worked one at a time in short rows of half double crochet, without cutting the yarn: 4 long rays point into the corners, 12 short ones sit 3 per side.
- Three aqua rounds turn the circle into a square, then one round of royal blue single crochet frames it.
- About 80 yd of DK in total for a square of about 8 in.
| At a glance | |
|---|---|
| Finished size | about 8 in (20 cm) square, after blocking |
| Yarn | DK #3: yellow, white, light aqua, royal blue |
| Hook | 4 mm (US G-6) |
| Stitches | ch, sl st, sc, hdc, dc, tr, dtr, trtr, hdc2tog |
| Techniques | colour changes in the round, short-row rays |
| Time | about 2–3 hours |
How the crescent moon hides inside the sun
A crescent is just two circles that don't share a centre. I wanted that shape without appliqué, so I let two rounds draw it. On Round 3, a third of the round is white. On Round 4, two thirds of the round is white, centred on the same point. Where both rounds are white, the moon is two rounds thick. At the ends, only Round 4 is white, so the moon thins out to two points.
The yellow centre stays a perfect circle inside the curve, and a full yellow Round 5 closes the moon in. From a step back, it reads exactly like a crescent lying against a little sun. Simple, right?
The rays are the other part I fussed over. A round of tall stitches gives you short, lacy rays. I wanted solid points, so each ray is a tiny triangle worked in short rows straight off the sun, narrowing to 1 stitch at the tip. You slip stitch back down its side and start the next one, so the yellow never gets cut. The four corner rays get 5 rows and reach deep into the corners. The twelve side rays get 3 rows. That way the sun fills the square, and the aqua has an even band to work with along each side. If you've made my sunshine amigurumi, this is the flat, blanket-ready cousin.
Yarn and hook for a sun and moon square
Yarn, DK #3. A soft cotton DK such as Paintbox Yarns Cotton DK gives crisp stitches and very clean colour changes. An acrylic DK such as Paintbox Yarns Simply DK is softer and washes easily, which I'd pick for a blanket. The amounts below are estimates worked out from the stitch counts, with extra for the tails.
| Colour | Used for | Amount |
|---|---|---|
| Sunflower yellow | Sun disc and rays | about 26 yd (24 m) |
| White | Crescent moon | about 5 yd (4.5 m) |
| Light aqua | Sky | about 40 yd (37 m) |
| Royal blue | Border | about 9 yd (8 m) |
Hook and notions
- 4 mm (US G-6) hook.
- A tapestry needle, scissors, one stitch marker and a few pins for blocking.
Tension. After Round 5, the sun disc should measure about 3¾ in (9.5 cm) across. If it's bigger, go down to 3.5 mm. If it's smaller, go up to 4.5 mm. Measure your first square before you plan a blanket: the tension decides the final size.
Stitches (US terms): ch = chain, sl st = slip stitch, sc = single crochet, hdc = half double crochet, dc = double crochet, tr = treble (yarn over twice), dtr = double treble (yarn over 3 times), trtr = triple treble (yarn over 4 times), hdc2tog = half double crochet 2 together, st = stitch, sp = space, MR = magic ring, RS = right side, WS = wrong side. The ch 3 at the start of a round counts as a dc, and the ch 5 at the start of Round 8 counts as a dtr. Rounds are joined with a sl st, and you never turn the work, except inside the rays.
UK crocheters: US sc = UK double crochet, hdc = UK half treble, dc = UK treble, tr = UK double treble.
Part 1: the sun disc and its crescent moon (Rounds 1–5)
The disc is worked in joined rounds of dc, growing by 12 stitches each round. Rounds 3 and 4 carry two colours.
Rounds 1–2, the yellow centre
With yellow, make a MR.
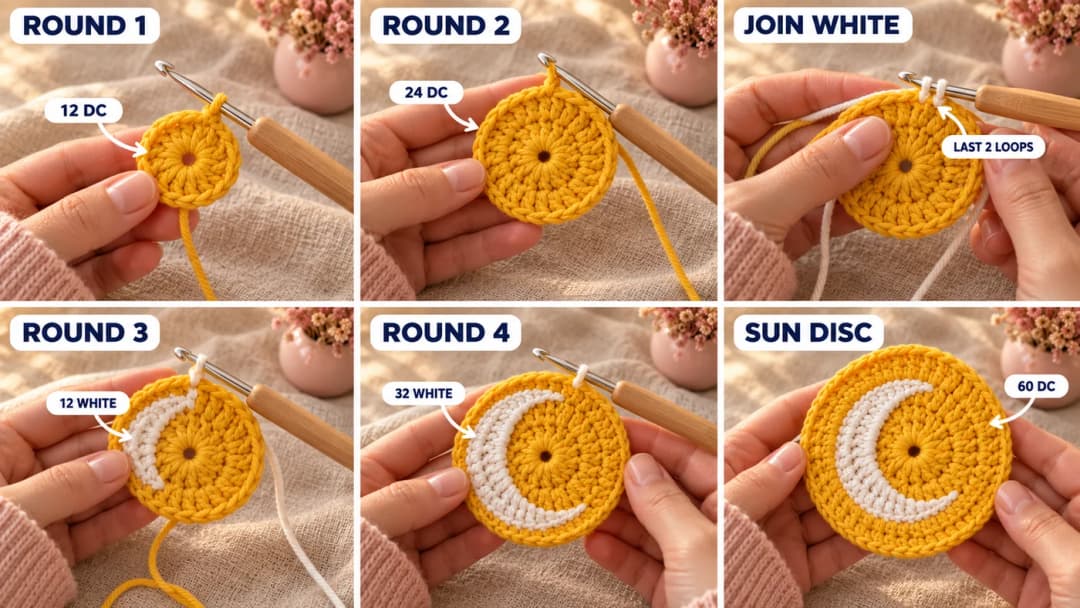
- Round 1: Ch 3, 11 dc in the ring. Pull the ring closed. Sl st into the top of the ch 3. (12 dc)
- Round 2: Ch 3, dc in the same st, 2 dc in each of the next 11 sts. Sl st into the top of the ch 3. (24 dc)
How the colour changes work
In Rounds 3 and 4 you'll switch between yellow and white. Both strands stay attached and travel with you, hidden inside the stitches.
- To change colour, work the last dc of the old colour until 2 loops are left on the hook. Finish that dc with the new colour: yarn over with it and pull it through the 2 loops.
- Carry the colour you're not using. Lay it along the top of the round below and work every dc over it, so it runs inside the stitches. The white rides along inside the yellow stitches, and the yellow inside the white ones.
- Keep the carried strand snug, not tight. Every 4 or 5 stitches, give it a gentle tug so it lies flat. Pulled too hard, it cups the disc. Too loose, it pokes out between stitches.
Tip: a little yellow peeking through the white is normal with carried colours. Holding the yarn a touch tighter on the white stitches, and tucking the carried strand right behind the hook, keeps the moon clean.
Rounds 3–4, the crescent moon
- Round 3: Yellow: ch 3, dc in the same st, dc in the next st, (2 dc in the next st, dc in the next st) 2 times. Change to white on the last dc. White: (2 dc in the next st, dc in the next st) 4 times, carrying the yellow. Change to yellow on the last dc. Yellow: (2 dc in the next st, dc in the next st) 5 times, carrying the white. Sl st into the top of the ch 3. (36 dc: 24 yellow, 12 white)
- Round 4: Yellow: ch 3, dc in the same st, dc in each of the next 2 sts, carrying the white. Change to white on the last dc. White: (2 dc in the next st, dc in each of the next 2 sts) 8 times, carrying the yellow. Change to yellow on the last dc and cut the white, leaving a 6-in (15 cm) tail. Yellow: (2 dc in the next st, dc in each of the next 2 sts) 3 times, working over the white tail for the first few sts. Sl st into the top of the ch 3. (48 dc: 16 yellow, 32 white)
Check the moon now. The white of Round 4 is worked into Round 3 from 6 stitches before its white section to 6 stitches after it, so the 12 white stitches of Round 3 sit right in the middle of the 32 white stitches of Round 4. If the moon leans to one side, count the repeats of that round again.
Round 5, closing the sun
- Round 5: Yellow: ch 3, dc in the same st, dc in each of the next 3 sts, (2 dc in the next st, dc in each of the next 3 sts) 11 times. Sl st into the top of the ch 3. (60 dc)
Don't fasten off: the yellow goes straight on into the rays. Trim the white tail later, when you weave in the ends.
Part 2: sixteen pointed rays worked in short rows
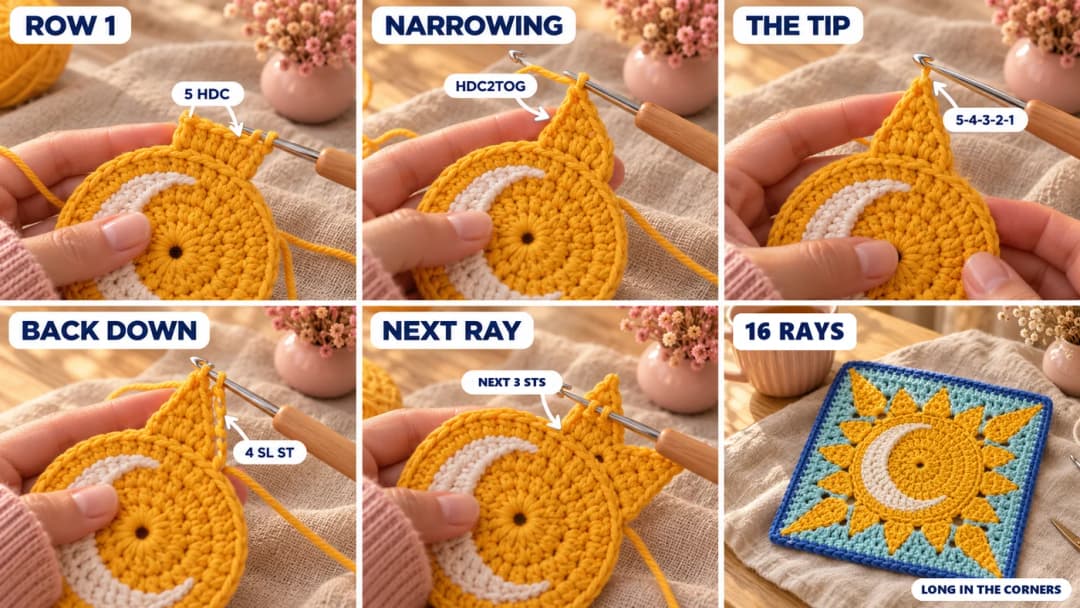
Each ray is a small triangle worked back and forth on top of Round 5, then you slip stitch back down to the sun and start the next one. The ch 1 at the start of each row doesn't count as a stitch. The rays come in 4 groups of 4: a long corner ray over 5 sts, a side ray over 3 sts, a middle ray over 4 sts and another side ray over 3 sts. That's 15 sts per group, so 4 groups use all 60 stitches. Together the rays count as Round 6.
In every ray, "the same st" in Row 1 is the stitch you're sitting in: the join of Round 5 for the very first ray, then the stitch you just slip stitched into.
Corner ray (5 rows)
- Row 1 (RS): Ch 1, hdc in the same st and in each of the next 4 sts. Turn. (5 hdc)
- Row 2 (WS): Ch 1, hdc2tog, hdc in each of the next 3 sts. Turn. (4 hdc)
- Row 3 (RS): Ch 1, hdc2tog, hdc in each of the next 2 sts. Turn. (3 hdc)
- Row 4 (WS): Ch 1, hdc2tog, hdc in the next st. Turn. (2 hdc)
- Row 5 (RS): Ch 1, hdc2tog, ch 1. Don't turn. (1 st, the tip)
Going back down. Sl st once into the side of each of Rows 4, 3, 2 and 1, down the edge of the ray nearest the next free stitches of Round 5. Then sl st in the next free st of Round 5. (4 sl st down the side, 1 into Round 5)
Side ray (3 rows)
- Row 1 (RS): Ch 1, hdc in the same st and in each of the next 2 sts. Turn. (3 hdc)
- Row 2 (WS): Ch 1, hdc2tog, hdc in the next st. Turn. (2 hdc)
- Row 3 (RS): Ch 1, hdc2tog, ch 1. Don't turn. (1 st, the tip)
Going back down. Sl st once into the side of each of Rows 2 and 1, then sl st in the next free st of Round 5. (2 sl st down the side, 1 into Round 5)
Middle ray (3 rows)
- Row 1 (RS): Ch 1, hdc in the same st and in each of the next 3 sts. Turn. (4 hdc)
- Row 2 (WS): Ch 1, hdc2tog twice. Turn. (2 hdc)
- Row 3 (RS): Ch 1, hdc2tog, ch 1. Don't turn. (1 st, the tip)
Going back down. Like the side ray: 2 sl sts down the side, then sl st in the next free st of Round 5.
Working all sixteen
Work a corner ray, a side ray, a middle ray and a side ray. Work this group of 4 rays 4 times in total, for 16 rays. After the very last side ray, its 2 sl sts down the side bring you to the base: instead of a new st, sl st into the same st as the first hdc of the first corner ray. Fasten off and weave in the yellow and white tails.
Tip: the decrease always goes at the start of the row, so it switches sides from row to row and the point lands in the middle. If your tips lean all one way, check you're not decreasing at the end of a row instead.
Lay the sun flat. The rays should touch each other at the base, with a small V of space between them. The corner rays are about 1¼ in (3 cm) long, and the side and middle rays about ¾ in (2 cm).
Part 3: an aqua sky that squares the circle
Three aqua rounds turn a round sun with pointy edges into a flat square. The four long rays point into the corners, and the twelve short ones sit three per side.
Before you join the aqua, turn the sun the way you like it. I hold it with the moon on the left, curving around the yellow centre and opening to the right, so it looks like a moon about to rise.
Round 7, ray tip to ray tip
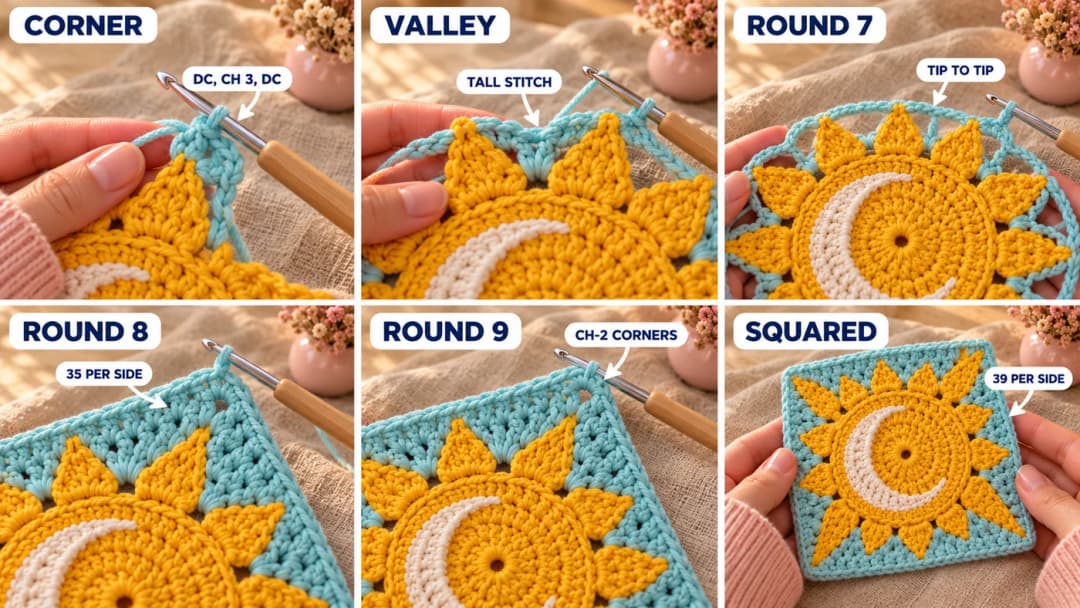
Each "valley" below is the V between two rays. Work the tall stitch in the valley into the top of Round 5, between the last hdc of one ray and the first hdc of the next.
- Round 7: Join aqua with a sl st in the ch-1 tip of any corner ray. Ch 6, dc in the same tip (first corner). *Ch 6, trtr in the next valley, ch 3, sc in the tip of the side ray, ch 3, dtr in the next valley, ch 3, sc in the tip of the middle ray, ch 3, dtr in the next valley, ch 3, sc in the tip of the side ray, ch 3, trtr in the next valley, ch 6, (dc, ch 3, dc) in the tip of the next corner ray.* Work from * to * 4 times in total, but on the 4th time stop after the last ch 6 and sl st into the 3rd ch of the beginning ch-6 instead of working the corner. (36 sts: 8 dc, 12 sc, 8 trtr, 8 dtr, with 8 ch-6 sps, 24 ch-3 sps and 4 corner sps)
The first 3 ch of the ch 6 count as the first dc of the corner, and the last 3 ch make the corner space.
Why different heights? The valleys on each side of a corner ray sit deepest, far from the edge of the future square, so they get the tallest stitch, a trtr. The two valleys around the middle ray are closer to the edge, so a dtr is enough. The longer ch 6 bridges the wide gap between a corner tip and its valley.
Round 8, filling in the corners
- Round 8: Sl st into the corner sp. Ch 5, (dtr, ch 3, 2 dtr) in the same sp. *Dtr in the next dc, 5 dtr in the next ch-6 sp, dtr in the trtr, 2 tr in the next ch-3 sp, tr in the sc, 2 tr in the next ch-3 sp, tr in the dtr, (tr, dc) in the next ch-3 sp, dc in the sc, (dc, tr) in the next ch-3 sp, tr in the dtr, 2 tr in the next ch-3 sp, tr in the sc, 2 tr in the next ch-3 sp, dtr in the trtr, 5 dtr in the next ch-6 sp, dtr in the next dc,* (2 dtr, ch 3, 2 dtr) in the next corner sp. Work from * to * 4 times in total, but on the 4th time stop after the last "dtr in the next dc" and sl st into the top of the ch 5. (140 sts: 35 per side between the ch-3 corners)
The stitches climb high around each corner ray, settle to tr along the short rays and dip to a dc over the middle ray. That uneven line is what makes the next round straight. Don't worry if the square looks a little bumpy right now.
Round 9, the straight side
- Round 9: Sl st in the next dtr and into the corner ch-3 sp. Ch 3, (dc, ch 2, 2 dc) in the same sp. *Dc in each of the next 35 sts, (2 dc, ch 2, 2 dc) in the next corner sp.* Work from * to * 3 times in total, then dc in each of the next 35 sts. Sl st into the top of the ch 3. Fasten off. (156 dc: 39 per side between the ch-2 corners)
Check the sides after Round 9. Lay the square flat. If one side ruffles, you've likely worked into a ch-3 sp twice in Round 8. If it pulls in and cups, check the 5 dtr in the two ch-6 sps next to each corner: they're the ones that are easy to shortchange.
Part 4: the royal blue border, then blocking
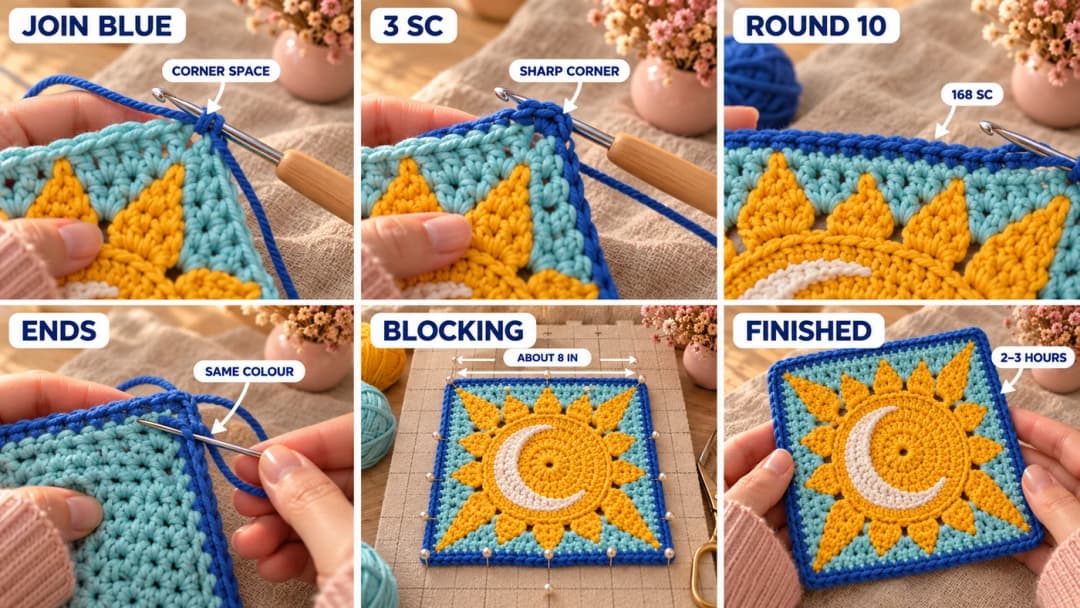
- Round 10: Join royal blue with a sl st in any corner ch-2 sp. Ch 1, 3 sc in the same sp. *Sc in each of the next 39 sts, 3 sc in the next corner sp.* Work from * to * 3 times in total, then sc in each of the next 39 sts. Sl st into the first sc. Fasten off. (168 sc: 41 per side, counting the corner sc on each end)
Weave in every tail through stitches of its own colour, so no yellow or blue shows through the aqua.
Block it. Pin the square to about 8 in (20 cm), RS up, with straight sides and square corners. Pin the tip of each ray flat too, so it points cleanly. Spritz it with water or hold a steam iron about 1 in above it (for acrylic, never touch the iron to the yarn), and let it dry completely before you unpin it. Blocking is what evens out the slightly wavy sides from Round 8.
Sun and moon squares in a blanket or a pillow
One square makes a sweet coaster for a big mug, a mini wall hanging or the front of a pouch. Four squares, two by two, make a pillow front of about 16 in (40 cm).
For a blanket, I'd alternate sun and moon squares with plain squares in the same aqua, so each sun has room to breathe. A plain square is just a classic granny square worked to the same 8 in: make it with my solid granny square method and stop when it matches. A throw of 6 × 8 squares comes to about 48 × 64 in (122 × 163 cm). Join the squares with a whipstitch through the back loops of the blue border, or with a row of royal blue sc on the wrong side for a ridge you can see.
For a bigger square, work the same rounds in worsted yarn with a 5 mm hook. It comes out around 9½ in (24 cm). Measure the sun after Round 5 to be sure, and plan about 25% more yarn per colour.
Prefer a night-sky version? Swap the aqua for navy and the border for a soft gold, and the sun turns into a little celestial badge. It would sit nicely next to my sleepy bear on the moon in a nursery.
Sun and moon square questions
Can I work the crescent without carrying the yarn? You can cut the white at the end of its section in Round 3 and join it again where Round 4 needs it, then carry only the yellow. You'll have two more tails to weave in. The yellow still has to travel inside the white stitches, because it's needed again on the other side of the moon.
Why does my square cup in the middle? Usually the carried strand in Rounds 3 and 4 is too tight. Undo to Round 3 and give the strand more slack, or go up half a hook size for those two rounds only.
Can I sell the squares I make? Yes, you're welcome to sell finished squares, pillows or blankets made from this free pattern. Please credit Wavode and link back to this page. Please don't republish the pattern text or my photos.
A single sun and moon square, tied to a gift with a strand of the royal blue, makes a lovely little "good morning, good night" present. Made one? Tag #wavodecrochet on Pinterest: I love seeing them.