Mini Strawberry Crochet Pouch

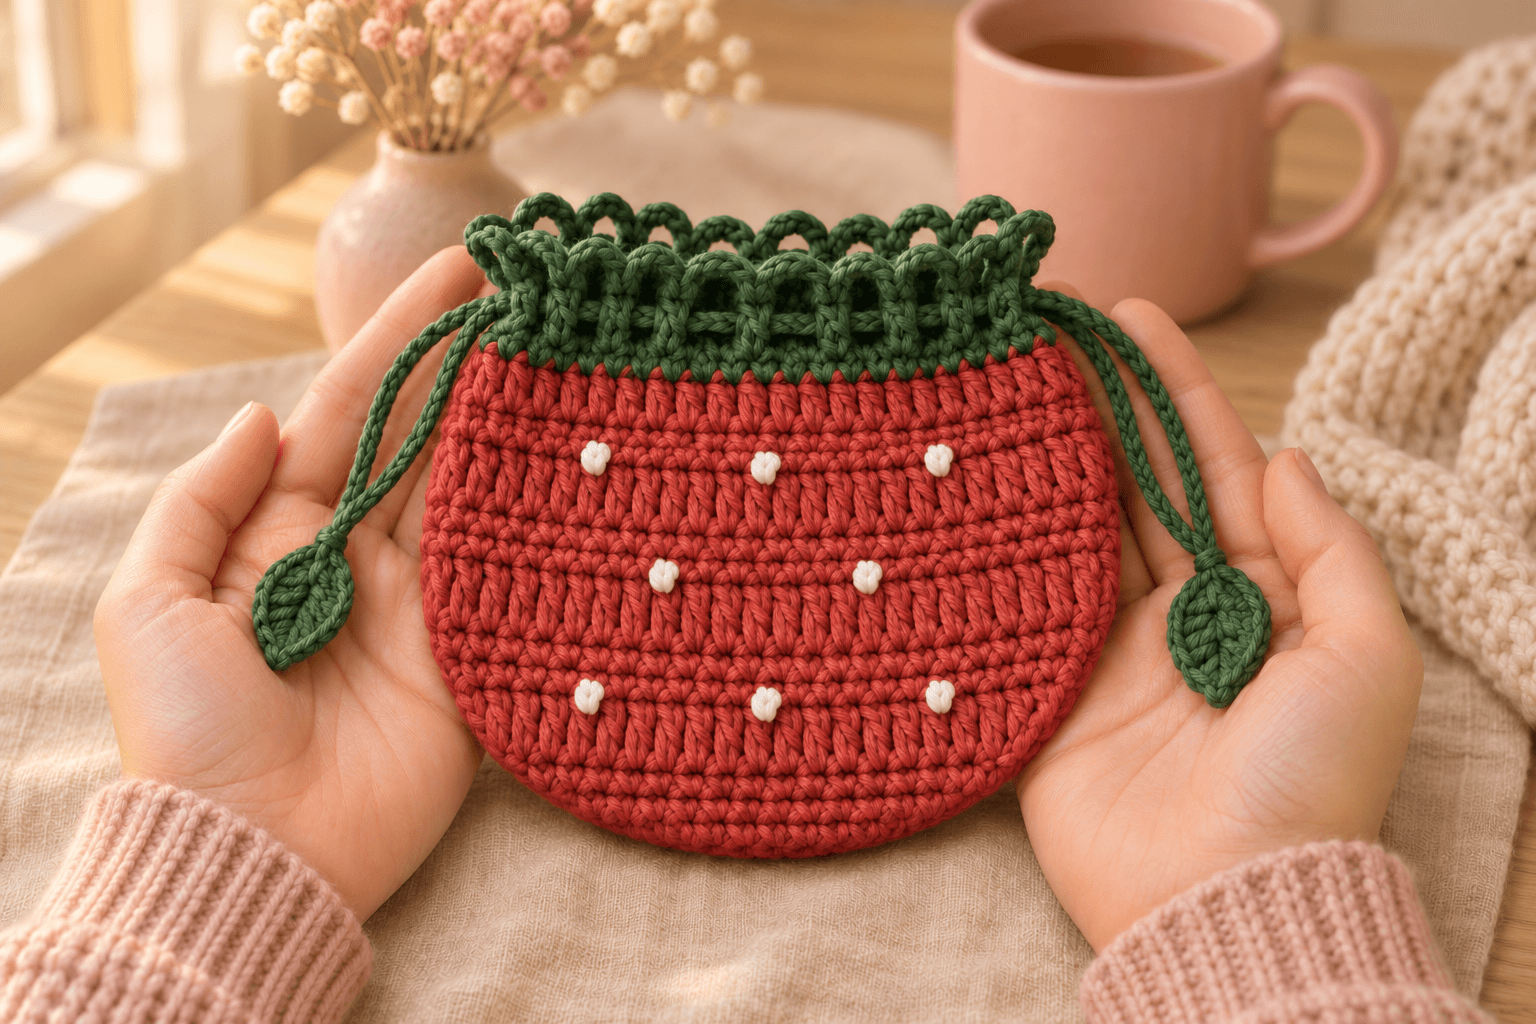
I like a little pouch that opens wide enough to see what's hiding at the bottom. This strawberry crochet pouch is about 5 in (12.7 cm) wide when laid flat, with white seeds tucked between rows of red double crochet. The green top gathers when you pull the leaves apart.
The oval base grows straight into the sides. I keep the seeds small: each one is a single white stitch, with red stitches between them. The leafy pulls are crocheted into the cords, so finishing means threading the opening and weaving in the yarn ends.
| At a glance | |
|---|---|
| Finished size | about 5 in (12.7 cm) wide laid flat; height depends on your double crochet |
| Yarn | DK #3 cotton in red, deep green and white |
| Hook | 4 mm (G/6) throughout |
| Pieces | 3 |
| Time | about 2–3 hours |
| Skill | easy: working around a chain, joined rounds, color changes, sc, hdc and dc |
Yarn, hook and sizing for the strawberry pouch
I like smooth cotton here: the white seeds stay crisp, and the cords slide through the green opening. My yarn choice for this version is Paintbox Yarns Cotton DK, a 100% cotton DK #3 yarn with 137 yd (125 m) per 50 g ball. Choose red, deep green and white.
- Yarn amounts: allow about 35 yd red, 30 yd green and 3 yd white. These are stitch-based estimates, with extra for the taller stitches, carried yarn and finishing.
- Hook: 4 mm (G/6) for the pouch, edging, leaves and cords.
- Small things: 3 locking stitch markers, a tapestry needle and scissors. A small safety pin helps with threading.
Tension: about 4 sc per inch (2.5 cm), measured flat and unstretched. Make a small single-crochet swatch first and adjust your hook if needed. The pouch has 40 stitches around, giving an estimated flat width of about 5 in (12.7 cm). Double-crochet height varies, so measure the finished pouch from the base to the green edging.
I'd tuck hair ties, a small tin of stitch markers or a wrapped little gift inside. The double-crochet rows have gaps; keep loose needles and tiny jewelry inside a separate closed container.
Stitches and color changes for the white seeds
Abbreviations: ch = chain; sl st = slip stitch; sc = single crochet; hdc = half double crochet; dc = double crochet; st = stitch; R = round. The number in parentheses is the finished stitch count. A chain space is the opening underneath a chain between two stitches.
Work in joined rounds, without turning. Mark the first actual stitch and move the marker up each round. The starting ch 1 or ch 2 and the joining sl st do not count as stitches. R9 has its own starting-chain convention, explained there.
Switching from red to white
Work the red sc before a seed until two loops remain on the hook. Yarn over with white and pull through both loops. Work one white sc, finishing its last pull-through with red. The stitch itself stays white while the loop ready for the next stitch is red.
Lay the unused strand along the inside edge and crochet over it. Ease the fabric flat after each seed so the carried strand stays relaxed. At the end of each seed round, cut white with a 6 in (15 cm) tail and weave it through the stitches inside. Rejoin white for the next seed round.
Tip. A tight carried strand makes the pouch gather before the drawstrings go in. Spread the red stitches along it gently before continuing.
Part 1 — The strawberry pouch’s oval base
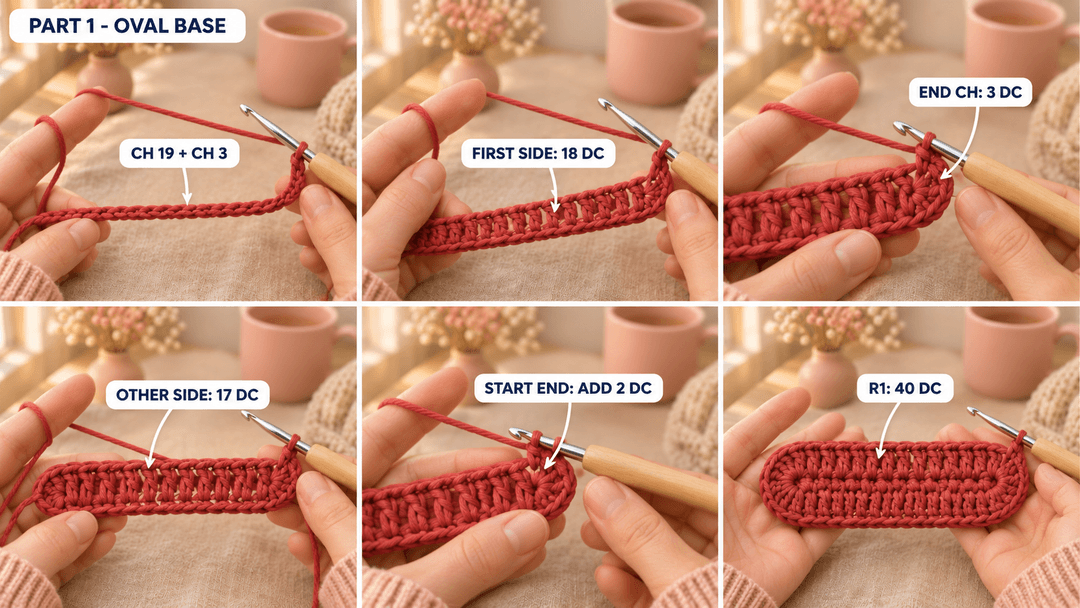
Pouch — red, then green; 4 mm hook; Make 1. Leave a 6 in (15 cm) starting tail. Ch 19, then ch 3 for height: 22 chains altogether. The foundation chain runs along the bottom of the pouch; the last green round will become the top opening.
- R1: dc in the 4th ch from the hook, dc in the next 17 ch, 3 dc in the last ch; working along the other side of the foundation chain, dc in the next 17 ch, 2 dc in the same foundation ch as the first dc. (40)
Mark the first dc and join to it with a sl st. The three skipped chains sit beside this first dc and stay outside the stitch count.
Here's the turn around the foundation slowly:
- Work the first dc, then 17 more along the chain.
- Put 3 dc into the far end chain. Turn the work in your hands so the unused side of the foundation faces you.
- Work 17 dc back toward the starting end, into the unused loops.
- Put 2 dc into the same chain that holds the first dc. Join to the marked stitch.
Flatten the oval with the little join near one curved end, at the side of the pouch. Work the next round into the tops of the 40 dc. Leave the foundation chain underneath.
Part 2 — Red sides with staggered white seeds
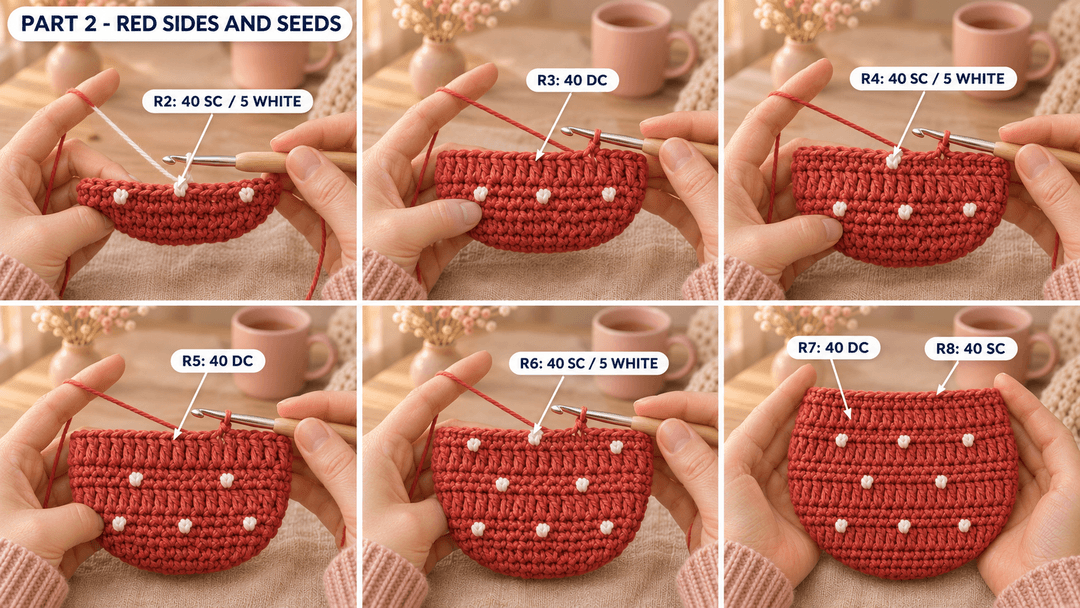
Continue from the base with red. Keep the right side facing outward as the sides rise. All seed stitches are sc; the plain red rounds between them are dc.
- R2: ch 1, sc 2, (sc, sc 7) × 4, sc, sc 5. (40)
- R3: ch 2, dc around. (40)
- R4: ch 1, (sc 7, sc) × 5. (40)
- R5: ch 2, dc around. (40)
- R6: ch 1, sc 2, (sc, sc 7) × 4, sc, sc 5. (40)
- R7: ch 2, dc around. (40)
- R8: ch 1, sc around. (40)
Color placement: in R2 and R6, work stitches 3, 11, 19, 27 and 35 in white, with every other stitch red. In R4, work stitches 8, 16, 24, 32 and 40 in white, with every other stitch red. R3, R5, R7 and R8 are entirely red.
Join every round to its first actual stitch with a sl st. In R2 and R6, change to white on the last pull-through of red stitch 2. In R4, make that first change on red stitch 7. Keep changing on the stitch immediately before each new color.
After R2, R4 and R6, finish the joining sl st in red and secure the white end inside. Keep red attached through R8. At the end of R8, change to green on the joining sl st, then cut red with a 6 in (15 cm) tail.
Tip. The joining sl st can look like an extra stitch. Stop at the stitch just before it, then join to the marker. The pouch stays at 40 stitches around.
The green drawstring opening and leafy edging
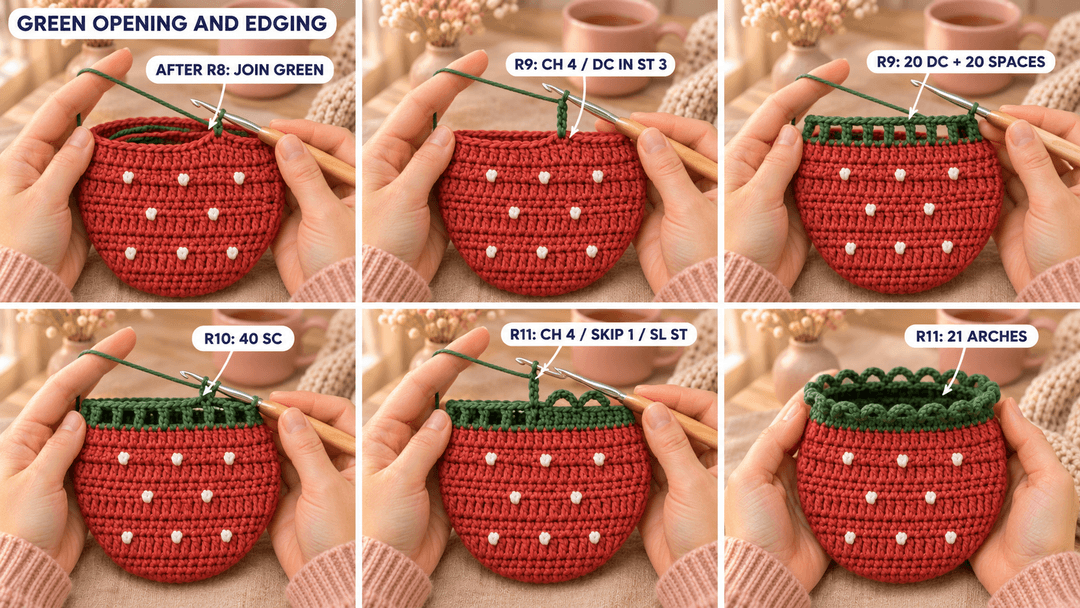
Continue with green and the same hook. Lay the red and green tails along the inside and work over them for a few stitches, then weave them in securely. For R9, the starting ch 4 stands above stitch 1 of R8: skip stitch 2 and put the first actual dc into stitch 3.
- R9: ch 4, skip the next st, dc in the next st, (ch 1, skip the next st, dc in the next st) × 18, ch 1, skip the last st; sl st in the 4th starting ch. (40)
For this round, the starting ch 4 stands for one dc and one ch-1 space above the first stitch of R8. Skip the second stitch and put the first actual dc into stitch 3. Mark the fourth starting chain before continuing. The finished opening has 20 dc positions and 20 ch-1 spaces.
- R10: ch 1, sc in the first ch-1 space, (sc in the next dc, sc in the next ch-1 space) × 19, sc in the top of the starting ch-3 column. (40)
Join R10 to the first sc. The first space is underneath the marked fourth chain where R9 was joined. Work under that chain, then alternate between dc tops and spaces around the opening. The last sc goes into the third starting chain of R9.
For R11, start with the first sc of R10 as the anchor. Skip stitch 2 and put the first sl st into stitch 3.
- R11: (ch 4, skip the next st, sl st in the next st) × 20, ch 4, sl st into the same stitch as the preceding sl st. (21 arches)
The last of the first 20 arches lands back at stitch 1. The final arch shares that anchor, giving the little doubled loop at the join. Ch 1, fasten off with a 6 in (15 cm) tail and weave it inside the green band.
Making and threading the two leafy drawstrings
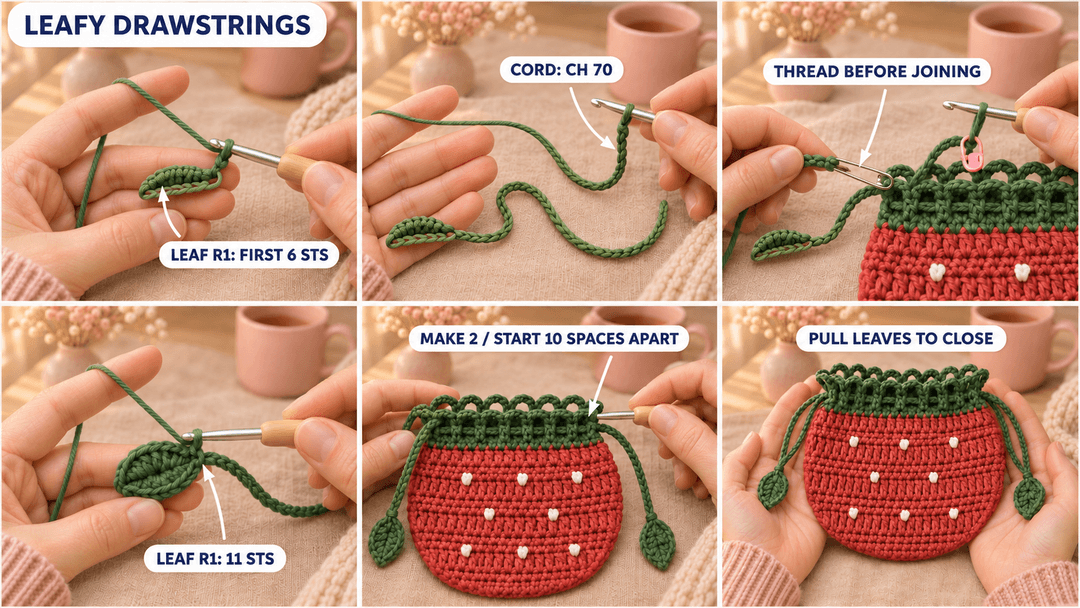
Leafy drawstring — green, 4 mm hook; Make 2. Each leaf is worked around a short chain. Pause halfway around it to make and thread the cord, then return to finish the leaf.
- R1: work the leaf and its cord in the six steps below. (11)
- Start the leaf. Leave a 6 in (15 cm) tail and ch 6. Sc in the second chain from the hook and mark this sc. Hdc in the next chain, dc in the next, hdc in the next, then 2 sc in the last chain. Keep the unused side of the foundation facing you.
- Make the cord. From the last sc, ch 70. Enlarge the working loop and secure it with a locking marker. Cut the working yarn, leaving 24 in (61 cm) beyond that loop for completing the leaf.
- Thread before closing the loop. Flatten the pouch with the base join at one side. Start at a ch-1 opening at that side of R9. Pass the cord's working-loop end through the 20 openings, alternating outside and inside, until it comes back beside the leaf. Keep the leaf outside the pouch and the cord untwisted. A safety pin through the secured loop helps guide it.
- Rejoin at the leaf. Remove the marker from the working loop and place it on the hook. Using the long cut end as working yarn, sl st into the last sc made before the cord. Keep that join snug enough to hold, while allowing the cord to slide through the pouch.
- Finish the other side. Sc once more into the same end foundation chain that already holds 2 sc. Work along the unused side of the chain: hdc in the next chain, dc in the next, hdc in the next and sc in the last chain. Sl st to the marked first sc.
- Secure the ends. Ch 1, fasten off and weave both tails back and forth through the leaf. Make the second drawstring the same way, starting its threading at the opening 10 spaces around from the first cord's starting opening, on the opposite side.
Pull the leaves gently away from each other. The green band gathers between them, and each leaf stays outside its own side of the pouch. To open it, ease the gathers apart with your fingers.
Tip. Keep the chain cords loose enough to bend easily. If a join catches in an opening, check that the cord is threaded through the ch-1 spaces below the edging, rather than through the small scallops.
Safety. The drawstring loops make this pouch unsuitable as a toy for babies or toddlers. Keep it for storing small belongings.
Keeping your strawberry pouch in shape
Follow the care instructions on your yarn label. Ease the cords open before washing, reshape the damp pouch with your hands and let it dry flat. Smooth the leaves between your fingers so the wider middle and narrow ends show clearly.
I like this one as a little gift bag, with a wrapped treat or a tin of stitch markers inside. Leave the leaves hanging at opposite sides when you tie on a gift tag: they're the nicest part of the wrapping.
UK terms: US sc = UK dc, US hdc = UK htr, and US dc = UK tr.
Made a strawberry pouch? Tag #wavodecrochet on Pinterest so I can see your colors.