Gingham and Daisy Baby Blanket | Free Crochet Pattern

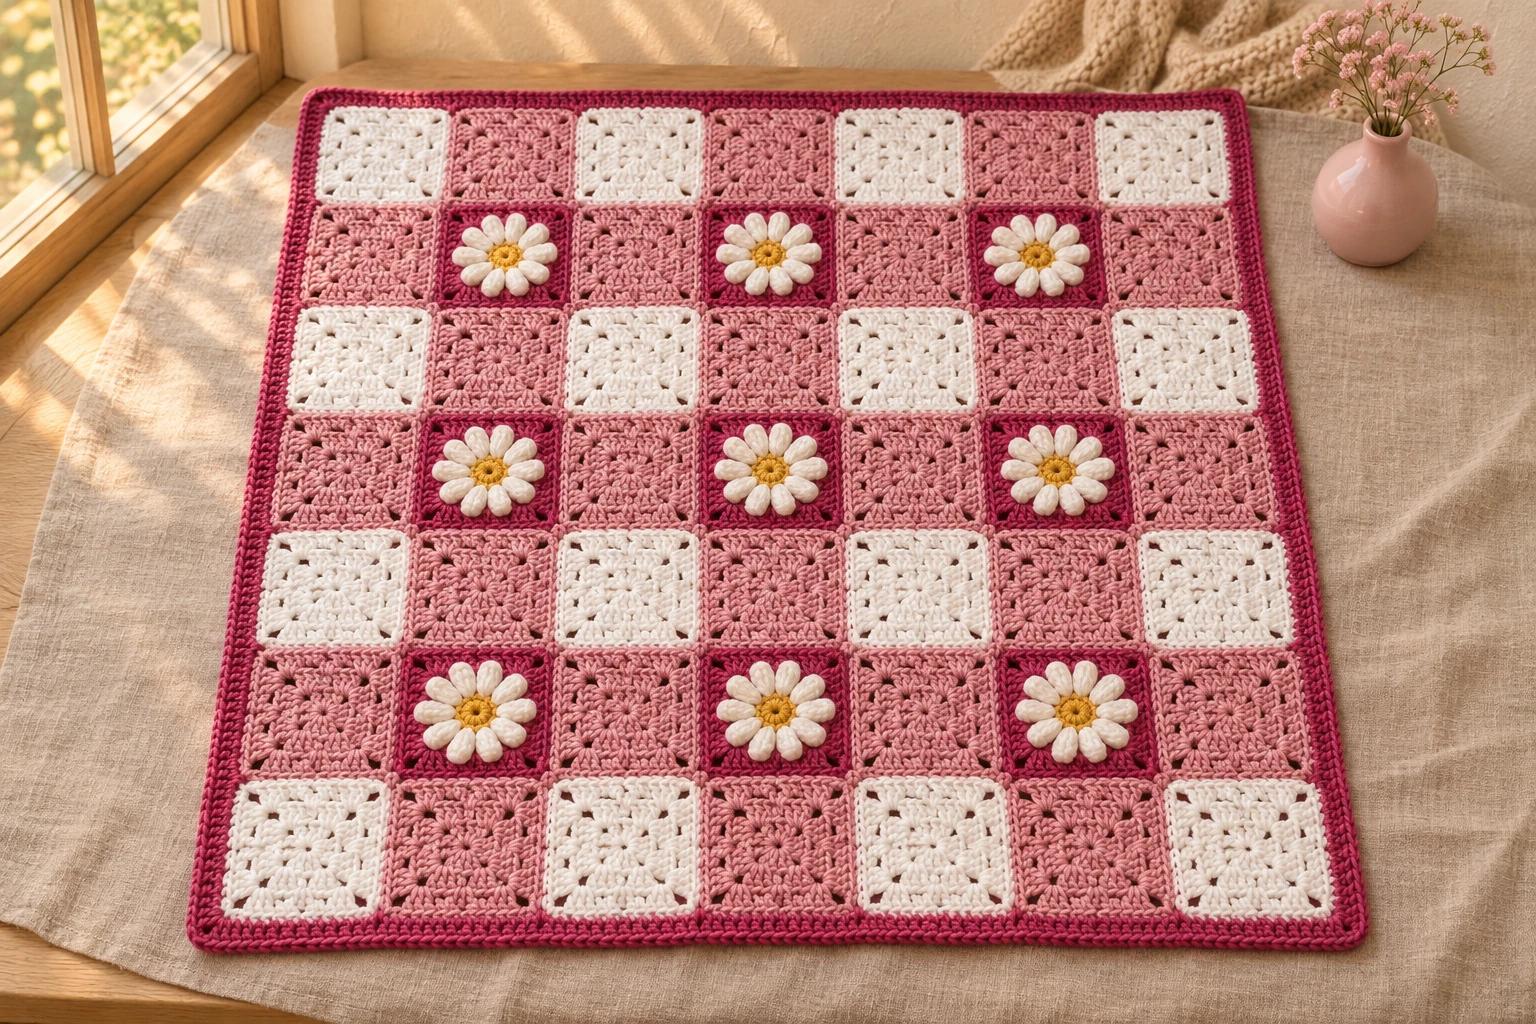
Dusty pink squares run through every row of this gingham and daisy baby blanket. In one row they alternate with white squares. In the next, they sit between raspberry squares with raised white daisies.
Both square styles end with 12 stitches per side, so the edges line up when you sew them together. Three rounds of raspberry linen stitch finish the blanket.
| At a glance | |
|---|---|
| Finished size | About 30 × 30 in (76 × 76 cm), estimated with the border |
| Yarn | Worsted #4 aran acrylic in dusty pink, white, raspberry and golden yellow |
| Hook | 5 mm (H/8) |
| Pieces | 49 squares on a 7 × 7 grid |
| Time | A multi-session project |
| Skill | Intermediate. Joined rounds, treble crochet popcorns and mattress stitch |
Yarn, hook and sizing for the 49-square baby blanket
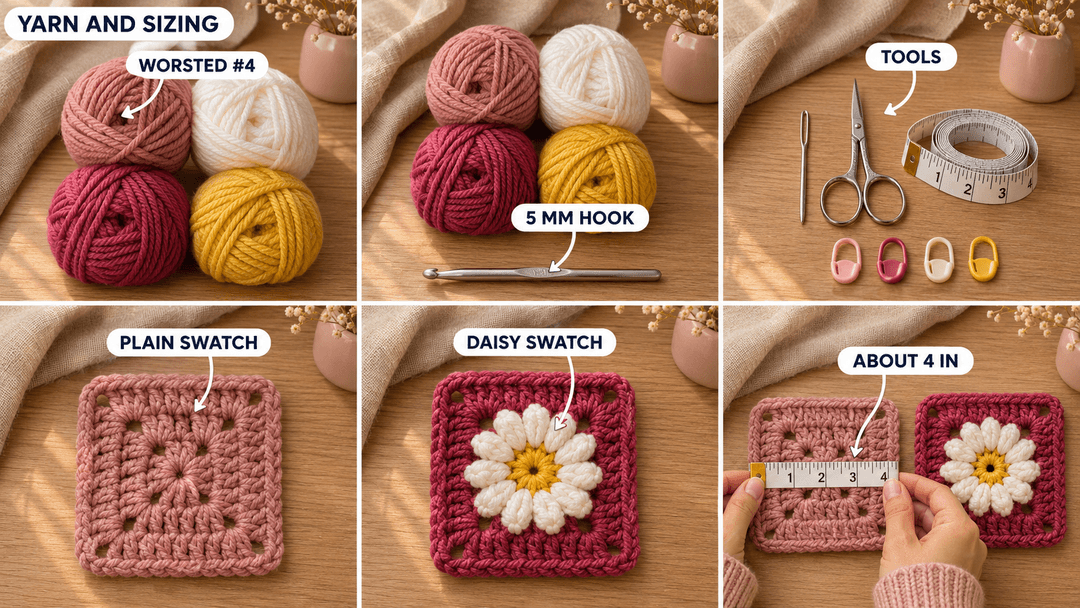
- Yarn: Paintbox Yarns Simply Aran, 100% acrylic, 201 yd (184 m) per 100 g. Allow about 305 yd dusty pink, 235 yd white, 175 yd raspberry and 15 yd golden yellow, including joining and finishing.
- Hook: 5 mm (H/8) throughout.
- Tools: Tapestry needle, scissors, a tape measure and removable stitch markers.
Gauge and size. The planning gauge is about 3 sc per inch (2.5 cm) in flat fabric. Crochet and block one of each square before making the rest. A square about 4 in (10 cm) across gives a 28 in (71 cm) grid before the border. Measure the whole square from edge to edge and lay the two types together to check that the corners line up.
For a larger baby blanket, 35 in (89 cm) square is a sizing reference. To keep seven squares across with a border about 1 in (2.5 cm) deep on each edge, aim for squares about 4¾ in (12 cm) across and recheck how much yarn one of each uses.
US terms: ch (chain), sl st (slip stitch), sc (single crochet), dc (double crochet), tr (treble crochet), st (stitch), ch-sp (chain space). The numbers in parentheses count stitches as specified beside each round. The squares are worked in joined rounds with the same face toward you. Mark the first stitch if the join is hard to spot.
Making the solid granny squares in pink and white
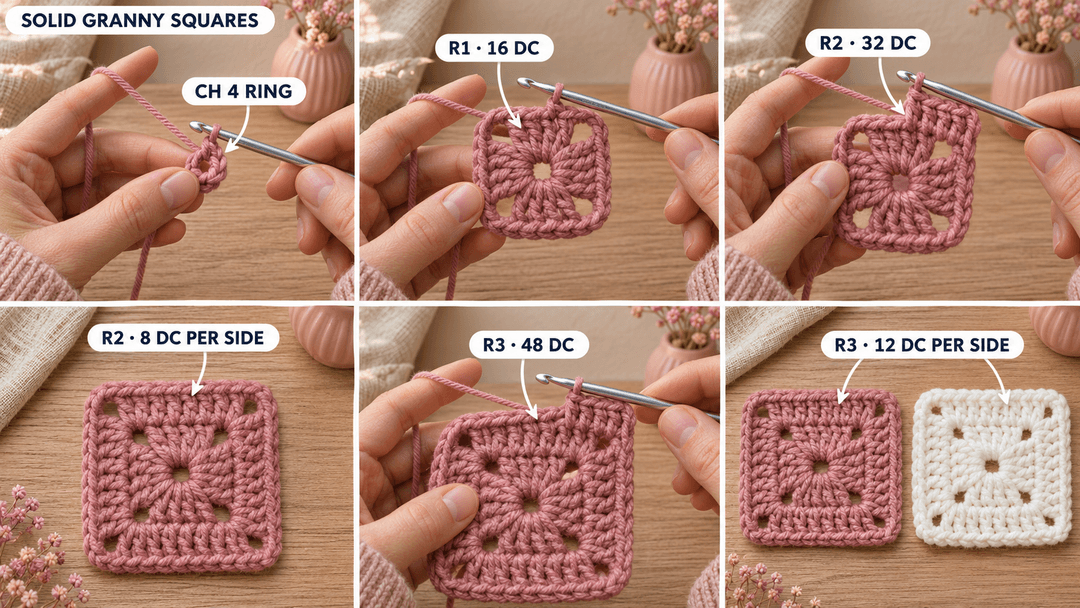
Solid squares (dusty pink and white, 5 mm, Make 40). Crochet 24 in dusty pink and 16 in white. The starting ring sits in the middle and R3 forms the four edges. Ch 4 and sl st in the first ch to make a ring. The beginning ch 3 counts as the first dc of each round.
- R1: Into the ring, ch 3, 3 dc, ch 2, then (4 dc, ch 2) × 3 in the ring. Sl st in the top of the beginning ch 3. (16) 4 dc between each pair of ch-2 corners.
- R2: Ch 3 in place and dc in the next 3 dc. Work (2 dc, ch 2, 2 dc) in each corner and dc in each dc across the next three sides, working the fourth corner just before the join. Sl st in the top of the beginning ch 3. (32) 8 dc per side.
- R3: Ch 3 in place and dc in the next 7 dc. Work (2 dc, ch 2, 2 dc) in each corner and dc in each dc across the next three sides, working the fourth corner just before the join. Sl st in the top of the beginning ch 3. (48) 12 dc per side.
Fasten off and weave the tails into the back. I nudge the corner stitches aside to find the first dc tucked underneath.
Working the 12 popcorn petals into each raspberry daisy square
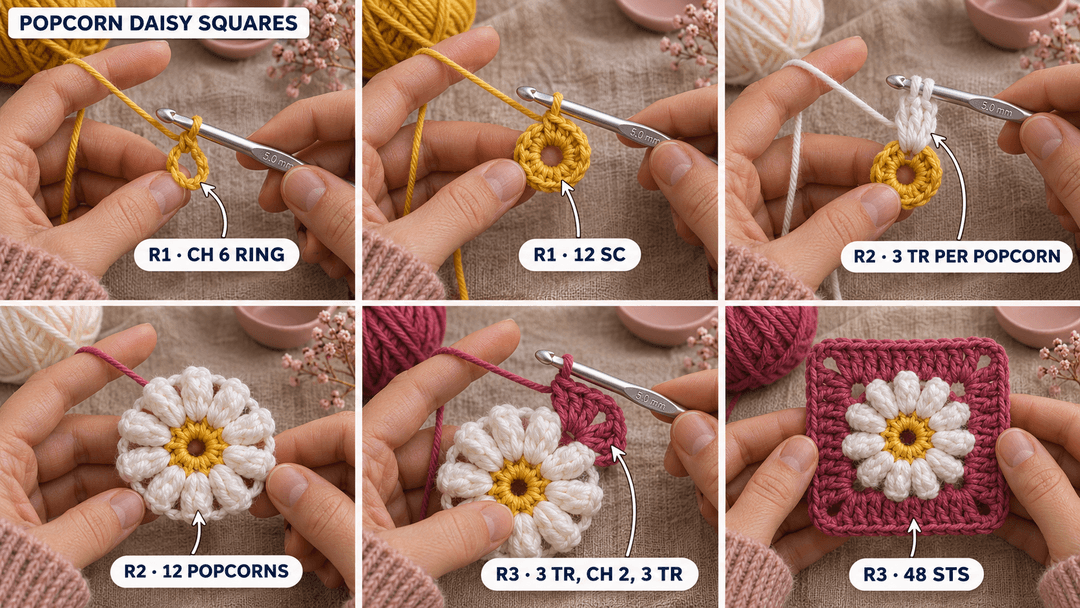
Daisy squares (golden yellow, white and raspberry, 5 mm, Make 9). The yellow ring is the center of the flower. R3 surrounds the raised petals and makes the square edge.
Popcorn. Work 3 tr into one stitch. Pull the working loop up a little and take the hook out. Insert the hook from front to back under both top loops of the first tr. Catch the dropped loop and pull it through. The three trebles bunch up like a little folded petal. Push it toward the front with your thumb.
- R1: With golden yellow, ch 6 and sl st in the first ch to make a ring. Ch 1, then work 12 sc into the ring. Sl st in the first sc and fasten off. (12) The starting ch 1 is for height.
- R2: Draw white through any sc and ch 2 for height. In that same sc, make 1 popcorn and ch 2. Work (1 popcorn in the next sc, ch 2) × 11. Sl st into the top of the first popcorn and fasten off. (12) 12 popcorns with a ch-2 space after each.
- R3: Draw raspberry through any ch-2 sp. In that space work (ch 4, 2 tr, ch 2, 3 tr). Work 3 dc in each of the next two ch-2 spaces. Repeat the following sequence 3 times around: (3 tr, ch 2, 3 tr) in the next space, then 3 dc in each of the next two spaces. Sl st in the top of the beginning ch 4. (48) The ch 4 counts as a tr. Each side has 3 tr, 6 dc and 3 tr between its two new corner spaces.
Fasten off at the outer edge. Weave the yellow and white ends into the backs of their own rounds and the raspberry end into its edge.
Laying out the seven gingham rows
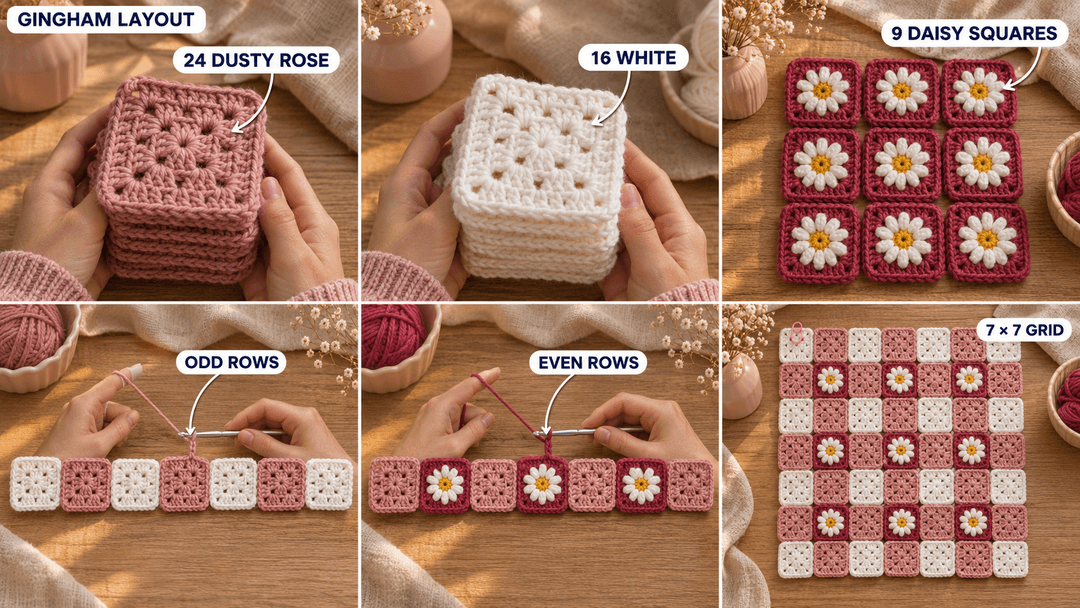
Spread the squares out with the flowers facing up. Mark the white square in the upper left so you have a starting corner when you move the blanket.
| Rows, top to bottom | Squares, left to right |
|---|---|
| 1, 3, 5 and 7 | White · Pink · White · Pink · White · Pink · White |
| 2, 4 and 6 | Pink · Daisy · Pink · Daisy · Pink · Daisy · Pink |
Set one plain square alongside one daisy square before sewing. If the sizes differ slightly, block them to the same shape and let them dry before laying out the grid again.
Joining the gingham squares with mattress stitch
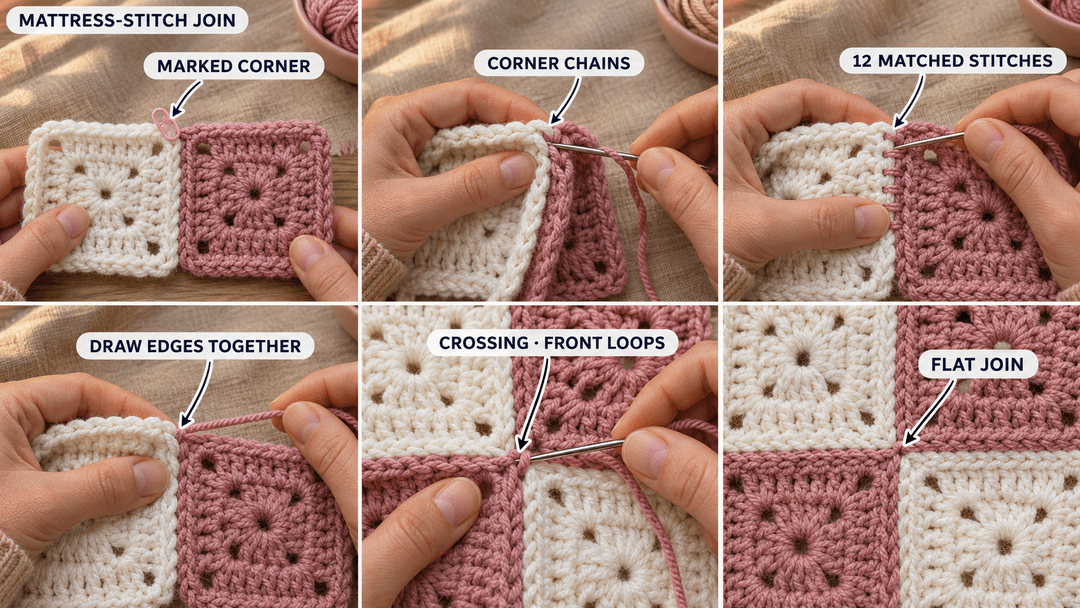
- Start at the marked corner. Take the first two squares that share a seam and hold their wrong sides together. Thread a tapestry needle with dusty pink yarn about three times the length of the run you're sewing. Leave a tail to weave in.
- Sew from corner to corner. Start by running the needle through the back loops of the two corner chains on one square, then do the same on the other. Sew back and forth across the gap, picking up the back loops of the 12 matching edge stitches. At the far corner, work through the two corner chains of each square. Give the yarn a gentle tug every few stitches, just until the edges touch.
- Cross the first set of seams. Sew the six parallel seams in one direction, then turn the blanket and sew the six that cross them. At each intersection, pass the needle through the exposed front loops of the corner chains around the meeting point. Draw the center together gently and return to the back loops for the next edge.
Crochet join option. With right sides together and dusty pink on the hook, work 1 sc through both corner spaces, 1 sc through each of the 12 matched stitch pairs, then 1 sc through both far corner spaces. Continue in the same order as the sewn join. At a crossing, use ch 1 if you need slack between the sc in the two adjacent corner pairs.
Adding the three-round raspberry linen-stitch border
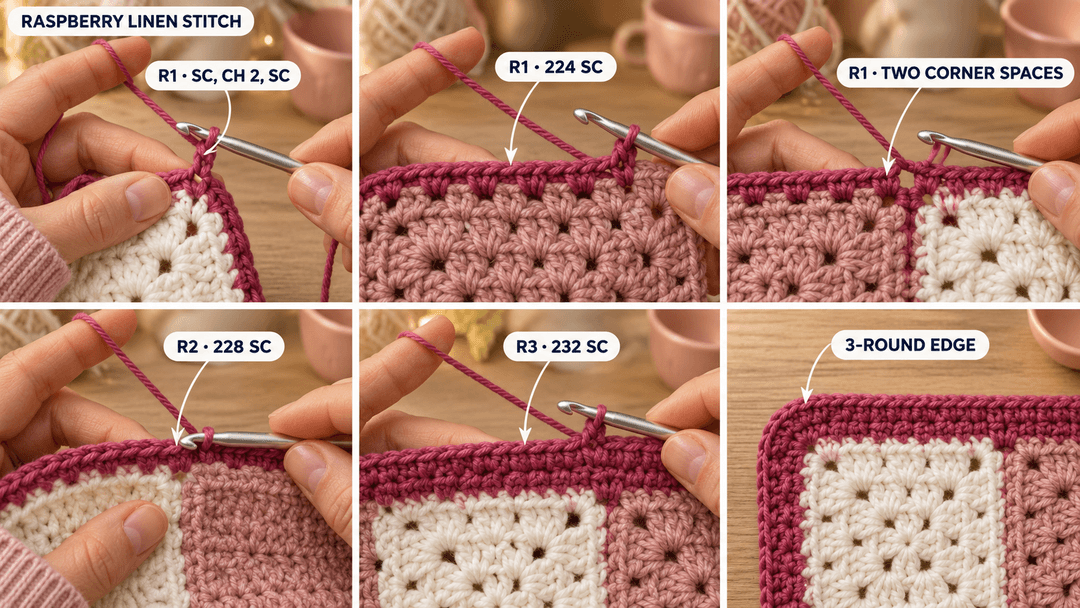
Use raspberry and mark each of the four outer corners. The little corner spaces at a seam are worked separately. The four outer corners each take (sc, ch 2, sc). Turn after each round so R1 and R3 face the front and R2 faces the back. The counts below are sc only.
- R1: With the right side facing, join raspberry in an outer corner and work (sc, ch 2, sc), then ch 1. Along each square edge work (skip 1 st, sc in the next st, ch 1) × 6. At each seam along the side, work (sc, ch 1) in the first square's corner space and again in the next square's corner space. At the next outer corner work (sc, ch 2, sc), then ch 1 to start the next side. Continue around all four sides and sl st in the first sc. (224) 55 ch-1 spaces along each side.
- R2: Ch 1 and turn. Sl st into the nearest outer ch-2 corner space, working across the intervening sc with a sl st if needed. Ch 1 for height. Work (sc, ch 2, sc) in that corner and ch 1. Work (sc, ch 1) in each ch-1 space across the side. Work the same corner and side sequence around and sl st in the first sc. (228) 56 ch-1 spaces along each side.
- R3: Ch 1, turn and repeat R2, working into the new ch-1 spaces. (232) 57 ch-1 spaces along each side.
Fasten off and weave in the tail. For a wider border, keep alternating sides as you add rounds and finish with the right side facing.
Blocking the gingham blanket and keeping the daisies in shape
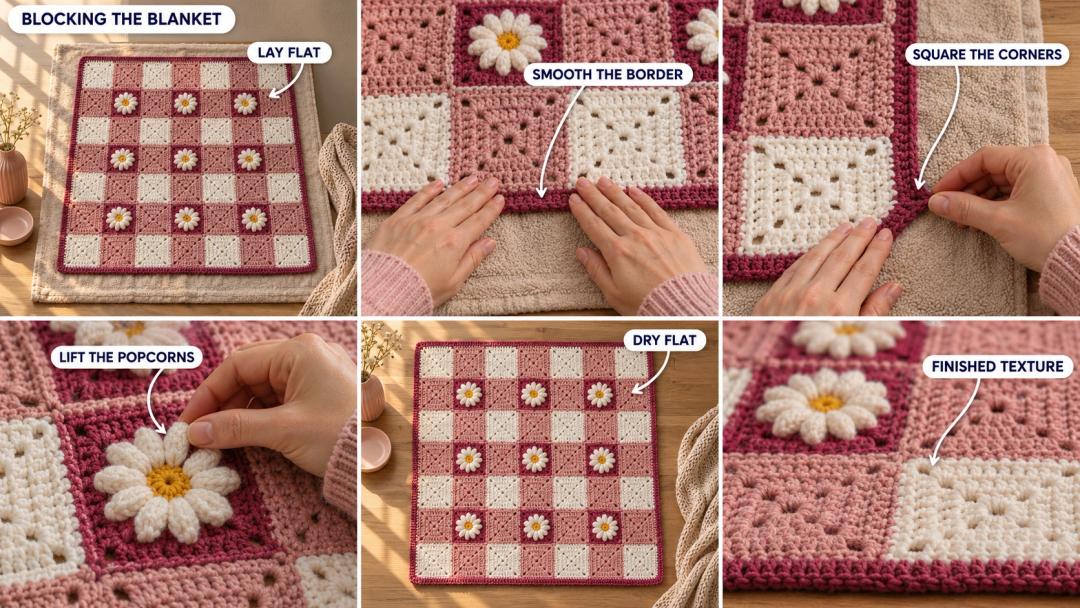
Lay the blanket flat and smooth the border with your palms. Nudge the corners outward with your fingertips and let the blanket dry flat with the edges straight. I lift the popcorns with my fingertips while the blanket is still damp so the petals keep their shape. For washing, follow the care instructions on the yarn label.
UK terms: US sc = UK dc, US dc = UK tr and US tr = UK dtr.
If you make a different gingham colorway, tag #wavodecrochet so I can see which color you put behind the daisies.