Crochet Tulip Pattern

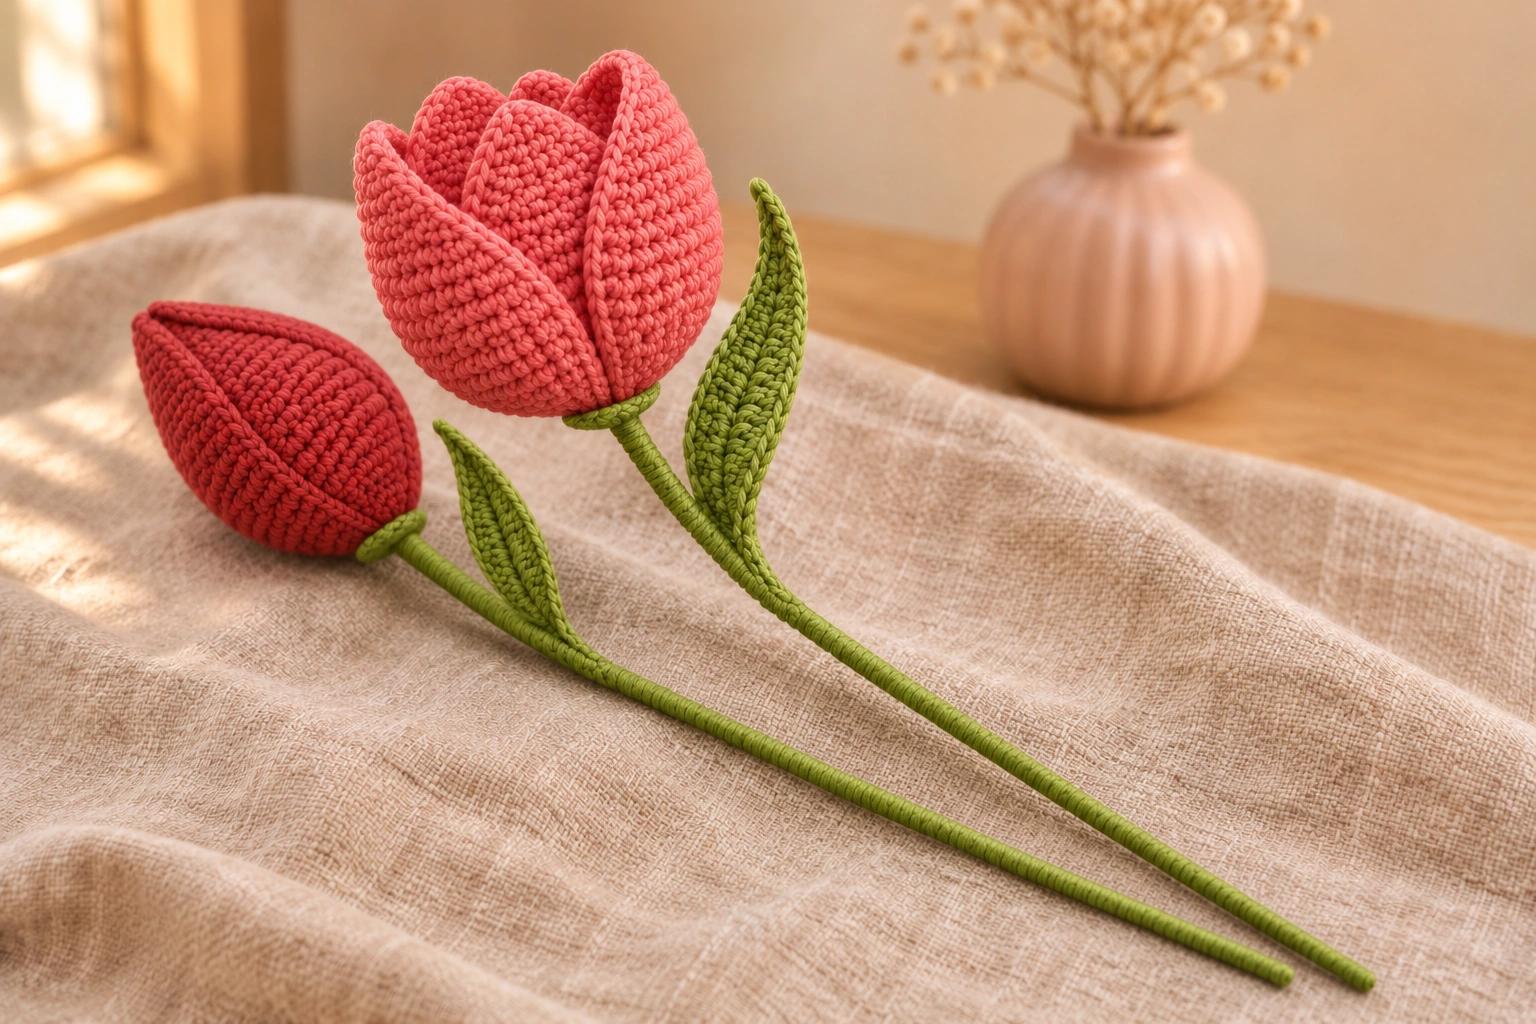
I like tulips best when the petals have just started to part and I can see the smaller ones inside. This crochet tulip stands about 12 in (30 cm) tall, with that little gap between its petals and a green leaf that leans up beside the bloom.
The open flower takes eight crocheted pieces. The little petals tuck inside, with just their tips peeking up level with the big ones. For a five-piece closed bud, sew the outer petals right up to their tips. A pinch of stuffing can help the bud hold its shape.
| At a glance | |
|---|---|
| Finished size | About 12 in (30 cm) tall with a 10 in (25 cm) dowel. Bloom about 2⅔ in (6.8 cm) tall, leaf about 3⅓ in (8.5 cm) long. |
| Yarn | DK #3 cotton in coral pink or red, and leaf green |
| Hook | 2.5 mm |
| Pieces | 8 crocheted pieces for the open tulip, or 5 for the bud, plus one wooden stem |
| Time | About 3 hours for the open tulip, plus glue drying time |
| Skill | Intermediate. Working around a chain, flattening small tubes and sewing curved pieces together. |
Yarn, hook and supplies for the tulip
- Yarn: Smooth DK #3 cotton, such as Paintbox Yarns Cotton DK, 100% cotton, 137 yd (125 m) per 50 g. Allow about 38 yd of coral pink or red for an open tulip, or 28 yd for a closed bud. Have about 12 yd of leaf green for either flower, about 7 yd for crochet and 5 yd for wrapping the stem.
- Hook: 2.5 mm for all the crocheted pieces.
- Stem: One smooth, blunt wooden dowel, 10 in (25 cm) long and ⅛ in (3 mm) thick, plus a little tacky craft glue suitable for wood and cotton.
- Small things: Locking stitch markers, sewing pins, a tapestry needle and scissors. For the closed bud, a small pinch of fiberfill.
Tension. Aim for about 6 sc per inch and about 6 rounds per inch (2.5 cm) in the petal fabric. Crochet snugly so the petals hold their edges and the filling in the bud stays hidden.
Stitches (US terms). MR = magic ring, ch = chain, sl st = slip stitch, sc = single crochet, hdc = half double crochet, dc = double crochet, inc = 2 sc in one stitch, dec = sc 2 stitches together, st = stitch, R = round. Work in a continuous spiral unless the instructions say to join. Mark the first stitch of each round and move the marker up as you work. The number in parentheses is the stitch count.
Making the three outer tulip petals
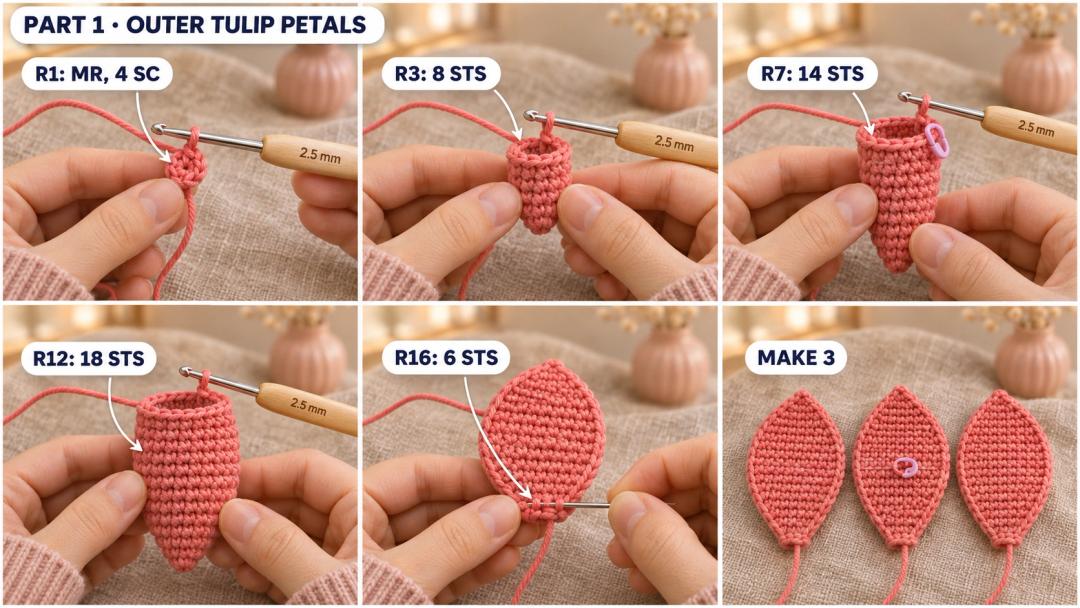
Outer petal (coral pink or red, 2.5 mm hook, Make 3). The magic ring is the tip. The last round is the narrow foot that sits against the green cup.
- R1: MR, 4 sc in the ring. (4)
- R2: (inc, sc) × 2. (6)
- R3: (inc, sc 2) × 2. (8)
- R4: (inc, sc 3) × 2. (10)
- R5: (inc, sc 4) × 2. (12)
- R6: sc around. (12)
- R7: (inc, sc 5) × 2. (14)
- R8–R9: sc around. (14) 2 rounds.
- R10: (inc, sc 6) × 2. (16)
- R11: sc around. (16)
- R12: (inc, sc 7) × 2. (18)
- R13–R14: sc around. (18) 2 rounds.
- R15: (dec, sc) × 6. (12)
- R16: dec × 6. (6)
Fasten off with a 16 in (41 cm) tail at the foot. Flatten the petal with the ring at the tip and leave it empty. At R16, whipstitch the 3 front sts to the 3 back sts, one stitch through each pair. Keep the tail for the side seam.
Put a marker through the center of each flattened petal at R10, between the fourth and fifth sts from the left fold with the inside face toward you. This is where the small petal will sit.
Tip. Pinch the tip and smooth the sides down toward the foot. Let the petal keep a little curve, like the bowl of a spoon.
The three smaller petals inside the bloom
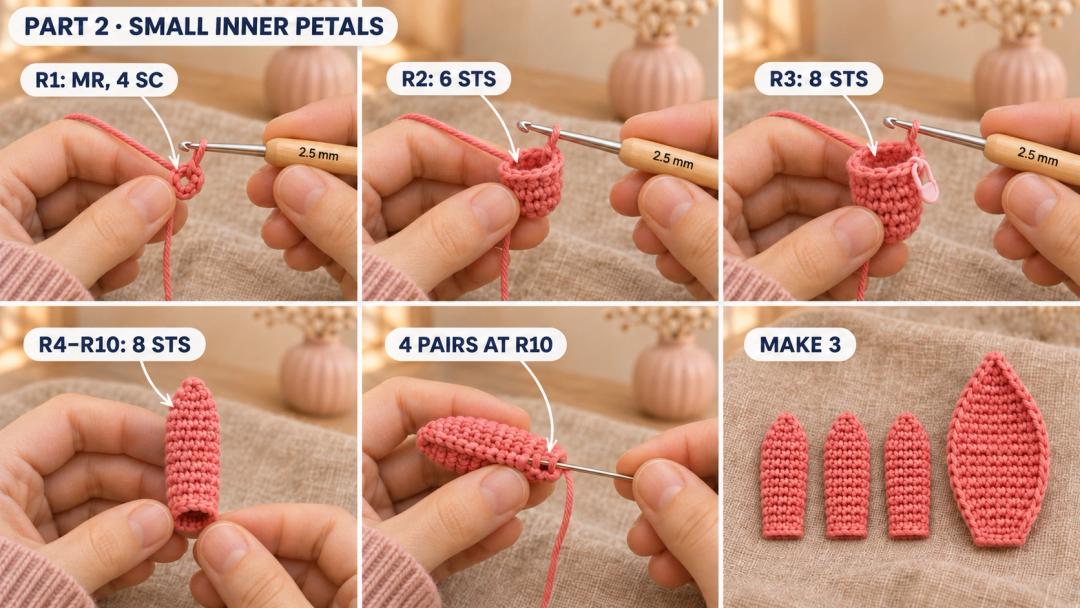
Inner petal (same flower color, 2.5 mm hook, Make 3). Make these for the open tulip. The magic ring is the tip and R10 is the foot.
- R1: MR, 4 sc in the ring. (4)
- R2: (inc, sc) × 2. (6)
- R3: (inc, sc 2) × 2. (8)
- R4–R10: sc around. (8) 7 rounds.
Fasten off with a 14 in (36 cm) tail at the foot. Flatten the petal and leave it empty. Whipstitch across the foot through both layers, one stitch through each of the 4 pairs. Keep the tail for joining the petals.
The green cup beneath the tulip
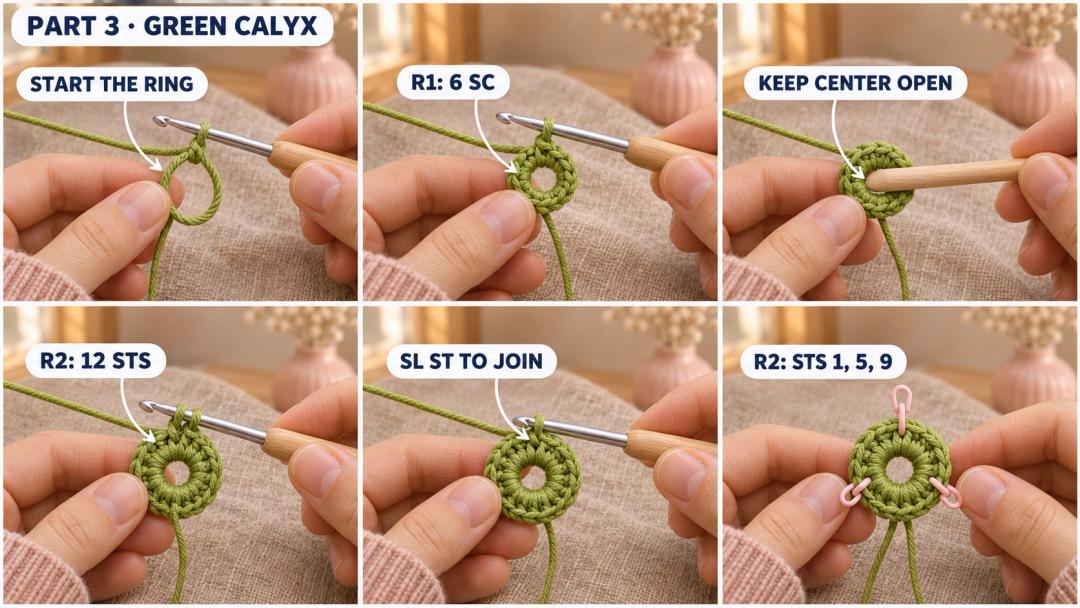
Calyx (leaf green, 2.5 mm hook, Make 1). The magic ring goes underneath the flower and fits around the dowel. The rim at R2 faces the petals.
- R1: MR, 6 sc in the ring. (6)
- R2: inc × 6. (12) Join with a sl st in the first sc.
Fasten off with a 14 in (36 cm) tail at the rim. Keep the magic-ring tail free and the center just open enough for the bare dowel to slip through. Mark R2 sts 1, 5 and 9. Each marker starts a group of four stitches for one petal.
The long, pointed tulip leaf
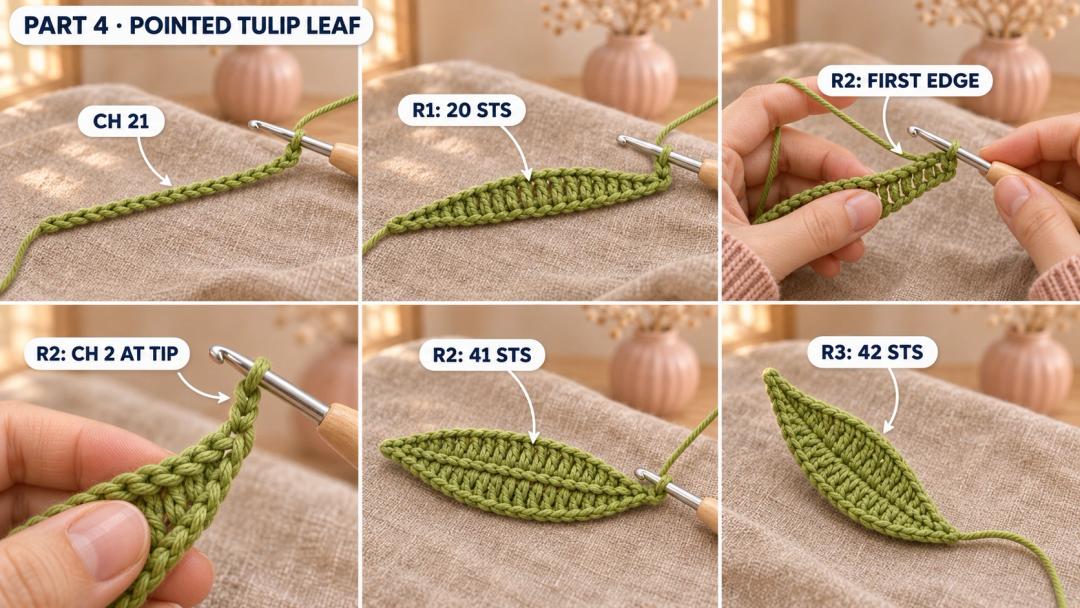
Leaf (leaf green, 2.5 mm hook, Make 1). Ch 21. The end with the starting tail is the base. The first sc at the hook end marks the tip. Work R1 flat, then shape both edges around the starting chain. Turning chains stay out of the stitch count.
- R1: Starting in the second ch from the hook, sc 5, hdc 1, dc 10, hdc 1, sc 3. (20)
- R2: Turn, ch 1, sc 2, hdc 1, dc 12, hdc 2, sc 2, sl st in the last st. Ch 2 and sl st in the first of those two chains. Pivot around the tip and sl st into the unused loop of the starting chain under the first sc of R1. Along the unused loops toward the base, sc 2, hdc 2, dc 11, hdc 2, sc 2. (41) Count the two tip sl sts and the sl st at the end of the first edge. Leave the two tip chains out of this count.
- R3: Turn, ch 1, sc 6, hdc 2, dc 4, hdc 2, sc 2, sl st 5, working up the second edge and into the two tip sl sts at the end. To start down the first edge, sl st into the second chain of the ch-2 tip. Then sl st 4 along the first edge, sc 2, hdc 2, dc 4, hdc 2, sc 6. (42)
Fasten off with a 12 in (30 cm) tail at the leaf base. Weave in the starting tail. Smooth the two sides outward from the chain with your fingers.
Sewing the bloom and wrapping the wooden stem
Nest the small petals inside the outer cup
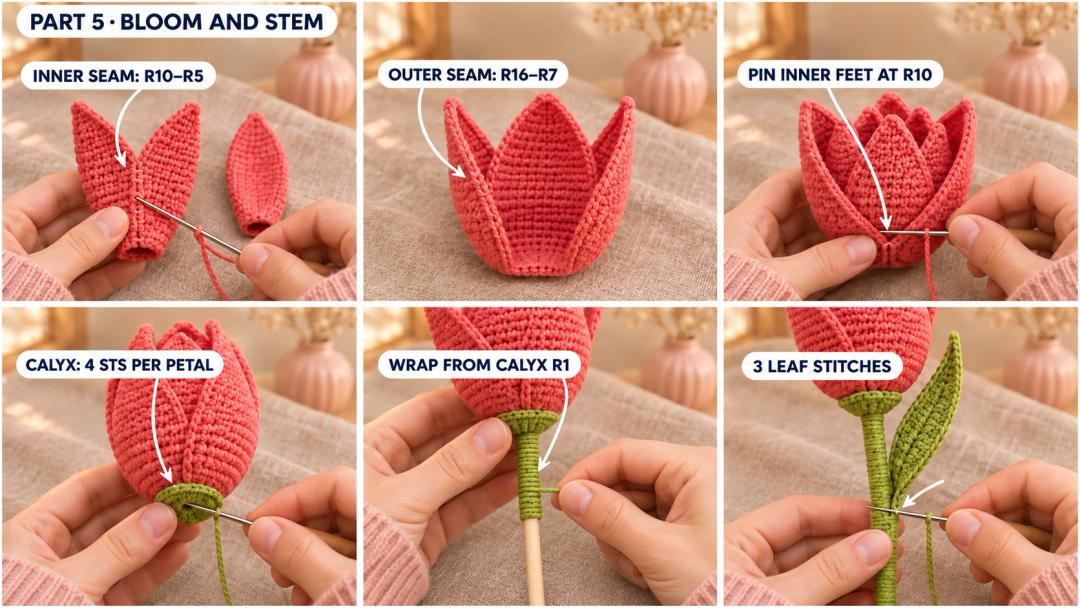
- Set the three small petals side by side with their tips pointing up. Sew the first petal to the second along the folds, one stitch per round from R10 up to R5. Sew the second to the third the same way. Leave the two outer edges free so the row can bend into a cup.
- Join the first two large petals along their folds from R16 up to R7, one stitch per round. Sew the second to the third the same way. Leave the last side seam open.
- Nest the small cup inside the big one and line up the tips. Pin each small foot to the inside of a large petal at its R10 center marker. Take four small stitches across the closed foot, two on each side of the marker, catching only the inside layer of the large petal. Remove the markers.
- Bring the two free outer edges together and sew from R16 up to R7. Leave a dowel-width opening where the feet meet. Pin the green calyx over it, with the magic ring centered over the opening. Starting at the first marker, sew four rim stitches per petal into the underside of the bloom at R15. Use the middle four stitches on the outward face of each flattened petal. Keep the ring tail free.
Tip. Use the bare dowel as a spacer when you pin the last seam and the calyx. Pull it out before sewing so you can reach the center.
Wrap the stem and sew on the leaf
- The dowel sits upright under the flower. Slide its blunt end through the calyx ring until it rests against the inner petals, about 1 in (2.5 cm) in. Draw the ring snug against the wood, then knot and weave the tail into R1.
- Anchor the green wrapping yarn in R1 of the calyx, next to the dowel. Lay its short end down the wood and wrap over it. Let each coil sit right beside the last, all the way down the stem. Glue the last coils and the cut end in place. Let the glue dry before handling the stem.
- With the leaf tip pointing up, wrap its base around the stem 2½ in (6.4 cm) below the calyx. With the leaf tail, take three small stitches through the first three sc at each end of R3 to hold the base around the stem. Catch a wrap of green yarn with each stitch. Tie off under the leaf and hide the tail.
Safety. The wooden stem is for display. Keep it out of reach of children under 3.
Turning the tulip into a closed bud
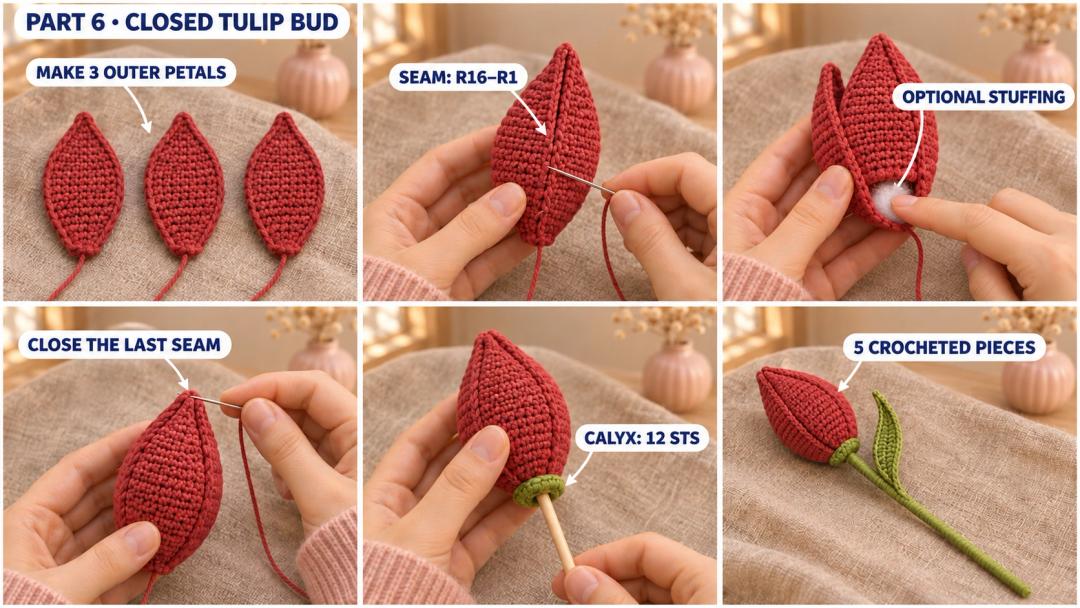
Use the three outer petals, the green calyx and the leaf. Sew the sides from R16 up to R1, one stitch per round. Leave the same dowel-width opening between the feet as for the open flower. After the first two seams, add a pinch of fiberfill if the bud needs help holding its shape. Keep the stuffing above the space for the dowel and sew the last seam.
Sew on the calyx as for the open flower. Slide about 1 in (2.5 cm) of the dowel into the bud through the ring before tightening it. Wrap the stem and sew on the leaf the same way.
A few tulips for a narrow vase
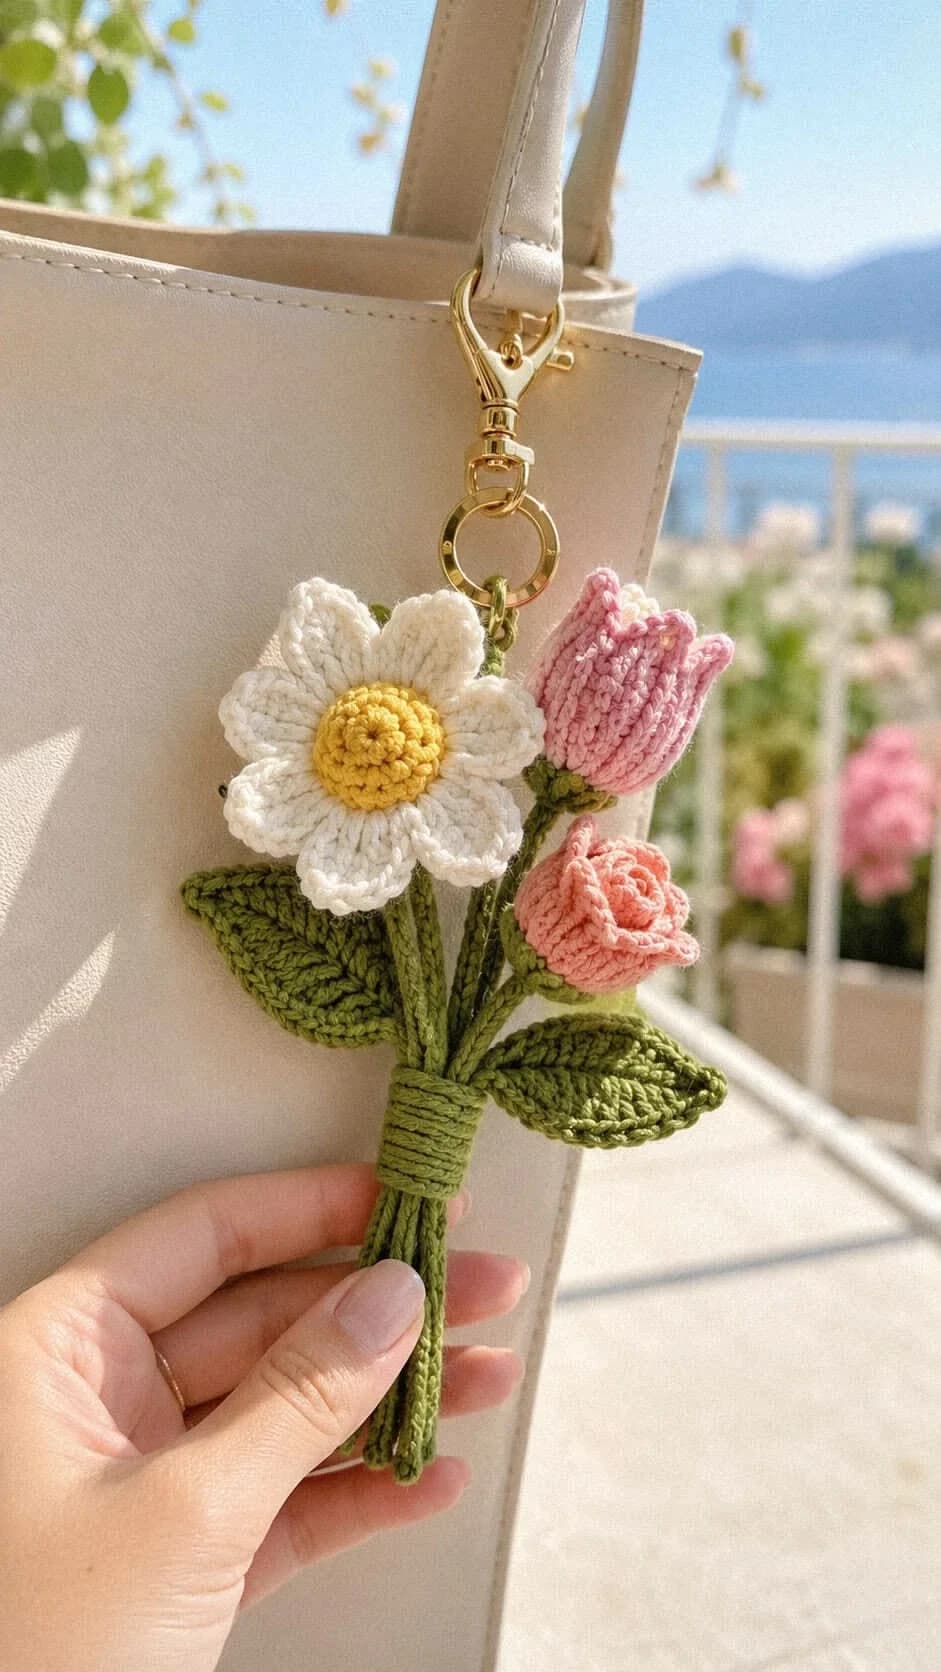
I like one coral bloom and one red bud in a narrow bottle. Turn the leaf on one stem a little to the side so it frames the flower next to it. For a smaller posy, I’d pair them with the daisy from my crochet flower bouquet bag charm.
UK terms: US sc = UK dc, US hdc = UK htr, US dc = UK tr.
Made a tulip? Tag #wavodecrochet so I can see which color you picked.