Crochet Lizard Coaster Pattern

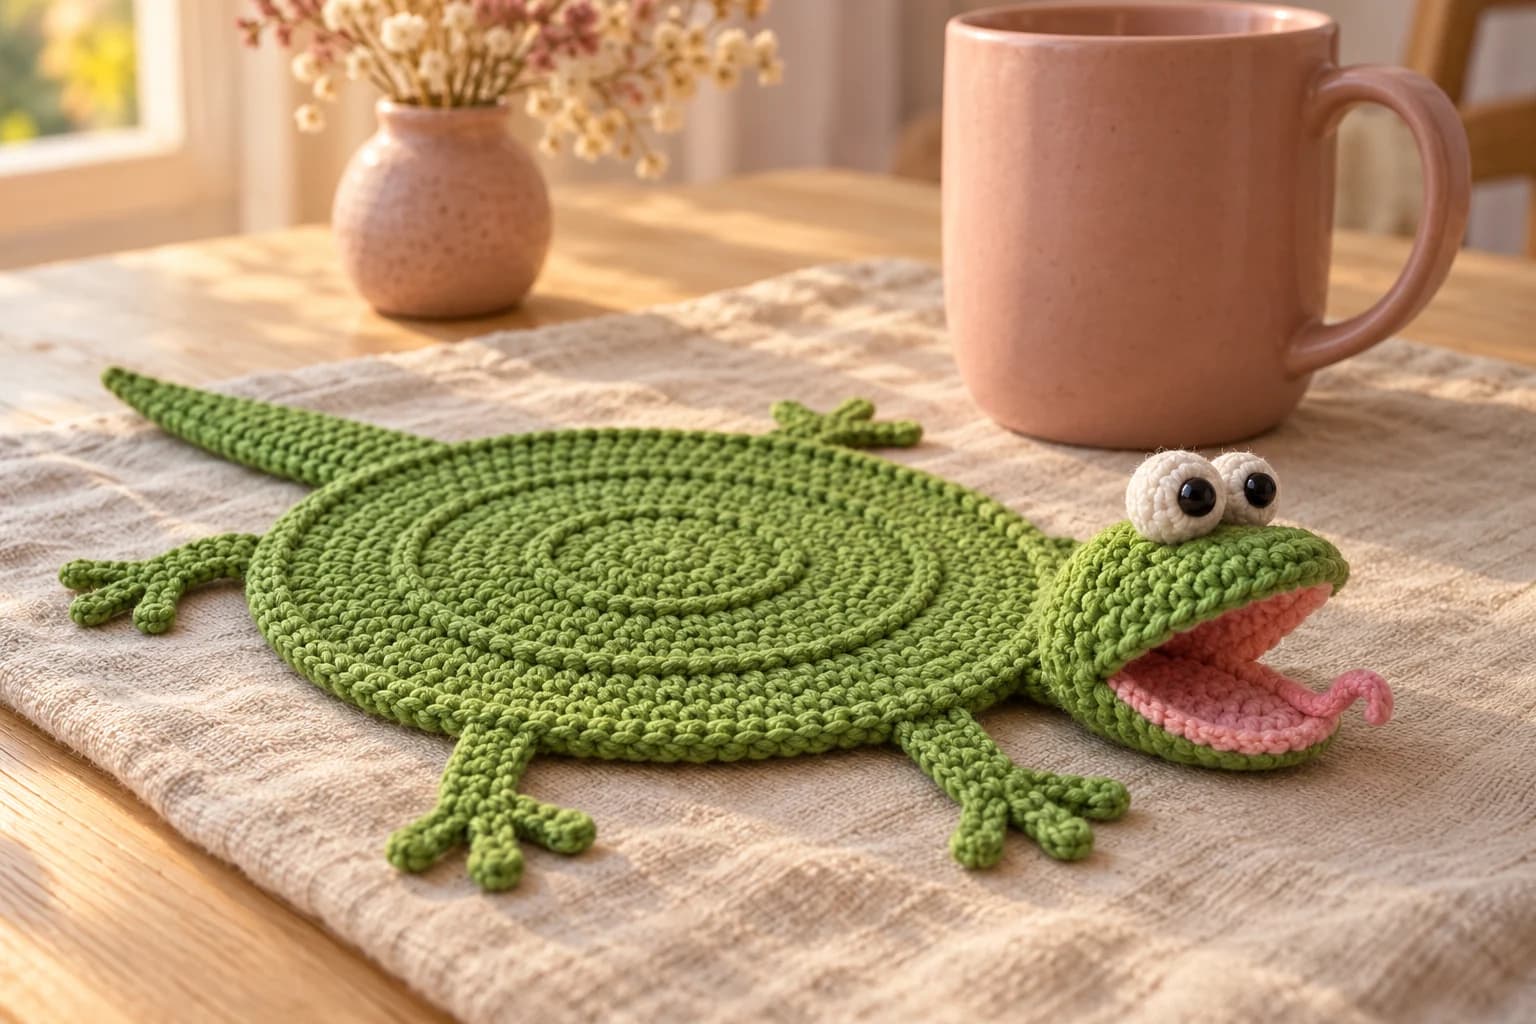
This crochet lizard coaster is a flat green coaster that turns out to be a lizard's back: a stuffed head lifts up at one edge with its pink mouth wide open, and four toed legs and a tail stick out from underneath. The coaster itself is a single crochet circle with three raised rings, so a glass sits level in the middle. You'll need about 55 yards of worsted cotton, mostly green, a 4 mm hook and 2 to 2½ hours.
That's the whole joke: you set a glass down, and something under it is clearly unhappy about it. It's the kind of coaster people pick up and turn over before they use it.
Key Takeaways
- One flat 60-stitch coaster with three back-loop rings, worked in a spiral and finished with a slip stitch edge.
- The head is the only stuffed piece. Taller stitches on its underside bend it upward, so it lifts off the table.
- Legs, tail and jaw are sewn to the back, so the middle 3½ inches stay clear for a glass.
- About 55 yd (50 m) of worsted #4 cotton in leaf green, pink and white, plus two 6 mm safety eyes.
| At a glance | |
|---|---|
| Finished size | coaster about 4½ in (11.5 cm) across; about 8 in (20 cm) from snout to tail tip |
| Yarn | worsted #4 cotton in leaf green, pink and white |
| Hook | 4 mm (US G-6) |
| Skill level | advanced beginner: sc, hdc, dc, BLO, sc2tog, working around a chain |
| Time | about 2 to 2½ hours |
Why the lizard head lifts while the legs stay flat
A coaster has one job: keep a glass level. So everything that could make it wobble goes under the edge or outside it. The legs, the tail and the lower jaw are all sewn to the back of the coaster and lie on the table. Only the head sits on top, and only on the very last round.
The head is what makes it pop. A plain stuffed tube lies flat, like a sleeping lizard. So I work the last two rounds of the head unevenly: half double and double crochet along the underside, single crochet along the top. The underside comes out about half an inch longer than the top, and that curves the head upward when you close it. It's a gentle tilt, not a right angle, which is exactly what you want next to a glass.
The open mouth is three small pieces: a pink lining under the head, a green-and-pink lower jaw that rests on the table, and a little tongue. Tacking the corners of the mouth together keeps the jaws apart without any wire.
What you need for one lizard coaster
Yarn: worsted #4 cotton, such as Lily Sugar 'n Cream or Paintbox Cotton Aran. Cotton soaks up drips from a cold glass and doesn't go shiny under a warm mug.
| Color | Used for | Amount |
|---|---|---|
| Leaf green | coaster, head, lower jaw, legs, tail | about 40–48 yd |
| Pink | palate, jaw lining, tongue | about 4–6 yd |
| White | eyes | about 4–5 yd |
I worked those amounts out from the stitch counts, with the sewing tails, so treat them as estimates. One 120 yd ball of green makes two lizards with some to spare.
Hook and notions
- 4 mm (US G-6) hook. It's a little small for worsted cotton, which keeps the coaster dense.
- Two 6 mm black safety eyes. For a coaster that small hands might grab, embroider the pupils instead (see the safety note at the end).
- A small handful of polyester stuffing.
- 2 stitch markers, a few pins, a tapestry needle and scissors.
Tension: about 4 sc and 4½ rounds to the inch (2.5 cm). At that tension the coaster is about 4½ in across, so measure your first one. Flatness matters more than size: if the circle cups, go up half a hook size, and if it ruffles, go down.
Stitches (US terms): ch (chain), sl st (slip stitch), sc (single crochet), hdc (half double crochet), dc (double crochet), inc (2 sc in the same stitch), sc2tog (single crochet 2 together), BLO (back loop only), MR (magic ring), st(s) (stitch/es). Pieces in rounds are worked in a continuous spiral: don't join, and move a marker up into the last stitch of each round. The stitch count is in parentheses at the end of each round.
The pattern, piece by piece
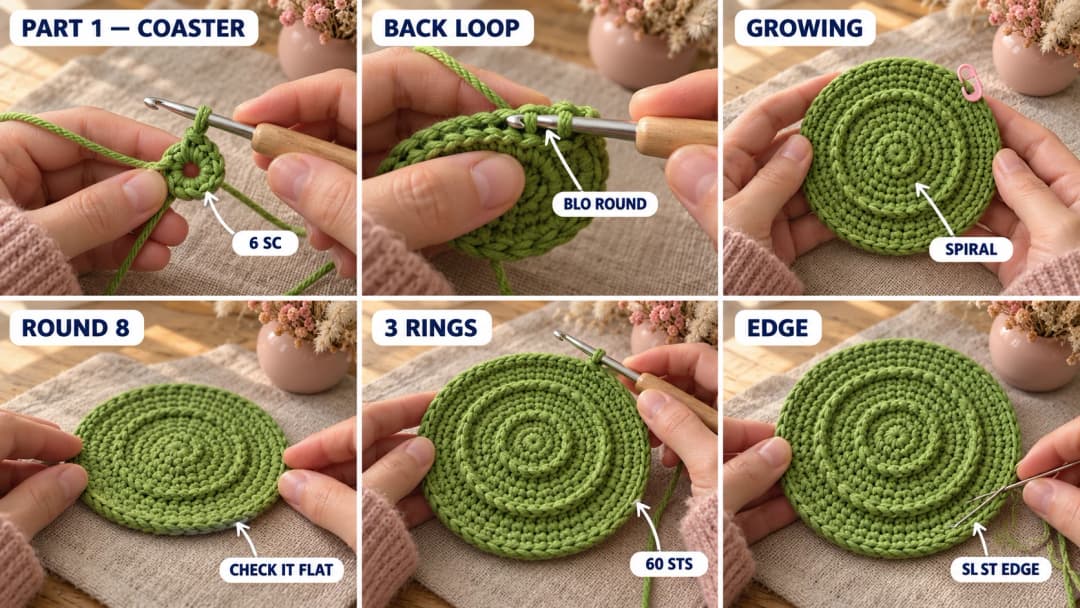
Part 1 — The ridged green coaster (Rounds 1–11)
With green. The side facing you is the right side. The magic ring is the center of the coaster.
- Rnd 1: MR, 6 sc in the ring. (6)
- Rnd 2: Inc in each st around. (12)
- Rnd 3 (BLO): Working in back loops only, (sc in the next st, inc) 6 times in total. (18)
- Rnd 4: (Sc in the next st, inc, sc in the next st) 6 times in total. (24)
- Rnd 5: (Sc in each of the next 3 sts, inc) 6 times in total. (30)
- Rnd 6 (BLO): Working in back loops only, (sc in each of the next 2 sts, inc, sc in each of the next 2 sts) 6 times in total. (36)
- Rnd 7: (Sc in each of the next 5 sts, inc) 6 times in total. (42)
- Rnd 8 (BLO): Working in back loops only, (sc in each of the next 3 sts, inc, sc in each of the next 3 sts) 6 times in total. (48)
- Rnd 9: (Sc in each of the next 7 sts, inc) 6 times in total. (54)
- Rnd 10: (Sc in each of the next 4 sts, inc, sc in each of the next 4 sts) 6 times in total. (60)
- Rnd 11: Sl st loosely in each st around. (60 sl st)
Each BLO round leaves the front loops of the round before it free on the right side. Those loops are the three raised rings, after Rounds 2, 5 and 7. On Rounds 4, 6, 8 and 10 the increase sits in the middle of each group instead of at the end, so the circle stays round instead of turning into a hexagon.
Cut the yarn with a 6 in tail and pull it through. Thread it on the needle, pass it under both loops of the first sl st of Round 11, then back down into the last one. That closes the edge without a bump. Weave in both tails on the back.
Tip: check it flat at Round 8. Lay the circle on the table before you start Round 9. It should be about 3½ in (9 cm) across, already show its three rings, and lie perfectly flat. A bowl means your tension is tight for this count: redo it with a 4.5 mm hook. Don't wait for the edge to find out.
Part 2 — The head (make 1)
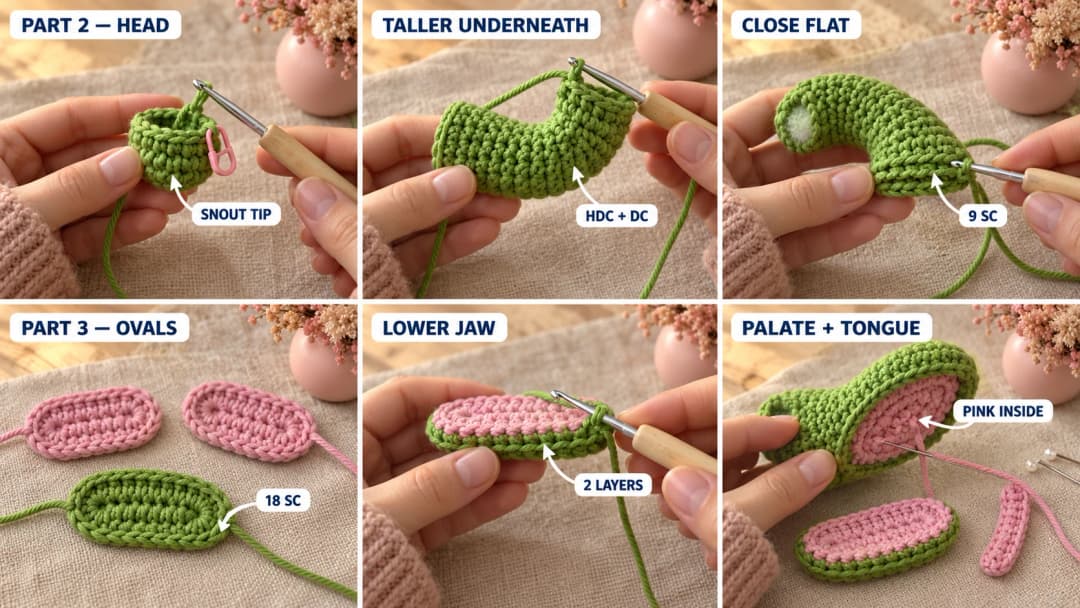
With green. The magic ring is the tip of the snout. The open end becomes the neck, and it's closed flat at the end.
- Rnd 1: MR, 6 sc in the ring. (6)
- Rnd 2: (Sc in the next st, inc) 3 times in total. (9)
- Rnd 3: (Sc in each of the next 2 sts, inc) 3 times in total. (12)
- Rnd 4: (Sc in each of the next 3 sts, inc) 3 times in total. (15)
- Rnds 5–8: Sc in each st around. (15) (4 rounds)
- Rnd 9: (Sc in each of the next 4 sts, inc) 3 times in total. (18)
Put a second marker in the next stitch. From here, the next 9 sts are the underside of the head and the 9 after them are the top.
- Rnd 10: Hdc in each of the next 9 sts, sc in each of the next 9 sts. (18)
- Rnd 11: Dc in each of the next 9 sts, sc in each of the next 9 sts. (18)
The taller underside makes the head curve upward. Your marker now sits at one side corner, where the top meets the underside.
Stuff the snout firmly and the rest of the head lightly, about a walnut-sized pinch in all. Flatten the opening so the 9 underside sts lie against the 9 top sts, then sc through both layers 9 times. (9) Fasten off, leaving a 16 in (40 cm) tail for sewing the head on.
Part 3 — The open mouth: palate, lower jaw and tongue
All three pieces are flat. The palate and the jaw use the same small oval.
Small oval (make 3: 2 pink, 1 green).
- Foundation: Ch 9.
- Rnd 1: 3 sc in the 2nd ch from the hook, sc in each of the next 6 ch, 3 sc in the last ch. Rotate the piece to work along the other side of the chain, then sc in each of the next 6 ch. (18)
Palate. Take one pink oval, sl st in the next st and fasten off with a 12 in tail. Pin it on the underside of the head, the dc side, from the snout tip to Round 11. Whipstitch it all around with the tail. This is the inside of the upper jaw.
Lower jaw. Fasten off the second pink oval and weave its tails in. Don't fasten off the green oval. Hold the pink one on top, wrong sides together, and keep going with the green:
- Joining round: Working through both layers, (sc in the next st, inc, sc in each of the next 7 sts) 2 times in total. (20)
The increase lands in the middle stitch of each end, so the jaw stays flat. Sl st in the next st and fasten off, leaving a 12 in tail. Pink is the inside of the mouth; green faces the table.
Tongue (pink). Leave a 6 in starting tail. Ch 9. Sl st in the 2nd ch from the hook, sc in each of the next 7 ch. (8) Fasten off. Both tails are at the base: use one to sew and weave in the other.
Part 4 — Two pop-out eyes (make 2)
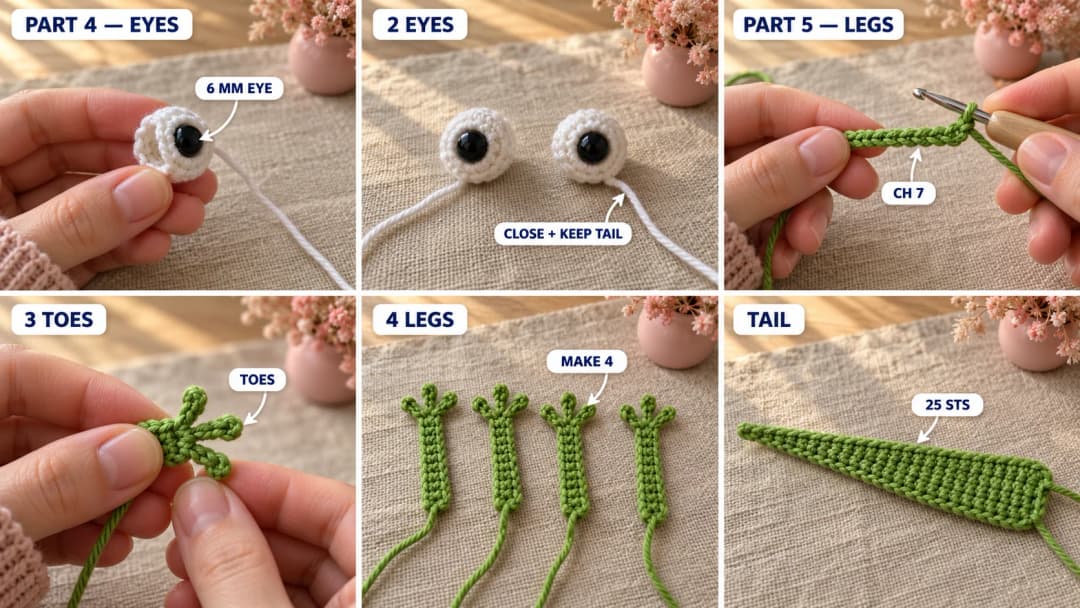
With white. The magic ring is the front of the eye, where the pupil goes.
- Rnd 1: MR, 6 sc in the ring. (6)
- Rnd 2: Inc in each st around. (12)
- Rnd 3: Sc in each st around. (12)
Push the post of a 6 mm safety eye through the center of the magic ring, from the outside, and snap the washer on inside. Add a tiny pinch of stuffing.
- Rnd 4: Sc2tog 6 times in total. (6)
Fasten off, leaving an 8 in tail. Weave the tail through the front loops of the last 6 sts, pull it closed, and keep the tail for sewing.
Part 5 — Four three-toed legs and the tail
With green. Each leg ends at the base, where the long tail comes out; that's the end you sew under the coaster.
Leg (make 4).
- Foundation: Ch 7.
- Side 1: Sc in the 2nd ch from the hook and in each of the next 5 ch. (6 sc) You're now at the slip knot end: that's the foot.
- Toes: In the same last stitch, (ch 3, sl st in the 2nd ch from the hook, sl st in the next ch, sl st in the same last sc) 3 times in total. (3 toes)
- Side 2: Rotate to work along the other side of the chain, then sc in each of the next 6 ch. (6 sc)
Fasten off, leaving an 8 in tail at the base. Weave the starting tail into the foot. Spread the three toes into a little fan with your fingers.
Tail (make 1). Here the slip knot end is the base, so leave an 8 in starting tail first.
- Foundation: Ch 13.
- Side 1: Starting in the 2nd ch from the hook (the tip): sl st in each of the next 2 ch, sc in each of the next 4 ch, hdc in each of the next 5 ch, 3 dc in the last ch.
- Side 2: Rotate, then along the other side of the chain: hdc in each of the next 5 ch, sc in each of the next 4 ch, sl st in each of the next 2 ch. (25 sts in all)
Fasten off at the tip and weave that end in. You have a tapered tail, wide at the base where the long tail hangs.
Putting the lizard together around the clock
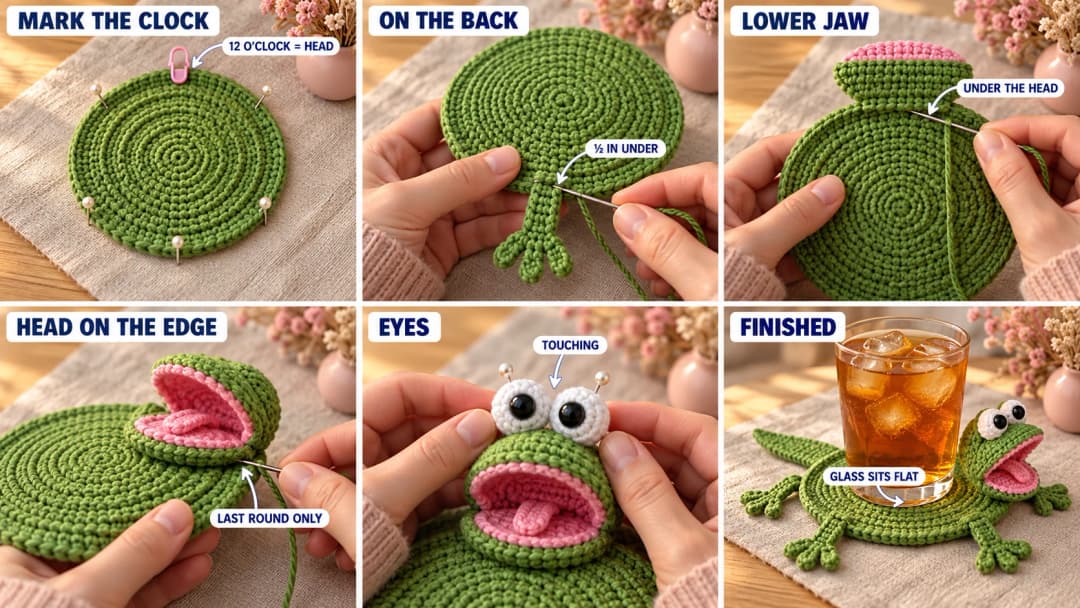
Lay the coaster right side up. Imagine a clock face on it: the head goes at 12 o'clock. Round 10 has 60 stitches, so every hour on the clock is 5 stitches.
- Mark the spots. Put a marker in a stitch of Round 10 for the head center. Count along Round 10 and pin: front legs 10 sts to the left and right of it (10 and 2 o'clock), back legs 20 sts to each side (8 and 4 o'clock), and the tail 30 sts away, straight across (6 o'clock).
- Legs and tail, on the back. Flip the coaster over. Tuck the base of each piece about ½ in (1.3 cm) under the edge, over Rounds 9 and 10, at its pin. Point the front legs a little toward the head and the back legs a little toward the tail. Whipstitch around each base with its own tail, catching only the back loops of the coaster so nothing shows on top.
- Lower jaw, on the back. At the head marker, lay one end of the jaw ½ in over the edge, green side facing you, so the pink will face up once the coaster is turned over. Sew across that end.
- The head, on top. Turn the coaster right side up. Lay the flat neck seam over Round 10 and the slip stitch edge at the head marker, palate facing down and the head curving up and out. Whipstitch along both edges of the seam with the long head tail. Round 10 is as far in as it goes, so the middle 3½ in stay clear.
- The corners of the mouth. On each side, take 2 or 3 stitches from the side of the head at Round 11 into the edge of the jaw, about ½ in from its back end. That fixes the mouth open.
- The tongue. Sew its base to the middle of the jaw, just in front of the mouth corners, and let the tip curl over the front edge of the jaw. Tack the base only.
- The eyes. Pin them on top of the head, over Rounds 8 and 9, close enough to touch. Their centers sit 2 sts each side of the middle of the top, in line with the 5th of the 9 top sts of Round 11. Sew around each one with its tail, going through to the inside of the head, then knot and hide the tails inside.
Tip: check the lift before you sew the head. Hold the head in place with two pins and look from the side. The snout should rise a little, with the jaw resting on the table. If it sags, push a bit more stuffing toward the snout through the stitches with the back of the hook.
Living with a lizard under your glass
The flat part works like any cotton coaster. Block it once before use: wet it, press it flat on a towel, straighten the legs and toes, and let it dry overnight.
To wash it, hand-wash in cool water with a drop of dish soap, press it in a towel and dry it flat with the head pointing up. I don't put mine in the machine: the stuffed head comes out squashed and the eyes get knocked about.
Safety. This is a table piece, not a toy. Safety eyes are a small part, so they're not suitable for children under 3. For a coaster in a house with toddlers, skip the safety eyes and embroider each pupil with black yarn: a satin-stitch dot over the magic ring, about 3 sts wide.
A little gang of lizards for the coffee table
Four lizards in four greens make a set that people actually talk about at dinner. Lime, leaf, sage and a dark forest green all work with the same pink mouth. For a gecko look, add a few white French knots on the coaster between the raised rings.
They're also a great gift for anyone who keeps a real lizard or a gecko. Pack one with a pretty glass and you're done in an evening. If you like reptiles on the table, my sea turtle crochet coaster swims in the same direction, with flippers sewn on flat.
Made a lizard coaster? Tag #wavodecrochet on Pinterest. I re-pin every finished make.
Pattern by Clara Hartwell for Wavode. Questions? Email me at support@wavode.com.