Crochet Bow Keychain

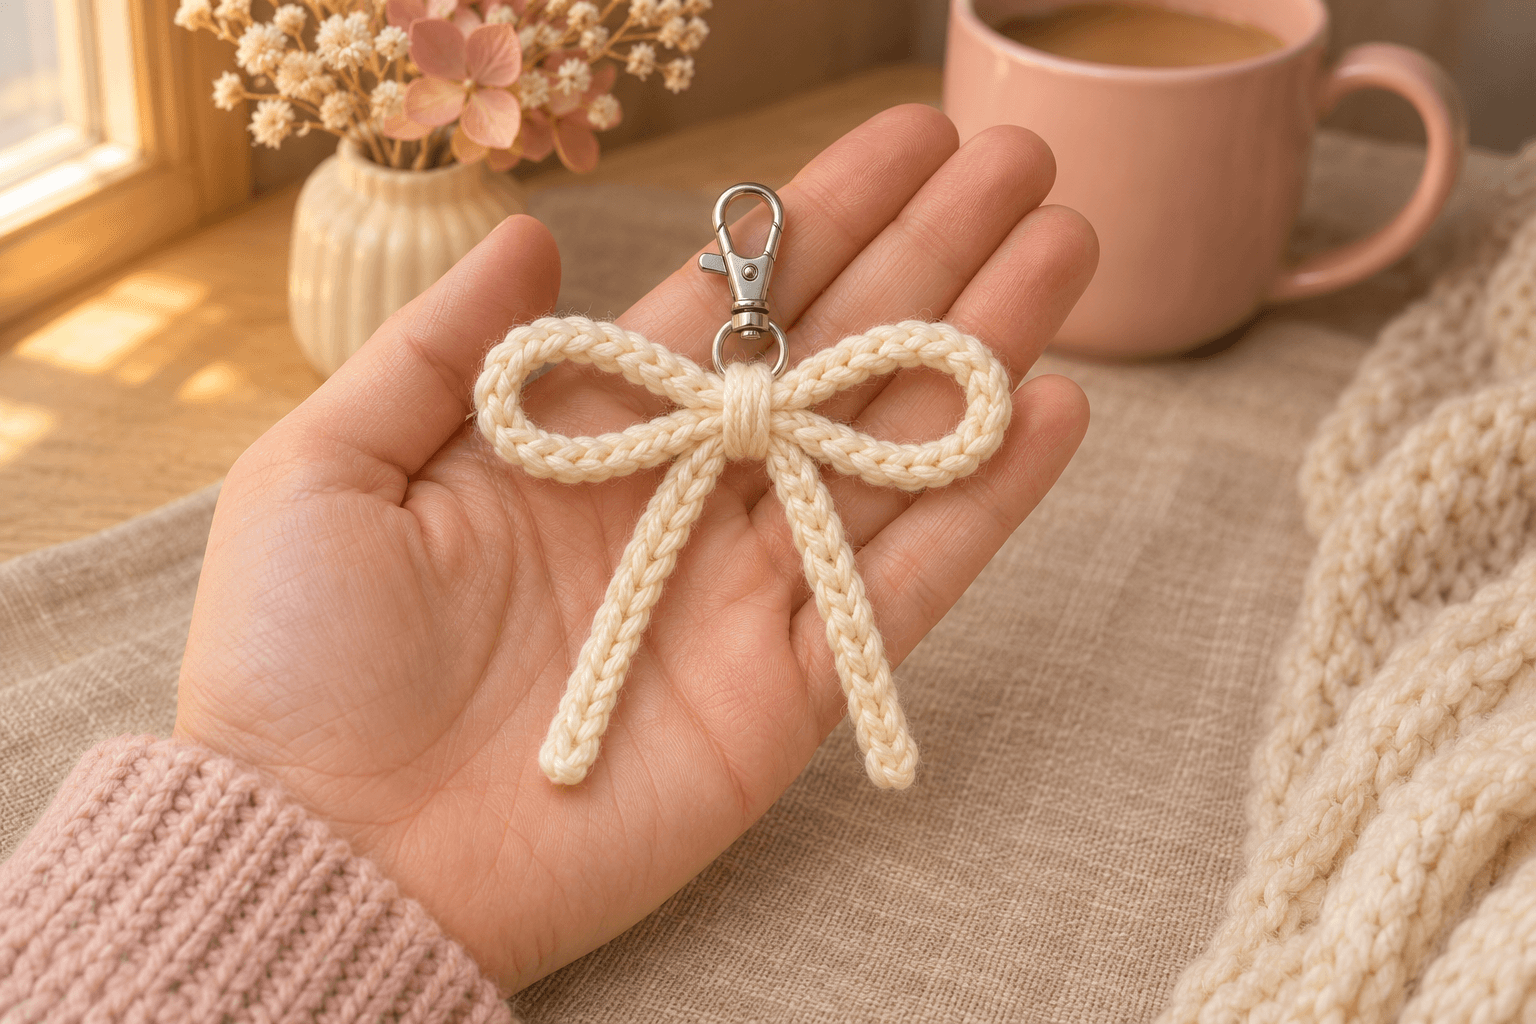
I like a little bow on a plain bag: something soft beside the zip, with tails that move when the bag does. This crochet bow keychain is about 3 in (7.5 cm) wide and 2.4 in (6 cm) long, with slim loops and a small clasp above the center.
One chain, one row of slip stitches, then the folding. I leave the center tie loose until the loops sit evenly. A small tug on either tail changes the shape, so take a moment here before pulling the knot snug.
| At a glance | |
|---|---|
| Finished size | about 3 in (7.5 cm) wide × 2.4 in (6 cm) long, plus the clasp |
| Yarn | worsted #4 acrylic; about 2 g / 4 yd of cream |
| Hook | 4 mm (G/6) |
| Pieces | 1 crocheted strip |
| Time | varies with experience |
| Skill | beginner: chains, slip stitches, weaving in ends and tying the center |
What you'll need for the bow keychain
- Yarn: about 2 g / 4 yd of worsted #4 yarn in cream. Red Heart Super Saver in Aran is a 100% acrylic option, with 364 yd (333 m) per 198 g solid-color ball. A smooth yarn makes the little chain loops easier to see.
- Hook: 4 mm (G/6). This is smaller than the yarn's usual recommended hook, helping the narrow strip hold its shape.
- Clasp: a small keychain clasp with a closed attachment ring at its base, optional if using the bow as an appliqué.
- Small things: scissors, a yarn needle and a removable stitch marker or short piece of contrasting thread.
Cut a 10 in (25 cm) strand of matching yarn for the center before starting, and keep it beside your needle.
Tension and size. Keep the slip stitches even and relaxed enough to slide along the hook. Tight slip stitches can pull the strip into a stiff curl. The finished dimensions are approximate: the starting chain, your slip stitches and the way you arrange the loops all affect the size. Measure the bow after tying its center.
Stitches, in US terms: ch = chain; sl st = slip stitch. This bow is worked flat along one side of a chain. The loop on the hook doesn't count as a chain, and the number in parentheses is the finished row count.
The pattern — a 50-chain strip for the bow
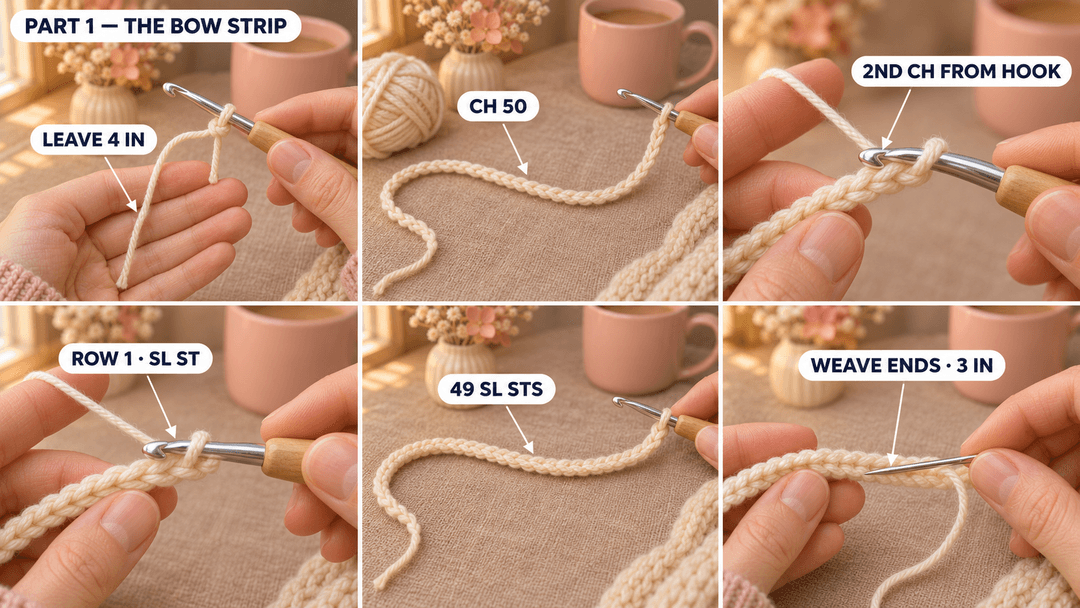
Bow strip (cream, 4 mm hook, Make 1). Leave a 4 in (10 cm) starting tail and make a slip knot.
Foundation: ch 50. Keep the chain untwisted, with the little V shapes facing you.
- Row 1: sl st in the 2nd ch from the hook and in each ch across. (49)
For each slip stitch, insert the hook under the upper strand of the chain's V. Yarn over, draw the yarn through the chain, then through the loop already on the hook. Continue to the starting end of the chain.
Tip. Let each new loop sit on the straight part of the hook before making the next stitch. Pulling it tight against the narrow tip makes the following stitch harder to enter.
Ch 1, cut the yarn leaving a 4 in (10 cm) tail, and pull the end completely through the loop. Tighten gently. This fastening chain sits outside the row count.
Thread each tail onto the needle and weave it along the strip for about 3 in (7.5 cm), slipping under several stitch strands. Keep the strip relaxed as you pull through, then trim the excess. One tail starts at each end of the strip.
Shaping the bow loops and securing the center
I keep the strip on the table for this part. It makes the crossing easier to hold while adjusting the loops.
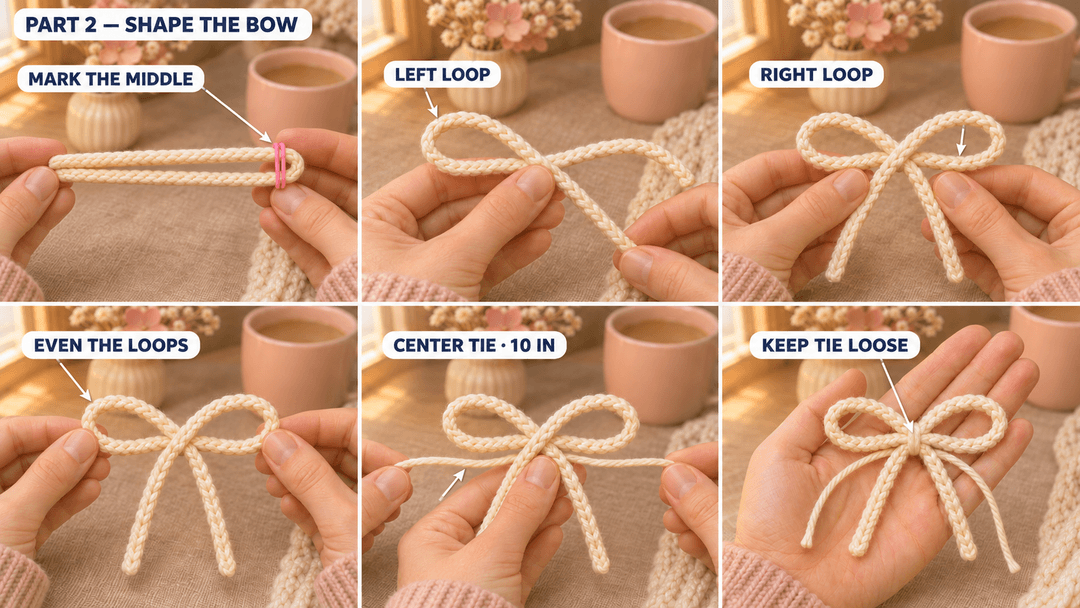
- Mark the middle. Fold the strip end to end to find its halfway point. Mark that fold, then open the strip and lay it horizontally.
- Make the left loop. Hold the marked middle against the table. Bring the left end up and around, crossing it over the marker. Let the free end point down toward the right.
- Make the right loop. Bring the right end up and around in the same way. Cross it over the middle and let its free end point down toward the left.
- Even the bow. Keep both loops above the crossing and both tails below it. Slide the strip gently until the loops are similar in size and the tails hang evenly.
- Prepare the center tie. Lay the separate 10 in (25 cm) strand underneath the crossing, with roughly equal lengths extending to either side. Remove the marker while holding the crossing in place.
Tip. Look at the bow from the front before tightening the tie. A twisted strip shows its edge inside one loop. Smooth it flat with your fingers while the crossing can still move.
For an appliqué: bring the tie ends around the middle, make a double knot at the back, then weave in the ends. For the keychain version, keep those ends loose and add the clasp below.
Adding the clasp above the bow
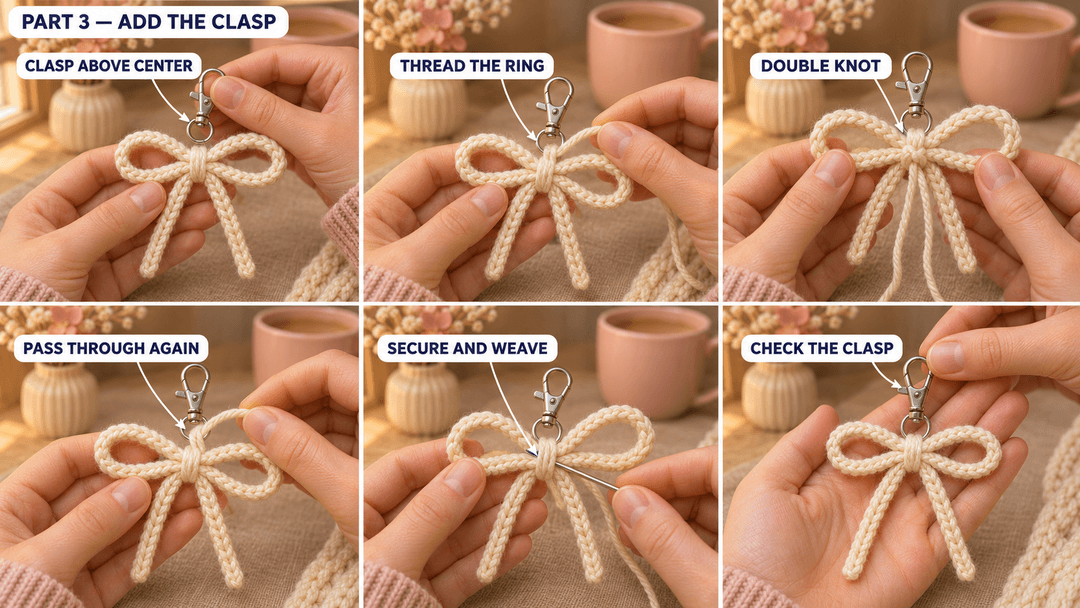
Hold the bow facing you, with its tails pointing down. Nestle the clasp between the loops, just above the tied middle.
- Thread one end of the center strand through the clasp's closed attachment ring. Slide the ring down until it rests against the upper edge of the bow's middle.
- Bring the strand ends around the crossing and tie a double knot at the back. Adjust the loops before pulling the knot snug.
- Pass one end through the attachment ring once more. Bring it around the tied center and make another double knot at the back, holding the ring against the top of the bow.
- Weave both ends into the strip, then trim. Hold the clasp and give the bow a gentle pull to check that the center stays together.
The clasp turns the bow into a light bag charm. Clip it beside a zip or onto a small bag loop, where its tails can hang freely.
Safety. With its metal clasp, this bow is an accessory for adults and older children. Keep it away from children under 3.
Making a smaller or larger bow
Change the starting chain to adjust the bow: fewer chains make a smaller bow, and more chains make a larger one. Work from the second chain as before, making one slip stitch in every remaining chain.
For any starting length, the finished row has one fewer slip stitch than the number of chains. Keep the same hook and yarn while changing the chain length so the strip stays similar in thickness. Allow more yarn for a longer strip.
I like cream for a quiet little bag charm, or a pale pink bow tied around a gift tag. Leave the clasp off for the gift version and sew through the tied center to attach it.
UK terms: chain and slip stitch have the same names as in US terminology.
Made a little bow? Tag #wavodecrochet on Pinterest so I can see your color choice.