Amigurumi Pumpkin Pattern

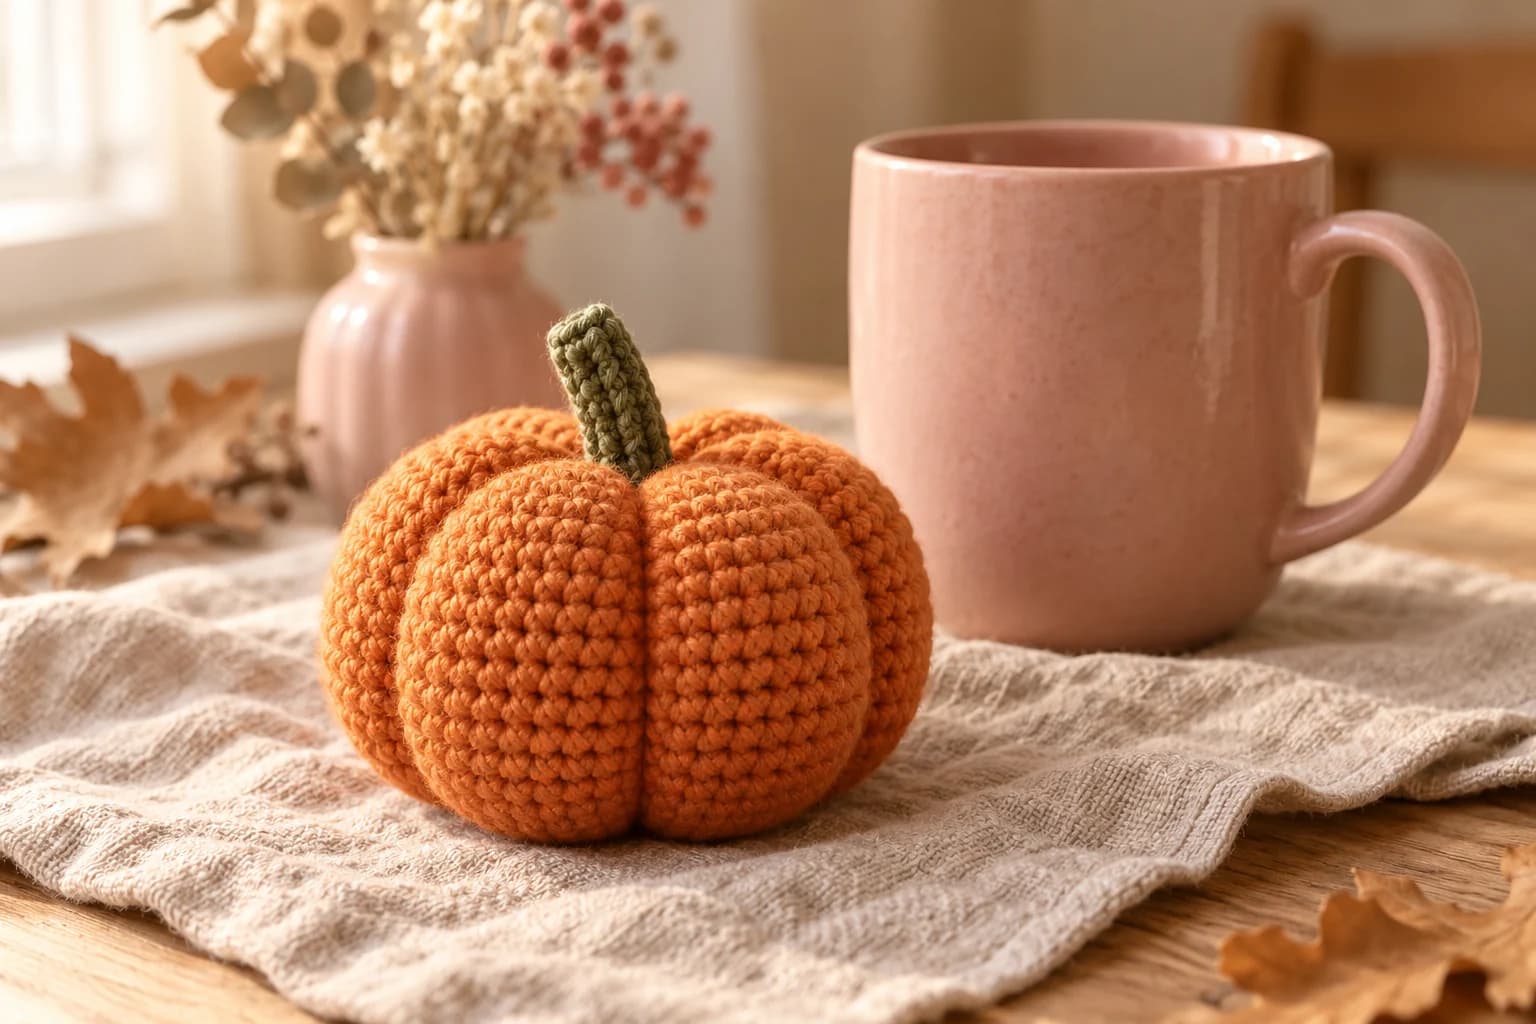
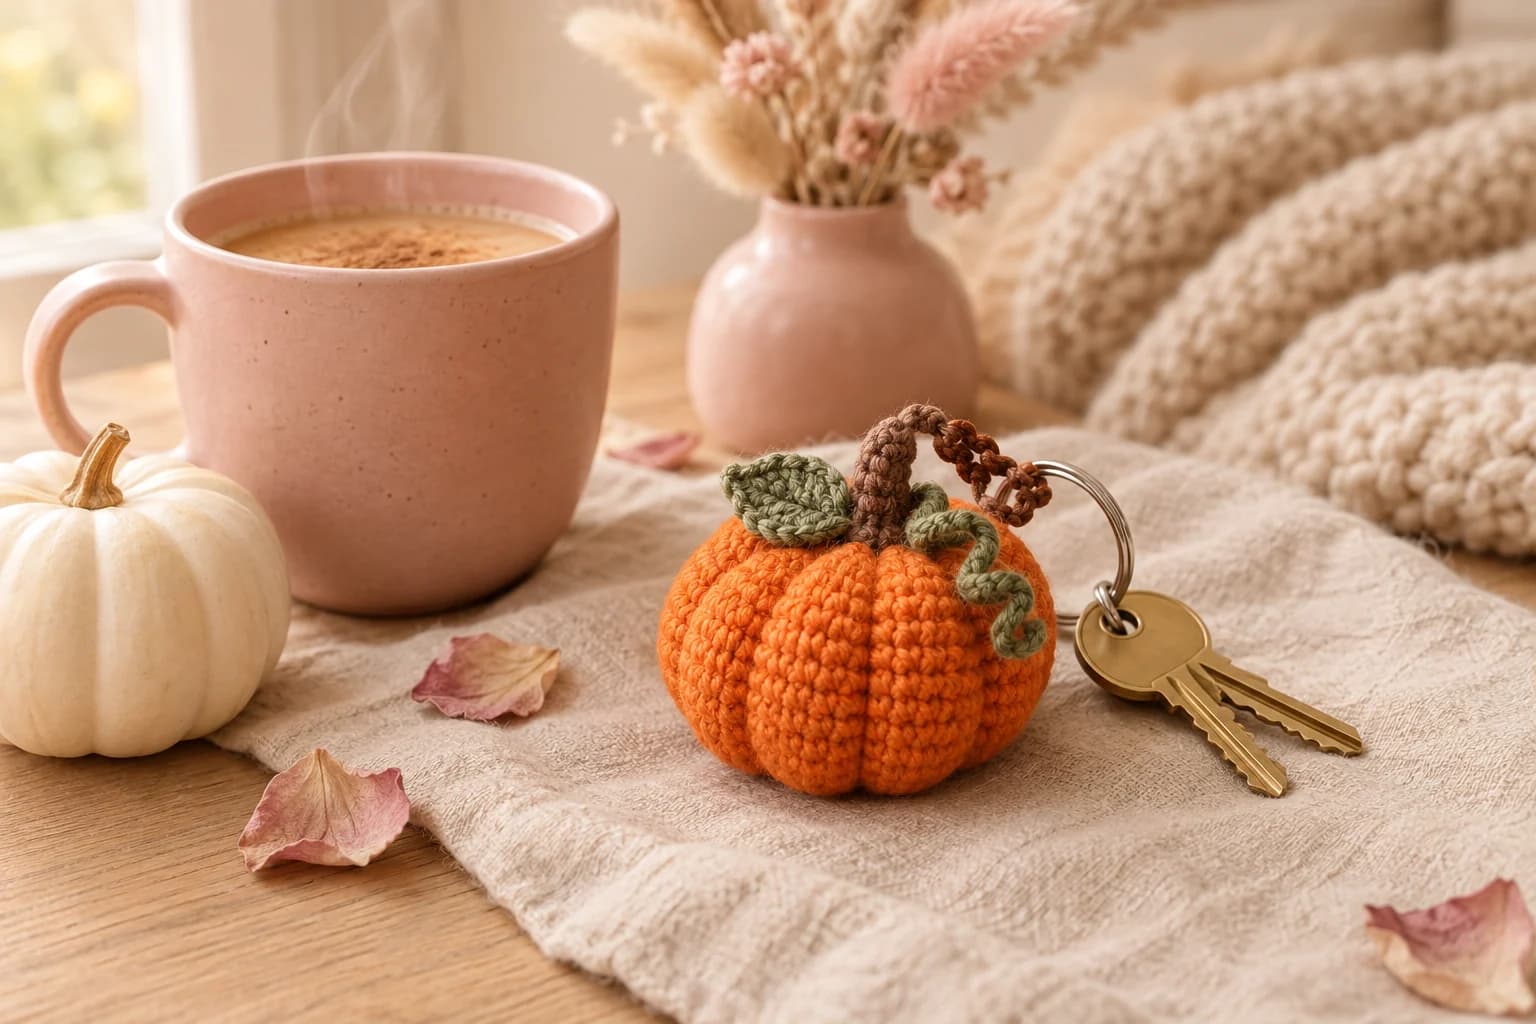
This amigurumi pumpkin pattern makes a plump orange pumpkin about 3 inches wide, with six deep grooves and a little green stem. It's one ball of single crochet worked in the round, stuffed and closed at the top. The grooves aren't crocheted: you pull them in with the long tail you leave at the end. You'll need worsted yarn in orange and green, a 3.5 mm hook and about 1½ hours.
Key Takeaways
- One round ball: 8 increases per round up to 48 sts, 8 straight rounds, then 8 decreases per round back down to 8.
- Leave a very long tail at the end, about 60 in (1.5 m): it pulls in all 6 grooves.
- Pin first, pull second: 6 pins, 8 sts apart, make the 6 sections come out even.
- The stem is one row: 8 sc on a 9-chain, sewn on top.
Why I love this pumpkin
It's the pumpkin I make when I want a proper round one, not a flat folded one. Working in the round gives it a real belly, and the six grooves turn the ball into a pumpkin in about ten minutes of sewing. Make three in orange, cream and sage for a shelf, or a whole patch for the Thanksgiving table.
It's also a great first amigurumi. The increases and decreases follow a simple pattern, and the shaping is done with a needle, not with tricky stitches.
Skill level. Easy. You need a magic ring, sc, inc and dec in the round, a chain, and basic sewing.
Looking for something smaller? My pumpkin keychain is the mini version, and the rectangle pumpkin needs no rounds at all.
What you'll need
Yarn (worsted #4)
| Color | Used for | Amount |
|---|---|---|
| Pumpkin orange | Body, grooves | about 45 yd |
| Green | Stem | about 2 yd |
- I like worsted acrylic, such as Red Heart Super Saver or Lion Brand Basic Stitch: it holds its shape and the grooves stay crisp. Cotton works too, with sharper stitches.
- I've worked the amounts out from the stitch count, with the long tail. They're estimates.
Hook and notions
- 3.5 mm (US E-4) hook. It's small for worsted on purpose, so the stuffing doesn't show.
- Fiberfill, a stitch marker, 6 sewing pins, a long tapestry needle (at least 3 in / 7.5 cm, to go through the middle of the pumpkin) and scissors.
Gauge
Gauge isn't critical, but tension is. Crochet tightly enough that the stuffing doesn't peek through. With worsted yarn and a 3.5 mm hook, that's about 5 sc per inch. At that tension the pumpkin comes out about 3 in (7.5 cm) wide and 2½ in (6 cm) tall once the grooves are pulled in. Those sizes are estimates: your tension and how hard you pull the grooves both change them.
Abbreviations (US crochet terms)
- MR: magic ring
- ch: chain
- sc: single crochet
- inc: 2 sc in the same st
- dec: single crochet 2 together (the invisible decrease, through the front loops, is neatest)
- R: round
- st(s): stitch(es)
Work in continuous spiral rounds. Don't join, and move your marker up at the start of each round. The number in parentheses at the end of each round is the stitch count.
How the pumpkin is built
Here's the whole thing in one sentence. The magic ring is the bottom of the pumpkin, the last round is the top, and the long tail from the top pulls six grooves from top to bottom. The stem is sewn on last, right over the closed top.
The pattern, step by step
Part 1: The pumpkin body
Make 1, in orange.
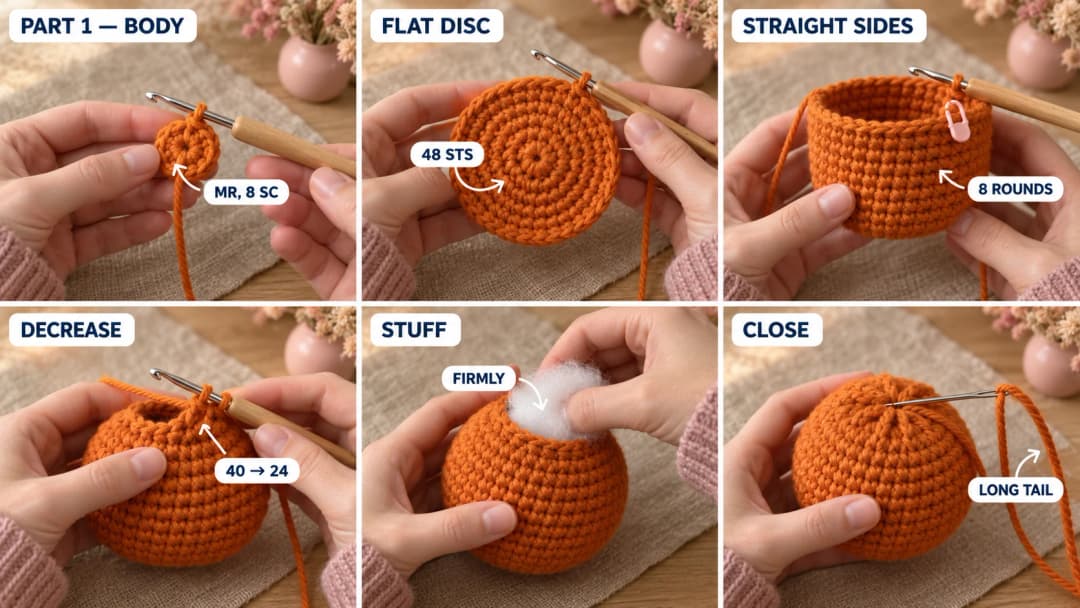
- R1: MR, 8 sc in the ring. (8) Pull the ring closed tight. This is the bottom center.
- R2: inc × 8. (16)
- R3: (sc, inc) × 8. (24)
- R4: (sc 2, inc) × 8. (32)
- R5: (sc 3, inc) × 8. (40)
- R6: (sc 4, inc) × 8. (48)
- R7–R14: sc around. (48) 8 rounds. The sides go straight up.
- R15: (sc 4, dec) × 8. (40)
- R16: (sc 3, dec) × 8. (32)
- R17: (sc 2, dec) × 8. (24)
Stuff the pumpkin firmly now, after R17, while the opening is still wide. Push the fiberfill out to the sides so the belly is round.
- R18: (sc, dec) × 8. (16) Top up the stuffing.
- R19: dec × 8. (8)
Fasten off, leaving a very long tail, about 60 in (1.5 m). Don't cut it short: it makes all six grooves. Thread it on the needle and pass it through the front loop of each of the 8 sts, then pull tight to close the hole. That point is the top center. Keep the tail on the needle.
Part 2: Pull in the 6 grooves
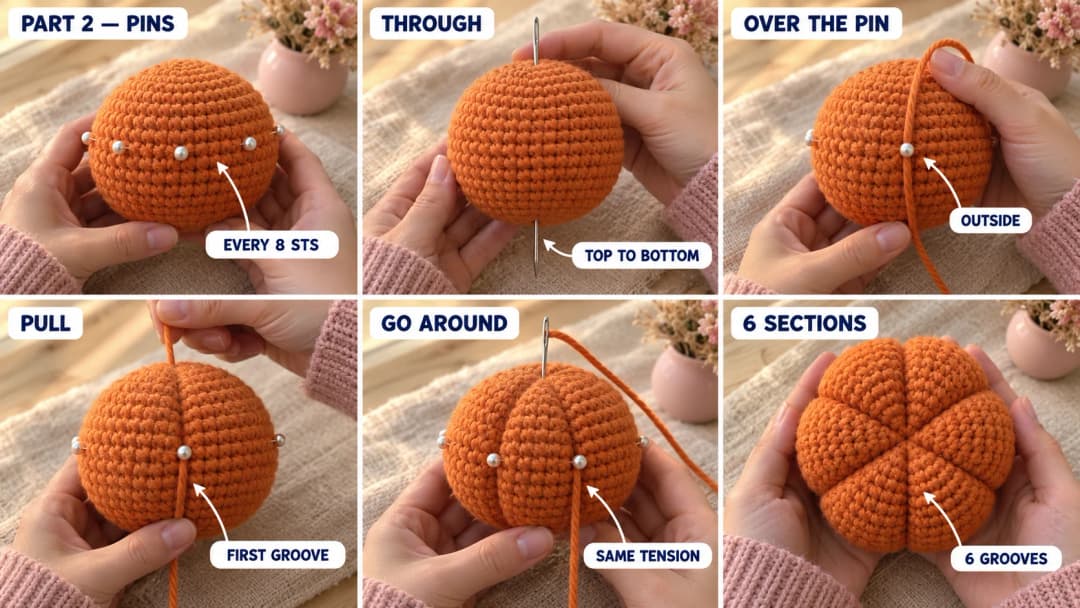
- Pin the sections. Put 6 pins around the middle of the pumpkin, on R10: one pin every 8 sts. With 48 sts in the round, that splits it into 6 equal parts. Each pin marks where a groove goes.
- First groove. Push the needle down through the top center, straight through the middle of the pumpkin, and out at the bottom center (the magic ring).
- Bring the yarn up the outside of the pumpkin, over the first pin, back to the top center. Push the needle down through the top center again and out at the bottom.
- Pull firmly. The pumpkin squashes a little and a groove sinks in along the yarn, over the pin.
- Repeat over each of the other pins, going around the pumpkin, until you have 6 grooves. Pull each one with the same tension, so the 6 sections come out even.
- End at the top center. Make a small knot close to the fabric, push the needle into the pumpkin and out at the side, and trim the tail so it disappears inside. Take the pins out.
Part 3: The stem
Make 1, in green.
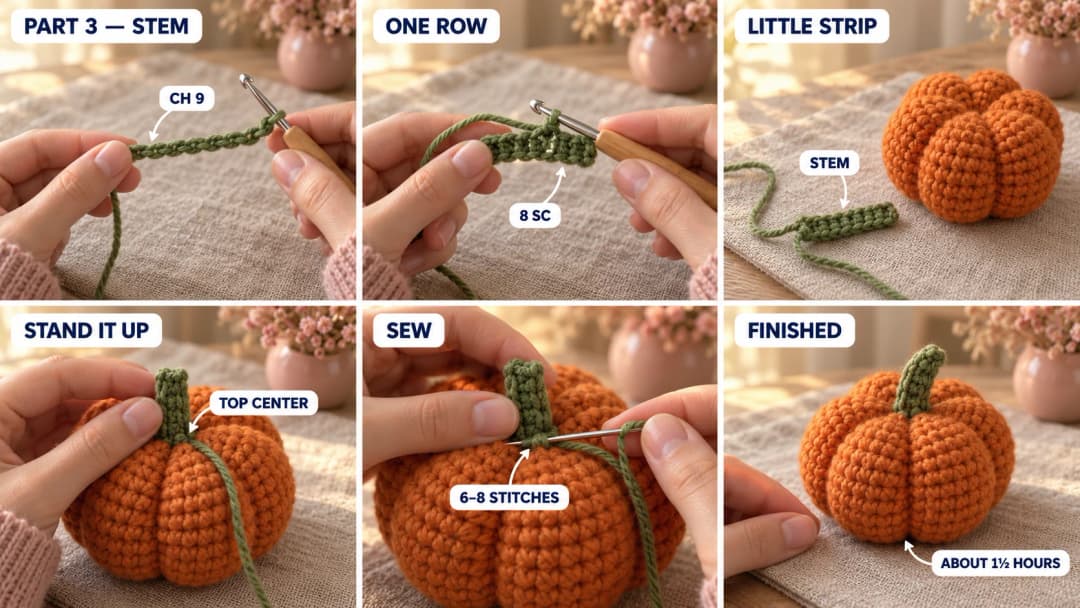
- Stem: Ch 9. Sc in the 2nd ch from the hook and in each ch across. (8)
Fasten off, leaving an 8 in (20 cm) tail. You have a small strip, 8 sc long.
Stand the stem on the top center, over the closed hole, with the tail end down. Sew that short end to the pumpkin with 6 to 8 small stitches all around it, going into the top of the pumpkin. The strip stands up and leans a little, like a real stem. Hide the end inside the pumpkin.
Safety. There are no small hard parts in this pumpkin, but keep the stem sewn on firmly if it's going to a toddler, and check it now and then.
Make it yours — quick variations
| Variation | Change from base pattern |
|---|---|
| Pumpkin trio | Make three in orange, cream and sage green, with brown stems. |
| Bigger pumpkin | Use bulky yarn and a 5 mm hook, and leave a 90 in (2.3 m) tail for the grooves. |
| Smaller pumpkin | Use DK yarn and a 2.5 mm hook: about a third smaller. |
| Leaf and vine | Sew a small green leaf and a curly chain vine next to the stem. |
| Jack-o'-lantern | Embroider two black triangle eyes and a zigzag mouth on one section before you pull the grooves. |
Troubleshooting the three things that go wrong
The pumpkin looks like a ball
The grooves aren't pulled tight enough. Go over each one a second time, from top to bottom, and pull harder. A pumpkin should be wider than it is tall.
The sections are uneven
The grooves didn't follow the pins. Pin first, every 8 sts on R10, and wrap the yarn right over each pin.
The stuffing shows between the stitches
The tension is too loose for the hook. Try a 3.25 mm hook, or take a little stuffing out before you close the top.
Frequently asked questions
How long does this pumpkin take? About 1½ hours: an hour for the body, 15 minutes for the grooves and 15 for the stem and finishing.
How much yarn do I need? About 45 yd (41 m) of worsted orange, most of it for the body and nearly 2 yd for the groove tail, plus about 2 yd of green.
Why does the pattern increase 8 times per round but make 6 sections? The 8 increases just make the ball round. The sections come from the grooves, and 48 sts divide evenly into 6 parts of 8 sts, so the pins line up exactly.
Can I sell pumpkins made from this pattern? Yes, you're welcome to sell finished pumpkins made from this free pattern at markets, on Etsy or as gifts. Please credit "Pattern by Wavode" in your listing and link back to this page. What you can't do is republish this write-up or my photos as your own pattern.
Related patterns on Wavode
- Pumpkin keychain: a ribbed mini pumpkin in about an hour.
- How to crochet a pumpkin: the folded rectangle method, no rounds.
- Mini crochet ghost: a tiny ghost with a wavy sheet.
- Crochet skull keychain: a round white skull with a stitched smile.
- Fall granny square blanket: rust, pumpkin and burgundy squares.
Made a pumpkin? Tag #wavodecrochet on Pinterest. I re-pin every finished make and credit the maker.
Pattern by Clara Hartwell for Wavode. Questions? Email me at support@wavode.com.
You might also like